NEC NP-UM352W User manual

Category
Projectors
Type
User manual
Projector
NP-UM352W
User's Manual for the APPS MENU
Contents
1. What can you do with the APPS MENU? ....................................................................2
2. VIEWER
..........................................................................................................................6
3. WHITEBOARD
.............................................................................................................10
4. COLLABORATION
.......................................................................................................11
5. REMOTE DESKTOP CONNECTION
...........................................................................13
6. IMAGE EXPRESS UTILITY
..........................................................................................17
7. Miracast
.......................................................................................................................18
8. WEB SERVER FUNCTION...........................................................................................19
8-1. WEB SHARING ..................................................................................................................... 19
8-2. PROJECTOR CONTROL
...................................................................................................... 22
9. NETWORK SETTINGS .................................................................................................23
9-1. PROJECTOR NAME ............................................................................................................. 23
9-2. NETWORK INFORMATION
................................................................................................... 23
9-3. WIRED LAN
.......................................................................................................................... 23
9-4. Wireless LAN
........................................................................................................................ 23
9-5. IMAGE EXPRESS UTILITY
................................................................................................... 30
9-6. NETWORK SERVICE
............................................................................................................ 30
10. TOOLS ........................................................................................................................32
10-1. PEN SETTINGS .................................................................................................................. 32
10-2. MOUSE
............................................................................................................................... 36
10-3. PROGRAM TIMER
.............................................................................................................. 36
10-4. DATE AND TIME
................................................................................................................. 39
10-5. ADMINISTRATOR MODE.................................................................................................... 39
10-6. DEFAULT APP
.................................................................................................................... 39
Trademarks ......................................................................................................................40
2
1. What can you do with the APPS MENU?
It becomes available to select the expansion functions indicated in below and various setting with the APPS MENU.
For displaying the APPS MENU, press the APPS button on the remote control or select [APPS] as the [SOURCE] on
the onscreen menu.
Once calibration for the stylus pen is performed, the stylus pen becomes available for selecting and setting up various
functions on the APPS MENU.
INFORMATION
For going back to the APPS MENU interrupting to use each application in the APPS MENU, press APPS button
on the remote control when the onscreen menu is not displayed on.
APPS MENU screen display
Current date and time
IMPORTANT:
Before utilizing the func-
tion of APPS MENU, set
day and time.
REMOTE DESKTOP
CONNECTION
Miracast
IMAGE EXPRESS UTIL-
ITY
NETWORK INFORMA-
TION
COLLABORATION
WHITEBOARD
FOCUS
Indicating the selected
item.
Surrounded in a yellow
square.
VIEWER
NETWORK SETTINGS
TOOLS
WEB SHARING
SETTING/ACCESS
PASSWORD DISPLAY
NOTE:
• APPSMENUdoesnotsupportUighur.
• Whenthisprojectorisnotinanetwork,youcannotselect[REMOTEDESKTOPCONNECTION],[IMAGEEXPRESSUTILITY],
[Miracast],and[WEBSHARING]
3
1. What can you do with the APPS MENU?
VIEWER
Select the saved images/videos and project them by the projector. This function is available for explained below:
(1) Projector Memory: Images temporarily saved in the projector built-in memory. (Call “Captured image in this
manual)
(2) USB Memory: Images and videos saved in the USB memory connected with the projector.
(3) Shared Folder: Images and videos saved in the shared folder in a network connected with the projector.
WHITEBOARD
Enables to perform drawing by the stylus pen supplied with the projector. Before starting the [WHITEBOARD], perform
the calibration in the [TOOLS] [PEN SETTINGS].
COLLABORATION
Enables to share the drawing drawn by the stylus pen with the computer connected in a network.
REMOTE DESKTOP CONNECTION
• Selectthecomputerconnectedinthesamenetworkwiththeprojector,andtheprojectorprojectstheimageson
the computer over the network.
A commercially available USB keyboard can be used for controlling Windows 8 and Windows 7 computers in the
network connected with the projector.
IMAGE EXPRESS UTILITY
• Ifvariousterminalunitssuchasacomputer,asmartphone,andatabletareconnectedwiththeprojectorinthe
network, it enables to transfer images saved on each terminal to the projector and to project them.
• YoucanconnectterminalunitsinmultipleOS(Windows,MacOSX,Android,andiOS)withtheprojectorsimultane-
ously.
• Theprojectorreceivesimagestransferredfrommultipleterminalunits(Max.50units)andprojectsthemonthe
screen dividing it (Max. 4 × 4) at the same time.
BA
C
D
E
AB
CD
Transmit Stop
Simultaneous connection
Simultaneous display
• Installtheapplicationsoftware“ImageExpressUtilityLite”,includedintheCD-ROMsuppliedwiththeprojectoron
computers.
• Forasmartphoneandatablet,downloadtheapplication“WirelessImageUtility”fromourwebsiteandinstalliton
these.
Miracast
By wirelessly connecting the terminal units supporting the Miracast such as the Android with the projector, it enables
the projector to project images transferred from these terminals.
Before connecting these terminal units, set [Miracast] in the [NETWORK SETTINGS] on the projector.
4
1. What can you do with the APPS MENU?
WEB SERVER FUNCTION
• Withoutusingtheexclusivesoftware,itenablestoshareimagesandlesamongtheprojectorandcomputersin
the same network by accessing the WEB server of the projector utilizing the web browser. (WEB SHARING)
BACDE
Sharing files
• Itenablestocontroltheprojectoronthewebbrowserscreensonthecomputers.
• ConnecttheprojectorandcomputersinanetworkandaccesstheURLinbelowbythewebbrowserofthecomput-
ers.
URL:http://<IPaddressoftheprojector>:3060
NETWORK SETTINGS
Set up below for connecting the projector with a wired/wireless LAN.
PROJECTOR NAME
Set up the projector name and host name. Serial number of the projector is set as factory default.
NETWORK INFORMATION
Indicate information when the projector has connected in a network (by a wired/wireless LAN)
WIRED LAN
Set up for connecting the projector by a wired LAN.
WIRELESS LAN
Set up for connecting the projector by a wireless LAN. At the same time, set up for the SIMPLE ACCESS POINT,
Wi-Fi Direct, and Miracast.
IMAGE EXPRESS UTILITY
SetuptheMODE(FREE,MANAGED)fortheIMAGEEXPRESSUTILITY.
NETWORK SERVICE
SetupvarioussettingfortheAMX,HTTPserver,PJLink,AlertmailandCRESTRON.
TOOLS
Set up for various features as the stylus pen, mouse, program timer, date and time, administrator mode and default
APP.
PEN SETTINGS
Forusingthestyluspenatthersttimeorwhentheprojectorinstallationplaceischanged,makesuretoperform
calibration of the stylus pen for letting the projector to recognize the stylus pen position properly. ( page 32)
MOUSE
A commercially available USB mouse can be used for operating the APPS MENU. Perform the set up for using it.
PROGRAM TIMER
Once day and time is set up, changing the projector’s condition in powering ON/standby, switching input signals, and
switching ECO mode can be automatically performed.
5
1. What can you do with the APPS MENU?
DATE AND TIME
Set up current date and time to the projector.
ADMINISTRATOR MODE
Selecting the menu mode of the projector, enable/disable to save all set up values of the projector, and set up a
password for the administrator mode.
DEFAULT APP
When the projector is turned on under the condition of being selected the “APPS” terminal, the function set up as the
default APP will be started automatically.
In case a terminal besides the APPS terminal has been selected, the function set up as the default APP will be started
automatically when the APPS terminal is selected.
6
2. VIEWER
What you can do with the viewer
Select a saved image or video and project it from this device. The following 3 destinations can be used.
(1) Projector memory: Screen images saved temporarily in the internal memory of this device (known as “capture
images” in this manual).
(2) USB memory: Images and videos inside the USB memory connected to this device.
(3) Shared folder: Images and videos inside the shared folder on the network connected to this device.
Top screen of the viewer
Projector memory
USB memory
Shared folder
Settings
• Seetheuser'smanualoftheprojectoronhowtostorecapturedimagesintheprojectormemory.
• Select[SETTINGS]tochangethesettingsfortheslideshow,videos,sharedfoldersandsoon.
• While"Autoplay"hasbeenseteitherto"Stillimage"or"Video"intheSettings,theprojectorstartsperforming"Au-
toplay"bytheoperationinbelow:
- WhentheViewertopscreenisdisplayedon,aUSBmemoryisconnectedintheprojector.
- WhentheViewerscreenisdisplayedonrsttimeafterpoweringONtheprojectorinwhichaUSBmemoryhas
been connected.
Forstarting"Autoplay",thesystemwillautomaticallysearchboththerootdirectoryandthefoldersinthesubse-
quent level in the USB memory and then display found still images or videos in order. The images and videos will
bedisplayedinthe"Sorted"order.
NOTE:
• Only1USBmemorycanberecognizedbytheviewer.DonotconnecttheUSBmemorytotheUSBportofthisdeviceusedfor
connectingtoawirelessLAN.
• 1to4sharedfolderscanbeset.
• Whentheconnectiontothesharedfolderfails,anerrormessageisdisplayedandan“x”isdisplayedinthefoldericon.Carryout
thefollowingchecksinthiscase.
• IstheLANcableconnectedcorrectly?
• Isthenameofthedestinationfoldercorrect?
• Isthedestinationfoldersetforsharing?
• Haveaccessrightsbeensetinthedestinationfolder?
• Arethereanydisplayablelessavedinthedestinationfolder?
• Isdateandtimesetcorrect?
7
2. VIEWER
Displayable/playable files
Still image
Supported formats
File extension Supported
*.gif Interlace, transmission, animation
*.jpg/*.jpe/*.jpeg
Baseline,Progrressive,RGB,CMYK
*.png Interlace, α channel
*.bmp
*MS-OfcelesandPDFlescannotbedisplayedintheviewer.
Supported image resolution
File extension Resolution
JPEG
Upto5000x5000pixels
Gif
Upto1280×1280/lesizeupto5MB
Other images (.png, .bmp) Upto4000×4000pixels
Video
Supported formats
File extension Videocodec Audio codec
*.mpg/*.mpeg MPEG2 MPEG Audio Layer2
MPEG Audio Layer3
(MP2/MP3 in abbreviation)
*.wmv WMV9
WMA9Standard
(WMA9inabbreviation)
*.mp4 H.264/AVC AAC-LC
(AAC in abbreviation)
Detailed information
Item Conditions
Resolution
From320×240upto1920×1080
Videoframerate Upto30FPS
Videobitrate Upto30Mbps
Audio channel Up to 2-ch stereo
Audio sampling rate Up to 48 KHz
Audio bit rate MP2/MP3: Up to 448 kbps
WMA9:Upto384Kbps
ACC:Upto256Kbps
Maximumlesize Up to 2 gigabytes
Unsupported codec
TheWMVlescontainingsounddataintheWMAProfessionalformatcannotbe
played.
NOTE:
• Dependingonale,itmayoccuryoucannotplayitevenwhenitsatisesallabovementionedconditions.
• Dependingonnetworkenvironments,atypeoftheUSBmemory,andlebitrate,itmayoccuravideocannotbeplayedprop-
erly.
• YoucannotplayDRMles(DigitalRightManagementles).
• Regardlessthesettingofleaspect,theMPEG2/WMVformattedmoviesareplayedat1:1
8
2. VIEWER
Compatible USB memory
This device cannot recognize USB memory formatted in the NTFS format. Check the format if this device cannot
recognize the connected USB memory.
FormataUSBmemoryintheFAT32formatorFAT16formatforusingitintheVIEWER,WHITEBOARD,andCOL-
LABORATION.RefertotheWindowsinstructionmanualorHelpleonhowtoformataUSBmemory.
NOTE:
• TheUSBportofthisdeviceisnotguaranteedtoworkwithallUSBmemoriessoldcommercially.
File display screen
• 12les(4lateral×3longitudinal)includingthefoldericonscanbedisplayedonasinglescreen.Usethe“PAGE
UP”or“PAGEDOWN”buttonontheleftofthescreentochangethelistoflesdisplayed.
• Thelescanbedisplayedusingeithericonsorthumbnailsintheviewer.
Icon display Thumbnail display
RETURN Go back one level higher.
PAGE UP Displayalistofthepreviousles.
PAGE DOWN Displayalistofthenextles.
SETTINGS Display the setting screen.
THUMBNAILS/ICON Switch between thumbnail display and icon display.
SORT
Changetheordertodisplaylesbyname(lename),type(leextension),date(date
ofcreation),orsize(lecapacity).Thedefaultsortingorderisby“Name”.
DELETE ALL
Allthelesinthememorycanbedeletedonlywhenalistofthelesintheprojector
memoryisdisplayed.Becarefulwhenexecuting“DELETEALLasdeletedleswill
not be recoverable.
EJECT
“Remove” the USB memory when a list of the les in the USB memoryis dis-
played.
NOTE:
•Themaximumnumberoflescanbedisplayedinafolderincludingfoldericonsis300.
•Filenameswitha“.”atthebeginningofthelenamewillnotbedisplayed.
•Theiconofalewhosetypecannotbedeterminedisindicatedbya“?”.
•Ashortvideolemaybedisplayedwiththethumbnailinblack.
9
2. VIEWER
Slideshow display
• Focusonastillimageontheledisplayscreen(icondisplayorthumbnaildisplay)andpresstheENTERbuttonto
switch to the Slideshow display.
• Aslideshowmaybedisplayedusing“ManualPlayback”inwhichtheimagesareswitchedbyoperatingabuttonon
the remote control, or “Auto Playback” in which the images are switched automatically at a set interval (playback
mode is “Auto”).
• Thedefaultfactorysettingis“ManualPlayback”.Toperform“AutoPlayback”,setthe“PlaybackMode”inthe“Set-
tings” to “Auto”.
• Theimageswillbedisplayedintheorderselectedunder“Sort”ontheledisplayscreen.
Playback of video
• Focusonamotionimageintheledisplayscreen(icondisplayorthumbnaildisplay)andpressthe(ENTER)button
to start video playback.
Viewer settings
Select the icon in the le list screen or top screen of the viewer to display theconguration screen of the
viewer.
Thefollowingsettingscanbeconguredonthecongurationscreen.
Item 1 Item 2 Options(gureswithintheparenthe-
ses [ ] are default values)
Remarks
Slideshow Screen size [Maximum size]/Actual size
Playback mode Auto / [Manual]
Interval
[5]-300seconds Enabled when “Auto” is selected
Repeat [Disable] / Enable (default setting is
unchecked)
Videosettings Screen size [Maximum size]/Actual size
Repeat [OFF]/Single File/All Files
Auto play AutoPlay
[OFF]/Stillimage/Video Enabled only when a USB memory
device is connected
Shared folder Folder 1/Folder 2/
Folder 3/Folder 4
[Disable] / Enable (default setting is
unchecked)
Shared folder [¥¥] Up to 41 characters
User name
Upto64characters
Password Upto64characters
10
3. WHITEBOARD
Boot up the DisplayNote as the software for the whiteboard, it enables to draw pictures by a stylus pen supplied with
the projector. Before booting up the software, perform the pen settings. (See page 32)
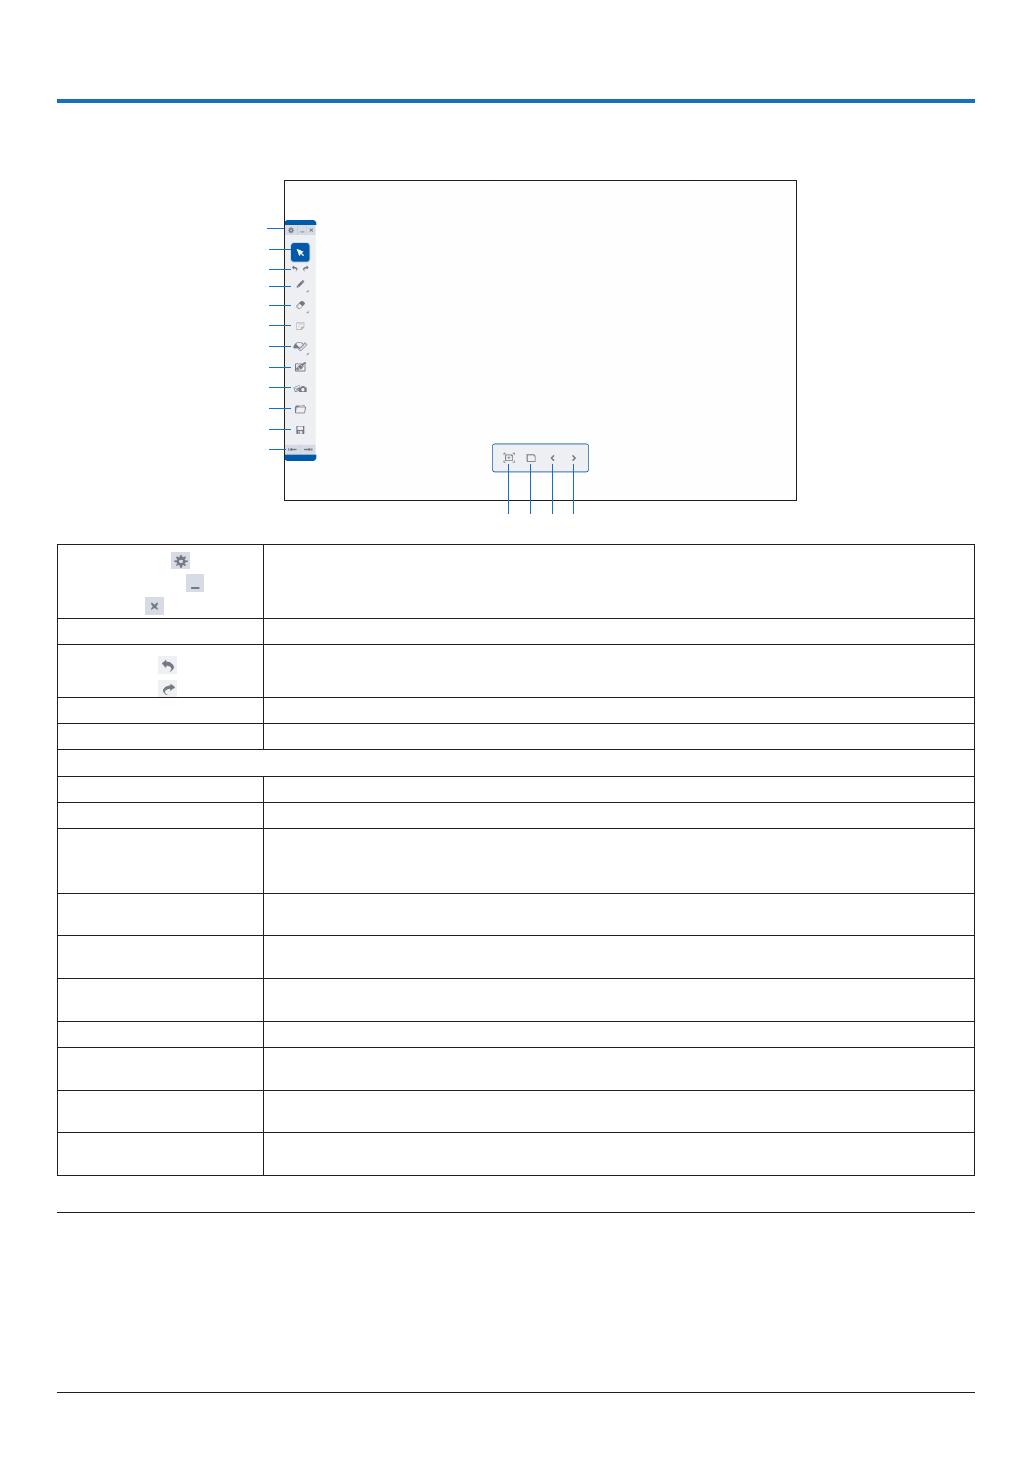
⑬⑭⑮⑯
Setting ( )
Minimize ( )
Exit ( )
Setting: Not available on the projector
Minimize: Go back to the APPS MENU without interrupting the DisplayNote,
Exit: Exit the DisplayNote
Cursor Drag drawn letters and pictures to other positions.
Undo (
)
Redo ( )
Undo: Back to the previous state
Redo: Back to the previous state of UNDO performance.
Pen tool Select a tool for drawing.
Eraser tool Select this for erasing drawing.
Not available on the projector
Stationary tool Select a drawing support toll as a ruler, a protractor, and a compass.
Background Select a background of the whiteboard. Default setting is “White”
Media tool
OpenthedrawinglessavedintheprojectormemoryandtheJPEGandPNGlessaved
intheUSBmemory.ThemaximumresolutionforJPEGinbaselineandprogressiveformat
is4000x4000andforPNGis3000x300.Doesnotsupportinterlacingandtheα channel
Open the saved
data
OpenthesavedLessonle(extension.dn:ExclusivelefortheDisplayNote)
Save the displaying
data
SavethedisplayunderdrawingasaLessonle(extension.dn)
Switch the Tool bar
display position
Move the Tool bar to the left or right end of the display screen.
Add a slide Copy the currently displaying slide (displayed screen) and add a slide.
Contents
Display the list of contained slides.
Once the dust box is selected on the displayed slide, the slide will be deleted.
Shift to the previous
slide
Shift to the slide that is displayed previously.
Shift to the next
slide
Shift to the next slide. In case the slide currently displayed on is the last one, create a blank
slideandshifttoit.Themaximumnumberofslidesis10slides.
NOTE:
• Ifthestyluspenisnotfunctionedtodraw,pleasecheckifPentoolisproperlyselected.
• Incase,thelinedrawnbythestyluspenisinterrupted,thebatteryofthestyluspenisalmostempty.Chargethestyluspenby
thesuppliedUSBcablefortheexclusiveusetochargethestyluspen.
• Thesystemmaybecomeheavywhenmanylettersandimagesareaddedonaslide.Inthiscase,pleasesaveimportantdatain
theUSBmemoryandexittheWHITEBOARDonce,thenstartitagain.
• IfyousavedlessonlesintheUSBmemory,donotpullouttheUSBmemoryuntilpoweringofftheprojector.
• TheremotecannotbeusedforoperatingtheWHITEBOARDfunctions.PleaseuseeitherthestyluspenortheUSBmouse.
11
4. COLLABORATION
Connect multiple terminals as a computer and a tablet, on which the DisplayNote (NEC Edition)(hereinafter called
DisplayNote)isintalled,withtheprojectorinanetwork.Itenablestoconnectupto5terminalssimultaneously.
Session ID will be displayed on the startup screen of the COLLABORATION. The session ID is changed every time
to start the collaboration.
Function explanation
⑧ ⑨
Session ID
For joining in the session via DisplayNote on a computer or a tablet, input the ID num-
ber.
END SESSION Finish the session
CONNECT A PRE-
SENTERDEVICE
Display the QR code as the session ID.
In case the camera function is installed on the participants’ tablets, they can participate the
session by reading out the QR code. Please use DisplayNote supports QR code.
MANAGE
Display the screen to manage the participation status and ON/OFF setting for the COL-
LABOLATION.
Close the window Close the window indicating the Session ID.
MANAGE
Display the screen to manage the participation status and ON/OFF setting for the COL-
LABOLATION.
Number of the
participants to the
session
Session ID
For joining in the session via DisplayNote on a computer or a tablet, input the ID num-
ber.
Not available on the projector.
12
4. COLLABORATION
Managed screen
② ③ ⑤ ⑥
Connection status
Indicate connection status to the session by color.
Green: Participating
Orange: The communication has shut down without ending the session
Red: Over 30 minutes has passed after shutting down the communication without
ending the session
Name of participant
Indicatethenameofparticipant.Upto5terminalscanbeconnected.
Not available on the projector.
Participant'sscreen
display
Selecttodisplayornottodisplayeachparticipant'sscreen.Theparticipants'sscreen
whose setting are ON will displayed on when Startup is touched.
ON/OFF the col-
laboration
When ON is selected, the presenter and all participants can share same slides.
Thecolorinthecheckcolumnshowseachparticipant'scolorofpen.
ON/OFF the collabo-
ration MUTE
When ON is selected for the collaboration MUTE, it disables the participants to share
slides temporarily.
Startup (Display par-
ticipants'screens)
Display screens of participants whose setting for is ON. In case, several participants
are selected, the projector divides its screen in portion and display their screens simul-
taneously.
Back Close the managed screen.
Information Display information about the session.
Boot up the DisplayNote on the participant’s terminal
Input your name
Input the Session ID
Click this after inputting and .
NOTE:
• ScreendisplayoftheDisplayNoteissubjecttochangewithoutnotice.
13
5. REMOTE DESKTOP CONNECTION
• ByselectingthePCconnectedinthesamenetworkwiththeprojector,theimageonthePCcanbeprojectedtothe
screen via network.
Then, by operating the keyboard, you can control Windows 8 or Windows 7 PC connected in the network.
• WiththeRemoteDesktopfunction,youcanremotelyoperatethePCplacedatadistancefromtheprojector.
Office
Meeting room
NOTE:
• The[REMOTEDESKTOP]functionwillworkonthefollowingWindowseditions.
Windows8Pro,Windows8Enterprise,
Windows7Professional,Windows7Ultimate,Windows7Enterprise,
• Inthisuser’smanual,thisfeatureisdescribedusingWindows7asanexample.
• AUSBkeyboardisrequiredtousetheRemoteDesktopconnection.
• TheRemoteDesktopconnectioncanbeoperatedwithakeyboard.Usingawirelessmousewithawirelesskeyboardismore
usefulforoperating.
Useacommerciallyavailablewirelesskeyboard,awirelessmouse,andaUSBwirelessreceiver.
UseacommerciallyavailableUSBkeyboardandUSBmouse.
• AUSBkeyboardwithabuilt-inUSBhubcannotbeusedwiththeprojector.
• AwirelesskeyboardormousethatsupportsBluetoothcannotbeusedwiththeprojector.
• WedonotwarrantthattheUSBportoftheprojectorwillsupportallUSBdevicesinthemarket.
• OntheloginscreenfortheREMOTEDESKTOPCONNECTION,makesuretousethestandardUSlayoutkeyboard(called101
keyboard).IfJapaneselayoutkeyboard(asJISlayoutkeyboard)isused,lettersdifferfromprintedlettersonthekeysmaybe
input.
Prepare a commercially available wireless keyboard (US layout version).
1. Connect the USB wireless receiver to the USB port (Type A) of the projector. Make all necessary settings
for your wireless keyboard and mouse.
USB-A
14
5. REMOTE DESKTOP CONNECTION
2. Press [APPS] on the remote to display the APPS MENU.
3. Focus on [TOOLS] and press [ENTER]
4. Focus on [MOUSE SETTING] and press [ENTER]
5. Focus on [MOUSE] and press [ENTER]
Check mark will be added.
6. Focus on [BACK] and press [ENTER]
7. Press [STANDBY] button on the remote twice.
The projector will be powered OFF.
8. Press [ON] button on the remote
The projector will be powered ON and the connected USB mouse will be available.
Setting the password to the user account of Windows 7
TIP:Ifapasswordhasbeensetforanaccount,thesteps1to9canbeskipped.
1. Click [Start] from the desktop of Windows 7.
2. Click [Control Panel].
3. Click [Add or remove user accounts] displayed under [User Accounts and Family Safety].
4. Click [Administrator].
5. Click [Create a password].
6. Input the password to the [New password] box.
7. Input the same password as that at Step 6 to the [Confirm new password] box.
8. Click [Create a password].
The Administrator is changed to [Password Protection].
Setting the Remote Access
1. Click [Start] from the desktop of Windows 7.
2. Click [Control Panel].
3. Click [System and Security].
4. Click [Allow remote access] displayed under [System].
5. When the [User Account Control] confirmation window appears, click [Continue].
The [System Properties] window appears.
6. Click [Allow connections from computers running any version of Remote Desktop (less secure)] in the
Remote Desktop box and click [OK].
15
5. REMOTE DESKTOP CONNECTION
Checking the IP address on Windows 7
1. Click [Start] from the desktop of Windows 7.
2. Click [Control Panel].
3. Click [View network status and tasks] displayed under [Network and Internet].
4. Click [View status] displayed in blue on the right of [Local Area Connection] in the window.
The [Local Area Connection Status] window appears.
5. Click [Details...].
Write down the value for “IPv4 IP Address” (xxx.xxx.xxx.xxx) displayed.
6. Click [Close].
7. Click [X] at the upper right of the window.
The system goes back to the desktop.
Starting REMOTE DESKTOP CONNECTION
1. Press the APPS button on the remote control when the projector is in the state of powered ON.
The APPS MENU screen will be displayed.
16
5. REMOTE DESKTOP CONNECTION
2. Select [REMOTE DESKTOP CONNECTION] on the APPS MENU.
The [REMOTE DESKTOP CONNECTION] window appears.
3. Operate one among the wireless keyboard, wireless mouse and the remote control to input the IP address
of Windows 7 and click [CONNECTION].
The log-on screen of Windows 7 is displayed in the screen projected by the projector.
4. Operate one among the wireless keyboard, wireless mouse and the remote control to input the user’s
password and press “Enter”.
The REMOTE DESKTOP CONNECTION is started.
Windows 7 desktop is displayed on the screen projected by the projector.
Log out the computer.
Use the wireless keyboard connected to the projector to operate Windows 7.
NOTE:
• IfyoucannotconnectwiththeREMOTEDESKTOPCONNECTIONproperlyandblackscreenremainstodisplay,oryoucannot
performtheREMOTEDESKTOPCONNECTIONcausedonunexpectedshutdown,etc.,press(APPS)buttonontheremotecon-
trolfordisplayingtheAPPSMENU,selecttheREMOTEDESKTOPCONNECTIONthenselectDISCONNECT.Trytoreconnectthe
REMOTEDESKTOPCONNECTION.
Exiting the REMOTE DESKTOP CONNECTION
1. Operate one among the wireless keyboard, wireless mouse and the remote control to click [Start] from the
desktop screen projected by the projector.
2. Click [LOG OFF] on the right of the start menu.
The remote desktop connection is stopped.
3. Press the button for an input terminal other than APPS on the remote control.
TIP:
Setting[DETAILSETTINGS]inREMOTEDESKTOPCONNECTION
[DETAIL SETTINGS] willallowyou to displaythedesktop background, ortoenable the windowanimationfunction during the
RemoteDesktopoperation.
DESKTOP BACKGROUND: Clear the check mark to display the desktop background in a single color.
THEMES: Clear the check mark not to use Themes.
MENU AND WINDOW ANIMATION: Clear the check mark to disable menu and window animation.
SHOW CONTENTS OF WINDOW WHILE DRAGGING: Clear the check mark to show only the window pane while
dragging.
17
6. IMAGE EXPRESS UTILITY
• Whentheprojectorisconnectedwithvariousterminalunitsasacomputer,asmartphone,andatabletoveranet-
work, it enables to transfer and project images saved on each terminal using this Image Express Utility software
program.
• TerminalunitsinvariousOS(Windows,MacOSX,Android,andiOS)canbeconnectedtotheprojectorsimultane-
ously.
• Theprojectorenablestoreceiveimagestransferredfrommultipleterminalunits(max.50units)atonceandproject
them splitting up its screen display into portions (max. 4 × 4).
• IMAGEEXPRESSUTILITYhastwoperformancemodes,theFREEmodeandMANAGEDmode.
EachmodecanbeselectedonthenetworksettingforIMAGEEXPRESSUTILITY(Seepage30)
- In the Free mode, you can freely connect to the projector via Image Express Utility Lite installed on a computer
or Wireless Image Utility installed on a smartphone, etc. The splitting pattern of the display screen is based on
the number of connected terminals. At the same time, you can select either splitting screen display or full screen
display from each terminal.
- In the Managed mode, same as in the Free mode in the state of the connection with several terminals you can
switch the splitting/full screen display to the full/splitting screen display but by the remote control. If ENTER button
ispressedduringprojectingtheconnectedterminals'screen,themenuforselectingdisplaysplittingpatternwill
be displayed on.
BA
C
D
E
AB
CD
Transmit Stop
Simultaneous connection
Simultaneous display
• Installtheapplicationsoftware,“ImageExpressUtility”thatiscontainedontheCD-ROMsuppliedwiththeprojector.
Pleaserefertothehelpleaboutdetailedsoftwareinformation.
• Downloadandinstalltheapplicationsoftware,“WirelessImageUtility”ontoterminalunitsasasmartphoneanda
tablet. About detailed information of this application software, please refer to the Wireless Image Utility manual that
is uploaded on our web site.
• Ourapplicationsoftware,ImageExpressUtility2.0,isalsoavailable.Downloadfromourwebsiteandinstalliton
your computer. Please be reminded the simultaneous connection and simultaneous display are not functioned by
ImageExpressUtility2.0.
18
7. Miracast
This device can be connected wirelessly to a wireless terminal such as an Android terminal etc. that supports
the Miracast standard to project mirroring images transmitted from the terminal.
Set the network setting of this device to “Miracast” before connecting it. ( page 25)
NOTE:
- DependingonthewirelessterminalsupportedtheMiracastinuseandtheenvironmentofradiowave,imagesandsoundmaybe
interrupted.
- TheproceduretoconnectwithMiracastisdifferedfromeachMiracastsupportedwirelessterminal.Fordetailedinformation,
pleaserefertotheuser’smanualofMiracastsupportedwirelessterminalortheHELPle.
- TheMiracastfunctionsontheprojectorarenotguaranteedforconnectingallMiracastsupportedwirelessterminalssoldcom-
mercially.
19
Withoutusingtheexclusivesoftware,itenablestoshareimagesandlesamongtheprojectorandcomputersinthe
network by accessing the projector’s web server utilizing the web browser. ( this page, WEB SHARING)
At the same time, it is able to control the projector by the web browser screen on the computer. ( page 22, PRO-
JECTORCONTROL)
BACDE
Sharing files
The WEB Server Function supports the web browsers in below:
Screen indication language is English only.
For Windows Internet Explorer 11
Chrome (latest version)
ForMacOSX Safari6orlater
For iOS Safari (latest version)
For Android Chrome (latest version)
* Compared with the computer, some functions can be restricted for utilizing the WEB SHARING on smartphones or
tablets.
8-1. WEB SHARING
Setting for the WEB SHARING
1. Connect the projector with your computer over a network.
2. Display the projector APPS MENU
3. Move the focus to the box under the WEB SHARING in the APPS MENU.
8. WEB SERVER FUNCTION
20
8. WEB SERVER
4. Press ENTER button on the remote control.
Display the WEB SHARING options setting screen.
Item Explanation Remark
WEB CAPTURE Select USE/NOT USE capture from
the WEB browser. By setting this ON,
the projector screen will be displayed
onto the browser screen every 5
seconds.
Factory default setting is NOT USE
ACCESS PASSWORD Select whether to USE/NOT USE
the password for accessing the WEB
SHARING.
Factory default setting is NOT USE
DELETE SHARED FILES
Deleteallsharedlesafter
5. After setting up options, move the focus to OK and press the ENTER button.
If USE is selected both for WEB CAPTURE and ACCESS PASSWORD, the screen in below will displayed on. The
access password will be changed every time the password is reset or the projector is powered ON and OFF.
Starting the WEB SHARING
1. Start up the web browser on the computer and access to the below URL.
URL: http://<Projector IP address>:3060
The IP address of the projector is displayed at the right bottom on the APPS MENU.
2. Input four digits number displayed on the APPS MENU and then click LOGIN.
If NOT USE is selected for the access password at the step [5], the WEB SHARING screen will be displayed.
  • Page 1 1
  • Page 2 2
  • Page 3 3
  • Page 4 4
  • Page 5 5
  • Page 6 6
  • Page 7 7
  • Page 8 8
  • Page 9 9
  • Page 10 10
  • Page 11 11
  • Page 12 12
  • Page 13 13
  • Page 14 14
  • Page 15 15
  • Page 16 16
  • Page 17 17
  • Page 18 18
  • Page 19 19
  • Page 20 20
  • Page 21 21
  • Page 22 22
  • Page 23 23
  • Page 24 24
  • Page 25 25
  • Page 26 26
  • Page 27 27
  • Page 28 28
  • Page 29 29
  • Page 30 30
  • Page 31 31
  • Page 32 32
  • Page 33 33
  • Page 34 34
  • Page 35 35
  • Page 36 36
  • Page 37 37
  • Page 38 38
  • Page 39 39
  • Page 40 40

NEC NP-UM352W User manual

Category
Projectors
Type
User manual

Ask a question and I''ll find the answer in the document

Finding information in a document is now easier with AI