
Pacic Accessory Corporation - 1502 S. Santa Fe Street, Santa Ana, CA 92705
[email protected] • Voice: 714-835-3022 • Fax: 714-835-3233 • www.pac-audio.com
Pacic Accessory Corporation - 1502 S. Santa Fe Street, Santa Ana, CA 92705
[email protected] • Voice: 714-835-3022 • Fax: 714-835-3233 • www.pac-audio.com
Pacic Accessory Corporation - 1502 S. Santa Fe Street, Santa Ana, CA 92705
[email protected] • Voice: 714-835-3022 • Fax: 714-835-3233 • www.pac-audio.com
AAI-GM12
Class II Auxiliary Audio Input for GM Vehicles
Pacific Accessory Corporation
The AAI-GM12 allows direct interface of any preamp level audio source to a GM factory radio,
eliminating the need for sound degrading solutions like an FM modulator. The AAI-GM12 interface
inputs sources from units such as a DVD, VCP, MP3, Satellite Radio or PlayStation.
Requirements: 2003-2006 SUV’s and trucks with a RDS or Navigation radio. The SUV or
truck must have a factory XM receiver, factory DVD Rear Seat Entertainment (RSE) or
factory/aftermarket CD changer (factory 6 disc changer built in the radio does not qualify).
• Lower cost and higher quality sound than a FM modulator.
• Perfect for SUV’s like Escalade, Tahoe, Suburban, Denali and Yukon.
• Comes with a three position switch which allows you to switch between two auxiliary inputs and the factory
slave unit.
• High quality audio isolation IC eliminates engine noise.
• Internal CMOS electronic switching for long term reliability.
• Completely plug & play. Requires no external wiring.
Installation
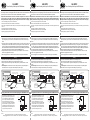
1. Remove factory 12 pin connector from headunit and insert the AAI-GM12 male plug in it’s
place. Plug factory 12 pin connector into the AAI-GM12 female connector as shown in Fig.1
below.
2. Connect the red wire from AAI-GM12 to pin# B3 of main 24 pin connector of factory radio. Pin#
B3 supplies power to the AAI-GM12 when the key is in the ignition. The wire in B3 will either
be a pink or dark green. Some newer vehicles do not have a remote output. You will have to lo-
cate a switched +12volts at the fuse box. Fuse wire with an 1 amp fuse. When key is removed and
door closed, the factory radio will still stay on, but the AAI-GM12 will turn off.
3. Plug RCA cables from rst audio source into Aux1 input of AAI-GM12. If there is a second
audio source, plug RCA into Aux2 input.
4. Mount the toggle switch in a suitable location and insert the 1/8” plug into the AAI-GM12.
AAI-GM12
GM Auxiliary Audio Input
A
u
x
1
I
n
p
u
t
Aux 2
Input
Pacific Accessory Corporation, Santa Ana, CA 91792
Left
Lef
t
Right
R
i
ght
RDS
PWR
DISP
BAND
TAPE
DISC
INFO
SEEK
TYPE
TRAF
AUTO
EQ
AUTO
VOL
SEEK
SCAN
1
2
3
4
5
6
VOL
TUNE
Aux1/Aux2
Switch
Insert these two plugs in between the
factory headunit and factory 12 pin plug
Factory wire harness
to vehicle
DVD player
or Satellite Radio
VCP player
or Playstation
Fig. 1
Brown wire
Red wire to pin# B3
Testing
1. Turn radio on and select either XM band or the CD changer source.
2. With the switch in the middle position you should hear XM or CD audio.
3. When you ip the switch left or right of the middle position, you should hear Aux1 or Aux2
audio.
4. Portable Players: Connect the brown wire to chassis ground only if the portable player or
other audio source is not using the vehicle’s battery as a power supply.
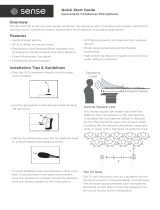
Most overhead video consoles have a +12 volt
trigger output when the video system is turned
on. Use a SPDT relay as shown and connect
pin 30 of relay to the AAI-GM12 switch’s red
wire or the middle terminal of the 1/8” plug.
Connect pin 87 to the AAI-GM12 switch’s shield
wire or the shield of 1/8” plug. Use Aux2 as the
external audio source input and leave switch in
the middle position. This automatic feature will
only work on Aux2 input and not Aux1.
30
85
86
87
87a
To overhead
+12v trigger output
Tap into AL-IA03
switch's red wire
Tap into AL-IA03
switch's shield(bare) wire
Terminal side of switch
Red
White
Shield
Using external video source to automatically trigger the AAI-GM12 for Aux2
7-23-07
AAI-GM12
Class II Auxiliary Audio Input for GM Vehicles
Pacific Accessory Corporation
The AAI-GM12 allows direct interface of any preamp level audio source to a GM factory radio,
eliminating the need for sound degrading solutions like an FM modulator. The AAI-GM12 interface
inputs sources from units such as a DVD, VCP, MP3, Satellite Radio or PlayStation.
Requirements: 2003-2006 SUV’s and trucks with a RDS or Navigation radio. The SUV or
truck must have a factory XM receiver, factory DVD Rear Seat Entertainment (RSE) or
factory/aftermarket CD changer (factory 6 disc changer built in the radio does not qualify).
• Lower cost and higher quality sound than a FM modulator.
• Perfect for SUV’s like Escalade, Tahoe, Suburban, Denali and Yukon.
• Comes with a three position switch which allows you to switch between two auxiliary inputs and the factory
slave unit.
• High quality audio isolation IC eliminates engine noise.
• Internal CMOS electronic switching for long term reliability.
• Completely plug & play. Requires no external wiring.
Installation
1. Remove factory 12 pin connector from headunit and insert the AAI-GM12 male plug in it’s
place. Plug factory 12 pin connector into the AAI-GM12 female connector as shown in Fig.1
below.
2. Connect the red wire from AAI-GM12 to pin# B3 of main 24 pin connector of factory radio. Pin#
B3 supplies power to the AAI-GM12 when the key is in the ignition. The wire in B3 will either
be a pink or dark green. Some newer vehicles do not have a remote output. You will have to lo-
cate a switched +12volts at the fuse box. Fuse wire with an 1 amp fuse. When key is removed and
door closed, the factory radio will still stay on, but the AAI-GM12 will turn off.
3. Plug RCA cables from rst audio source into Aux1 input of AAI-GM12. If there is a second
audio source, plug RCA into Aux2 input.
4. Mount the toggle switch in a suitable location and insert the 1/8” plug into the AAI-GM12.
AAI-GM12
GM Auxiliary Audio Input
A
u
x
1
I
n
p
u
t
Aux 2
Input
Pacific Accessory Corporation, Santa Ana, CA 91792
Left
Lef
t
Right
R
i
ght
RDS
PWR
DISP
BAND
TAPE
DISC
INFO
SEEK
TYPE
TRAF
AUTO
EQ
AUTO
VOL
SEEK
SCAN
1
2
3
4
5
6
VOL
TUNE
Aux1/Aux2
Switch
Insert these two plugs in between the
factory headunit and factory 12 pin plug
Factory wire harness
to vehicle
DVD player
or Satellite Radio
VCP player
or Playstation
Fig. 1
Brown wire
Red wire to pin# B3
Testing
1. Turn radio on and select either XM band or the CD changer source.
2. With the switch in the middle position you should hear XM or CD audio.
3. When you ip the switch left or right of the middle position, you should hear Aux1 or Aux2
audio.
4. Portable Players: Connect the brown wire to chassis ground only if the portable player or
other audio source is not using the vehicle’s battery as a power supply.
Most overhead video consoles have a +12 volt
trigger output when the video system is turned
on. Use a SPDT relay as shown and connect
pin 30 of relay to the AAI-GM12 switch’s red
wire or the middle terminal of the 1/8” plug.
Connect pin 87 to the AAI-GM12 switch’s shield
wire or the shield of 1/8” plug. Use Aux2 as the
external audio source input and leave switch in
the middle position. This automatic feature will
only work on Aux2 input and not Aux1.
30
85
86
87
87a
To overhead
+12v trigger output
Tap into AL-IA03
switch's red wire
Tap into AL-IA03
switch's shield(bare) wire
Terminal side of switch
Red
White
Shield
Using external video source to automatically trigger the AAI-GM12 for Aux2
7-23-07
-
 1
1

Ask a question and I''ll find the answer in the document
Finding information in a document is now easier with AI
Related papers
Other documents
-
Voyager JSB4000 User manual
-
Belkin F8V3063TT User manual
-
 Clore Automotive ES8000 User manual
-
Hypro 9307C & 9307CWS Owner's manual
-
Haier HL22KN1 User manual
-
 Sense SE-300-GM-18 Quick start guide
-
Metra GMOS-01 User manual
-
Hercules WAE BTP02 User manual
-
Havis-Shields KK-K9-C12-K User manual
-
Vaisala GMD20 User manual

