3
Scotch-Weld
™
Hot Melt Applicator PG II Owner’s
Manual
Manuel de l’utilisateur – Applicateur d’adhésif
thermo-fusible PG II 3M
™
Scotch-Weld
™
Aplicador por fusión al calor de Scotch-Weld
™
PG
II de 3M
™
Manual del usuario
Use with 3M™ Scotch-Weld™ Hot Melt Adhesives
À utiliser avec les adhésifs thermo-fusibles 3M™ Scotch-Weld™
Úselo con adhesivos de fusión al calor Scotch-Weld™ de 3M™

General Information...............................................................................Page 3
Set Up and Installation...........................................................................Page 4
Operation................................................................................................Page 5
Preventive Maintenance..................................................................Page 6 & 7
Troubleshooting......................................................................................Page 8
Repair Part Kits......................................................................................Page 9
Repair Procedures...........................................................................Page 11-14
General Assembly (Schematic)............................................................Page 15
Electrical Control/Wiring Arrangement...............................................Page 16
Flow Control ........................................................................................Page 17
Accessories .................................................................................Page 17 & 18
Repair Options .....................................................................................Page 19
Sales Branches .................................................................................Back Page
Contents

General Information
©
3M 2006
3
The 3M™ Scotch-Weld™ Hot Melt Applicator PG II
is designed to be a simple, reliable tool for
dispensing 3M™ Scotch-Weld™ Hot Melt Adhesive
Sticks. It is self-contained and hand held, designed
for multi-station or intermittent manual adhesive
application.
The 3M Scotch-Weld Hot Melt Applicator PG II uses
electric heat to melt the adhesive, and air pressure to
deliver the adhesive. Adhesive temperature is
automatically maintained by a fixed thermostat on the
heat block. The system is further protected by a
thermal cutout (TCO), which acts as a thermal fuse.
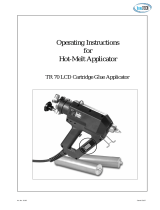
When trigger (1) is pulled, the variable regulator (2)
allows air pressure into rear of the Speedloader stick
feed (3). Air pushes the piston (4), which advances
adhesive stick through the applicator. As adhesive
advances, it passes through hard plastic insulating
sleeve (5) which acts as thermal barrier to keep
molten adhesive and heat in forward portion of the
applicator. The rest of the applicator stays cool.
As adhesive advances into the heat block, it is melted
and liquified. With pressure from the solid adhesive
sticks and the piston, the liquid adhesive is forced out
the tip of the applicator through the nozzle valve (6).
When the trigger is released, air pressure is released
from the rear of the loading chamber. Pressure on the
molten adhesive in the front of the applicator is then
also relieved. Spring tension in the nozzle valve
retracts the valve, neatly cutting off the adhesive
flow. The trigger of the 3M Scotch-Weld Hot Melt
Applicator PG II can be feathered. The operator can
pull the trigger back part way for a small amount of
adhesive or pull the trigger back all the way for
maximum flow.
The delivery rate of molten adhesive for the 3M
Scotch-Weld Hot Melt Applicator PG II is seven
pounds per hour with a product like 3M™ Scotch-
Weld™ Hot Melt Adhesive 3738 utilizing the
standard tip 9921. Adhesive flow rates will vary with
the different adhesives in the line and the nozzle tip
you choose.
READ INSTRUCTIONS THOROUGHL
Y BEFORE OPERA
TING OR
PERFORMING ANY MAINT
ANCE ON 3M SCOTCH-WELD HOT MEL
T
APPLICATOR PG II.

© 3M 2006
4
Set Up and Installation
Remove the 3M™ Scotch-Weld ™ Hot Melt Applicator PG II from its shipper and inspect for obvious
damage.
1. Connect Air and Electrical Service
Select a work station where 120 VAC grounded
receptacle and compressed air service are available.
Electrical outlet should be as close to air supply as
possible.
Filtered air regulated to 80 psi maximum
is vital to trouble-free operation.
Connect air hose
using two 1/2’’ open-end wrenches. Remove the steel
swivel portion of the connector and insert the steel
swivel into 1/8’’ female pipe thread air source. Insert
and tighten the brass fitting into the swivel and snug
up all fittings.
2. Install Air Filter and Regulator
An air filter and moisture trap must be installed at the
applicator connection point of the air system. Install
an air filter WATTS #602-2S Model M4 (or
equivalent) at the air outlet or as close as possible to
it. The hose connection at the end of the 3M Scotch-
Weld Hot Melt Applicator PG II air hose is 1/8’’
standard male pipe fitting.
3. Install Bench Stand
Prior to start up in operation, set the bench stand on
work surface so that tip of gun points away from
work area when gun is not in use. When bench stand
is in most desirable position, fasten permanently
using the screws provided. (If portability of the
bench stand is desired, simply attach the stand to a
piece of scrap wood approximately 7’’ x 16’’ using
either screws or by adhering the stand to the wood.)

Operation
©
3M 2006
5
Warm Up
Make certain that the 3M™ Scotch-Weld ™ Hot
Melt Applicator PG II is fully loaded with
adhesive. Set the off/on switch to the “on”
position, switch should light up, and set 3M
Scotch-Weld Hot Melt Applicator PG II in the
bench stand for 15 minutes. During this warm-up
period you may note a slight dripping from the
nozzle tip. This dripping is due to expansion of the
adhesive during warm-up.
Loading
After warm-up, load applicator with the 3M™
Scotch-Weld™ Hot Melt Adhesive you’ll be using on
the job. To do this, fully retract the Speedloader
piston by pulling one of the retract knobs located on
either side of the loading chamber. Insert up to three
3M Scotch-Weld Hot Melt Adhesive Sticks into the
chamber through the rear loading port. The applicator
is now ready for operation.
As adhesive is extruded, the piston will move
forward. This will be visually evident by the forward
movement of the retract knobs. As the piston
approaches the front of the chamber, a whistling
sound will be heard. At this point the piston may be
retracted and another adhesive stick will fall into
place. Applicator is again ready for operation.
Adhesive may be loaded into the chamber via the
rear port at any time during operation thus saving
time and increasing productivity.
If it is desired to remove adhesive once it is in the
loading chamber, simply roll the applicator to one
side and then point up. This will allow the adhesive
to roll up and out of the chamber.
In order to keep the Speedloader stick feed operating
at maximum efficiency, the chamber should be
sprayed inside while the piston is in the full forward
position with 3M™ Silicone Lubricant or equivalent
once a week.
CAUTION:
Never pull the trigger on the applicator unless there
is adhesive in the loading chamber.
Application
Get a feel for your new 3M Scotch-Weld Hot Melt
Applicator PG II. Start by applying small amounts of
adhesive in puddles on a piece of scrap or paper. Try
feathering the trigger. The 3M Scotch-Weld Hot Melt
Applicator PG II is unique in this respect. Pull the
trigger back slowly and note a small discharge of
adhesive; pull the trigger back more and note
increasing adhesive flow. When the trigger is fully
depressed; you will get maximum flow. If more or
less flow is desired, refer to page 17 of this manual.
Never operate the applicator without a nozzle tip.
Doing so could seriously damage the nozzle valve.
Changing Tips
The 3M Scotch-Weld Hot Melt Applicator PG II
includes two different tips as standard equipment.
Other tips, available from your Scotch-Weld Hot
Melt Adhesive distributor, are shown on page 17 of
this manual.
Caution:
Disconnect air and electrical power before servicing.
Wear heat resistant gloves while working on tips.
Tips can be changed only when the applicator is hot.
You will need a 5/8’’ and a 1/2’’ open-end wrench.
Hold the nozzle valve hex firmly with the 5/8’’
wench, while removing the nozzle tip with the 1/2’’
wrench. The accessory tip is mounted using the
reverse procedure. Snug the tip lightly.
Over
tightening could damage the valve assembly.

Before Operation
CAUTION:
Always remember the tip and valve are
extremely hot.
1. Make sure filtered compressed air is available,
regulated to a maximum of 80 psi or to a
minimum of 50 psi. DO NOT OPERATE 3M™
SCOTCH-WELD™ HOT MELT APPLICATOR
PG II BELOW 40 PSI. If low flow is experienced
at 40 psi see page 8.
2. Make sure that the 3M Scotch-Weld Hot Melt
Applicator PG II is plugged into 120 VAC and
that the switch is in the “on” position. Switch
should light up.
3. Inspect nozzle tip daily. Make sure tip is clean
and clear of foreign matter. Using a coarse cloth,
wipe off any accumulated adhesive or other
foreign matter on the tip.
CAUTION:
Valve and nozzle tip are extremely hot. Wear heat
resistant gloves when cleaning tip.
4. Be sure there is adhesive in the loading chamber.
5. Under normal conditions, allow at least 15
minutes for the applicator to warm up.
6. Under normal operations the in-line air filter
should be removed and cleaned every six months.
Simply remove the filter from the air supply line
and blow compressed air through the filter in
reverse of normal air flow to remove particular
matter.
7. Periodically inspect the applicator to ensure that
assembly is proper (i.e. watch for loose screws,
worn pins, etc). See page 8-14 for
Troubleshooting and Repair Procedures.
NOTE: Before shutting down the 3M Scotch-Weld
Hot Melt Applicator PG II put the electrical
switch in the “off” position. Continue using the
applicator until approximately one adhesive stick
has been consumed. If 3M Scotch-Weld Hot Melt
Applicator PG II has not been in use but still on
heat prior to shut down WITHOUT EXTRUDING
ADHESIVE, allow at least one hour for heat-up.
© 3M 2006
6
Preventive Maintance

Preventive Maintenance
©
3M 2006
7
During Operation
Always use the bench stand provided when 3M™
Scotch-Weld™ Hot Melt Applicator PG II is not in
use. Do not lay the applicator on its side. This
impedes cooling process and may cause plugging
problems.
Open adhesive stick container only when necessary.
Keep sticks clean and free from airborne
contaminants.
After Operation
Before shutting down the 3M Scotch-Weld Hot Melt
Applicator PG II put the electrical switch in the “off”
position. Continue using the applicator until
approximately one adhesive stick has been
discharged. If 3M Scotch-Weld Hot Melt Applicator
PG II has not been in use but still on heat prior to
shut down
without extruding adhesive, allow at
least one hour for heat-up.
Lubricate inside loading cartridge with 3M™
Silicone Lubricant or equivalent once a week.
S
c
o
t
c
h
-
W
e
l
d
™
H
o
t
M
e
l
t
A
p
p
l
i
c
a
t
o
r
P
G
I
I

© 3M 2006
8
Troubleshooting
Problem Probable Cause Correction
(In or
der of priority)
Low or no adhesive flow
1. Hung adhesive stick
T
urn on the 3M™ Scotch-Weld™ Hot Melt
Applicator PG II and allow it to heat for at
least 60 minutes. With incoming air at 80 psi
extrude adhesive. If unsuccessful remove
nozzle assembly and extrude one stick of
adhesive. Readjust incoming air to 80 psi.
Check to see if there is sufficient air
pressure. Test by setting pressure at 80 psi.
Check in-line filter to insure that it is not
plugged with contaminants. Disconnect in-
line filter from air hose. Using a
compressed air line, blow compressed air
through the filter in the reverse flow
position. If this does not increase air flow
through the filter, swivel filter should be
replaced.
Check to see that electrical service is live,
and that lighted switch is in “on” position.
Remove nozzle valve and clean. Run one
adhesive stick out. Replace cleaned valve
assembly.
Squeeze trigger and try to pull retract
knobs. If they can be pulled back easily,
install new regulator kit.
With Volt/Ohm Meter, run electrical
continuity check on each heater (see page
13 for procedure). If open circuit exists,
install new heater kit.
If the piston is retracted before reaching the
point where the whistle is heard, a jam-up
of the adhesive may occur. To free this,
simply r
etract the piston fully and r
oll the
applicator to one side so that the adhesive
in the magazine will free itself. Now push
the knobs forwar
d until the adhesive stick
still in the chamber is contacted by the
piston. Roll the applicator back to its
normal operating position and continue
extruding adhesive until the whistle is hear
d
or until the piston has traveled its full length
as indicated by the orange r
etract knobs.
Replace with new Thermostat/TCO kit.
Refer to page 14, paragraph J.
With finger off of trigger, attempt to retract
piston. If piston is very difficult to pull back,
air r
egulator may not be shutting off
entirely. Replace regulator.
Extrude one adhesive stick.
Replace with new nozzle valve assembly
.
Refer to page 12, paragraph C.
2. Low air pressure
3. No electricity
4. Dirty nozzle valve assembly
5. Regulator malfunction
6. Burned out heater(s)
7. Jammed slugs
1. Blown thermal cutoff
1. Regulator malfunction
2. Expanded adhesive stick
3. Worn nozzle valve
No heat
Dripping Nozzle

# of
Items/
Kit # Repair Part Kit Kit
9200
T
rigger Kit
a. Trigger Pin 1
b. Trigger Assembly 1
9203 Heat Shield Kit
a. Heat Shield 1
9204 Regulator Kit
a. Regulator
Assembly 1
9205 Regulator Hose
Sub-Assembly Kit
a. Hose Assembly 1
9207 Power Cord Kit
a. Power Cord Assembly 1
b. Cable Ties 5
9209 Thermostat/TCO Kit
a. Thermal Cutout Assembly 1
b. Machine Screw Large 1
c. Machine Screw Small 2
d. Thermostat Sub-Assembly 1
9214 Low Temperature -350°F
Thermostat/TCO Kit
a.
Thermal Cutout
Assembly
1
b. Machine Screw Large 1
c. Machine Screw Small 2
d. Low Temperature
Thermostat Sub-Assembly 1
9938 Hanger Kit
a. Hanger 2
9221 Handle Kit
a. Right Handle Sub-Assembly 1
b. Left- Handle Sub-Assembly
1
c. Machine Screw 4
d. Machine Screw
3
# of
Items/
Kit # Repair Part Kit Kit
9219
Switch Kit
a. Switch Sub-Assembly 1
9206 Hose Kit, Main
a. Hose Sub-Assembly 1
b. Cable Ties 5
9220 Hose Kit
a. Hose 1
b. Elbow 1
c. Swivel Filter 1
d. Cable Ties 5
9222 Heater Kit
a. 125 W Heater 4
b. Machine Screw 8
c. Cable Tie 1
9223 Valve Kit
a. Nozzle Tip 1
b. Valve Assembly 1
# of
Items/
Kit # Repair Part Kit Kit
9224
Miscellaneous Parts Kit
a. Heat Shield Screw, Top 1
b. Heat Shield Screw, Side 2
c. Heat Shield Screw 4
d. Shim 2
e. Electrical Connector Screw 9
f. Connector Strip 2
g. Handle Screw 4
h. Regulator Screw 3
i. Ground Wire Screw 2
j. Hinge Pin 3
k. Bail Screw 2
l. Lock Washer for Bail 2
m. Bail 2
9226 Dump Valve
a. Valve 1
9260 Speedloader Hose Assembly
a. Hose Assembly 1
9261 Scotch-Weld SL Magazine
Extension Kit
a. Magazine Extension 1
9987 Speedloader Assembly
a. Speedloader 1
b. Hose 1
c. Pin 1
d. Bail
1
©
3M 2006
9
Troubleshooting
For ease and convenience in repair, 3M™ Scotch-
Weld™ Hot Melt Applicator PG II repair part kits are
available from your authorized 3M Scotch-Weld Hot
Melt Adhesive distributor. When ordering part kits,
provide the name and number of the repair part kit.
If necessary, part kits can also be ordered direct from
the nearest 3M Sales Branch listed on the back cover.
Note: Depending upon the serial number on your
3M Scotch-Weld Hot Melt Applicator PG II,
different part kits may be needed. Please check
the Serial Number located on the heat block
before ordering part kits.
Repair Parts Kit

© 3M 2006
10
Troubleshooting
Your 3M™ Scotch-Weld™ Hot Melt Applicator PG
II has been engineered for durability and reliability.
However, as with any electrical-mechanical device,
parts will wear with use and require replacement for
maximum performance. We have listed below certain
part kits that you may want to have available in case
the immediate need for replacement arises. All part
kits listed are available from your authorized 3M
Scotch-Weld Hot Melt Adhesive distributor or from
the nearest 3M Sales Branch location listed on back
cover of this manual.
Please note the serial number
of your 3M Scotch-Weld Hot Melt Applicator PG
II before ordering part kits.
No. of Scotch-Weld Hot Melt
Kit Applicators in Use
Number Name Stock Number
2-5 6-10 11-15 16-20
9200 Trigger Kit 62-9200-6921-8 0 0 1 1
9203 Heat Shield Kit 62-9203-6901-4 0 1 1 2
9204 Regulator Kit 62-9204-6922-8 1 1 2 2
9207
Power Cord Kit 62-9207-6947-8 0 0 0 1
9209 Thermostat/TCO Kit 62-9209-6962-3 1 2 2 3
9219 Switch Kit 62-9219-2798-4 0 0 1 1
9220 Hose Kit 62-9220-2797-4 0 001
9221 Handle Kit 62-9221-2651-1 0 0 0 1
9222 Heater Kit 62-9222-6930-3 0 0 1 1
9223 Valve Kit 62-9223-6930-1 1 2 3 4
9226 Dump Valve Kit 62-9226-6990-8 0 0 1 1
9260 S/L Hose Assem. Kit 62-9260-2945-5 0 0 1 1
Recommended Part Kits

©
3M 2006
11
Repair Procedures
A. Handle Kit
Disconnect electrical and compressed air service.
To replace applicator handles, first follow “Handle
Disassembly Instructions.” Next remove the electrical
wiring from the terminal strip on the left handle,
replacing them to the same terminals on the
replacement. The right half of the handle is removed by
removing the four Phillips head cap screws. Next
remove the electrical wiring from the terminal strip and
reassemble these to the replacement right half handle.
Lift the switch out of its slot in the handle and replace
it in the new handle. Replace the trigger and trigger pin
at this time. Using reverse procedure, reassemble the
right handle half, then the left. Be sure all the electrical
wires are in place and are not being pinched.
Handle Disassembly Instructions
Caution
Prior to making any repairs on the applicator, make
certain that the applicator is at room temperature and
that both air and electrical service lines have been
disconnected from their respective sources. Failure to
disconnect the electrical power source could result in
electrical shock. Heat shield must be in place before
connecting applicator to electrical outlet.
Procedure Part Kit
A. Handle Kit
B. Regulator Kit
C. Valve Kit
D. Hose Kit
E. Power Cord Kit
F. Switch Kit
G. Trigger Kit
All of the above part kits repair procedures require
“Handle and Heat Shield Disassembly”.
H. Heat Shield Kit
I. Heater Kit
J. Thermostat/TCO Kit
All of the above part kits repair procedures require “Heat
Shield Disassembly- procedure H”.
Heat Shield Disassembly
Instructions
Disconnect Electrical and Compressed Air Service.
Remove the heat shield assembly by removing the two
Phillips head screws from either side of the heat shield
and the one Phillips head screw on the heat shield
immediately above the loading chamber. Reassemble,
following reverse procedure.
Handle Disassembly Instructions
With the nozzle of the applicator pointing away from
you, remove the seven Phillips head cap screws in the
handle. These screws are located in the left hand side
of the handle grip, two in the pistol grip itself, two just
forward of the wire terminal and three to the rear of
the wire terminal. Remove the long screw on the
bottom left of the flange immediately above the three
screws located to the rear of the wire terminal. Without
removing the wires from the wire terminals, lift the
handle up and to the front of the applicator. This
operation will allow for subsequent repair steps.

© 3M 2006
12
Repair Procedures
Disconnect electrical and compressed air service.
First follow “Handle Disassembly Instructions” then
remove the two large Phillips head screws to the rear of
the wire terminals on the right hand side of the handle.
This allows the regulator assembly to swing free,
connected only by the hose going from the brass rear
of the regulator to the loading chamber assembly, and
the main hose assembly. Remove the main hose by
unscrewing the elbow fitting from the regulator. Use a
5/16’’ wrench to remove the loading chamber hose
from the regulator. Reassemble with a new regulator
using reverse procedure. Be sure hose fittings are quite
snug. Check for air leaks by activating the regulator.
Once this is done, reassemble the handle and heat
shield.
B. Regulator Kit
C. Valve Kit
3M™ Scotch-Weld™ Hot Melt Applicator PG II
must be heated prior to repairing nozzle valve.
CAUTION: WEAR SAFETY GOGGLES AND
HEAT RESISTANT GLOVES. DISCONNECT AIR
LINE BEFORE MAKING REPAIRS.
Nozzle valve assembly consists of the nozzle tip and
the nozzle valve. Remove the old valve assembly using
a 5/8’’ open-end wrench. Replace with new assembly.
Gently snug up the valve assembly. With a 1/2’’
wrench, also snug up the new tip.
Disconnect electrical and compressed air service.
Follow “Handle Disassembly Instructions,” page 11.
Remove the main hose by unscrewing the elbow fitting
from the air regulator. Cut the cable ties holding the
power cord and hose assembly together. Remove the
hose and reconnect the new hose using reverse
procedure. Add new cable ties to the hose and power
cord.
D. Hose Kit
Disconnect electrical and compressed air service.
Follow “Handle Disassembly Instructions.” The power
cord wire from the switch is removed from the bayonet
connector. The black and white wires are removed
from their respective terminals. Remember which wire
came off which terminal for reassembly. Consult the
electrical Wiring Arrangement on page 16. Reassembly
is accomplished by reversing the above.
E. Power Cord Kit
Disconnect electrical and compressed air service.
Follow “Handle Disassembly Instructions,” page 11.
Lift the switch from the slot in the right half of the
handle. The power lead can be unplugged from the
power cord receptacle. The other wires terminating in
ring lugs should be removed from their respective
terminals, noting that the black lead is connected to the
Thermal Cut Out Assembly and the white lead to the
heaters. Install the new switch using reverse procedure.
F. Switch Kit

©
3M 2006
13
Repair Procedures
G. Trigger Kit
Disconnect electrical and compressed air service.
Follow “Handle Disassembly Procedures”. Lift the
trigger assembly off the trigger pin and replace. Re-
assemble following reverse procedure.
Heat Shield Disassembly
Instructions
H. Heat Shield Kit
Disconnect electrical and compressed air service.
Remove the heat shield assembly by removing the two
Phillips head screws from either side of the heat shield
and the one Phillips head screw on the heat shield
immediately above the loading chamber. Reassemble,
following reverse procedure.
I. Heater Kit
Disconnect electrical and compressed air service.
Follow “Heat Shield Disassembly,” per procedure H. All
heater wires must be disconnected from their respective
terminal strips. With a suitable drift punch, drive the old
heaters out through the top of the heat block.
All four heaters should be replaced making sure to
reconnect the wires in the proper places. Refer to the
“Wiring Arrangement” and “Electrical Control”
diagrams, page 16. Be sure that heaters are bottomed
out in the heat block. They should not stick out above
the block more than 1/4’’. It may be necessary to gently
tap the heaters into place, but be careful not to crack the
ceramic.
To insure that heaters remain in place, gather all the
wires together approximately 1/2’’ below the heat block
and tightly attach the cable tie provided with the kit.
Heater Check-Out
Disconnect electrical and compressed air service.
Use Volt/Ohm Meter to check electrical continuity of
each heater. If continuity exists, heater is okay. First
remove heat shield. Heaters need not be removed from
the block. Check in the following sequence: left front,
right front, right rear, left rear. To start the check,
remove only one wire from its connection on the
terminal strip.
Place one probe from the meter on the connector of the
wire that has been removed, and with the other probe,
touch the matching connector on opposite side of the
applicator. If needle on Volt/Ohm Meter swings, heater
is okay.
Reconnect wire that was removed first, and continue
sequence. If one or more heaters are burned out, refer
to Repair Procedure, pages 11-14.

© 3M 2006
14
Repair Procedures
J. Thermostat/TCO Kit
Disconnect electrical and compressed air service.
Remove the heat shield assembly by removing the two
Phillips head screws from either side of the heat shield
and the one Phillips head screw on the heat shield
immediately above the loading chamber.
The thermostat and TCO are assembled as a unit and
are replaced as such no matter which component has
failed.
The Quick-Slide clips should be removed from the
thermostat. Remove the two screws holding the
thermostat, and pry the thermostat from the block.
Insert new thermostat.
Make sure the rear rim of the
thermostat is slipped into the slot in the heat block
before affixing screws.
The thermal cutout assembly is then removed by
disconnecting the Phillips head screw, holding the
thermal cutout to the head block on the stand off strip.
Remove the other end of the thermal cutout from the
terminal strip with a small Phillips screwdriver.
Procedure is reversed to replace the thermal cutout.
K. Heat Block Kit
Disconnect electrical and compressed air service.
If the original heat block is broken or needs
replacement, you may use the 3M factory refurbish
program. Please contact your distributor for
information on our PG II equipment refurbish program.

©
3M 2006
15
General Assembly
Please check serial number located on the heat block before ordering part kits.
A
G
E
A
E
D
F
B
L
K
M
N
O
I
J
J
C
H
A. 9221 Handle Kit
B. 9204 Regulator Kit
C. 9223 Valve Kit
D. 9220 Hose Kit
E. 9207 Power Cord Kit
F
.
9219
Switch Kit
G.
9200
Trigger Kit
H. 9203 Heat Shield Kit
I.
9222
Heater Kit
J.
9209 Thermostat/TCO Kit
9214
Low
T
emperature -350ºF
Thermostat/TCO Kit
K. 9202 Heat Block Kit
L. 9260 Speedloader Hose
Assembly
M. 9226 Dump Valve Kit
N. 9987 Speedloader Chamber
Assembly
O. 9938 Hanger Kit

© 3M 2006
16
General Assembly
Wiring Arrangement
Electrical Control

©
3M 2006
17
Flow Control
Flow control of adhesive with your new 3M™ Scotch-
Weld ™ Hot Melt Applicator PG II is easy. An operator
familiar with the control devices should be able to
adjust the applicator for desired flow. To adjust
adhesive flow, a combination of these control methods
can be used.
The four control devices are:
1. Speed of 3M Scotch-Weld Hot Melt Applicator PG
II movement.
2. The trigger.
3. The nozzle tip.
4. Air pressure.
The trigger of the applicator is uniquely designed to
allow for variable control. By pulling the trigger slowly
to the rear, you can observe the start of adhesive flow.
As you continue to pull the trigger rearward, increasing
amounts of adhesive are dispensed.
Two nozzle tips were supplied with your 3M Scotch-
Weld Hot Melt Applicator PG II: a .093’’ (9921) fluted
tip and a .072’’ (9946) brass extension tip. The
applicator was shipped with the .093’’ (9921) tip on the
applicator. This tip will provide maximum flow for all
3M™ Scotch-Weld™ Hot Melt Adhesives except 3746
and 3783. The brass extension tip (9946) will allow for
maximum
control of all the adhesives and substantially
eliminate initial surge. This is accomplished at a
decrease in flow rate. Speed of movement is the
preferred means to control flow. In the event that this is
inappropriate for your operation, additional accessory
tips are available.
NOTE:
DO NOT REDUCE AIR PRESSUE BELOW
40 PSI. If low adhesive flow occurs when operating at
reduced air pressure, return to maximum (80 psi) and
run at least one stick of adhesive through the applicator
and then return to the lower pressure.
Tip No. Description
9913 2 Hole Spreader
9916
3 Hole Spreader
9917
3 Hole 1’’ Spreader
9921 .093’’ Fluted
9922 .063’’ Fluted
9726 “T” Tip
9940 .125’’ Fluted Tip
9946 .072’’ Brass Extension
9727 “L” Tip
3M Scotch-Weld Hot Melt
Applicator PG II Tips
9726 “T” tip for RSC carton closing and other uses.
9727 “L” tip for FOL carton closing and other uses.
9945 heavy-duty bench stand holds 3M Scotch-Weld
Hot Melt Applicator PG II in proper position when
gun is not is use.

© 3M 2006
18
Accessories
Bench Mount for 3M™ Scotch-Weld™ Hot Melt
Applicator PG II
A special bench mount assembly is available which
allows the 3M Scotch-Weld Hot Melt Applicator PG II
to be mounted in a 45° position and operated with a
foot pedal. It is adjustable to allow positioning of the
nozzle tip from a minimum of 9 1/2’’ to a maximum of
15 1/2’’ from the bench top. A nozzle adapter that
directs adhesive flow straight down is included in
addition to the foot pedal unit.
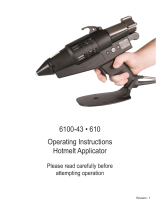
Speedloader Magazine Feed for 3M Scotch-Weld
Hot Melt Applicator PG II
The 3M Scotch-Weld Hot Melt Applicator PG II can be
modified into a semi-automatic loading mode by the
addition of the Speedloader Magazine Feed. By simply
pushing a lever to the rear, the magazine feeds a new
stick of adhesive into the melt chamber. Sticks won’t
jam. The magazine holds 12 3M™ Scotch-Weld™ Hot
Melt Adhesive sticks, reduces the need for frequent
reloading and helps increase production. It is ideal for
hands-free benchtop applications in packaging and
assembly.
Bench mounted 3M Scotch-Weld Hot Melt
Applicator PG II with Speedloader Magazine Feed.

©
3M 2006
19
3M Repair Service
During warranty period
Contact your nearest 3M Sales Branch or 3M™
Scotch-Weld ™ Hot Melt Adhesives distributor
After warranty period
The 3M™ Scotch-Weld™ Hot Melt Applicator PG II
has been engineered to be durable and reliable.
Recognizing that it will eventually need maintenance,
we have made it easy to disassemble and repair. Step
by step repair instructions are detailed in this manual,
pages 3 through 19. Also provided are simple line
drawings and exploded views.
Should your 3M Scotch-Weld Hot Melt Applicator PG
II require repair, you can order repair part kits from
your local 3M Scotch-Weld Hot Melt Adhesives
distributor or from the nearest 3M Sales Branch listed
on the back cover.
If you do not wish to make your own repair, check with
your local distributor. Many of our 3M Scotch-Weld
Hot Melt Adhesives distributors have in-house repair
capability.
3M offers a “Refurbish Program”. Complete costs and
details on 3M’s Refurbishing Program can be had by
contacting your nearest 3M Branch Office.
Important Notice: User is responsible for
determining whether the 3M Scotch-Weld Hot
Melt Applicator PG II is fit for a particular
purpose and suitable for user’s method of
application.
Warranty: 3M warrants for a period of 12
months from the date of use or purchase,
whichever occurs first, that the 3M Scotch-Weld
Hot Melt Applicator PG II will be free of defects
in material and workmanship. 3M MAKES NO
OTHER WARRANTIES, EXPRESS OR
IMPLIED, INCLUDING, BUT NOT LIMITED
TO, ANY IMPLIED WARRANTY OF
MERCHANTABILITY OR FITNESS FOR A
PARTICULAR PURPOSE OR ANY IMPLIED
WARRANTY ARISING OUT OF A COURSE
OF DEALING, CUSTOM, OR USAGE OF
TRADE. This warranty does not cover routine
maintenance, normal wear and tear, or damage
resulting from accident, misuse, alteration,
corrosion, lack of reasonable care, service
performed by an unauthorized repair service, use
of unauthorized replacement parts or accessories,
installation, use, operation, or maintenance not
in accordance with 3M recommended
procedures, or use of adhesive cartridges not
manufactured by 3M or not subject to 3M
quality standards.
Limitation of Remedies: If the 3M Scotch-
Weld Hot Melt Applicator PG II is proved to be
defective within the warranty period stated
above, THE EXCLUSIVE REMEDY, AT 3M’S
OPTION, SHALL BE TO REFUND THE
PURCHASE PRICE OF OR TO REPAIR OR
REPLACE THE DEFECTIVE 3M
APPLICATOR, provided that the defective
applicator is, at 3M’s choice, returned
immediately to 3M or an authorized service
representative designated by 3M, or made
available at user’s premises in a location suitable
for servicing.
Limitation of Liability
3M shall not otherwise be liable for any losses
or damages, whether direct, indirect, special,
incidental or consequential, regardless of the
legal or equitable theory asserted, including
contract, negligence, warranty, or strict liability.
RoHS compliant means that the product
or part does not contain any of the
substances in excess of the maximum
concentration values in EU Directive
2002/95/EC, as amended by Commission Decision
2005/618/EC, unless the substance is in an
application that is exempt under RoHS. Unless
otherwise stated by 3M in writing, this information
represents 3M’s knowledge and belief based on
information provided by third party suppliers to 3M.
/