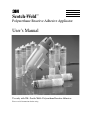
3M Scotch-Weld™ PUR Adhesive Applicator Accessory Operating instructions
- Type
- Operating instructions

3
Scotch-Weld
™
Polyurethane Reactive Adhesive Applicator
User’s Manual
Use only with 3M
™
Scotch-Weld
™
Polyurethane Reactive Adhesives
Please read all instructions before using.
120V. USA
100V. JAPAN
120V. USA REFURB

3M™ Scotch-Weld™ Polyurethane Reactive Adhesive Applicator User’s Manual
©3M 2006 4/06
Table of Contents
Important Safety Instructions . . . . . . . . . . . . . . . . . . . . . . . . . . . . . . . . . . . . . . . . . . . . . . . . . . . . . . 1
3M™ Scotch-Weld™ Polyurethane Reactive Adhesive
. . . . . . . . . . . . . . . . . . . . . 1
Scotch-Weld Polyurethane Reactive Adhesive Applicator Operation . . . . . . . . 1
Scotch-Weld Polyurethane Reactive Adhesive Applicator Servicing . . . . . . . . . 2
Applicator Diagram and Replacement Parts List . . . . . . . . . . . . . . . . . . . . . . . . . . . 3
Parts and Accessories . . . . . . . . . . . . . . . . . . . . . . . . . . . . . . . . . . . . . . . . . . . . . . . 4-6
Grounding Instructions
. . . . . . . . . . . . . . . . . . . . . . . . . . . . . . . . . . . . . . . . . . . . . . . . . . . . . . . . . . . . 7
Setup and Installation . . . . . . . . . . . . . . . . . . . . . . . . . . . . . . . . . . . . . . . . . . . . . . 8-10
Loading Applicator and Dispensing . . . . . . . . . . . . . . . . . . . . . . . . . . . . . . . . . . 11-12
Reloading Applicator . . . . . . . . . . . . . . . . . . . . . . . . . . . . . . . . . . . . . . . . . . . . . 13-17
Cold Cartridge Reload . . . . . . . . . . . . . . . . . . . . . . . . . . . . . . . . . . . . . . . 13-15
Preheated Cartridge Reload . . . . . . . . . . . . . . . . . . . . . . . . . . . . . . . . . . . 15-17
Applicator Shutdown . . . . . . . . . . . . . . . . . . . . . . . . . . . . . . . . . . . . . . . . . . . . . . . . 18
Scotch-Weld Polyurethane Reactive Adhesive
Applicator Operating Recommendations . . . . . . . . . . . . . . . . . . . . . . . . . . . 19
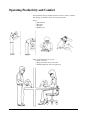
Operator Productivity and Comfort . . . . . . . . . . . . . . . . . . . . . . . . . . . . . . . . . . . . . 20
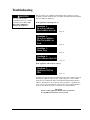
Troubleshooting . . . . . . . . . . . . . . . . . . . . . . . . . . . . . . . . . . . . . . . . . . . . . . . . . . 21-37
Condition 1: No or Low Adhesive Flow/Audible Air Leak . . . . . . . . . . 22-26
Condition 2: No or Low Adhesive Flow/No Audible Air Leak . . . . . . . 27-31
Condition 3: Nozzle Drip . . . . . . . . . . . . . . . . . . . . . . . . . . . . . . . . . . . . . . . . 32
Condition 4: Slow Adhesive Shut Off . . . . . . . . . . . . . . . . . . . . . . . . . . . . . . 32
Condition 5: Applicator Will Not Heat: . . . . . . . . . . . . . . . . . . . . . . . . . . 32-37
Applicator Reassembly Procedure . . . . . . . . . . . . . . . . . . . . . . . . . . . . . . . . . . . . . . 38
Warranty and Important Notice Information . . . . . . . . . . . . . . . . . . . . . . . . . . . . . . 39
i

3M™ Scotch-Weld™ Polyurethane Reactive Adhesive Applicator User’s Manual
1
©3M 2006 4/06
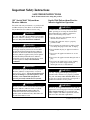
Important Safety Instructions
3M
™
Scotch-Weld
™
Polyurethane
Reactive Adhesive
For health and safety information, see product label
and Material Safety Data Sheet for Scotch-Weld
Polyurethane Reactive Adhesive before using.
SAVE THESE INSTRUCTIONS
Read all instructions before using this product.
!
WARNING
Use only with 3M™ Scotch-Weld™ Polyurethane
Reactive Adhesive Cartridges. Use with any other
materials may cause hazardous conditions.
!
WARNING
Scotch-Weld Polyurethane Reactive Adhesive
Cartridges should be preheated or used in 3M™
Scotch-Weld™ Polyurethane Reactive Adhesive
Preheater or 3M™ Scotch-Weld™ Polyurethane
Reactive Adhesive Applicator only. Do not preheat
Scotch-Weld Polyurethane Reactive Adhesive
Cartridges in ovens or other heating devices or use
in other applicators. May cause hazardous
conditions.
!
WARNING
Do not heat or expose Scotch-Weld Polyurethane
Reactive Adhesive to temperatures or surfaces
above 275°F (135°C). Vapors of heated material
may be irritating to eyes and respiratory tract
and may cause asthma-like symptoms in
persons previously sensitized to isocyanates.
!
WARNING
Do not clean or remove Scotch-Weld Polyurethane
Reactive Adhesive with heat, flame, or solvent.
May cause hazardous vapors or fire. For
additional health and safety information, see
product label and Material Safety Data Sheet for
Scotch-Weld Adhesive used.
Scotch-Weld Polyurethane Reactive
Adhesive Applicator Operation
!
WARNING
To reduce the risk of electrical shock or injury
while operating or servicing the Scotch-Weld
Polyurethane Reactive Adhesive Applicator,
observe the following safety rules:
1. Operate and service the applicator only as
described in this manual.
2. Connect the applicator only to a properly
grounded outlet.
3. Do not unplug the applicator by pulling on the
cord. Grasp the plug, not the cord, to unplug.
4. Do not handle the plug or applicator with wet
hands.
5. Do not use the applicator outdoors or on wet
surfaces.
6. Do not use the applicator with damaged cord or
plug.
7. Do not use the applicator if it is not working
properly or has been dropped, damaged,
submerged in water, or left outdoors.
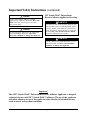
!
WARNING
Use only 3-prong grounded plug and properly
grounded outlet. Failure to use properly grounded
plug and outlet may cause electrical shock. If you
are not sure of proper connections, get help from a
qualified electrician or service person.
!
WARNING
Do not use an unapproved extension cord with the
applicator. Use of an improper extension cord may
cause electrical shock. Use an extension cord
which complies with NEC requirements and state
and local codes and other requirements.
Continued on next page

3M™ Scotch-Weld™ Polyurethane Reactive Adhesive Applicator User’s Manual
©3M 2006 4/06
2
!
Caution
Avoid contact with hot adhesive, cartridge,
applicator tip, and metal components. May cause
burns. Wear heat resistant gloves and safety
glasses when using.
Important Safety Instructions (continued)
3M
™
Scotch-Weld
™
Polyurethane
Reactive Adhesive Applicator Servicing
!
WARNING
Disconnect air and electrical power and make sure
applicator has cooled to room temperature before
servicing. Failure to disconnect air and electrical
power or failure to allow applicator to cool before
servicing may cause electrical shock or burns.
Read User’s Manual before servicing.
!
WARNING
Use only 3M-specified replacement parts. Use of
other replacement parts may cause hazardous
conditions or damage the applicator.
!
Caution
Do not connect the applicator to air supply with
greater than 80 psi air pressure. May cause
hazardous conditions or damage the applicator.
Important
This 3M™ Scotch-Weld™ Polyurethane Reactive Adhesive Applicator is designed
exclusively for use with 3M™ Scotch-Weld™ Adhesives. The use of this applicator
with other adhesives or use of this applicator other than for its intended use may
result in unsafe or hazardous conditions.

3M™ Scotch-Weld™ Polyurethane Reactive Adhesive Applicator User’s Manual
3
©3M 2006 4/06
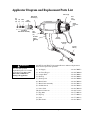
Applicator Diagram and Replacement Parts List
All 3M™ Scotch-Weld™ Polyurethane Reactive Adhesive Replacement
Parts contain replacement procedure.
(1) Air Supply . . . . . . . . . . . . . . . . . . . . . . . . . . . . . . . . . . 62-9895-0005-3
(2) Air Valve/Trigger . . . . . . . . . . . . . . . . . . . . . . . . . . . . . 62-9845-0009-0
(3) Coupler Filter . . . . . . . . . . . . . . . . . . . . . . . . . . . . . . . 62-9895-0001-2
(4) End Cap . . . . . . . . . . . . . . . . . . . . . . . . . . . . . . . . . . . . 62-9895-0003-8
(5) End Cap Seal . . . . . . . . . . . . . . . . . . . . . . . . . . . . . . . . 62-9895-0004-6
(6) Main Nozzle . . . . . . . . . . . . . . . . . . . . . . . . . . . . . . . . 62-9895-0018-6
(7) Main Nozzle Assembly . . . . . . . . . . . . . . . . . . . . . . . . 62-9895-0019-4
(8) On/Off Switch . . . . . . . . . . . . . . . . . . . . . . . . . . . . . . . 62-9895-0024-4
(9) Power Cord . . . . . . . . . . . . . . . . . . . . . . . . . . . . . . . . . 62-9895-0021-0
(10) Swivel Connector . . . . . . . . . . . . . . . . . . . . . . . . . . . . 62-9845-9934-8
(11) Tip (.090) . . . . . . . . . . . . . . . . . . . . . . . . . . . . . . . . . . . 62-9773-0013-6
(12) Tip Cap . . . . . . . . . . . . . . . . . . . . . . . . . . . . . . . . . . . . 62-9773-0014-4
(13) Valve . . . . . . . . . . . . . . . . . . . . . . . . . . . . . . . . . . . . . . 62-9773-0012-8
(14) Wire Stand . . . . . . . . . . . . . . . . . . . . . . . . . . . . . . . . . . 62-9895-0033-5
!
WARNING
Use only 3M-specified
replacement parts. Use of other
replacement parts may cause
hazardous conditions or
damage the applicator.
Tip
Cap
(12)
Tip
(11)
Valve
(13)
Main Nozzle
Assembly (7)
Main
Nozzle (6)
End Cap (4)
End
Cap
Seal (5)
Swivel
Connector
(10)
Coupler
Filter (3)
Air Supply
Line (1)
On/Off
Switch (8)
Power
Cord (9)
Air Valve/
Trigger
Assembly
(2)
Wire
Stand
(14)
Included in
Main Nozzle Assembly

3M™ Scotch-Weld™ Polyurethane Reactive Adhesive Applicator User’s Manual
4
©3M 2006 4/06
3
Scotch-Weld
™
Polyurethane Reactive Adhesive Applicator
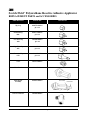
REPLACEMENT PARTS and ACCESSORIES
DESCRIPTION STOCK NO.
CONTENTS
Tip Cap 62-9773-0014-4
pk. of 3
Standard Tip
.090"
62-9773-0013-6
pk. of 3
Low Flow Tip
.063"
62-9895-0016-0
pk. of 3
High Flow Tip
.125"
62-9895-0017-8
pk. of 3
Extension Tip
.072"
62-9895-0015-2
pk. of 3
Valve 62-9773-0012-8
Main Nozzle 62-9895-0018-6
Main Nozzle
Assembly
62-9895-0019-4
Swivel Connector 62-9845-9934-8
62-9773-0012-8
62-9773-0014-4
62-9773-0013-6
62-9895-0018-6

3M™ Scotch-Weld™ Polyurethane Reactive Adhesive Applicator User’s Manual
5
©3M 2006 4/06
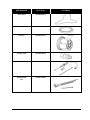
DESCRIPTION STOCK NO.
CONTENTS
Wire Stand 62-9895-0033-5
End Cap Seal 62-9895-0004-6
Coupler Filter 62-9895-0001-2
End Cap 62-9895-0003-8
Air Valve Kit 62-9845-0009-0
On/Off Switch
Kit
62-9895-0024-4
62-9895-0004-6

3M™ Scotch-Weld™ Polyurethane Reactive Adhesive Applicator User’s Manual
6
©3M 2006 4/06
DESCRIPTION STOCK NO.
CONTENTS
Power Cord Kit 62-9895-0021-0
Air Supply Line
Kit
62-9895-0005-3

3M™ Scotch-Weld™ Polyurethane Reactive Adhesive Applicator User’s Manual
7
©3M 2006 4/06
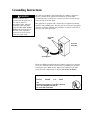
Grounding Instructions
The 3M™ Scotch-Weld™ Polyurethane Reactive Adhesive Applicator
must be grounded. If the applicator malfunctions or breaks down,
grounding provides a path of least resistance for electric current to help
reduce the risk of electric shock.
This applicator is equipped with a cord having an equipment-grounding
conductor and grounding plug. The plug must be used with an appropriate
outlet that is properly installed and grounded in accordance with all state
and local codes and requirements.
!
WARNING
Do not modify the plug
provided with the applicator or
use with an adapter or
ungrounded outlet. Improper
grounding connection of the
applicator may cause electric
shock. If the plug will not fit
the outlet, have a qualified
electrician or service person
install the proper outlet.
The Scotch-Weld Polyurethane Reactive Adhesive Applicator is intended
for use on a nominal 120-volt circuit and has a grounding plug as shown
in the figure above. Make sure the applicator is connected to an outlet
having the same configurations as the plug. Do not use an adapter.
3M™ Scotch-Weld™ Polyurethane Reactive Adhesive Applicator
120VAC 50/60Hz 1.7A 200W
3M
3M Industrial Adhesives and Tapes Division
3M Center, Building 220-5E-06
St. Paul, MN 55144-1000
Grounded
Outlet
Grounded
Outlet Box
Grounding Pin

3M™ Scotch-Weld™ Polyurethane Reactive Adhesive Applicator User’s Manual
Setup and Installation
1. Remove the applicator from its shipping container and inspect for any
obvious damage. If damaged, do not use and immediately contact
your local 3M representative.
2. Connect air coupling provided on the end of the supply hose (male
1/8-inch pipe thread) to a filtered, regulated and dry air supply.
(Regulator and filter not included.)
3. Adjust air regulator to a 80 psi starting point.
4. Plug applicator into grounded 120 VAC receptacle.
8
©3M 2006 4/06
!
Caution
Do not connect the applicator to
air supply with greater than 80
psi air pressure. May cause
hazardous conditions or
damage the applicator.
!
WARNING
Use only 3-prong grounded plug
and properly grounded outlet.
Failure to use properly grounded
plug and outlet may cause
electrical shock. If you are not
sure of proper connections, get
help from a qualified electrician
or service person.
!
WARNING
Do not use an unapproved
extension cord with the
applicator. Use of an improper
extension cord may cause
electrical shock. Use an
extension cord which complies
with NEC requirements and
state and local codes and other
requirements.
Filter/Dryer

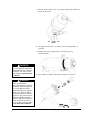
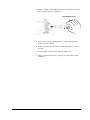
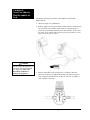
5. Push the on/off switch to the “on” position, indicated by visible red
portion of the switch.
6. Let applicator heat for five (5) minutes prior to loading adhesive
cartridge.
7. Remove end cap from applicator by unscrewing end cap
counterclockwise.
8. Select adhesive cartridge and insert into applicator as shown.
3M™ Scotch-Weld™ Polyurethane Reactive Adhesive Applicator User’s Manual
9
©3M 2006 4/06
!
WARNING
Use only 3M™ Scotch-Weld™
Polyurethane Reactive Adhesive
Cartridges. Use with any other
material may cause hazardous
conditions.
!
WARNING
3M™ Scotch-Weld™
Polyurethane Reactive Adhesive
Cartridges should be preheated
or used in 3M Scotch-Weld
Polyurethane Reactive Adhesive
Preheater or 3M Scotch-Weld
Polyurethane Reactive Adhesive
Applicator only. Do not preheat
3M Scotch-Weld Polyurethane
Reactive Adhesive Cartridges in
ovens or other heating devices
or use in other applicators. May
cause hazardous conditions.
On/Off
Switch
Off
On
Scotch-Weld™

3M™ Scotch-Weld™ Polyurethane Reactive Adhesive Applicator User’s Manual
©3M 2006 4/06
10
Setup and Installation (continued)
!
Caution
Avoid contact with hot
adhesive, cartridge, applicator
tip, and metal components.
May cause burns. Wear heat
resistant gloves and safety
glasses when using.
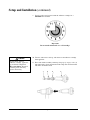
9. Loosely replace end cap and warm the adhesive cartridge for a
minimum of 45 minutes.
10. Unscrew and remove end cap, and remove warm adhesive cartridge
from applicator.
11. Place main nozzle assembly consisting of tip cap (1), tip (2), valve (3),
and main nozzle (4) into the bench wrench. Align flats on main nozzle
with those on bench wrench.
Important
Do not attach main nozzle to a cold cartridge.
1
2
3
4

Loading Applicator and Dispensing
3M™ Scotch-Weld™ Polyurethane Reactive Adhesive Applicator User’s Manual
11
©3M 2006 4/06
!
Caution
Avoid contact with hot
adhesive, cartridge, applicator
tip, and metal components.
May cause burns. Wear heat
resistant gloves and safety
glasses when using.
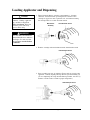
1. Thread warmed adhesive cartridge (approximately 1-1/4 turns)
clockwise onto main nozzle up to the point of resistance. Give
cartridge an aggressive turn to puncture seal, and continue turning
the cartridge until it is sealed onto main nozzle.
2. Remove cartridge with attached main nozzle from bench wrench.
3. Insert assembly into rear of applicator. Fasten end cap securely onto
applicator, carefully aligning end cap threads to prevent binding. (If
you are completing the setup and installation procedure, wait five (5)
minutes to allow nozzle to warm to proper temperature.)
!
WARNING
Use only 3M™ Scotch-Weld™
Polyurethane Reactive Adhesive
Cartridges. Use with any other
material may cause hazardous
conditions.
Main Nozzle
Assembly
Heat Resistant Gloves
Heat Resistant Gloves
Heat Resistant Gloves
Scotch-Weld™
Scotch-Weld™
Scotch-Weld™

3M™ Scotch-Weld™ Polyurethane Reactive Adhesive Applicator User’s Manual
12
©3M 2006 4/06
Loading Applicator and Dispensing (continued)
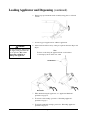
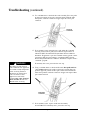
4. Remove tip cap from main nozzle assembly using pliers or 3/8-inch
wrench.
5. Actuate trigger on applicator for adhesive application.
6. Adjust for desired flow rate by setting air regulator between 30 psi and
80 psi.
Note
For best results, hang the applicator from a tool balancer
or stand up by means of the wire stand.
7. When finished using the applicator, see “Applicator Shutdown”
procedure on page 14.
8. To reload a cold cartridge, proceed to “Reloading Applicator”
procedure on page 9.
9. To reload a preheated cartridge, proceed to “Reloading Applicator”
procedure on page 12.
!
Caution
Do not connect the applicator to
air supply with greater than 80
psi air pressure. May cause
hazardous conditions or
damage the applicator.
Tool Balancer
Wire Stand

3M™ Scotch-Weld™ Polyurethane Reactive Adhesive Applicator User’s Manual
13
©3M 2006 4/06
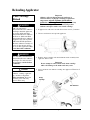
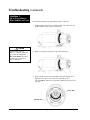
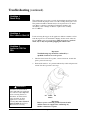
Reloading Applicator
Important
Adhesive will resist flowing through applicator if
total heat history of adhesive cartridge at application
temperature
exceeds 16 hours (total time in
prehea
ter and in applicator)
. Properly discard any
adhesive cartridge that has been heated longer than
16 hours and replace with a new, heated cartridge.
1. If applicator is cold, turn it on and allow to heat for five (5) minutes.
2. Unscrew and remove end cap from applicator.
3. Remove empty cartridge with attached main nozzle assembly from
applicator and set aside.
Important
Do not attempt to remove main nozzle from cartridge
while cold. Damage to the main nozzle may occur.
4. Select and insert new adhesive cartridge into applicator. Warm for 45
minutes.
!
Caution
Avoid contact with hot
adhesive, cartridge, applicator
tip, and metal components.
May cause burns. Wear heat
resistant gloves and safety
glasses when using.
Cold Cartridge
Reload
!
WARNING
Use only 3M™ Scotch-Weld™
Polyurethane Reactive Adhesive
Cartridges. Use with any other
material may cause hazardous
conditions.
!
WARNING
3M™ Scotch-Weld™
Polyurethane Reactive Adhesive
Cartridges should be preheated
or used in 3M Scotch-Weld
Polyurethane Reactive Adhesive
Preheater or 3M Scotch-Weld
Polyurethane Reactive Adhesive
Applicator only. Do not preheat
3M Scotch-Weld Polyurethane
Reactive Adhesive Cartridges in
ovens or other heating devices
or use in other applicators. May
cause hazardous conditions.
Empty
Cartridge
New Adhesive
Scotch-Weld™
Scotch-Weld™

3M™ Scotch-Weld™ Polyurethane Reactive Adhesive Applicator User’s Manual
14
©3M 2006 4/06
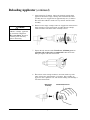
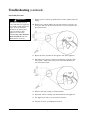
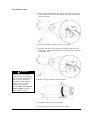
Reloading Applicator (continued)
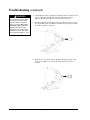
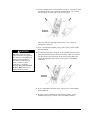
5. After heating for 45 minutes, remove the warmed cartridge from
applicator and reinsert empty cartridge with attached main nozzle
assembly into rear of applicator for approximately five (5) minutes.
This will reheat adhesive residue for easy removal of main nozzle
assembly.
6. Remove warm, empty cartridge from rear of applicator and insert into
bench wrench to remove main nozzle assembly. Rotate cartridge
counterclockwise until main nozzle assembly releases.
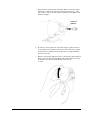
7. Inspect threads on main nozzle. Periodic use of lithium grease or
petroleum jelly on threads is recommended. If threads become
damaged, replace with new main nozzle.
!
Caution
Avoid contact with hot
adhesive, cartridge, applicator
tip, and metal components.
May cause burns. Wear heat
resistant gloves and safety
glasses when using.
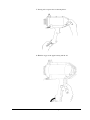
8. Thread new warm cartridge clockwise onto main nozzle up to the
point of resistance (approximately 1-1/4 turns). Give cartridge an
aggressive turn to puncture seal, and continue turning until cartridge is
sealed onto main nozzle.
Main Nozzle
Assembly
Heat Resistant Gloves
Scotch-Weld™
Scotch-Weld™

3M™ Scotch-Weld™ Polyurethane Reactive Adhesive Applicator User’s Manual
15
©3M 2006 4/06
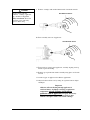
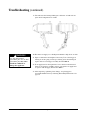
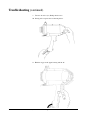
11. Fasten end cap securely onto applicator, carefully aligning end cap
threads to prevent binding.
12. Remove tip cap from main nozzle assembly using pliers or 3/8-inch
wrench.
13. Actuate trigger on applicator for adhesive application.
14. Adjust for desired flow rate by setting air regulator between 30 psi
and 80 psi.
Important
Adhesive will resist flowing through applicator if
total heat history of adhesive cartridge at application
temperature
exceeds 16 hours (total time in
preheater and in applicator). Properly discard any
adhesive cartridge that has been heated longer than
16 hours and replace with a new, heated cartridge.
9. Remove cartridge with attached main nozzle from bench wrench.
10. Insert assembly into rear of applicator.
!
Caution
Avoid contact with hot
adhesive, cartridge, applicator
tip, and metal components.
May cause burns. Wear heat
resistant gloves and safety
glasses when using.
Heat Resistant Gloves
Heat Resistant Gloves
Scotch-Weld™
Scotch-Weld™

3M™ Scotch-Weld™ Polyurethane Reactive Adhesive Applicator User’s Manual
16
©3M 2006 4/06
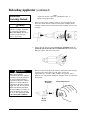
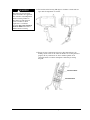
Reloading Applicator (continued)
Note
Applicator must be warmed for a minimum of five (5)
minutes before proceeding.
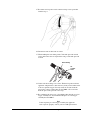
1. Remove warm, empty cartridge from rear of warm applicator and
insert into bench wrench to remove main nozzle assembly. Rotate
cartridge counterclockwise until main nozzle assembly releases from
cartridge.
2. Inspect threads on main nozzle. Periodic use of lithium grease or
petroleum jelly on the threads is recommended. If threads become
damaged, replace with new main nozzle.
3. Remove warmed cartridge from preheater and thread warm cartridge
clockwise onto main nozzle up to the point of resistance
(approximately 1-1/4 turns). Give cartridge an aggressive turn to
puncture seal, and continue turning the cartridge until it is sealed onto
main nozzle.
!
Caution
Avoid contact with hot
adhesive, cartridge, applicator
tip, and metal components.
May cause burns. Wear heat
resistant gloves and safety
glasses when using.
Preheated
Cartridge Reload
Main Nozzle
Assembly
Heat Resistant Gloves
Scotch-Weld™
Scotch-Weld™
!
WARNING
3M™ Scotch-Weld™
Polyurethane Reactive Adhesive
Cartridges should be preheated
or used in 3M Scotch-Weld
Polyurethane Reactive Adhesive
Preheater or 3M Scotch-Weld
Polyurethane Reactive Adhesive
Applicator only. Do not preheat
3M Scotch-Weld Polyurethane
Reactive Adhesive Cartridges in
ovens or other heating devices
or use in other applicators. May
cause hazardous conditions.
Bench
Wrench

3M™ Scotch-Weld™ Polyurethane Reactive Adhesive Applicator User’s Manual
17
©3M 2006 4/06
4. Remove cartridge with attached main nozzle from bench wrench and
insert assembly into rear of applicator.
5. Fasten end cap securely onto applicator, carefully aligning end cap
threads to prevent binding.
6. Remove tip cap from main nozzle assembly with pliers or 3/8-inch
wrench.
7. Actuate trigger on applicator for adhesive application.
8. Adjust for desired flow rate by setting air regulator between 30 psi
and 80 psi.
Heat Resistant Gloves
Scotch-Weld™

3M™ Scotch-Weld™ Polyurethane Reactive Adhesive Applicator User’s Manual
18
©3M 2006 4/06
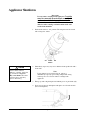
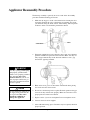
Applicator Shutdown
Important
Do not remove cartridge from applicator!
Cartridge
must be connected to main nozzle assembly
and remain sealed during applicator shutdown.
Failure to do so will allow moisture to cure the
adhesive in the cartridge and in the main nozzle and
render them unusable.
1. Push on/off switch to “off” position. The red portion of the switch
will no longer be visible.
2. Immediately wipe away any excess adhesive from tip threads with a
clean cloth.
Note
If any damage has occurred to the tip, replace it
immediately to prevent poor sealing and possible curing
in the tip-valve area. Do not remove cartridge from
applicator.
3. Fill tip cap with a high temperature lithium grease or petroleum jelly.
4. Screw tip cap onto tip and tighten with pliers or a 3/8-inch wrench.
(Do not overtighten.)
!
Caution
Avoid contact with hot
adhesive, cartridge, applicator
tip, and metal components.
May cause burns. Wear heat
resistant gloves and safety
glasses when using.
On/Off
Switch
Off
On
Page is loading ...
Page is loading ...
Page is loading ...
Page is loading ...
Page is loading ...
Page is loading ...
Page is loading ...
Page is loading ...
Page is loading ...
Page is loading ...
Page is loading ...
Page is loading ...
Page is loading ...
Page is loading ...
Page is loading ...
Page is loading ...
Page is loading ...
Page is loading ...
Page is loading ...
Page is loading ...
Page is loading ...
Page is loading ...
-
 1
1
-
 2
2
-
 3
3
-
 4
4
-
 5
5
-
 6
6
-
 7
7
-
 8
8
-
 9
9
-
 10
10
-
 11
11
-
 12
12
-
 13
13
-
 14
14
-
 15
15
-
 16
16
-
 17
17
-
 18
18
-
 19
19
-
 20
20
-
 21
21
-
 22
22
-
 23
23
-
 24
24
-
 25
25
-
 26
26
-
 27
27
-
 28
28
-
 29
29
-
 30
30
-
 31
31
-
 32
32
-
 33
33
-
 34
34
-
 35
35
-
 36
36
-
 37
37
-
 38
38
-
 39
39
-
 40
40
-
 41
41
-
 42
42


3M Scotch-Weld™ PUR Adhesive Applicator Accessory Operating instructions
- Type
- Operating instructions
Ask a question and I''ll find the answer in the document
Finding information in a document is now easier with AI
Related papers
-
3M Scotch-Weld™ PUR Adhesive TE200 Operating instructions
-
3M Scotch-Weld™ PUR Easy 250 Applicator Operating instructions
-
-
-
-
-
-
-
-
Other documents
-
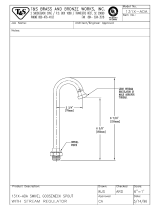 T & S Brass & Bronze Works 131X-ADA Datasheet
-
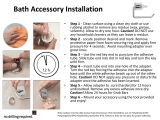 No Drilling Required KL235-CHR Installation guide
-
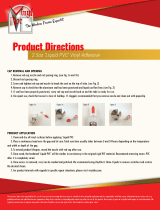 VinylDoc LPVC2OZ-110 Operating instructions
-
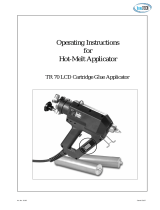 Idealtech TR 70 LCD Operating Instructions Manual
-
 Reka MS 200 Operational Instructions
-
Nordson AltaBlue Customer Product Manual
-
DAP 7079800042 User guide
-
 Power Adhesives 6100-43 Operating instructions
-
Bradley Terreon Extra Height WF3203 Installation guide
-
 Vante 3120/3807 Tube Sealing System User manual


