Page is loading ...

TDC-5502C
User Manual
5M PIXEL DIGITAL CAMERA

CONTENTS
I. GETTING TO KNOW YOUR
CAMERA............................................
2
1.CONFIGURATION & INSTALLATION........ 2
2. MONITOR SCREEN DISPLAY................ 3
3. PREPARATION BEFORE CAPTURE ....... 3
4. SHOOTING........................................ 4
5. VIDEO & AUDIO RECORDING:.............. 9
6. AUDIO INPUT & OUTPUT....................11
7. IMAGE REVIEW................................ 12
8. OTHER SETTINGS............................ 17
II. SOFTWARE & DOWNLOAD........
22
1. PC-CAM DRIVER INSTALLATION ...... 22
III. MAINTENANCE ..........................
24
1. CAMERA......................................... 24
2. BATTERY ........................................ 25
3. MEMORY CARD ............................... 27
4. SECURITY ...................................... 29


2
I Getting to know your camera
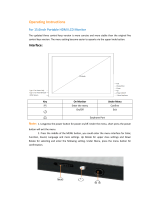
1. Configuration
& installation
1 SHOOT/OK button
2 POWER button
3 Flash light
4 MACRO button
5 USB jack
6 Lens
7 MACRO light
8 BUSY light
9
LEFT/flash
10 MENU button
11
RIGHT/DISP
12
UP
13 MODE button
14
DOWN
15 TFT monitor screen
16 Tripod socket
17 SD card slot
18 Battery cover

3
2. Monitor screen display
3. Preparation before capture
3.1 Battery
It’s optional to use AAA alkaline batteries or
rechargeable batteries.
Open the battery cover and load the batteries
according to the polarity indicated on the
battery door.
3.2 Insert the memory card
Insert the memory card to the card slot
carefully. Check the right direction before

4
insert the memory card.
Attention: If you can not insert the SD card,
take it out and insert again.
4. Shooting
1): Move the slide cover to display the lens;
2): Press POWER button to enter default
capture mode;
3): Press the shutter button to take pictures.
Note:
z Do not take the memory card or battery
out when camera is saving the image,
otherwise, the image won't be saved
completely.
z The screen will power off automatically if
the camera is not in working status for
30 minutes. Press any key to restart the
screen.
In capture
mode, press “MENU” to enter main
menu for 2 options: ”Image” mode and “Setup”
mode:

5
Select “Image”, the following settings are:
Resolution, Quality, White Balance, Color
Effect, Exposure, Date Stamp, Self timer, and
Burst Snapshot
A. Resolution:
a) Press the DOWN button
to select
“resolution” mode, then press RIGHT
button
for 5 options : 2592*1944,
2048*1536 , 1600*1200 , 1280*960 ,
640*480;
Press the UP/DOWN button
to
select the resolution;
c) Double press “MENU” to confirm and exit.
B. Quality:
a) Press the DOWN button
to select
“Quality” and press the RIGHT button
for 3
options: “Super”, “Fine”, “ Normal”.
b) Press the UP/DOWN button
to
select the image quality.
c) Double press “MENU” to confirm and exit.

6
C. White Balance:
a) Press the DOWN button
to select
“White Balance”, press the RIGHT button
for 5 options: Auto, Day Light, Tungsten,
Fluorescent and Cloudy;
b) Press the UP/DOWN button
to
select the proper mode;
c) Double press “MENU” to confirm and exit.
D. Color Effect:
a) Press the DOWN button
to select
“Color Effect”, press the RIGHT button
for 3
options: “Color”, “Sepia”, “Monochrome”.;
b) Press the UP/DOWN button
to
select the color you desired;
c) Double press “MENU” to confirm and exit.
E. Exposure:
a) Press the DOWN button
to select
“Exposure”, press the RIGHT button
;
b) Press the LEFT/RIGHT button to

7
adjust the exposure from -2.0 to +2.0; then
press “MENU” to confirm and exit.
F: Date Stamp:
The date will be showed at the lower right
corner of the image when viewing the image
.
a) Press the UP/DOWN button
to
select “Date Stamp”, press the RIGHT
button
;
b) Press the UP/DOWN button to
select “Enable” or “Disable”;
c) Double press “MENU” to confirm and exit.
G: Self timer:
a) Press the UP/DOWN button
to
select “Self timer”, press the RIGHT button
to select: “Disable”, “10SEC”, “20SEC”;
b) Press the UP/DOWN button
to
select the time you desired;
c) Double press “MENU” to confirm and exit.

8
Note: set “Disable” if you want to
cancel the self timer..
H: Burst Snapshot:
a) Press the UP/DONW button to
select “Burst Snapshot”, press the RIGHT
button
b) Press the UP/DOWN button to
select “Single” or “Burst”;
c) Double press “MENU” to confirm and exit.
Flashlight
Auto: Automatically turn
on/off according to the
light
Flash on: Force on the
flash
Flash off: Force off the
flash

9
In capture mode, press the LEFT button
to
enter above three modes in cycle.
● Flash will be charged automatically between
shooting and the screen turn into black
when charging. The next image can be
shot only the charge is completed.
●If shooting with flash under a bright
environment, the facular in the image will
cause the incorrect exposure.
Note: The flash does not work in “Burst
snapshot” mode.
Digital zoom
To view the zoom effected by LCD.
Note: digital zoom may affect the quality of
image. The higher digital zoom multiples, the
lower of the image quality, maximum 4X digital
zoom available.
In the camera/video mode, press the
UP/DOWN button
to select digital
zoom;
5. Video & audio recording:

10
1): Press “MODE” till the icon ” “appears
on the upper left of screen;
2): Press shutter to start recording;
3): Press shutter again to stop recording the
video.
4): In the video mode press “MENU” to enter
the main menu for 2 options: “video” and
“setup”.
5): There are 4 Options available for “video”
mode: “ Resolution”, “Frame rate”, “White
balance” and “Audio”.
A: Video Resolution:
a) Press the UP/DOWN button
to
select “Resolution”, press the RIGHT button
for 2 options: 640*480 or 320*240;
b) Press the UP/DOWN button to
select resolution.
c) Double press “MENU” to confirm and exit.
B: Frame rate:

11
a) Press the UP/DOWN button
to
select “Frame rate”, press the RIGHT button
for 2 options: 30 fps or 15 fps;
b) Press the UP/DOWN button to
select the frame rate you desired;
c) Double Press “MENU” to confirm and exit.
C: White balance
Same as the setting under the capture mode
(See page 4).
D: Audio Recording: .
a) Press “MENU” under video mode, press the
UP/DOWN button
to select “Audio”,
press the RIGHT button
to select “Enable”
or “Disable”;
b) The video with voice recorded when select”
Enable” the video without voice recorded
when select “ Disable”;
c) Double press “MENU” to confirm and exit.
6. Audio input & output

12
6.1 Audio input
a): Power on;
b): Press “MODE” to select Audio record
Mode ( )
c): Press shutter to start recording, the time of
recording will display on the screen;
d): Press shutter again to stop record.
6.2 Audio playback
Please note that this camera do not support
the speaker; the volume is only available
when connecting with TV or PC to playback
7. Image review
7.1 Still image review
a): Press “MODE” to playback mode.
b): Press the LEFT/RIGHT button
to
review the images.
c): Press the LEFT/RIGHT button
to
show previous or next image or video file.

13
7.2 Play video
a): Power on and press “MODE” to playback
mode.
b): Press the LEFT/RIGHT button to
select video files;
c): Press shutter to play video file and press
shutter again to end playing;
d): Press LEFT/RIGHT button
to
show previous or next image or video file.
7.3 Play video file on TV
You can play video file on TV by connecting
the cable:
a): Power on and connect the camera and TV
by the AV cable;
b): Power on TV and switch to AV mode;
c): Press LEFT/RIGHT button
to select
to play, FF or SP to watch video file.
Note:
z The camera screen will automatically

14
power off when the cable connected to
the camera;
z The battery will also be used when the
camera connected to TV;
z The TV system may affect the image
quality, please adjust the system of the
camera complied with the TV
system(see P.15 for TV output setting)
z Please adjust the TV setting if the image
does not display at the center of TV
screen; this is not the failure of the
camera.
Note: Please use the cable attached to
connect with the camera and TV.
7.4:Image review setup:
Under image playback mode, press “MENU”
to enter the main menu for 2 options: “play”
and “Setup”.
There are 8 Options in “play” mode: Delete
Current, Delete All, lock, thumbnail, set logo,
rotate, slideshow and set DPOF.

15
7.4.1. Delete image
a) Press the UP/DOWN button
to
select delete current or delete all.
b) Select “Delete Current” to delete current
the image. Press RIGHT button to confirm
and exit.
c) Select “Delete All” to delete all the images.
Press RIGHT button to confirm and exit.
7.4.2: Lock image
a) Press the UP/DOWN button
to
select “lock”, press the RIGHT button
to
select “lock current”, “lock all”, “unlock current”,
“unlock all”;
b) Press the UP/DOWN button
to
select the necessary operation;
c) Double press “MENU” to confirm and exit.
Note: The locked image cannot be
deleted.
7.4.3: Thumbnail

16
a) Press “MENU” button in image playback
mode, then press UP/DOWN button to
select “thumbnail”, press the RIGHT button
to enter thumbnail mode;
b) Press “MENU” key to delete the selected
image.
c) Press the LEFT/RIGHT/UP/DOWN button
to select image and press
shutter to restore the original size.
7.4.4: Rotate
Press “mode” button in image playback mode,
then press UP/DOWN button
to select
“Rotate”, press the RIGHT button
to enter
rotate mode: 90º, 180º and 270º, press
UP/DOWN button
to select the rotate
degree you are needed, then press “Menu” to
confirm and exit.
7.4.5:Slideshow:
Press the UP/DOWN button
to select
“slide show” and press the RIGHT button
to set slideshow;

17
Press shutter to return the normal playback
mode.
8. Other settings
A: Language (Abc):
a) Power on and press “MENU” to enter
“Image” and “Setup”;
b) Press RIGHT button
to select “Setup”;
c) Press the UP/DOWN button to
select “Language(Abc), then press the right
button
to enter “Language (Abc)”, press
the UP/DOWN button
to select needed
language; then double press “MENU” to
confirm and exit.
B: Auto Power Off
a) Power on and press “MENU” to enter
“Setup”;
b) Press the UP/DOWN button
to enter
“Auto Power Off”;
c) Press the RIGHT button
to select
“Disable”, “60Sec”, “120Sec”;

18
d) Press the UP/DOWN button
to
select power off time, and then double press
“MENU” to confirm and exit
C: TV Output
a) Power on and press “MENU” to enter
“Setup”;
b) Press the UP/DOWN button
to enter
“TV Output”;
c) Press the RIGHT button
to show
“NTSC,PAL”;
d) Press the UP/DOWN button
to
select the proper TV mode; then press
“MENU” to confirm.
d) Press “MENU” again to exit.
D: Play Logo
a) Press the UP/DOWN button
to
select “Play Logo”, press the RIGHT button
to select “Enable” or “Disable”;
b) Press the UP/DOWN button to
select the operation you are needed; then
/