Page is loading ...


CONTENTS
I Getting to know your camera……………………………1
1. Configuration and installation………………….……..…1
2. Monitor screen display…………………………………..2
3. Preparing for photo capture………….……….………..2
4. Video and audio recording………………...…………….3
5. Shooting photos…………..…………………………….5
6. Audio recording…..………………………………...11
7. Image review…………………………………………….11
8. Other setup………………………………………………15
II Software & download…………………………………….21
1 PC-CAM driver installation………………….………..21
2 How to use the PC CAM function……………...…31
3 Image download……………………………………….32
III Maintenance……………………………………………….32
IV Specification and system requirement……………….33

I Getting to know your camea
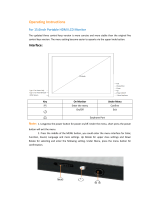
Configuration & installation
1 Speaker
2 Microphone
3 TFT monitor screen
4 Tripod socket
5 SD card slot
6 Lens
7 Busy light
8 Flash light
9 USB plug
10
Left
11
Up
12 Shutter/OK button
13
Right/flash
14 Mode button
15
Down
16 Self-timer status LED
17 Zoom button
18 Menu button
19 Display button
20 Power button
3
4
5
2
1
6
7
8
9
15
14
13
11
10
16
17
18
19
20
12

2. Monitor screen display

3. Preparing for photo capture
3.1 Battery
You have the option of using AAA alkaline or rechargeable batteries.
Open the battery cover and load the batteries according to the polarity
indicated on the battery door.
3.2 Inserting the SD memory card
Insert the memory card into the card slot carefully. Check the direction
before inserting the memory card.
Attention: If you can not insert the SD card, take it out
and insert again. The SD card can only be inserted
one way. Forcing it may cause damage to the card
and the camera.
4. Video & audio recording:
(1): Open and rotate the LCD screen to the best angle which to view the
object.
(2): Turn the Mode switch to capture mode make sure the video icon is

against the red triangle.
3): Press the Power button for about one second to enter video mode,
then the icon” “ will appear on the upper left corner of the screen.
4): Press the OK button to start recording.
5): Press the OK button again to stop recording the video.
6): While in video mode press “Menu” to enter the main menu for 2 options:
“Video” and “Setup”. The “Video” option has four submenus: Resolution,
Frame Rate, White Balance, and Audio.
A: Video Resolution:
a) Press the Up/Down button
to select “Resolution”, press the Right
button
for 2 options: 640*480 or 320*240;
b) Press the Right/Left button to select the resolution.
c) Press the OK button to confirm and exit.
d) Press the OK button or the MENU button again to return to video mode.
B: Frame rate:
a) Press the Up/Down button to select “Frame rate”, press the

Right button
for 2 options 30FPS or 15FPS.
b) Press the Up/Down button to select the frame rate you want.
c) Press the OK button to confirm and exit.
d) Press the OK button or the MENU button to enter video recording
mode.
C: White balance
a) Press the Up/Down button
to select “White Balance”, press the
Right button
for 5 options: Auto, Day Light, Tungsten, Fluorescent, and
Cloudy.
b) Press the Up/Down button
to select the proper mode.
c) Press the OK button to confirm and exit.
d) Press the OK button or Menu button again to return to the video mode.
D: Audio Recording:
a) Press “MENU” under video mode, press the Up/Down button to
select “Audio”, press the RIGHT button
to select “Enable” or “Disable”;
b) Videos will record with audio when “Enable” is selected the videos will

not record with audio when “Disable” is selected.
c) Press the OK button to confirm and exit.
5. Shooting Photos
(1) Power on
(2): Turn the Mode switch to capture mode make sure the capture icon is
against the red triangle.
3): Press the OK button to take pictures.
Note:
z Do not take the memory card or battery out while the camera is
saving the image, otherwise, the image will not be saved completely.
z The screen will turn off automatically if the camera is not in use for
30 seconds. Press any key to restart the screen.
While in capture mode press “Menu” to enter the main menu for 2
options: “Image” and ”Setup”. The “Image” option has eight submenus
:
Resolution, Quality, White Balance, Color Effect, Exposure, Date
Stamp, Self timer, and Burst Snapshot.
A. Flash mode

Auto: Automatically turns on/off according
to the lighting conditions.
Flash on: Forces the flash to fire all the
time.
Flash off: Flash does not turn on.
While in capture mode, press the Right button to enter the above three
flash modes in turn.
●The flash will charge automatically between shots and the screen will go
blank when charging. The next image can be shot only when the charge
is completed.
●If shooting with the flash under a bright environment, the flash in the
image will cause the incorrect exposure.
Note: The flash will not work with the “Burst snapshot” function.

B. Resolution:
a) Press the Right/Left button
to select the “resolution” mode,
then press the Right button
for 5 options: 2592*1944 ,
2048*1536,1600*1200,1280*960,and 640*480.
(b) Press the Up/Down button
to select the resolution.
c) Press the OK button or Menu button to confirm and exit.
C. Quality:
a) Press the Up/Down button to select “Quality” and press the
Right button
for 3 options: Super, Fine, and Normal.
b) Press the Up/Down button to select the image quality.
c) Press the OK button or Menu button to confirm and exit.
D. White Balance:
a) Press the Up/Down button
to select “White Balance”, press the
Right button
for 5 options: Auto, Day Light, Tungsten, Fluorescent, and
Cloudy.
b) Press the Up/Down button
to select the proper mode.

c) Press the OK button or Menu button to confirm and exit.
E. Color Effect:
a) Press the Up/Down button to select “Color Effect”, press the
Right button
for 3 options: Color, Sepia, and Monochrome.
b) Press the Up/Down button to select the color you desire.
c) Press the OK button or Menu button to confirm and exit.
F. Exposure:
a) Press the Up/Down button to select “Exposure”, press the Right
button
.
b) Press the Left/Right button to adjust the exposure from -2.0 to
+2.0. Then press the OK button or Menu button to confirm and exit.
G: Date Stamp:
The date icon will be show on the lower right corner of the image
when viewing the images.
a) Press the Up/Down button
to select “Date Stamp”, press the
Right button for 2 options: Enable, and Disable.

b) Press the Up/Down to select Enable or Disable.
c) Press the OK button or Menu button to confirm and exit.
H: Self timer:
a) Press the Up/Down button
to select “Self timer”, press the Right
button
to select: Disable, 10SEC, or 20SEC.
b) Press the Up/Down button
to select the delay time you desire.
c) Press the OK button or Menu button to confirm and exit.
Note: Set “Disable” if you wish to cancel the self timer mode.
I: Burst Snapshot:
a) Press the Up/Down button
to select “Burst Snapshot”, press the
Right
button for 2 options: Single, and Burst.
b) Press the Up/Down button to select Single or Burst.
c) Press the OK button or Menu button to confirm and exit.
Digital zoom
The zoom can only be viewed using the LCD display.

Note: digital zoom may affect the quality of image. The higher the digital
zoom, the lower the image quality, the maximum is 4X digital zoom.
While in the photo/video mode, turn up or turn down the zoom switch
to zoom out or zoom in.
6. Audio recording
a) Turn the camera on.
b) Turn the “Mode” switch to audio record mode, this icon ( ) will
appear on the screen.
c) Press the OK button to start recording, the time of recording will be
displayed on the screen.
d) Press the OK button again to stop recording.
7. Image review
7.1 Still image review
a) Switch the “Mode” switch to playback mode.
b) Press the Left/Right button
to review the images.

c) Press the Left/Right button
to show the previous image, next
image or video file.
7.2 Playing videos and audio files
a) Turn the “Mode” switch to playback mode.
b) Press the Left/Right button
to select video file or audio file.
c) Press the OK button to play video files and press the OK button again to
stop playing and return to the beginning of the video file.
d) While the video file is playing, press the up
button to pause and
press the up
button again to continue playing.
e) Press the Left/Right button to show the previous image, next
image or video file.
Note:
While in playback mode, push down on the digital zoom switch to turn the
files into thumbnails, push up on the digital zoom switch to turn back to
normal size.

7.3 Playing video files on the TV
You can play videos and audio files on the TV by using the AV cable.
a) Turn on the camera and connect to the TV using the AV cable.
b) Turn on the TV and switch the camera to playback mode.
c) Press the Left/Right button
to select play, fast forward or stop
play to watch the video file.
Note:
z The camera screen will automatically turn off when the cable is
connected to the camera.
z The battery will be used while the camera is connected to the TV.
z The TV may affect the image quality, please adjust the camera to
comply with the TV system (see P.15 for TV output settings).
z Please adjust the TV setting if the image does not display on the
center of TV screen; this is not an indication of a defective camera.
Note: Please use the AV cable included to connect the camera to the TV.

7.4:Image review setup:
While in playback mode, press “Menu” to enter the main menu for 2
options: Play and Setup.
There are 8 submenus in the Play menu: Delete Current, Delete all, Lock,
Thumbnail, Set Logo, Rotate, Slideshow, and Set DPOF.
Note: The Menu button only works to show images or files in thumbnail
mode.
7.4.1. Deleting images
a) Press the Up/Down button
to select delete current or delete all.
b) Select Delete Current to delete the current image. Press the Right
button to confirm and exit.
c) Select Delete All to delete all the images in the internal and external
memory. Press the Right button to confirm and exit.
7.4.2: Locking images
a) Press the Up/Down button
to select Lock, press the Right
button
to select lock current, lock all, unlock current, or unlock all.
b) Press the Up/Down button to select the necessary operation.

c) Press the OK button to confirm and exit.
Note: The locked images can not be deleted. They must be
unlocked and then deleted. They will be deleted if the camera is formatted.
7.4.3: Thumbnails
a) Press the Up/Down button
to select “Thumbnail”, press the
Right button
to enter thumbnail mode.
The other way to switch into thumbnail mode:
a) Turn the Mode switch to playback mode, then push down the digital
zoom switch to enter “thumbnail” mode:
b) Push up on the digital zoom switch to view the file in full screen.
7.4.4: Rotating images
Press the Menu button in image playback mode, then press the Up/Down
button
to select “Rotate”, press the Right button to enter rotate
mode: 90º, 180º and 270º, press the Up/Down button
to select
the rotate degree you want, then press “Menu” or the OK button to confirm
and exit.
Note: You cannot rotate the picture when the picture size is

“2592X1944” or higher.
7.4.5:Slideshow function
Press the Up/Down button
to select “Slideshow” and press the
Right button
to start the slideshow.
Note: Press the OK button to pause and press it again to continue.
After showing the files from beginning to end it returns to normal
mode automatically.
8. Other settings
a) Turn the camera on and press the “Menu” button to enter the menu.
b) Press the Right button
to select “Setup”, there are 11 options:
Language, Auto Power Off, TV Output, Play Logo, Light Frequency,
Date/Time, Buzzer, Format, Default Settings, USB Mode, and Firmware
Version.
A: Languages
a) Turn the camera on and press the “Menu” button to enter the menu.
b) Press the Right button
to select “Setup”;
c) Press the Up/Down button to select “Language”, there are 7

options, English, French, Deutsch, Italian, Dutch, Spanish, and
Portuguese.
d) Press the Up/Down button to select the language you desire.
e) Press the OK button to confirm and exit.
B: Auto Power Off
a) Turn on the camera and press “Menu” to enter “Setup”.
b) Press the Up/Down button
to select “Auto Power Off”.
c) Press the Right button to select Disable, 60Sec, or 120Sec.
d) Press the Up/Down button to select the power off time, then
press “OK” to confirm and exit.
C: TV Output
a) Turn the camera on and press “Menu” to enter “Setup”.
b) Press the Up/Down button
to select “TV Output”.
c) Press the Right button to show NTSC and PAL.
d) Press the Up/Down button to select the proper TV mode, then

press the OK or Menu button to confirm.
D: Play Logo
a) Press the Up/Down button
to select “Play Logo”, press the OK
button to select “Enable” or “Disable”.
b) Press the Up/Down button
to select the operation you want, then
press the OK or MENU button to confirm and exit.
Note: No startup screen will be displayed when you select “Disable”.
E: Light Frequency
a) Turn the camera on and press “Menu” to select “Setup”.
b) Press the Up/Down button
to select “Light Frequency”.
c) Press the Right button , there will be 2 options: 50HZ or 60HZ.
d) Press the Up/Down button to select the frequency you want.
d) Then press the OK or MENU button to confirm and exit.
F: Date/Time
This camera can record the shooting date and time if the Date/Time
/