
User’s Guide
i1200/i1300 Scanners
Eastman Kodak Company
343 State Street
Rochester, NY 14650 U.S.A.
© Kodak, 2008. All rights reserved.
TM: Kodak
A-61560
9E9502
CYAN
MAGENTA YELLOW BLACKCYAN
8.5 X 11” FOLDED
GUIDE COVER-KODAK SCANNERS
FONTS
Whitney K Family
SIZE
P/N SWATCHES
FILE FORMAT
DESIGN/IMPLEMENTATION
DATE
04.08
9E9458A
DE MEYER
4 COLOR PROCESS
ARTWORK NAME
PRINTING INFORMATION
0000-000
EN
ECO
LANGUAGES
ILLUSTRATOR CS3
9E9502A

A-61560 April 2008 i
Contents
1 Introduction . . . . . . . . . . . . . . . . . . . . . . . . . . . . . . . . . . . . . . . . . . . . . . . . . 1
Scanner features . . . . . . . . . . . . . . . . . . . . . . . . . . . . . . . . . . . . . . . . . . . . . 2
Safety information . . . . . . . . . . . . . . . . . . . . . . . . . . . . . . . . . . . . . . . . . . . . 3
User precautions . . . . . . . . . . . . . . . . . . . . . . . . . . . . . . . . . . . . . . . . . . . 3
Environmental information . . . . . . . . . . . . . . . . . . . . . . . . . . . . . . . . . . . . . . 3
European Union. . . . . . . . . . . . . . . . . . . . . . . . . . . . . . . . . . . . . . . . . . . . 4
Power system. . . . . . . . . . . . . . . . . . . . . . . . . . . . . . . . . . . . . . . . . . . . . . . . 4
Acoustic emission. . . . . . . . . . . . . . . . . . . . . . . . . . . . . . . . . . . . . . . . . . . . . 4
EMC statements . . . . . . . . . . . . . . . . . . . . . . . . . . . . . . . . . . . . . . . . . . . . . 5
United States. . . . . . . . . . . . . . . . . . . . . . . . . . . . . . . . . . . . . . . . . . . . . . 5
Korea. . . . . . . . . . . . . . . . . . . . . . . . . . . . . . . . . . . . . . . . . . . . . . . . . . . . 5
Japan. . . . . . . . . . . . . . . . . . . . . . . . . . . . . . . . . . . . . . . . . . . . . . . . . . . . 5
2 Getting Started . . . . . . . . . . . . . . . . . . . . . . . . . . . . . . . . . . . . . . . . . . . . . . . 6
What’s in the box . . . . . . . . . . . . . . . . . . . . . . . . . . . . . . . . . . . . . . . . . . . . . 6
System requirements . . . . . . . . . . . . . . . . . . . . . . . . . . . . . . . . . . . . . . . . . . 7
Installing the scanner . . . . . . . . . . . . . . . . . . . . . . . . . . . . . . . . . . . . . . . . . . 7
Installing the Kodak Driver Software . . . . . . . . . . . . . . . . . . . . . . . . . . . . . . 8
Windows operating systems . . . . . . . . . . . . . . . . . . . . . . . . . . . . . . . . . . 8
Linux operating systems . . . . . . . . . . . . . . . . . . . . . . . . . . . . . . . . . . . . 10
Attaching the output tray. . . . . . . . . . . . . . . . . . . . . . . . . . . . . . . . . . . . . . . .11
Connecting the power cord to the scanner . . . . . . . . . . . . . . . . . . . . . . .11
Connecting the USB cable . . . . . . . . . . . . . . . . . . . . . . . . . . . . . . . . . . .11
Turning on the scanner and finalizing Kodak Driver Software
installation. . . . . . . . . . . . . . . . . . . . . . . . . . . . . . . . . . . . . . . . . . . . . . . 13
Installing application software . . . . . . . . . . . . . . . . . . . . . . . . . . . . . . . . 13
Scanner components . . . . . . . . . . . . . . . . . . . . . . . . . . . . . . . . . . . . . . . . . 14
Locking the scanner . . . . . . . . . . . . . . . . . . . . . . . . . . . . . . . . . . . . . . . . . . 16
3 Using the Scanner . . . . . . . . . . . . . . . . . . . . . . . . . . . . . . . . . . . . . . . . . . . 17
Turning the scanner on and off . . . . . . . . . . . . . . . . . . . . . . . . . . . . . . . . . 17
Scanner positions. . . . . . . . . . . . . . . . . . . . . . . . . . . . . . . . . . . . . . . . . . . . 17
Tilting the scanner body . . . . . . . . . . . . . . . . . . . . . . . . . . . . . . . . . . . . . . . 18
Adjusting the output tray. . . . . . . . . . . . . . . . . . . . . . . . . . . . . . . . . . . . . . . 19
Adjusting the input tray. . . . . . . . . . . . . . . . . . . . . . . . . . . . . . . . . . . . . . . . 21
Adjusting the side guides . . . . . . . . . . . . . . . . . . . . . . . . . . . . . . . . . . . . . . 22
Start and stop scanning . . . . . . . . . . . . . . . . . . . . . . . . . . . . . . . . . . . . . . . 22
Document preparation . . . . . . . . . . . . . . . . . . . . . . . . . . . . . . . . . . . . . . . . 23
Verifying your scanner installation - Windows operating systems . . . . . . . 24
Verifying your scanner installation - Linux operating systems . . . . . . . . . . 26
Application software . . . . . . . . . . . . . . . . . . . . . . . . . . . . . . . . . . . . . . . . . . 26
Smart Touch functionality - WIndows operating systems. . . . . . . . . . . . . . 27
Configuration dialog box . . . . . . . . . . . . . . . . . . . . . . . . . . . . . . . . . . . . 28
Scan To settings . . . . . . . . . . . . . . . . . . . . . . . . . . . . . . . . . . . . . . . . . . 29
Scan As settings . . . . . . . . . . . . . . . . . . . . . . . . . . . . . . . . . . . . . . . . . . 32
Menu buttons. . . . . . . . . . . . . . . . . . . . . . . . . . . . . . . . . . . . . . . . . . . . . 32
Configuring function numbers . . . . . . . . . . . . . . . . . . . . . . . . . . . . . . . . 33
Third party applications . . . . . . . . . . . . . . . . . . . . . . . . . . . . . . . . . . . . . 35
Custom destinations . . . . . . . . . . . . . . . . . . . . . . . . . . . . . . . . . . . . . . . 35
Smart touch Edit window. . . . . . . . . . . . . . . . . . . . . . . . . . . . . . . . . . . . 37
Using function numbers. . . . . . . . . . . . . . . . . . . . . . . . . . . . . . . . . . . . . 39
Scanning your documents . . . . . . . . . . . . . . . . . . . . . . . . . . . . . . . . . . . . . 40
Automatic feeding . . . . . . . . . . . . . . . . . . . . . . . . . . . . . . . . . . . . . . . . . 40
Manual feeding . . . . . . . . . . . . . . . . . . . . . . . . . . . . . . . . . . . . . . . . . . . 40

ii A-61560 April 2008
4 Image Processing . . . . . . . . . . . . . . . . . . . . . . . . . . . . . . . . . . . . . . . . . . . . 41
Overview . . . . . . . . . . . . . . . . . . . . . . . . . . . . . . . . . . . . . . . . . . . . . . . . . . 41
Starting the Scan Validation Tool . . . . . . . . . . . . . . . . . . . . . . . . . . . . . . . . 41
Scan Validation Tool dialog box . . . . . . . . . . . . . . . . . . . . . . . . . . . . . . . . . 42
Using the TWAIN datasource. . . . . . . . . . . . . . . . . . . . . . . . . . . . . . . . . . . 43
Terminology and features. . . . . . . . . . . . . . . . . . . . . . . . . . . . . . . . . . . . . . 43
How do I begin? . . . . . . . . . . . . . . . . . . . . . . . . . . . . . . . . . . . . . . . . . . . . . 44
Selecting Image settings . . . . . . . . . . . . . . . . . . . . . . . . . . . . . . . . . . . . 45
Selecting Device settings . . . . . . . . . . . . . . . . . . . . . . . . . . . . . . . . . . . 47
The main Kodak Scanner window . . . . . . . . . . . . . . . . . . . . . . . . . . . . . . . 48
The Image Settings window . . . . . . . . . . . . . . . . . . . . . . . . . . . . . . . . . . . . 51
Preview area . . . . . . . . . . . . . . . . . . . . . . . . . . . . . . . . . . . . . . . . . . . . . 52
General tab . . . . . . . . . . . . . . . . . . . . . . . . . . . . . . . . . . . . . . . . . . . . . . 53
Size tab . . . . . . . . . . . . . . . . . . . . . . . . . . . . . . . . . . . . . . . . . . . . . . . . . 55
Adjustments tab: black and white . . . . . . . . . . . . . . . . . . . . . . . . . . . . . 58
Adjustments tab: color or grayscale. . . . . . . . . . . . . . . . . . . . . . . . . . . . 60
Enhancements tab. . . . . . . . . . . . . . . . . . . . . . . . . . . . . . . . . . . . . . . . . 62
Advanced Image Setup . . . . . . . . . . . . . . . . . . . . . . . . . . . . . . . . . . . . . . . 64
Advanced tab. . . . . . . . . . . . . . . . . . . . . . . . . . . . . . . . . . . . . . . . . . . . . 64
Content Settings tab . . . . . . . . . . . . . . . . . . . . . . . . . . . . . . . . . . . . . . . 67
Creating color/grayscale or black and white images based on the
content of your documents - Example 1 . . . . . . . . . . . . . . . . . . . . . . . . . . 69
Creating multiple images for each side of a document - Example 2 . . . . . 71
Creating different settings for each side of a document - Example 3. . . . . 73
Creating a new Setting Shortcut. . . . . . . . . . . . . . . . . . . . . . . . . . . . . . . . . 75
Changing Image Settings. . . . . . . . . . . . . . . . . . . . . . . . . . . . . . . . . . . . . . 77
The Device Settings window . . . . . . . . . . . . . . . . . . . . . . . . . . . . . . . . . . . 78
Device - General tab . . . . . . . . . . . . . . . . . . . . . . . . . . . . . . . . . . . . . . . 79
Device - Multifeed tab . . . . . . . . . . . . . . . . . . . . . . . . . . . . . . . . . . . . . . 80
Changing Device settings. . . . . . . . . . . . . . . . . . . . . . . . . . . . . . . . . . . . . . 82
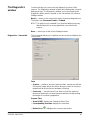
The Diagnostics window. . . . . . . . . . . . . . . . . . . . . . . . . . . . . . . . . . . . . . . 83
Diagnostics - General tab . . . . . . . . . . . . . . . . . . . . . . . . . . . . . . . . . . . 83
Diagnostics - Debug tab . . . . . . . . . . . . . . . . . . . . . . . . . . . . . . . . . . . . 84
Diagnostics - Logs tab. . . . . . . . . . . . . . . . . . . . . . . . . . . . . . . . . . . . . . 85
Using the ISIS Driver . . . . . . . . . . . . . . . . . . . . . . . . . . . . . . . . . . . . . . . . . 86
The main ISIS Driver window. . . . . . . . . . . . . . . . . . . . . . . . . . . . . . . . . . . 86
Main tab. . . . . . . . . . . . . . . . . . . . . . . . . . . . . . . . . . . . . . . . . . . . . . . . . 87
Layout tab . . . . . . . . . . . . . . . . . . . . . . . . . . . . . . . . . . . . . . . . . . . . . . . 90
Image Processing tab . . . . . . . . . . . . . . . . . . . . . . . . . . . . . . . . . . . . . . 91
Scanner tab . . . . . . . . . . . . . . . . . . . . . . . . . . . . . . . . . . . . . . . . . . . . . . 93
Auto Color Detect tab . . . . . . . . . . . . . . . . . . . . . . . . . . . . . . . . . . . . . . 95
Adjustments tab. . . . . . . . . . . . . . . . . . . . . . . . . . . . . . . . . . . . . . . . . . . 97
Dropout tab . . . . . . . . . . . . . . . . . . . . . . . . . . . . . . . . . . . . . . . . . . . . . . 99
Log tab. . . . . . . . . . . . . . . . . . . . . . . . . . . . . . . . . . . . . . . . . . . . . . . . . 100
About tab . . . . . . . . . . . . . . . . . . . . . . . . . . . . . . . . . . . . . . . . . . . . . . . 100
Scan Area dialog box . . . . . . . . . . . . . . . . . . . . . . . . . . . . . . . . . . . . . . . . 101

A-61560 April 2008 iii
5 Maintenance . . . . . . . . . . . . . . . . . . . . . . . . . . . . . . . . . . . . . . . . . . . . . . . 103
Cleaning the scanner . . . . . . . . . . . . . . . . . . . . . . . . . . . . . . . . . . . . . . . . 103
Replacing parts. . . . . . . . . . . . . . . . . . . . . . . . . . . . . . . . . . . . . . . . . . . . . 103
Opening the scanner cover . . . . . . . . . . . . . . . . . . . . . . . . . . . . . . . . . 104
Cleaning the rollers and transport . . . . . . . . . . . . . . . . . . . . . . . . . . . . 104
Cleaning or replacing the separation module . . . . . . . . . . . . . . . . . . . 105
Replacing the separation module tires . . . . . . . . . . . . . . . . . . . . . . . . 106
Replacing the pre-separation pad . . . . . . . . . . . . . . . . . . . . . . . . . . . . 107
Adjusting the pre-separation roller tension . . . . . . . . . . . . . . . . . . . . . 109
Cleaning or replacing the feed module . . . . . . . . . . . . . . . . . . . . . . . . .110
Replacing the tires on the feed module. . . . . . . . . . . . . . . . . . . . . . . . .112
Vacuuming the scanner. . . . . . . . . . . . . . . . . . . . . . . . . . . . . . . . . . . . .113
Cleaning the imaging area. . . . . . . . . . . . . . . . . . . . . . . . . . . . . . . . . . .113
Running a transport cleaning sheet. . . . . . . . . . . . . . . . . . . . . . . . . . . .114
Supplies and consumables . . . . . . . . . . . . . . . . . . . . . . . . . . . . . . . . . . . .115
Accessories . . . . . . . . . . . . . . . . . . . . . . . . . . . . . . . . . . . . . . . . . . . . . . . .115
6 Troubleshooting . . . . . . . . . . . . . . . . . . . . . . . . . . . . . . . . . . . . . . . . . . . . .116
Indicator lights and error codes . . . . . . . . . . . . . . . . . . . . . . . . . . . . . . . . .116
Clearing a document jam . . . . . . . . . . . . . . . . . . . . . . . . . . . . . . . . . . . . .117
Problem solving . . . . . . . . . . . . . . . . . . . . . . . . . . . . . . . . . . . . . . . . . . . . .118
Known limitations - Linux . . . . . . . . . . . . . . . . . . . . . . . . . . . . . . . . . . . . . .119
Appendix A Specifications. . . . . . . . . . . . . . . . . . . . . . . . . . . . . . . . . . . . . 120
Appendix B TWAIN Image Processing Terminology . . . . . . . . . . . . . . . . 121
Appendix C Warranty - US and Canada only . . . . . . . . . . . . . . . . . . . . . . 123
Limited warranty on Kodak Scanners. . . . . . . . . . . . . . . . . . . . . . . . . . . . 123
Warranty exclusions . . . . . . . . . . . . . . . . . . . . . . . . . . . . . . . . . . . . . . . . . 124
Installation Warning and Disclaimer . . . . . . . . . . . . . . . . . . . . . . . . . . . . . 125
How to obtain limited warranty service. . . . . . . . . . . . . . . . . . . . . . . . . . . 125
Packaging and shipping guidelines . . . . . . . . . . . . . . . . . . . . . . . . . . . . . 126
Return procedure . . . . . . . . . . . . . . . . . . . . . . . . . . . . . . . . . . . . . . . . . . . 126
Customer responsibility . . . . . . . . . . . . . . . . . . . . . . . . . . . . . . . . . . . . . . 126
Warranty Service descriptions . . . . . . . . . . . . . . . . . . . . . . . . . . . . . . . . . 126
On-site service . . . . . . . . . . . . . . . . . . . . . . . . . . . . . . . . . . . . . . . . . . . . . 127
AUR . . . . . . . . . . . . . . . . . . . . . . . . . . . . . . . . . . . . . . . . . . . . . . . . . . . . . 127
Depot service . . . . . . . . . . . . . . . . . . . . . . . . . . . . . . . . . . . . . . . . . . . . . . 128
Important restrictions. . . . . . . . . . . . . . . . . . . . . . . . . . . . . . . . . . . . . . 129
Contacting Kodak. . . . . . . . . . . . . . . . . . . . . . . . . . . . . . . . . . . . . . . . . . . 129

A-61560 April 2008 1
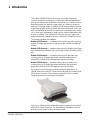
1 Introduction
The Kodak i1200/i1300 Series Scanners are compact document
scanners perfect for workgroups and other decentralized applications.
All scanner models have a tilt feature that allows you to tilt the scanner
body and position the input and output trays in a variety of angles to
meet your scanning needs. In addition, the tilt feature allows scanning
in tight spaces when space is limited and stores easily when not in use.
Also included with each model is smart touch functionality which allows
you to send your documents to email, print or various applications with
a touch of a button. The i1200/i1300 Scanners also can support the
optional Kodak A4 Flatbed Accessory or Kodak A3 Flatbed Accessory.
The following models are available:
Kodak i1210 Scanner — a simplex scanner which provides scanning
at up to 30 pages per minute in color, grayscale or black and white at
200 dpi.
Kodak i1220 Scanner — a duplex scanner which provides scanning at
up to 30 pages per minute in color, grayscale or black and white at 200
dpi.
Kodak i1310 Scanner — a simplex scanner which provides color
scanning at up to 30 pages per minute and black and white and
grayscale scanning at up to 60 pages per minute at 200 dpi.
Kodak i1320 Scanner — a duplex scanner which provides color
scanning at up to 30 pages per minute and black and white and
grayscale scanning at up to 60 pages per minute at 200 dpi.
For support of most document scanning software applications, a
TWAIN datasource and ISIS Driver are included with the Kodak i1200/
i1300 Series Scanners. These drivers provide all of the innovative
image processing you can expect from Kodak.
This User’s Guide provides information and procedures for the Kodak
i1200/i1300 Series Scanners. The information in this guide is for use
with all scanner models unless otherwise noted.

2 A-61560 April 2008
Scanner features • Lightweight and portable
• Small, compact size
• Tilt-A-Scan feature provides a vertical position for ad-hoc scanning in
a compact footprint and tilt positions for production scanning
• Smart touch functionality allows you to send documents to file, email,
printers, fax printers or desktop applications that support TIFF, JPEG,
RTF, PDF and searchable PDF
• Scans up to 2000 pages per day using the i1200 Series Scanners or
3000 pages per day using the i1300 Series Scanners
• Scans up to
21.6 x 86 cm / 8.5 x 34 inches using the automatic
document feeder or as small as 50 x 63 mm / 2.0 x 2.5 inches
• An optional A4/A3 tethered flatbed accessory provides added
scanning capability for exception documents and easily connects and
disconnects to the scanner
• Choose color, black and white, grayscale, simultaneous black and
white and grayscale, or simultaneous black and white and color
• Interactive brightness, contrast and color adjustment
• Multi-feed detection including ultrasonic technology
• Easy cleaning and maintenance
• Easily replaceable feed and separation modules
• Electronic red, green and blue color dropout
• Optical resolutions at 600 dpi (1200 dpi using the flatbed)
• Output resolutions from 75 to 1200 dpi
• Advanced software image processing including: automatically detect
and straighten, iThresholding, ATP, auto orientation, background
color smoothing, add or remove borders, auto color detect and
searchable PDF output
• High speed USB 2.0 interface
• Energy star compliant

A-61560 April 2008 3
Safety information CAUTION: The scanner and power supply must only be used
indoors in a dry location.
• When placing the scanner, make sure that the electrical power outlet
is located within 1.52 metres (5 feet) of the scanner and is easily
accessible.
• Material Safety Data Sheets (MSDS) for chemical products are
available on the Kodak website at: www.kodak.com/go/msds. When
accessing the MSDSs from the website, you will be required to
provide the catalog number of the consumable you want the Material
Safety Data Sheet for. See the section entitled, “Supplies and
consumables” later in this guide for supplies and catalog numbers.
User precautions Users and their employer need to observe the common sense
precautions applicable to the operation of any machinery. These
include, but are not limited to, the following:
• Do not wear loose clothing, unbuttoned sleeves, etc.
• Do not wear loose jewelry, bracelets, bulky rings, long necklaces, etc.
• Hair should be kept short, using a hair net if needed, or by tying long
hair up in a bundle.
• Remove all loose objects from the area that could be drawn into the
machine.
• Follow the recommended Kodak cleaning procedures. Do not use air,
liquid or gas spray cleaners. These cleaners only displace the dust,
dirt or debris to another location within the scanner, which could
cause the scanner to malfunction.
Supervisors should review their practices and make the compliance
with these precautions a part of the job description for the operator of
the Kodak i1200/i1300 Series Scanners and any other mechanical
devices.
Environmental
information
• The Kodak i1200/i1300 Series Scanners are designed to meet
worldwide environmental requirements.
• Guidelines are available for the disposal of consumable items that
are replaced during maintenance or service; follow local regulations
or contact Kodak locally for more information.
• For disposal or recycling information, contact your local authorities or,
in the USA, visit the Electronics Industry Alliance website:
www.eiae.org.
• The product packaging is recyclable.
• Parts are designed for reuse or recycling.
• The Kodak i1200/i1300 Series Scanners are Energy Star compliant
and are shipped from the factory with the default time set to 15
minutes.

4 A-61560 April 2008
European Union This symbol indicates that when the last user wishes to discard this
product, it must be sent to appropriate facilities for recovery and
recycling. Please contact your local Kodak representative or refer to
www.kodak.com/go/recycle for additional information on the collection
and recovery programs available for this product.
Power system Power system connection
This product is also designed for Norwegian IT power system with
phase-to-phase voltage 230V.
Netzanschluß
Das Gerät ist auch für die Verwendung im norwegischen IT-
Stromsystem mit einer Leiterspannung von 230 V geeignet.
Connexion aux systèmes d’alimentation électrique
Ce produit est également conçu pour les systèmes norvégiens
d’alimentation électrique informatique, dont la tension par phase est de
230 V.
Acoustic emission Maschinenlärminformationsverordnung – 3, GSGV
Der arbeitsplatzbezogene Emissionswert beträgt <70 db(A).
[Machine Noise Information Ordinance — 3, GSGV
The operator-position noise emission value is <70 dB(A).]

A-61560 April 2008 5
EMC statements
United States This equipment has been tested and found to comply with the limits for
a Class B digital device pursuant to Part 15 of the FCC rules. These
limits are designed to provide reasonable protection against harmful
interference in a residential installation. This equipment generates,
uses, and can radiate radio frequency energy and, if not installed and
used in accordance with the instruction manual, may cause harmful
interference to radio communications. However, there is no guarantee
that interference will not occur in a particular installation. If this
equipment does cause harmful interference to radio or television
reception, which can be determined by turning the equipment off and
on, the user is encouraged to try to correct the interference by one or
more of the following measures:
• Reorient or relocate the receiving antenna.
• Increase the separation between the equipment and receiver.
• Connect the equipment into an outlet on a circuit different from that to
which the receiver is connected.
• Consult the dealer or an experienced radio/TV technician for
additional suggestions.
Any changes or modifications not expressly approved by the party
responsible for compliance could void the user’s authority to operate
the equipment. Where shielded interface cables have been provided
with the product or specified additional components or accessories
elsewhere defined to be used with the installation of the product, they
must be used in order to ensure compliance with FCC regulation.
Korea
As this equipment has obtained EMC registration for household use, it
can be used in any area including residential areas.
Japan This is a Class B product based on the standard of the Voluntary
Control Council for interference by information Technology Equipment
(VCCI). If this is used near a radio or television receiver in a domestic
environment, it may cause radio interference. Install and use the
equipment according to the instruction manual.

6 A-61560 April 2008
2 Getting Started
What’s in the box Before you begin open the box and check the contents:
• Kodak i1210 or i1220 Scanner or Kodak i1310 or i1320 Scanner
• Output tray
• Output tray extender and exit deflector
• USB 2.0 cable
• Power supply
• AC power cord bundles
• Sample Cleaning Kit
• Welcome Folio which includes:
- Bundled installation and application CDs
- Registration sheets
- Printed User’s Guide, English
- Service Contact sheets
- Quick Installation Guide
-Quick Tips Guide
- Miscellaneous flyers
Kodak provides these applications with Kodak i1200/i1300 Scanners:
• Kodak Capture Software, Lite installs in minutes and helps
automate your capture workflow for maximum performance. It allows
scanning, viewing, and storing of images in standard image file
formats (TIFF, JPEG, and PDF), for practically any workgroup
application.
• Nuance ScanSoft PaperPort Software is an easy way to turn piles
of paper and photos into organized digital PDF files that you can
quickly find, use and share. PaperPort provides a unique visual
desktop that displays small thumbnails of your documents for fast
browsing of what you need. End the frustration of looking for paper or
digital documents by searching for words inside your files with the
exclusive All-in-One Search
™
. Save time and have the security of
knowing that important documents and photos will never be lost.
PaperPort is perfect for your home or small office and all your related
documents.
• Nuance ScanSoft OmniPage Pro Software will help you reach new
levels of productivity by eliminating retyping. Precision OCR
technology, advanced layout analysis and powerful editing tools allow
you to quickly turn paper and PDF files into editable electronic
documents that look just like the original — complete with text, tables
and graphics. Robust new tools enable you to turn text documents
into audio books and add digital signatures to your electronic
documents. Save time and money like never before with the world’s
most powerful document conversion application.

A-61560 April 2008 7
System
requirements
Following is the minimum recommended system configuration to run
Kodak i1200/i1300 Series Scanners.
• Recommended PC configuration:
- For documents up to 356 mm (14 in.) long up to 400 dpi: Pentium
IV, 3.2 GHz processor, 512 MB RAM
- For documents up to 660 mm (26 in.) long up to 400 dpi: Pentium
IV, 3.2 GHz processor, 1 GB RAM
- For longer documents/higher resolutions: Pentium IV, 3.2 GHz
processor, 3 GB RAM
• USB port 2.0 (compatible with USB 1.1 but at slower speeds)
• Supported operating systems:
- Microsoft Windows Vista (32-bit and 64-bit)
- Microsoft Windows Vista SP1 (32-bit and 64-bit)
- Microsoft Windows XP SP2 (32-bit and 64-bit)
- Microsoft Windows XP x64 Edition
- Microsoft Windows 2003 Server x64 Edition
- Microsoft Windows 2000 Professional SP4
- Linux Ubuntu 6.0.6+
- Linux SUSE 10.x+
- Linux Fedora 7+
• 100 MB free hard disk space
• CD-ROM drive
Included Drivers:
• Windows operating systems: TWAIN, ISIS, WIA
• Windows 2000: TWAIN, ISIS, STI
• Linux distributions: TWAIN and SANE
Installing the
scanner
Install the scanner in the following order:
1. Install the Kodak Driver Software on the PC.
2. Connect the power cord to the scanner.
3. Connect the USB cable between your scanner and PC.
4. Attach the output tray.
5. Turn on scanner power and finalize the Kodak Driver Software
installation.
6. Verify your scanner installation (see Chapter 3).
7. Install other supplied scanning applications (See Chapter 3).

8 A-61560 April 2008
Installing the Kodak
Driver Software
Windows operating
systems
Install the driver software before connecting the scanner to your PC.
1. Insert the Kodak Scanner installation CD in the CD-ROM drive of
your computer. The installation program starts automatically.
NOTES:
• If the CD does not start automatically, open the My Computer
icon on your desktop. Double-click the icon for your CD-ROM
drive, then double-click on Setup.exe.
• The i1200 and i1300 Series Scanners have separate installation
CDs. If you have both scanners in your environment, be sure to
use the correct installation CD.
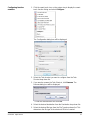
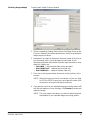
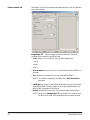
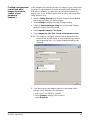
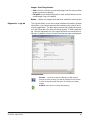
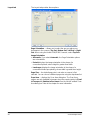
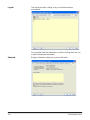
2. Select Install Scanner Software.
3. The Kodak i1200/i1300 Series Scanner Installation window will be
displayed.
NOTE: This window may or may not be displayed depending upon what
was previously installed on your computer.

A-61560 April 2008 9
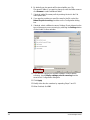
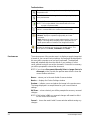
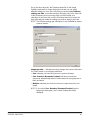
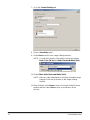
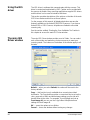
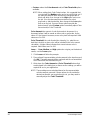
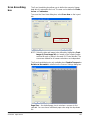
4. Click Yes. The Welcome window will be displayed.
5. Click Next.
The Software License Agreement window will be displayed.
6. After reading the agreement, click I Agree to continue. The
installation will start.

10 A-61560 April 2008
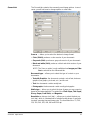
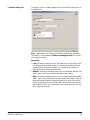
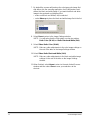
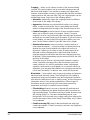
When the installation is complete, the Installation Completed
window will be displayed.
7. Click Finish.
8. When the software is finished installing, click Exit and remove the
CD from the CD-ROM drive.
Linux operating systems Install the driver software before connecting the scanner to your PC.
NOTES:
• Depending on the operating system you are installing on (Ubuntu,
Fedora, or SUSE) the following procedures may be slightly different.
• Kodak Scanner software requires glibc 2.4 or greater and QT3. Verify
that your system has these installed (e.g., Fedora:
Applications>Add/Remove Software).
• You must be a super user to install the software.
1. Insert the Kodak Scanner installation CD in the CD-ROM drive of
your computer. The installation program starts automatically.
2. Open a terminal.
3. Change the directory to the CD folder.
4. Change the directory to the linuxx86 directory.
NOTE: On Ubuntu operating systems, you may need to copy the
linuxx86 folder to the desktop and change the permissions
on the setup script using: chmod u+x setup
5. Run ./setup and follow the prompts.
6. When finished, press Enter to exit.

A-61560 April 2008 11
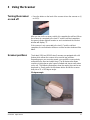
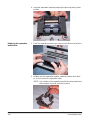
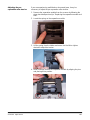
Attaching the
output tray
• Slide the output tray along the center guide underneath the scanner
platform as shown below:
NOTE: The output tray can be placed in a variety of positions to meet
your scanning needs. See the section entitled, “Adjusting the
output tray” in Chapter 3 for more information.
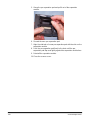
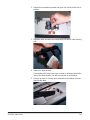
Connecting the power cord
to the scanner
Use only the power supply that was provided with the Kodak i1200/
i1300 Series Scanner. Do not substitute another power supply model or
another manufacturer’s power supply.
After the drivers have been installed, connect the power supply and
power cord to the scanner. Make sure that the power outlet is located
within 1.52 metres (5 feet) of the scanner and is easily accessible.
1. Select the appropriate AC power cord for your region from the
supply of power cords packed with your scanner.
2. Attach the power cord for your power type to the power supply.
3. Plug the output power cord from the power supply into the power
port located on the back of the scanner.
4. Plug the other end of the power cord into the wall outlet.
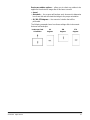
Align
center
guide

12 A-61560 April 2008
Connecting the USB cable IMPORTANT: If you have not installed the Kodak Driver Software,
do that now before proceeding.
The USB cable supplied with your scanner has two different ends.
1. Attach the A end of the USB cable to the proper USB port on your
PC.
2. Attach the B end of the USB cable to the scanner USB port located
on the back of your scanner.
A
B

A-61560 April 2008 13
Turning on the scanner and
finalizing Kodak Driver
Software installation
When the USB cable and power connections have been made, and the
Kodak Software Drivers have been properly installed, the installation
will be complete when the scanner is turned on.
• Use the power switch on the back of the scanner to turn the scanner
on (I).
When you turn on the scanner, the scanner goes through an
initialization process. During the initialization process, the operating
system will auto detect your scanner and “Found New Hardware”
messages may be displayed.
When it is finished and ready to scan, the LED indicator will stop
flashing and stay green.
Installing application
software - Windows
operating systems only
The Kodak Scan Validation Tool is a test application that was
automatically installed as part of the Kodak Scanner installation CD.
Refer the section entitled, “Verifying your scanner installation” in
Chapter 3 for instructions and use.
Other scanning applications are also provided on the CDs packed with
your scanner (e.g., Kodak Capture Software Lite, Nuance ScanSoft
PaperPort Software, Nuance ScanSoft OmniPage Pro Software). You
may also use other scanning applications not provided with the
scanner. See the User Guides provided with these applications for
instructions on how to install and use the software.

14 A-61560 April 2008
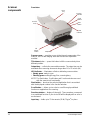
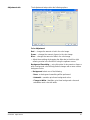
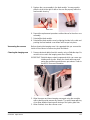
Scanner
components
Front view
Scanner cover — provides access to the internal components of the
scanner, such as the imaging area and the feed and separation
modules.
Tilt release button — press this button to tilt the scanner body into a
different position.
Output tray — collects the scanned documents. The output tray can be
extended when scanning documents longer than 8.5 x 11 inches (A4).
LED Indicator — illuminates or flashes indicating scanner status.
• Steady green: ready to scan
• Flashing green: waiting/Energy Star; scanning/busy
NOTE: The Start button, Scroll button and Function window are used
with the smart touch functionality.
Start button — launches the selected application that is associated
with the displayed number in the function window.
Scroll button — allows you to select or scroll through predefined
functions or applications for scanning.
Function window — displays 0 through 9. These numbers correspond
to a predefined function of your choice. E will be displayed if an error is
encountered.
Input tray — holds up to 75 documents (20 lb./75 g/m
2
) in place.
Scanner
cover
Tilt
release
button
Input
tray
Function
window
LED
indicator
Start
button
Scroll
button
Output tray

A-61560 April 2008 15
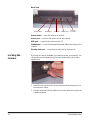
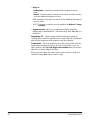
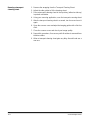
Inside view
Side guides — slide the guides back and forth to accommodate the
size of documents you are scanning.
Paper Present sensor — detects the presence of documents in the
input tray.
Feed module cover — this cover needs to be removed when cleaning
or replacing the feed module or feed module tires.
Separation module release lever — push the release lever down to
remove the separation module for cleaning or replacement.
Gap release lever — allows you to manually adjust the space between
the feed module and separation module for documents that require
special handling.
Scanner cover release lever — opens the scanner to allow access to
the paper path for cleaning or clearing a document jam.
Feed module, separation module and rollers — provides smooth
document feeding and separation of various sizes, thicknesses and
textures of documents.
Feed
module
Separation
module
Scanner cover
release lever
Gap release
lever
Separation module
release lever
Rollers
Side guides
Paper present
sensor
Feed module
cover

16 A-61560 April 2008
Back view
Power switch — turns the scanner on and off.
Power port — connects the power cord to the scanner.
USB port — connects the scanner to the PC.
Flatbed port — connects the optional tethered flatbed accessory to the
scanner.
Security lock port — connects a security lock to the scanner.
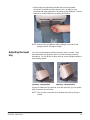
Locking the
scanner
A security lock port is available if you want to secure your scanner. You
can purchase a standard security lock (as shown below) at an office
supply store.
1. Insert the lock into the back of the scanner and turn the key to lock
the scanner in place.
2. Use the looped end of the cable to secure the cable and scanner to
a stationary place.
Power switch
Power port USB port
Flatbed port
Security
lock port
Page is loading ...
Page is loading ...
Page is loading ...
Page is loading ...
Page is loading ...
Page is loading ...
Page is loading ...
Page is loading ...
Page is loading ...
Page is loading ...
Page is loading ...
Page is loading ...
Page is loading ...
Page is loading ...
Page is loading ...
Page is loading ...
Page is loading ...
Page is loading ...
Page is loading ...
Page is loading ...
Page is loading ...
Page is loading ...
Page is loading ...
Page is loading ...
Page is loading ...
Page is loading ...
Page is loading ...
Page is loading ...
Page is loading ...
Page is loading ...
Page is loading ...
Page is loading ...
Page is loading ...
Page is loading ...
Page is loading ...
Page is loading ...
Page is loading ...
Page is loading ...
Page is loading ...
Page is loading ...
Page is loading ...
Page is loading ...
Page is loading ...
Page is loading ...
Page is loading ...
Page is loading ...
Page is loading ...
Page is loading ...
Page is loading ...
Page is loading ...
Page is loading ...
Page is loading ...
Page is loading ...
Page is loading ...
Page is loading ...
Page is loading ...
Page is loading ...
Page is loading ...
Page is loading ...
Page is loading ...
Page is loading ...
Page is loading ...
Page is loading ...
Page is loading ...
Page is loading ...
Page is loading ...
Page is loading ...
Page is loading ...
Page is loading ...
Page is loading ...
Page is loading ...
Page is loading ...
Page is loading ...
Page is loading ...
Page is loading ...
Page is loading ...
Page is loading ...
Page is loading ...
Page is loading ...
Page is loading ...
Page is loading ...
Page is loading ...
Page is loading ...
Page is loading ...
Page is loading ...
Page is loading ...
Page is loading ...
Page is loading ...
Page is loading ...
Page is loading ...
Page is loading ...
Page is loading ...
Page is loading ...
Page is loading ...
Page is loading ...
Page is loading ...
Page is loading ...
Page is loading ...
Page is loading ...
Page is loading ...
Page is loading ...
Page is loading ...
Page is loading ...
Page is loading ...
Page is loading ...
Page is loading ...
Page is loading ...
Page is loading ...
Page is loading ...
Page is loading ...
Page is loading ...
Page is loading ...
Page is loading ...
Page is loading ...
-
 1
1
-
 2
2
-
 3
3
-
 4
4
-
 5
5
-
 6
6
-
 7
7
-
 8
8
-
 9
9
-
 10
10
-
 11
11
-
 12
12
-
 13
13
-
 14
14
-
 15
15
-
 16
16
-
 17
17
-
 18
18
-
 19
19
-
 20
20
-
 21
21
-
 22
22
-
 23
23
-
 24
24
-
 25
25
-
 26
26
-
 27
27
-
 28
28
-
 29
29
-
 30
30
-
 31
31
-
 32
32
-
 33
33
-
 34
34
-
 35
35
-
 36
36
-
 37
37
-
 38
38
-
 39
39
-
 40
40
-
 41
41
-
 42
42
-
 43
43
-
 44
44
-
 45
45
-
 46
46
-
 47
47
-
 48
48
-
 49
49
-
 50
50
-
 51
51
-
 52
52
-
 53
53
-
 54
54
-
 55
55
-
 56
56
-
 57
57
-
 58
58
-
 59
59
-
 60
60
-
 61
61
-
 62
62
-
 63
63
-
 64
64
-
 65
65
-
 66
66
-
 67
67
-
 68
68
-
 69
69
-
 70
70
-
 71
71
-
 72
72
-
 73
73
-
 74
74
-
 75
75
-
 76
76
-
 77
77
-
 78
78
-
 79
79
-
 80
80
-
 81
81
-
 82
82
-
 83
83
-
 84
84
-
 85
85
-
 86
86
-
 87
87
-
 88
88
-
 89
89
-
 90
90
-
 91
91
-
 92
92
-
 93
93
-
 94
94
-
 95
95
-
 96
96
-
 97
97
-
 98
98
-
 99
99
-
 100
100
-
 101
101
-
 102
102
-
 103
103
-
 104
104
-
 105
105
-
 106
106
-
 107
107
-
 108
108
-
 109
109
-
 110
110
-
 111
111
-
 112
112
-
 113
113
-
 114
114
-
 115
115
-
 116
116
-
 117
117
-
 118
118
-
 119
119
-
 120
120
-
 121
121
-
 122
122
-
 123
123
-
 124
124
-
 125
125
-
 126
126
-
 127
127
-
 128
128
-
 129
129
-
 130
130
-
 131
131
-
 132
132
-
 133
133
-
 134
134


Kodak I1320 - Document Scanner User manual
- Type
- User manual
- This manual is also suitable for
Ask a question and I''ll find the answer in the document
Finding information in a document is now easier with AI
Related papers
-
Kodak I1320 - Document Scanner User manual
-
Kodak I1310 User manual
-
-
-
-
-
Kodak I2400 Reference guide
-
Kodak SCAN STATION 100 Quick Tips
-
-
Kodak Scan Station 500 Reference guide
