
CLEANING THE ROLLERS
The scanner transport rollers and imaging area should be
cleaned routinely for optimum performance. Some paper
types and operating environments require cleaning more
often then specified in the User’s Guide.
1. Turn off the scanner.
2. Open the scanner cover.
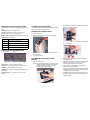
3. With a roller cleaning pad, wipe the rollers from side to
side. Rotate the rollers to clean the entire surface.
IMPORTANT:The Roller Cleaning Pad contains sodium
lauryl ether sulfate which can cause eye
irritation. Refer to the MSDS for more
information.
4. Dry the rollers with a lint-free cloth.
CLEANING OR REPLACING THE SEPARATION
MODULE
1. Open the scanner cover.
2. Push the separation module release lever down and
lift the separation module up and out of position.
3. Manually rotate and wipe the separation module tires
with a roller cleaning pad.
4. Inspect the separation module. If the tires show signs of
wear or damage, replace the tires or the separation
module.
5. Insert the separation module by aligning the pins and
placing it into position.
CLEANING THE IMAGING AREA
1. Remove dust and debris from this area by using a Stati-
cide wipe or a small brush. Be careful not to scratch the
imaging area when cleaning
.
IMPORTANT:Staticide wipes contain isopropanol which can
cause eye irritation and dry skin. Wash your
hands with soap and water after performing
maintenance procedures. Refer to the MSDS
for more information.
2. Wipe the upper and lower imaging area again with an
almost-dry Staticide wipe to remove any streaks
.
SUPPLIES*
* Items are subject to change.
EASTMAN KODAK COMPANY
343 State Street
Rochester, New York 14650 U.S.A.
A-61561 / Part #9E4867 August, 2007
© Eastman Kodak Company, 2007
TM: Kodak
i1200/i1300 Series Scanners
Quick Tips
www.kodak.com
Kodak Service
1-800-822-1414
Kodak Parts Services
1-800-471-0803
1-585-724-6042
Kodak Professional Services
1-800-525-6325
CAT No. Description
148 4864 Kodak Feed Rollers for i1200/i1300
Series Scanners
173 6115 Kodak Separation Module for i1200/
i1300 Series Scanners
826 9607 Kodak Feed Module for i1200/i1300
Series Scanners
853 5981 Kodak Digital Science Roller Cleaning
Pads (qty 24)
896 5519 Staticide Wipes for Kodak Scanners
(qty 144)

INDICATOR LIGHTS AND ERROR CODES
Indicator light — illuminates or flashes indicating scanner
status.
Steady green: scanner is ready to scan.
Steady red: indicates a scanner error; such as, the
scanner cover is open or a document jam, etc.
Flashing green: waiting/Energy Star mode; scanning/busy.
Flashing red: scanner failure.
POWER SWITCH AND CONNECTORS
Power switch — turns the scanner on and off.
Power port — connects the power cord to the scanner.
USB port — connects the scanner to the PC.
Flatbed port — connects the tethered flatbed accessory to
the scanner.
Security lock port — connects a security lock to the
scanner.
CLEANING AND MAINTENANCE
For detailed cleaning and replacement procedures, see the
User’s Guide, Chapter 5, Maintenance.
OPENING THE SCANNER COVER
1. Turn off the scanner.
2. Press the scanner cover release lever and pull the
scanner cover down.
3. Close the cover when finished cleaning the scanner or
replacing parts.
4. Turn on the scanner.
CLEANING OR REPLACING THE FEED
MODULE
1. Open the scanner cover.
NOTE: The paper present sensor is located to the right
of the feed module. Be careful not to damage
the paper present sensor when removing or
cleaning around the feed module.
2. Push against the raised edge of the feed module cover
and lift it up and out of position.
3. Rotate the feed module upward and push it to the left to
lift it out of position.
4. Manually rotate and wipe the feed module tires with a
roller cleaning pad.
5. Inspect the feed module. If the tires show signs of wear
or damage or multi-feeds continue to occur after
cleaning, replace the tires or feed module.
6. Using a vacuum or cleaning pad, remove dust and
debris from the feed module area.
7. Insert the feed module by aligning the pins and pushing
it toward the left to fit it into position. Be sure the gears
are aligned and it snaps into place.
8. Reinstall the feed module cover by aligning the tabs in
the slots and pushing the feed module cover down until
it snaps into place.
Error Code Description
0 USB cable is not connected
1-5,
7 and 8
Call Service
6 The scanner cover is open
9 Document jam
Power switch
USB port
Power port
Flatbed port
Security lock port
-
 1
1
-
 2
2


Kodak I1320 - Document Scanner Quick Tips
- Type
- Quick Tips
- This manual is also suitable for
Ask a question and I''ll find the answer in the document
Finding information in a document is now easier with AI
Related papers
-
Kodak I1320 - Document Scanner User manual
-
-
-
Kodak I1320 - Document Scanner User manual
-
-
-
Kodak 8263006 Datasheet
-
Kodak PS450 User manual
-
-