Page is loading ...

3.0 / 4.0 / 5.0 / 6.0 3.0 / 4.0 / 5.0 / 6.0
3.0 / 4.0 / 5.0 / 6.0
3.0 / 4.0 / 5.0 / 6.0
3.0 / 4.0 / 5.0 / 6.0
3.0 / 4.0 / 5.0 / 6.0
3.0 / 4.0 / 5.0 / 6.0
3.0 / 4.0 / 5.0 / 6.0

ATOM SL 3.0 / 4.0 / 5.0 / 6.0
Congratulations on the purchase of your new Blackburn Atom Series cyclometer.
Blackburn cyclometers are manufactured using only the highest quality materials
and production standards.
This manual is an integral part of your Blackburn
cyclometer. Please read it carefully and use it while
performing the initial programming and operating of the
unit. After you are fully familiar with all of the features
and functions of your Blackburn cyclometer, put this
manual in a safe location for future reference.
IntroductIon
ATOM SERIES FUNCTIONS SL 3.0 4.0 5.0 6.0
Speed
Avg speed
Max speed
Trip distance
Odometer
Ride time
Time of day
Wheel sizes
ETA
Temperature
Altimeter
Slope
Total altitude gain
Max altitude gain
2nd bike settings
Cadence

english
coMPonEntS

ATOM SL 3.0 / 4.0 / 5.0 / 6.0
coMPonEntS
ATOM SERIES FUNCTIONS SL 3.0 4.0 5.0 6.0
1. Cyclometer Unit
2. Front speed sensor
3. Rear speed sensor
4. Cadence sensor
5. Spoke Magnet
6. Crank Magnet
7. Wired Mounting Bracket
8. Wireless Mounting Bracket
9. Rubber Mount
10. Velcro
11. Zip-Ties

english
BAttEry
Blackburn Atom computers are powered by a CR2016 / CR2032 3v Lithium Battery. Under normal
conditions, this battery should last approximately one year.
INSTALLING/REPLACING THE COMPUTER BATTERY
Using a small Philips screwdriver, turn screws counter clockwise until the door comes free.
Use a small coin to remove the battery cover from wireless sensor.
LOW BATTERY INDICATOR
Cyclometer unit
Speed sensor
Cadence sensor
LOW BATTERY INDICATOR SL 3.0 4.0 5.0 6.0
1. Cyclometer unit
2. Speed sensor
3. Cadence sensor

ATOM SL 3.0 / 4.0 / 5.0 / 6.0
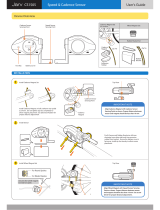
InStALLAtIon
The Blackburn Atom SL uses a single wired sensor attached to the front fork.
INSTALLING WIRED SPEED SENSOR AND BRACKET
1. Loosely attach the wheel sensor to either fork blade using the zip-ties. Do not fully tighten.
2. Attach the spoke magnet on same side of wheel as sensor.
3. Adjust the positions of sensor and magnet so the magnet passes 1– 3 mm from the sensor.
4. Make certain that the center of the magnet aligns with the “sensor” markings on the back
of the wheel sensor.
5. Route the remaining wire and bracket up the fork securing it with tape. Wrap the excess
wire around the front brake cable housing allowing enough slack for the bracket to reach
the handlebars. Attach the bracket to the handlebars or stem. Tighten magnet and zip-ties.
Atom SL
Front Wheel
Sensor
Magnet
Sensor
1–3 mm

english
The Blackburn Atom 3.0 / 5.0 uses a single wireless sensor attached to the front fork.
INSTALLING WIRELESS SPEED SENSOR AND BRACKET
1. Loosely attach the wheel sensor to either fork blade using the zip-ties. Do not fully tighten.
2. Attach the spoke magnet on same side of wheel as sensor.
3. Adjust the positions of sensor and magnet so the magnet passes 1– 3 mm from the sensor.
4. Make certain that the center of the magnet aligns with the “sensor” markings on the back
of the wheel sensor.
5. Tighten magnet and zip-ties.
6. Attach the bracket to the handlebars or stem.
Atom 3.0 / 5.0
InStALLAtIon
Max 22"
Front Wheel
Sensor
Magnet
Sensor
1–3 mm

ATOM SL 3.0 / 4.0 / 5.0 / 6.0
InStALLAtIon
The Blackburn Atom 6.0 uses speed and cadence sensors attached to the chain stay.
INSTALLING WIRELESS SPEED SENSORS AND BRACKET
1. Loosely attach the two sensors to the left chain stay using the zip-ties. Do not fully tighten.
2. Attach the spoke magnet on same side of wheel as sensor.
3. Adjust the positions of sensor and magnet so the magnet passes 1– 3 mm from the sensor.
4. Make certain that the center of the magnet aligns with the “sensor” markings on the back
of the wheel sensor.
5. Tighten magnet and zip-ties.
6. Attach the cadence magnet on
crank and adjust the position
of cadence sensor, so the
magnet passes 1– 3 mm from
the sensor. Tighten magnet
and zip-ties.
7. Attach the bracket to the
handlebars or stem.
Cadence sensor
Speed sensor
2 mm Max
Back Wheel
Sensor
Magnet
Sensor
1–3 mm
Max 40"
Atom 6.0 / Atom 4.0 follow steps 1– 5

english
ButtonS
Blackburn Atom cyclometers have 2 operating buttons located on the base of the unit.
SET
(RESET)
MODE

ATOM SL 3.0 / 4.0 / 5.0 / 6.0
oPErAtInG ModES
Atom SL / 3.0 / 4.0 Operation
TIME OF DAY ODOMETER TRIP DISTANCE
SCAN RIDE TIME AVERAGE SPEED MAX SPEED
MODE MODE
MODEMODEMODE

english
Atom SL / 3.0 / 4.0 SETTING WHEEL SIZE
1. Press & Hold MODE and SET. (Note: this will clear all odometer information and reset time of day.)
2. Adjust blinking digit by Pressing MODE.
3. Set & advance by Pressing SET.
4. Continue through all fields.
5. Adjust Unit of Measurement (M/H or KM/H) by Pressing MODE.
6. Press SET to return to operating mode.
oPErAtInG ModES

ATOM SL 3.0 / 4.0 / 5.0 / 6.0
Atom 5.0 / 6.0 Operation
oPErAtInG ModES
SCAN BIKE ALTIMETER
CADENCE
(for Atom 6.0 only)
ETA
MODE MODE
MODEMODEMODE

english
oPErAtInG ModES
SCAN MODE:
SCAN mode automatically scrolls through the data in a continuous loop as below.
Clock
Trip distance Trip time Temperature Altimeter Slope Gain ETA1 ETA2 Cadence
BIKE MODE:
Press Set Button in BIKE mode to select the data show as below sequence.
Clock
Trip distance Odometer Bike 1+2 Odometer Avg. Speed Max Speed Trip Time Temp.
ALTIMETER MODE:
Press Set Button in ALTIMETER mode to select the data show as below sequence:
Altimeter
Slope Altitude gain Maximum Altitude
CADENCE MODE:
Press Set Button in CADENCE mode to show the Average Cadence data.

ATOM SL 3.0 / 4.0 / 5.0 / 6.0
ProGrAMMInG
Atom 5.0 / 6.0 SETTING WHEEL SIZE
1. Press & hold MODE and SET. (note: this will reset the cyclometer and clear all setting data)
2. Adjust blinking digit by Pressing MODE.
3. Set & advance by Pressing SET.
4. Continue through all fields.
5. Set for Bike 2 after Bike 1 is set.
6. Adjust Unit of Measurement (M/H or KM/H) by Pressing MODE.
7. Press RESET to return to operating mode.

english
Atom 5.0 / 6.0 BIKE 1 & BIKE 2 switching
1. Press & hold MODE for 2 seconds to select either BIKE 1 or BIKE 2. This cyclometer can
store 2 bikes data for wheel sizes, average speed, trip time and distance.
ProGrAMMInG

ATOM SL 3.0 / 4.0 / 5.0 / 6.0
WHEEL SIZE
MEASURING WHEEL SIZE
To assure accurate Speed and Distance measurements, you must enter the correct wheel
circumference (in millimeters). The adjacent chart (1) lists most popular wheel sizes and
their circumferences. If you can not find your wheel size on the chart, use the following
method for manually measuring your wheel size:
MANUALLY MEASURING WHEEL SIZE (2)
1. On a flat open surface make a mark on your tire and the floor exactly where they meet.
2. Roll your bike forward one full revolution of the wheel and mark the point on the floor.
3. Measure the distance between marks in millimeters.
WHEEL CIR.

english
ProGrAMMInG
SETTING TIME OF DAY
1. Select the Clock in Bike mode, Press & Hold
the SET button.
2. Adjust 12- or 24-hour format by pressing
the MODE button. Set by pressing Set button.
3. Adjust Hour by pressing MODE. Set by pressing
SET button.
4. Adjust Minutes by pressing MODE. Set Minutes and
resume normal operation by pressing SET button.
Atom SL / 3.0 / 4.0
Atom SL / 5.0 / 6.0

ATOM SL 3.0 / 4.0 / 5.0 / 6.0
rESEttInG tHE cycLoMEtEr
To Set and reset current data — Atom SL / 3.0 / 4.0
1. To reset all current ride data, in Distance mode (DST), press &
Hold RESET for 2 SECONDS.
2. Ride Time, Trip Distance, Average speed will be reset to zero (0).
3. To reset the Maximum speed, in maximum speed mode (MXS),
Press & Hold RESET for 2 SECONDS.
To Set and reset current data — Atom 5.0 / 6.0
1. Odometer Speed in BIKE MODE, press and hold SET button, it will go to set ODO value and wheel size for BIKE 1 & 2.
2. Average Speed / Trip Time / Trip distance in BIKE MODE, press and hold SET button, it will reset to zero.
3. Maximum Speed in BIKE MODE, press and hold SET button to reset.
4. Altitude in ALTIMETER MODE, press and hold SET button to reset.
5. Maximum Altitude in ALTIMETER MODE, press and hold SET button to reset.
Average Cadence in CADENCE MODE, press and hold SET button to reset.

english
1. To conserve battery life, the unit will go into SLEEP
mode when there is no signal received for 5 minutes.
2. Press either MODE or SET to instantly resume normal
operation with no loss of ride data.
3. For Atom 5.0 / 6.0, spin wheel or begin to ride, in less
than 60 seconds, the unit will begin to operate.
SLEEP ModE

ATOM SL 3.0 / 4.0 / 5.0 / 6.0
EStIMAtE tIME to ArrIVAL (EtA)
Estimate time to arrival function
1. Press SET button to select Destination 1 or 2.
2. Then press and hold SET button for 2 second, it sets the destination distance.
3. After the distance is set, it shows the estimated time of arrival in hr and mins. It will shows 99:59 initially,
and after you ride a few seconds, the remaining time will change by the calculated riding speed.
/