Page is loading ...

ENGLISH

TABLE OF CONTENTS
ENGLISH
TABLE OF CONTENTS
ENGLISH
INTRODUCTION 1
WARNINGS AND CAUTIONS 2
CARE AND MAINTENANCE 3
FCC & CE WARNINGS 4
HOW THIS PRODUCT WORKS 5
PARTS OF YOUR BLACKBURN NEURO CYCLOMETER 8
RESETTING THE COMPUTER TO ITS DEFAULT SETTINGS 9
SHIPPING AND SLEEP MODES 10
CHANGING THE BATTERY IN THE BLACKBURN NEURO CYCLOMETER 11
CHANGING THE BATTERY IN THE WIRELESS SPEED & CADENCE TRANSMITTER 12
CHANGING THE BATTERY IN THE HEART RATE TRANSMITTER 13
WEARING THE HEART RATE TRANSMITTER 14
KEYS AND THEIR FUNCTIONS 15
SECTIONS OF LCD DISPLAY 19
BIKE ONE/BIKE TWO SETTING 23
PAIRING TRANSMITTERS TO THE COMPUTER UNIT 24
INSTALLING THE COMPUTER ON YOUR BIKE 28
LINKING TRANSMITTERS TO COMPUTER FOR USE 32
BASIC OPERATION 34
PROGRAM WHEEL SIZE, UNITS AND CHRONOGRAPH 37
ODOMETERS, WEEKLY AND ANNUAL RIDE TIME 44
PROGRAM TIME OF DAY 47
PROGRAM HEART RATE LEVELS 49
OPERATING THE HEART MONITOR 52
PROGRAM ALTIMETER 54
OPERATING THE RIDE TIME AND TOTAL TIME CHRONOGRAPHS 57
STARTING STOPPING AND CLEARING THE CHRONOGRAPH AND MEMORY 58
CLEARING MAXIMUM SPEED AND MAXIMUM CADENCE ONLY 58
OPERATING THE LAP CHRONOGRAPH/INTERVAL CHRONOGRAPH SYSTEM 59
OPERATING RACE DISPLAY SYSTEM 66
OPERATING THE BACKLIGHT SYSTEM 67
TECHNICAL DATA 68
WARRANTY AND REPAIR 70

ENGLISH
1
ENGLISH
2CYCLOMET E R
INTRODUCTION
Congratulations on your purchase of a new Blackburn Neuro Cyclometer. Blackburn Cyclometers with UHF
Digital Transmission are among the most advanced cyclometers available. Designed to meet the needs of
elite cyclists, these products feature multiple channel, 2.4GHz digitally encoded data transmission making
interference and cross talk a thing of the past. Blackburn has gone to great expense to assure these are the
finest and most reliable cyclometers you can buy. We are so sure of this, each unit we make is covered by a
limited LIFETIME WARRANTY against any defects in materials or workmanship. (See Page 54 for a complete
description of the Bell Sports Limited Warranty.) Your new Neuro unit is filled with new and unique features
designed to enhance your riding and racing experience. Of special note are the new Interval Training Program,
5 Zone Heart Rate System and Blackburn’s exclusive Race Display Option.
This manual is an integral part of your Blackburn cyclometer. We have organized it to guide you through
the setup, installation and operation follow in a logical sequence. When starting out it is best to start at the
beginning of this manual and go through all sections in sequence. This will assure all setup and installation
steps are done in the proper sequence. After you are fully familiar with all of the features and functions of your
Blackburn cyclometer, put this manual in a safe location for future reference.
WARNINGS AND CAUTIONS
WARNING TO PEOPLE THAT WEAR PACEMAKERS—Persons who have a pace maker, defibrillator or other similar
device use this product at their own risk. We strongly recommend that you consult your physician or cardiologist
before using this product or embarking on an exercise program.
WARNING—Blackburn cyclometers and heart rate monitors are training and fitness tools. Before beginning
any exercise program, consult your doctor to discuss your exercise plans.
WARNING—Blackburn cyclometers featuring an altimeter sensor are NOT designed to be used as a
PRIMARY altitude instrument for flying, skydiving, hang gliding or other sports where sudden major changes in
altitude may occur or when there is a need for industrial precision.
WARNING—Do not divert your attention from the road ahead to operate your cyclometer at any time. We
also strongly suggest you wear a Bell or Giro helmet any time you ride your bike.
CAUTION—Blackburn cyclometers are sophisticated electronic instruments. Blackburn recommends this
unit only be installed by a qualified Blackburn retailer. Failure to read the instructions may result in damaged
caused by improper installation and may void the warranty. If you are unsure about how to properly perform
any aspect of the assembly, installation or operation of your Blackburn cyclometer, please contact your local
Blackburn retailer.
CAUTION—This unit is designed to be water resistant under normal riding conditions. It should not be immersed
in water. It should not be left attached to the bike if the bike is being transported on an automobile.

ENGLISH
3
ENGLISH
4CYCLOMET E R
CARE AND MAINTENANCE
Blackburn cyclometers contain many delicate electronic components which may be damaged by excessive
exposure to heat, shock or general abuse. Treated with care, your cyclometer is capable of delivering many
years of reliable service. Improper care and handling, or damage caused by abuse or neglect, will void you
Blackburn Warranty.
NEVER—Leave your computer in your car on hot days.
NEVER—Store your Blackburn cyclometer in a plastic or other non-breathable container.
NEVER—Leave your Blackburn cyclometer on your bike while transporting it by automobile.
FCC & CE WARNINGS
CE—The CE logo is used to mark compliance with the European Union
Directives 89/336/EEc and 99/5/EEC
FCC—This device complies with Part 15 of the FCC limits for class B digital devices subject to the two following
conditions:
1.
This device cannot cause harmful interference
2. This device must accept any interference received, including interference that may cause undesired
operation.
This equipment generates uses and can radiate radio frequency energy and if not installed or used in
accordance with the instructions, may cause harmful interference to radio communications. There is no
guarantee that interference will not occur in a particular instance. If this equipment does cause harmful
interference to other equipment, try to correct the problem by moving or reorienting the equipment.
If you cannot correct the problem by the method above, consult an authorized Bell Sports dealer or other
qualified service technician. Repairs should be performed only by qualified and authorized Bell Sports
technicians. Unauthorized repairs will void the products warranty.
This product has been tested and found to comply with FCC standards for home or office use.
FCC WARNING: Changes or modifications not expressly approved by Bell Sports, Inc. may void your authority to
operate this device under FCC Regulations

ENGLISH
5
ENGLISH
6CYCLOMET E R
Your new Blackburn Neuro cyclometer is equipped with an Ultra-High Frequency (UHF) Digital transmission
system for speed, distance, cadence and heart rate which operates on a frequency of 2.4GHz. This new
transmission system offers significant performance advantages over previous generations of wireless
cyclometers.
With this new system, information is sent to the receiver unit in the computer head in digitally encoded data
packets. These data packets are identified by unique individual identifier codes making for cross communi
-
cation (cross-talk) between adjacent units and electromagnetic interference (EMI) virtually impossible.
Another major advantage of this new system is greatly improved transmission range. Because digital encoding
virtually eliminates interference and cross talk, we can make the new digital system operate at significantly
greater ranges. While the range of most wireless cyclometers is measured in inches, our new UHF digital
system is measured in feet. The increased range will result in dramatically improved performance on instal
-
lations which have traditionally proven troublesome such as large bikes, tandems and recumbents.
AUTO START/STOP—Unlike wired units, wireless computers are incapable of having a true automatic start/stop
system because there is no hard wired circuit to close and activate the computer. Because of this, wireless
cyclometers must, at some point, turn off their radio system in order to conserve battery life. Your Blackburn
wireless computer is programmed with the most sophisticated Start/Stop algorithm available in a cyclometer.
HOW THIS PRODUCT WORKS HOW THIS PRODUCT WORKS
WIRELESS HEART RATE MONITORS (NEURO 5.0 AND 6.0 MODELS ONLY)
All Blackburn Neuro models are capable of monitoring heart rate using our new 2.4GH UHF digital transmission
system. If your Neuro unit was not supplied with a heart rate transmitter one may be purchased from your
Blackburn retailer. Utilizing our new 2.4GHz UHF digital transmission system. By utilizing UHF digital technology
we have been able to dramatically improve the reliability and performance of the heart rate system in this
product as compared to traditional heart rate systems. While the UHF digital technology used in this new heart
rate system dramatically improves its performance over traditional low frequency systems, it should be noted
there are conditions which may cause the system to generate false readings. To avoid the potential for false
readings. Please note the following:
1. The chest strap should be worn as tightly as possible without being uncomfortable. If the chest strap is
not tight enough, movement between it and your body can cause false signals to be generated, which
may be seen as heart beats by the cyclometer. This is especially true during high impact activities, such
as running.
2. Although extremely rare, environmental factors may interfere with the ability of the cyclometer to receive
a signal from the transmitter. This is especially true if the product is being used in close proximity to
other products operating on the same 2.4GHz transmission frequency. The system is designed with
redundancy to help reduce the possibility of interference effecting the accuracy of the unit.
3. While riding, the flow of air over your body may cause your jersey or shirt to flutter and tap against
the heart rate transmitter. This tapping can result in false signals being generated causing inaccurate
readings. Try wearing the transmitter backward so that the transmitter and electrodes are against your
back with the elastic strap across the front of your chest. Wearing snug jerseys or a tight base layer will
also help to reduce this problem from occurring.

ENGLISH
7
ENGLISH
8CYCLOMET E R
HOW THIS PRODUCT WORKS
PRESSURE SENSING ALTIMETERS (NEURO 6.0 MODEL ONLY)
Some Blackburn cyclometers come equipped with a highly sensitive pressure sensing altimeter module. This
altimeter is capable of measuring changes in altitude of as little as 1’ or 0.5m. The altimeter system in the
Neuro units is also programmed to display your instantaneous % grade. Because the altimeter system in the
Blackburn cyclometer relies on Barometric Pressure for its measurements, it is critical that you regularly
calibrate the unit to a known altitude. You may notice the altitude at the end of a ride may be slightly different
than what it was at the start, even though you started and stopped from the same location. This is caused by
small pressure changes in the atmosphere which occur continually over time. Generally these small changes
will have only a minor effect on the overall accuracy of the unit. However, the arrival or departure of a weather
front can change the current altitude display by several hundred feet or more.
To simplify the calibration process the Blackburn Neuro allows you to store your home altitude to memory and
calibrate the unit to this altitude at any time using a
PRESS & HOLD of the OPTION key while in the CURRENT
ALTITUDE screen (See Page 55 for more altimeter information).
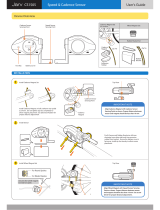
1
2
2
3
4
5
6
7
1
5
7
FACE OF COMPUTER
SPOKE & CADENCE MAGNETS
WIRELESS SPEED & CADENCE
TRANSMITTER
ZIP- TIES
HEART RATE TRANSMITTER
WIRELESS BRACKET
BRACKET SLEEVE
PARTS OF YOUR BLACKBURN NEURO
CYCLOMETER
4
6
3

ENGLISH
9
ENGLISH
10CYCLOMETER
RESETTING THE COMPUTER TO ITS
DEFAULT SETTINGS
Two “hidden” keys are located on the bottom of the computer each with specific
functions. Use a toothpick or other small pointed object to press these keys and
initiate their functions.
PAIRING KEY—Located to the lower right of the battery door.
This key is used to initiate the PAIRING SEQUENCE which allows you to digitally match
transmitters to the computer head. Detailed instructions for the PAIRING SEQUENCE
is found on Pages 21-24 of this manual
ALL CLEAR KEY (AC)—Located to the upper right fo the battery door.
This key is used to reset the units microprocessor to its default programming values.
Resetting the unit to its default values will CLEAR ALL MEMORIES including Total Time
and Total Distance Memories as well as all Heart Rate and Bicycle related settings.
DO NOT use the AC key unless you are sure you want to clear all stored information.
NOTE: Using the AC key does not clear Paired Transmitter information from the
memory, this information is permanently held in a separate memory.
PAIRING KEY
SHIPPING AND SLEEP MODES
SHIPPING MODE—Your new Blackburn Neuro computer comes to the dealer in SHIPPING MODE. In this mode
the LCD display is totally blank. This is done to extend the battery life. Press any key to wake the unit up and
advance to the default display mode.
NOTE: It is possible the unit may not be received in SHIPPING MODE if it has been previously
activated. This should not have an adverse impact on the life of the battery.
SLEEP MODE—When the receiver circuit of the computer unit shuts down, the unit goes into
its SLEEP MODE. In SLEEP MODE the display will show the current Time of Day, Chronograph
(RT or TT) and Units (Miles or Kilometers) settings. In SLEEP MODE the SPD, CAD and HR
icons indicate which types of transmitters are currently paired with the computer unit.
ALL CLEAR KEY (AC)

ENGLISH
11
ENGLISH
12CYCLOMETER
CHANGING THE BATTERY IN THE BLACKBURN NEURO
CYCLOMETER
Blackburn Neuro computers are powered by a CR2032 3v Lithium Battery. Under normal conditions, this battery
should last for approximately 300-350 hours depending on the quality of the battery.
REPLACING THE COMPUTER BATTERY
1. Using a coin, turn the battery door counter clockwise until the door comes free.
2. Take care not to damage the O-ring seal for the battery compartment and carefully remove the old
battery.
3. Place a new battery in the battery compartment with the positive (+) side toward the battery door. Be
extremely careful not to bend the battery contact when inserting a new battery.
4. Place the battery door over the opening and tighten it down by using a coin and turning in a clockwise
direction.
5. If the O-ring has been damaged, replace it before reinstalling the battery door. Battery door and O-ring
kits are available as replacement parts from your Blackburn Retailer.
CAUTION—Extreme care should be taken when replacing the battery to ensure the unit remains fully water
resistant. Failure to properly replace the battery and correctly seal the unit may cause the unit to become
damaged and may void the warranty.
CAUTION—Excessive use of the backlight system will result in shortened
battery life.
ALWAYS—Check the batteries if you are experiencing problems with your
computer. Most problems experienced with the operation of this unit are
the result of dead or dying batteries. Even supposedly “NEW” batteries
may be dead as a result of age or improper storage.
CHANGING THE BATTERY IN THE WIRELESS SPEED &
CADENCE TRANSMITTER
The Wireless Speed & Cadence Transmitter uses a CR 2032 3v Lithium battery. Under normal conditions, you
can expect to get about 1100-1450 hours of Speed & Cadence Transmitter use from a fresh battery.
1. Using a coin, turn the battery door counter clockwise until the door comes free.
2. Take care not to damage the O-ring seal for the battery compartment and carefully remove the old
battery.
3. Place a new battery in the battery compartment with the positive (+) side toward the battery door. Be
extremely careful not to bend the battery contact when inserting a new battery.
4. Place the battery door over the opening and tighten it down by using a coin and turning in a clockwise
direction.
5. If the O-ring has been damaged, replace it before reinstalling the battery door. Battery door and O-ring
kits are available as replacement parts from your Blackburn Retailer.
NOTE: Extreme care should be taken when replacing the
battery to ensure the unit remains fully water resistant.
Failure to properly replace the battery and correctly
seal the unit may cause the unit to become damaged
and may void the warranty.

ENGLISH
13
ENGLISH
14CYCLOMETER
CHANGING THE BATTERY IN THE HEART RATE
TRANSMITTER
Blackburn Neuro cyclometers with Heart Rate feature a wireless heart rate transmitter, powered by a CR2032
3v Lithium battery. Under normal conditions you can expect to get approximately 750 hours of heart rate
transmitter use with a fresh battery.
1. Using a coin, turn the battery door counter clockwise until the door comes free.
2. Take care not to damage the O-ring seal for the battery compartment and carefully remove the old
battery.
3. Place a new battery in the battery compartment with the positive (+) side toward the battery door. Be
extremely careful not to bend the battery contact when inserting a new battery.
4. Place the battery door over the opening and tighten it down by using a coin and turning in a clockwise
direction.
5. If the O-ring has been damaged, replace it before reinstalling the battery door. Most jewelers and
cyclometer shops should have replacement O-ring seals. Battery door and O-ring kits are available as
replacement parts from your Blackburn Retailer.
NOTE: Extreme care should be taken when replacing the battery to ensure the unit remains fully water resistant.
Failure to properly replace the battery and correctly seal the unit may cause the unit to become damaged
and may void the warranty.
NOTE: All Neuro units are capable of displaying heart rate information from Blackburn Digital heart rate
transmitters. Neuro 5.0 and 6.0 units are supplied from the factory with heart rate transmitters. The
Neuro 4.0 unit can be upgraded to heart rate functionality with the additional purchase of a Blackburn
Digital heart rate transmitter from your Blackburn dealer.
WEARING THE HEART RATE TRANSMITTER
To ensure a proper heart rate display, the chest transmitter must be properly adjusted. Snap the plastic tabs
at the end of the elastic belt into the holes at the end of the transmitter, and adjust the strap so that the
transmitter fits tightly below the pectoral muscles, as shown in the drawing.
NOTE: Users with significant chest hair may have a problem obtaining contact between the transmitter
electrodes and their skin, resulting in poor performance. It may be necessary for these individuals to
shave the area of their chest beneath the transmitter.
NOTE: In dry and cold climates it may take a few minutes for a layer of perspiration to form between the
cheststrap and the skin. Moistening the electrodes with saliva or ECG conductive gel can speed up this
process.
ELECTRODES

ENGLISH
15
ENGLISH
16CYCLOMETER
KEYS AND THEIR FUNCTIONSKEYS AND THEIR FUNCTIONS
QUICK PRESS VS. PRESS & HOLD
There are two key actions used to program and operate the Neuro computer.
QUICK PRESS—The key is pressed quickly and then immediately released. This is the most common key action
and is used for most operations. Throughout this manual,
QUICK PRESS will be indicated in BLUE.
PRESS & HOLD—The key is pressed and held for a period of 2-seconds until the desired action takes place.
This key action is generally used to enter a programming sequence or to clear information from the display.
Throughout this manual,
PRESS & HOLD will be indicated in RED.
MULTIPLE KEY FUNCTIONS
• PRESS & HOLD MODE and OPTION to change between Bike 1 and
Bike 2 settings
•
PRESS & HOLD MODE, START/STOP and OPTION to enter RACE
DISPLAY mode.

ENGLISH
17
ENGLISH
18CYCLOMETER
KEYS AND THEIR FUNCTIONS KEYS AND THEIR FUNCTIONS
UPPER DISPLAY/EL KEY
Primary Function
•
PRESS & HOLD to Change the Upper Display Window view.
The upper window is capable of displaying Current Cadence,
Current Heart Rate or Heart Rate Training Level.
Secondary Function
•
QUICK PRESS to Activate the UltraNightGlow™ display light.
OPTION KEY
Primary Function
•
QUICK PRESS to change between OPTIONS within MODES
Secondary Functions
•
QUICK PRESS to Change a Variable in a Setting Sequence
Upward. HOLD for FAST ADVANCE
•
PRESS & HOLD in Main Altimeter Display to calibrate to stored
home altitude.
•
PRESS & HOLD in any screen except Altimeter to enter LINK
Sequence.
START/STOP KEY
Primary Function
•
QUICK PRESS to Start/Stop TT Chronograph.
•
QUICK PRESS to Start and Stop LAP/INTERVAL Chronograph.
•
PRESS & HOLD in DST MODE to Clear ALL Ride Data.
Secondary Functions
•
QUICK PRESS to Change a Variable in a Setting Sequence
Downward. HOLD for FAST ADVANCE.
• PRESS & HOLD to Clear Maximum Speed or Maximum Cadence.
MODE KEY
Primary Function
•
QUICK PRESS to change between MODES.
Secondary Functions
•
PRESS & HOLD to Enter Setting Sequences.
•
QUICK PRESS to Select a Variable in a Setting Sequence.

ENGLISH
19
ENGLISH
20CYCLOMETER
SECTIONS OF LCD DISPLAY SECTIONS OF LCD DISPLAY
SPEED WINDOW
Current Speed is always visible
in the upper left corner of the
LCD display except in Race
Mode.
KM/H AND M/H
These icons indicate if the
unit is programmed to display
speed and distance in Miles or
Kilometers.
UPPER DATA WINDOW
The Upper Data Window located
at the top right corner of the
LCD Display is one of the unique
features of Blackburn Neuro
computers. You can choose
to display Current Cadence,
Current Heart Rate, Heart Rate
Training Level or leave this
window blank.
CAD
This icon indicates Cadence is
currently being shown in the
Upper Data Window.
RT/TT
These icons indicate if the
primary chronograph is
programmed to display Ride
Time (RT) with the chronograph
starting and stopping with the
turning of the wheel. Or Total
Time (TT) with the chronograph
running continually.
CHRONOGRAPH WINDOW
The center line of the LCD
display shows the primary
chronograph for the unit. The
center line always shows the
primary chronograph with two
exceptions. 1. When viewing
Heart Rate Dynamic Memory in
the Lower Data Window, time
accumulated in each heart rate
zone will be displayed in the
Chronograph Window. 2. When
performing an interval workout
using the Interval Chronograph
the time for each Work and
Rest Session is displayed in the
Chronograph Window.
HEART RATE SYMBOL
This icon indicates Heart Rate
or Heart Rate Training Level is
currently being shown in the
Upper Data Window.
COMPARISON ARROWS
These arrows will indicate if
your current speed is above,
below or equal to your current
average speed.

ENGLISH
21
ENGLISH
22CYCLOMETER
SECTIONS OF LCD DISPLAY SECTIONS OF LCD DISPLAY
LOWER DATA WINDOW
The Lower Data Window shows a wide range of secondary
functions. This window is controlled by the MODE and
OPTION keys. Pressing the MODE key scrolls through the
following primary information groups. Pressing the OPTION
key scrolls through secondary information in each primary
information group:
Speed Information
Distance Information
LAP/INTERVAL Chronograph Information
Cadence Information (If Active)
Heart Rate Information
Altitude Information
Time of Day (If Active—See Page 31 for more detail
on the operation of the Lower Data Window using the
MODE and OPTION keys.)
The Icon Line above the Lower Data Window indicates which
function you are currently viewing.
In Sleep Mode, the Icon Line also indicates which transmitters
are currently paired (SPD, CAD, HR) to the receiver.
AM
This icon is located to the right
of the Lower Data Window and
indicates when the 12-hr clock
is showing AM time. PM and 24-
hr clock time are indicated by
the lack of any icon.
BIKE 1/BIKE 2
To the left of the Lower Data
Window are the Bike 1 and Bike
2 Icons. To manually change
between Bike 1 and Bike 2
settings,
PRESS & HOLD both
the MODE and OPTION key to
change the Bike Settings at
any time.
NOTE: Once you have paired
separate Transmitters for Bike
1 and Bike 2, the computer unit
will automatically recognize
each transmitter and configure
the computer accordingly.
FT / M
These icons indicate if altitude
is being shown in Feet (FT) or
Meters (M).
NOTE: The altimeter setting is
independent of the Miles/
Kilometers settings. You
may choose to display
speed in Miles per Hour
and Altitude in Meters.
ALTIMETER (NEURO 6.0 ONLY)
To the right of the Lower Data
Line there is a mountain icon
which is active when altimeter
functions are being displayed.

ENGLISH
23
ENGLISH
24CYCLOMETER
Blackburn Neuro Computers allow you to program two separate bike functions. Most functions are totally
independent. For example, you can program Bike One for Ride Time in Miles and Bike Two for Total Time in
Kilometers.
CHANGE BIKE 1/BIKE 2 SETTING
To manually change the Bike 1/Bike 2 setting, PRESS & HOLD both the MODE and OPTION keys at the same
time. When Bike 1-2 icon changes, release the keys.
Once you have paired separate Speed/Cadence transmitters for Bike 1 and Bike 2 to the system (Pages 24-27)
there is no need to manually change between Bike 1 and Bike 2 settings in normal operation. This process will
be performed automatically once the system LINKS with a Speed/Cadence transmitter.
BIKE ONE/BIKE TWO SETTING PAIRING TRANSMITTERS TO THE COMPUTER UNIT
Each Speed/Cadence and Heart Rate transmitter is programmed with its own unique signal which must be
stored in the memory of the computer unit. This process is called PAIRING. We have tried to make the pairing
process as automated as possible. With a little planning all transmitters can be paired simply and easily.
Before beginning the pairing process please have the following items easily accessible:
1. Computer Head Unit
2. Bike 1 Speed and Cadence Transmitter
3. Wheel Magnet
4. Heart Rate Transmitter (Heart Rate units only)
5. Bike 2 Speed and Cadence Transmitter if you are planning on setting up a second bike.
Please wear the heart rate transmitter and make sure the electrodes are moistened to assure good skin
contact.
CAUTION—Do not attempt the pairing process for the Blackburn Neuro cyclometer with other Blackburn Neuro
units in use near by. Please allow at least 15 feet of distance between units during the pairing process. Failure
to do this may result in the wrong transmitters being paired to the receiver.

ENGLISH
25
ENGLISH
26CYCLOMETER
STEP BY STEP — PAIRING THE SPEED/CADENCE TRANSMITTER
1. Make sure Bike 1 is selected. If Bike 2 is showing on the display, change the display to Bike 1 using a
2-second PRESS & HOLD of the MODE and OPTION keys. If you are planning on using the system with
two different bikes you will need to purchase a second speed/cadence transmitter for use on Bike 2
and repeat the pairing process starting in the Bike 2 setting. Bike 1 Speed and Cadence must be paired
BEFORE the system will allow you to pair a heart rate or second bike transmitter. (Complete second bike
kits are available from your Blackburn Retailer)
2. On the back of the computer unit, depress the small hidden PAIRING key using a small pointed object.
The display of the unit will clear with PAIR showing in the Lower Data Line and your Bike selection to left.
3. Select PAIR with a
QUICK PRESS of the MODE key.
4. SPD/CAD will automatically appear in the Lower Data Line and 4-dashes will begin flashing in the
Chronograph Window indicating the unit is searching for the Bike 1 Speed/Cadence Transmitter.
STEP BY STEP — PAIRING TRANSMITTERS THE
SPEED/CADENCE TRANSMITTER (CONTINUED)
5. Pass the Wheel Magnet back and forth past the Speed sensor portion of the
Speed/Cadence Transmitter for several seconds. When the system has paired
with and stored the Speed/Cadence Transmitter information to memory, the
Lower Data Line will show DONE along with the SPD and CAD Icons above it for
a period of 5-seconds, before advancing automatically to the pairing sequence
for the Heart Rate Transmitter.
6. If the Pairing sequences is not successful, the Lower Data Window will flash
FAIL along with the SPD/CAD Icons above it for a period of 5-seconds and
automatically restart the pairing sequence for the Speed Transmitter.
NOTE: the unit will cycle through 3 FAIL sequences and abort the pairing sequence.
7. This will continue until the unit recognizes and stores a Speed Transmitter or the
user aborts the process by a QUICK PRESS of the OPTION key.
NOTE: You MUST complete the Speed/Cadence pairing sequence for Bike 1 in order to
advance to the Heart Rate Transmitter pairing sequence.
NOTE: If you intend to PAIR heart rate, you, MUST be wearing Heart Rate Transmitter.
PAIRING TRANSMITTERS TO THE COMPUTER UNIT PAIRING TRANSMITTERS TO THE COMPUTER UNIT
STEP 4
STEP 2
STEP 3
STEP 5
STEP 6

ENGLISH
27
ENGLISH
28CYCLOMETER
PAIRING TRANSMITTERS TO THE COMPUTER UNIT
STEP BY STEP — PAIRING TRANSMITTERS TO THE
HEART RATE TRANSMITTER (CONTINUED)
8. Once the system has paired with and stored the Speed/Cadence Sensor
information to memory it will advance automatically to the pairing sequence for
Heart Rate.
9. If you are wearing the Heart Rate Transmitter the pairing should be automatic as
with the Speed and Cadence Transmitters. Once the system has paired with and
stored the Heart Rate Transmitter information to memory it will automatically
advance back to the Primary Display Screen.
NOTE: When a Heart Rate Transmitter has been paired to the system, it can be used for
both Bike 1 and Bike 2 settings.
10. If your Blackburn Neuro cyclometer system DOES NOT include a Heart Rate
Transmitter simply
QUICK PRESS the OPTION key to skip the Heart Rate
Transmitter pairing process and exit to the Primary Display Screen.
11. If you wish to configure the unit for a second bike, select Bike 2 and repeat steps 1-7 above.
NOTE: All Blackburn Neuro cyclometers are heart rate compatible. If your unit was not supplied with a Heart
Rate Transmitter system you may upgrade your unit to full heart rate functionality simply by purchasing a
compatible Heart Rate Transmitter from your Blackburn dealer.
NOTE: At any point during the Pairing Sequence a QUICK PRESS of the Pairing Key will exit the sequence.
INSTALLING THE COMPUTER ON YOUR BIKE
INSTALLING THE WIRELESS SPEED & CADENCE TRANSMITTER
Once the transmitter has been paired to the computer you are ready to install it on your bike. It is possible
to install the Speed/Cadence transmitter first and then perform the pairing sequences but this is not
recommended for reasons of simplicity.
The speed and cadence transmitter system is made up of two parts; the Speed Transmitter/Sensor and the
Cadence Sensor which are attached to each other by a short wire. Attach the Cadence Sensor first followed by
the Speed Sensor and Transmitter in the following manner.
1. Attach the cadence sensor portion of the system to the LEFT chainstay where the crank arm passes the
stay using the zip-ties provided. Snug up the zip-ties but do not fully tighten them. We recommend the
cadence sensor be mounted toward the TOP of the chainstay (see illustration on following page).
NOTE: The wire exiting the Cadence Sensor should be pointing toward the REAR of the bike.
2. Very loosely attach the cadence magnet to the back side of the LEFT crank arm using the zip-tie provided
(to allow for adding spacers, if necessary). The cadence magnet should be attached as closely to the
pedal spindle as possible.
3. Adjust and position the sensor and magnet so they pass within 1-3mm of each other. Fully tighten the zip-
ties once you have everything properly aligned.
4. Attach the transmitter body to the TOP of the LEFT chainstay (see illustration on following page) using the
zip-ties provided so that the wire between the transmitter and cadence sensor is straight but not under a
lot of tension. Snug up the zip-ties, but do not fully tighten them.
5. Attach the spoke magnet to a spoke on the same side of the wheel as the sensor. Tighten the magnet
enough to hold it in place but loose enough so that it is still movable.
6. Adjust the position of the sensor and magnet so they are in proper alignment as shown (see illustration
on following page) The magnet should pass by the sensor adjacent to the indicator line at a distance of
1-3mm.
7. Once everything is in alignment, fully tighten the spoke magnet in place and tighten the zip-ties.
STEP 8

ENGLISH
29
ENGLISH
30CYCLOMETER
INSTALLING THE WIRELESS SPEED & CADENCE TRANSMITTER
INSTALLING THE WIRELESS SPEED & CADENCE TRANSMITTER
WARNING—Speed/Cadence Sensor mounting MUST NOT interfere with spokes or rear wheel.
WARNING—If Speed/Cadence Sensor interferes with rear wheel or spokes while riding, stop riding
immediately and remount sensor as directed in owner’s manual. Do not ride bike if Speed/Cadence sensor still
interferes with rear wheel or spokes.
INSTALLING THE WIRELESS HANDLEBAR BRACKET
Attach the wireless handlebar bracket to the handlebars. Tighten the mounting screw enough so the bracket
will not easily rotate on the handlebars. Do not over tighten the mounting screw or you may damage the
bracket.
NOTE: There are two molded plastic shims supplied with the Neuro computer brackets. The THIN shim allows
the bracket to fit Oversized 31.8 mm handlebars. The THICK shim allows the bracket to fit standard
26.0mm handlebars.
NOTE: There is a wide variety of smaller handlebar diameters which are available. If the thick shim does not
make the bracket tight enough, cut a section of the thin spacer to use as a shim to fill up the additional
space as necessary.
NOTE: If you have odd shaped handlebars which will not fit a standard round mounting system, a stem mount
adaptor shoe is available from your Blackburn Dealer.
INSTALLING THE COMPUTER ON YOUR BIKE
INSTALLING THE COMPUTER ON YOUR BIKE

ENGLISH
31
ENGLISH
32CYCLOMETER
When you start the system needs to establish a LINK between the transmitters you are using and the computer
unit on your bike before it can begin receiving data.
LINK FROM SLEEP MODE
Any time the computer is activated out of SLEEP MODE, the LINK sequence starts
automatically and runs for a period of 10-12 Seconds, with LINK appearing in the
Lower Data Line and 4-dashes flashing in the Chronograph Window. Begin your ride
within that time period and the system will automatically LINK with all available paired
transmitters and the display will automatically advance to the primary display screen
as soon as the pairings have been made. If you do not start riding within the 10-12
second period the unit will go back into SLEEP MODE in order to conserve battery life.
If this happens, simply restart the LINK sequence by pressing any key.
NOTE: If you have a paired heart rate transmitter but are choosing NOT to use the heart rate system on a
particular ride, start riding for a short distance so the system can LINK with the speed and cadence
transmitter. If the system does not recognise a heart rate transmitter by the end of the LINK sequence
it will simply advance out of the link mode and the Heart Rate displays will not appear on screen. If you
wish to LINK a Heart Rate Transmitter to the system AFTER it has recognized and linked with a SPEED/
CADENCE transmitter; OR if you wish to change Bikes while the system is active, follow the steps on the
following page for LINKING a transmitter from active mode.
NOTE: When in Sleep Mode, the icon line above the Lower Data Window will indicate which types of
transmitters are currently paired to the system—SPD—CAD—HR
INSTALLING THE COMPUTER ON YOUR BIKE
LINKING TRANSMITTERS TO COMPUTER FOR USE
ATTACHING THE COMPUTER HEAD TO THE HANDLEBAR BRACKET AND
TESTING
When the bracket is completely installed on the bike slide the Neuro computer unit into the bracket. The
computer should LOCK into the bracket with an AUDIBLE “CLICK”. If you do not hear a click or if the Neuro
computer body is not flush with the back edge of the bracket the computer is not locked in place and may come
out.
Once everything is assembled perform the LINK sequence shown on Pages 27-28 and turn the crank to make
sure speed and cadence are being displayed on the screen. If you are not receiving one or both pieces of
information, check the magnet and sensor alignment and make sure the magnets are passing the proper point
on the sensor and that they are within 1-3mm. If they are closer to 3mm than to 1mm try reducing the gap and
test the system again. If you are still having problems getting display readings, repeat the Pairing and Link
sequences for the transmitter.

ENGLISH
33
ENGLISH
34CYCLOMETER
LINK FROM ACTIVE MODE
If you need to enter the LINK sequence while the computer is active (Not from Sleep Mode). PRESS & HOLD
the OPTION key in any screen EXCEPT ALTIMETER for a period of approximately 3-seconds and the system will
automatically enter the LINK sequence as described previously. LINK from Active Mode will usually be used
under these conditions:
1. If you wish to LINK a paired heart rate transmitter when the unit is already fully operational.
2. If you wish to move your computer between Bike 1 and Bike 2 while the unit is fully operational.
3. If the LINK has been lost due to inactivity prior to the unit going into SLEEP MODE .
AUTOMATIC BIKE RECOGNITION
Once you have paired separate transmitters for Bike 1 and Bike 2, your Blackburn Neuro will automatically
recognize which bike it is mounted on during the LINK process and configure itself accordingly.
LINKING TRANSMITTERS TO COMPUTER FOR USE BASIC OPERATION
MODE AND OPTION FLOW SEQUENCES
This diagram shows the information which is displayed in the Lower Data Window in response to QUICK
PRESSES
of the MODE and OPTION keys.

ENGLISH
35
ENGLISH
36CYCLOMETER
BASIC OPERATION
BASIC OPERATION
UPPER DATA WINDOW FLOW SEQUENCES
This diagram shows the information which is displayed in the Upper Data Window. You may choose to show
Blank, Cadence, Heart Rate or Training Level (1-5) in this line.
AVERAGE SPEED COMPARISON
Just below the Upper Data Window are two arrows: the Comparison Arrows function
as a Speed Comparator indicating if you current speed is above (
1), below ( 2) or
equal (no arrow) to your current average speed.
STEP BY STEP—CHANGING THE UPPER DATA WINDOW INFORMATION
1. By Default the Upper Data Window is Blank (no display data) when you install a new battery.
2. To change the Upper Data Window
PRESS & HOLD the Upper Display/EL key for approximately
2-seconds until the value changes.
3. Release the key and repeat step #2 until the information you want is showing.
NOTE: If Heart Rate or Cadence is displayed in the Upper Data Window, it is not shown in the Heart Rate or
Cadence sequences of the Lower Data Window.
NOTE: Heart Rate information will only be able to be accessed if you have PAIRED AND LINKED a heart rate
transmitter to the system.
AVERAGE SPEED
COMPARISON ARROWS
/