
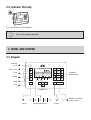
Quick Start
•PUE HX5.EX
Indicator
ITKB-11-01-12-20-EN

To view the full user manual, go to the website or scan the QR code:
radwag.com/pl/manuals/9O3

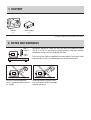
1. CONTENT
*The type of plug may vary depending on the country.
Power supply*
×1
Indicator
×1
2. NOTES AND WARNINGS
Operate the indicator in a room free from dust where the temperature ranges
-10–40 °C (14–104 °F) and where the relative humidity is below 80%. Potential
temperature change shall occur gradually and slowly.
Place the scale on a table or a wall bracket ensuring stability. For the most stable
and repeatable results it is recommended to use an anti-vibration table.
-10
o
C
+14
o
F
+104
o
F
+40
o
C
Place the scale away from heat
sources. Avoid exposing the scale to
the sunlight.
Avoid exposing the scale to the influ-
ence of a magnetic field. Do not weigh
magnetic substances.

EX area Safe area
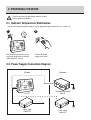
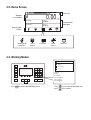
3. PREPARING FOR WORK
3.1. Indicator Temperature Stabilization
3.2. Power Supply Connection Diagram
Place the device on the workstation and leave it until it
reaches ambient temperature.
Prior to connecting to the power supply select the appropriate type of connection (see section 3.2)
Prior to switching the device on let it
reach room temperature (estimated
stabilization time: 8 hours).
Connect the power
supply to the mains.
1 2
1
1-8h
HX5 EX
Power supply
PM01.EX-1
Communication module
IM01.EX
Power supply
PM01.EX-2

The scale is ready for operation!
Press ON/OFF key to start the indicator.
3.3. Indicator Start-Up
PUE HX5
E2R
Product:
Operator: Sum:
0.00 kg
Tare:
4. PANEL AND SCREEN
4.1. Keypad
Switching
on / off
Home screen
Log in
Cancel
Zeroing
Taring
Units
ConfirmProgrammable buttons
Operation confirmation
or report printout
Navigation keys
Text keypad /
Numeric keypad

Working modes
Percent weighing
Dosing
Working modes
Weighing
Checkweighing
Dosing
Weighing
Formulations
4.3. Working Modes
Press key to enter Working Modes menu. Press keys to select working mode and
press key to confirm.
4.2. Home Screen
0.00
><
Product:
Operator: Sum:
0.00 kg
0.00 kg
kg
Tare:
PUE HX5
E2R
Programmable
buttons
Programmable
workspace
Weighing
result window
Status bar
Working mode
parameters
Lot numberSelect
product
Delete
statistics
Databases
Weighing
Dosing
Formulations
Percent weighing
Parts counting
Animal weighing

><
NET
PUE HX5
E2R
Product:
Operator: Sum:
0.00 kg
Tare:
4.4. Unit Selection
Press key to change the mass unit.
The indicator enables selecting the
following mass units:
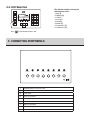
5. CONNECTING PERIPHERALS
PLATFORM OUTINRS 232 (1)RS 232 (2)RS 485 IM01.EX PM01.EX
Kontroler PLC
RS 485
PLATFORM OUTINRS 232 (1)RS 232 (2)RS 485 IM01.EX PM01.EX
IM01.EX
Moduł komunikacyjny
IM01.EX
Skaner kodów
kreskowych
Czytnk kart
RFID
M12 5P
Skaner kodów
kreskowych
M12 5P M12 5P
1 2 3 4 5 6 7 8
9
1 Weighing platform connection cable
2 Outputs cable
3 Inputs cable
4 RS232 (1) connector
5 RS232 (2) connector
6 RS485 connector
7 IM01.EX cable gland
8 PM01.EX cable gland
9 Grounding terminal
•Gram [g]
•Kilogram [kg]
•Carat [ct]
•Ounce [oz]
•Pound [lb]
•Newton [N]
•Custom unit 1 [U1]
•Custom unit 2 [U2]

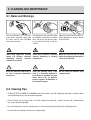
6. CLEANING AND MAINTENANCE
Avoid using aggressive cleaning
agents (e.g. solvents, cleansers
containing chlorine, corrosive
substances or bleach).
Clean the indicator when there is
no risk of explosive atmosphere
occurrence.
Do not clean the indicator using
compressed air.
Avoid using cleansers containing
abrasive substances or scouring
preparations.
Clean the housing using a wet
cloth. It is especially important if
the indicator is operated in a room
where there is dry air. Moisture
protects against accumulation of
electrostatic charges.
Make sure that no dust or liquid
enters the weighing system and the
inside of the indicator.
6.2. Cleaning Tips
Prior to maintenance it is necessary
to disconnect the power supply from
the mains and to check grounding
connection and status.
For cleaning use only soft cloths made
of microfiber, natural fibres or artificial
fibres. Do not use any abrasive cloths
or any material that may scratch the
surface!
Apply the cleanser onto the cloth first.
Avoid applying the cleanser directly
onto the device!
6.1. Notes and Warnings
• STAINLESSSTEELELEMENTS,ALUMINUMcanbecleanedwithasoftclothslightlymoistenedwithasolutionofwater
and a mild detergent (e.g. soap or dishwashing liquid).
• Plastic elements can becleanedwith a softcloth slightly moistened with a solution ofwateranda mild detergent
(e.g. soap or dishwashing liquid).
• Drycleanedelementsusingsoftanddryclothorusedust-freepapertoweltoabsorbtheremainingmoisture.
• Donotinstallthecomponentsuntiltheyarecompletelydry.


www.radwag.com
-
 1
1
-
 2
2
-
 3
3
-
 4
4
-
 5
5
-
 6
6
-
 7
7
-
 8
8
-
 9
9
-
 10
10
-
 11
11
-
 12
12


RADWAG HX5.EX-1.4P2.2000.C1 User manual
- Type
- User manual
- This manual is also suitable for
Ask a question and I''ll find the answer in the document
Finding information in a document is now easier with AI
Related papers
-
RADWAG TMX19C.6.H2.K User manual
-
RADWAG HX5.EX-1.4N.300.H1 User manual
-
-
-
RADWAG WPT/4N 600 H4 User manual
-
RADWAG HIGH User manual
-
RADWAG HX7.30.H3 User manual
-
RADWAG C32.6.F1.K User manual
-
-
RADWAG PS 4500.X2.M.PGC User manual
Other documents
-
Avet Reels HX - 5/2 User manual
-
CODi A09010 Datasheet
-
Mettler Toledo NewClassic Balances MS Semi-Micro Models Operating instructions
-
-
-
Olympia CM 811 Operating Instructions Manual
-
-