Page is loading ...

English
Français
Deutsch
Nederlands
ItalianoEspañol
Dansk
Owner’s manual and mounting instruction
Mode d’emploi et manuel d’installation
Bedienungs- und Einbauanleitung
Gebruiksaanwijzing en inbouwhandleiding
Istruzioni d’uso e d’installazione
Instrucciones de manejo y de montaje
Betjeningsvejledning og monteringsanvisning
DOM 6500

2
30 °
POWER
12 V
red / rouge / rot
blue / bleu / blau
black / noir / schwarz
yellow / jaune / gelb
AUDIO L/R
VIDEO
+12V
REMOTE
OUT
3A
0.5 A
AV1 IN
white / blanche / weiß
ILL
CONTROL
OUTPUT
AV1
INPUT
0.25 A max.

3

5
Illustrations Pages 2 - 3
Instructions de montage Page 35
Mode d’emploi Page 39
Abbildungen Seiten 2 - 3
Einbauanleitung Seite 61
Bedienungsanleitung Seite 65
Illustrations Page 2 - 3
Installation instructions Page 9
Operating instructions Page 13
EnglishFrançais
Deutsch
Afbeeldingen Pagina’s 2 - 3
Inbouwaanwijzing Pagina 87
Gebruiksaanwijzing Pagina 91
Nederlands
Figures Pagine 2 - 3
Instruzioni per il montaggio Pagina 113
Istruzioni d’uso Pagina 117
Italiano
Ilustraciones Páginas 2 - 3
Manual de instalación Página 139
Instrucciones de manejo Página 143
Español
Illustrationer Sider 2 - 3
Monteringsvejledning Side 165
Betjeningsvejledning Side 169
Dansk

CONTENTS
Contents
INSTALLATION INSTRUCTIONS . . . . . . . . . . . . . . . . . . . . . . . . . . . . . . . 9
Important Information. . . . . . . . . . . . . . . . . . . . . . . . . . . . . . . . . 9
Scope of delivery . . . . . . . . . . . . . . . . . . . . . . . . . . . . . . . . . . . . 9
Taking safety precautions, Fig. 1 . . . . . . . . . . . . . . . . . . . . . . . . . . 10
Electrical connections, Fig. 2 . . . . . . . . . . . . . . . . . . . . . . . . . . . . . 10
Installing the DVD multimedia system . . . . . . . . . . . . . . . . . . . . . . . 11
Preparing the remote control . . . . . . . . . . . . . . . . . . . . . . . . . . . . 12
Initial operation. . . . . . . . . . . . . . . . . . . . . . . . . . . . . . . . . . . . 12
Checking the vehicle functions . . . . . . . . . . . . . . . . . . . . . . . . . . . 12
GENERAL INFORMATION . . . . . . . . . . . . . . . . . . . . . . . . . . . . . . . . . 13
Features . . . . . . . . . . . . . . . . . . . . . . . . . . . . . . . . . . . . . . . . 13
Notes on the Operation Guide. . . . . . . . . . . . . . . . . . . . . . . . . . . . 13
Important information for safe operation . . . . . . . . . . . . . . . . . . . . . 14
Class 1 laser product . . . . . . . . . . . . . . . . . . . . . . . . . . . . . . . . . 14
Copyright protection . . . . . . . . . . . . . . . . . . . . . . . . . . . . . . . . . 14
Region Code Information . . . . . . . . . . . . . . . . . . . . . . . . . . . . . . 14
Dolby Digital . . . . . . . . . . . . . . . . . . . . . . . . . . . . . . . . . . . . . 14
DISC NOTES . . . . . . . . . . . . . . . . . . . . . . . . . . . . . . . . . . . . . . . .15
Disc formats . . . . . . . . . . . . . . . . . . . . . . . . . . . . . . . . . . . . . . 15
Handling and cleaning DVDs and CDs. . . . . . . . . . . . . . . . . . . . . . . . 15
CONTROLS . . . . . . . . . . . . . . . . . . . . . . . . . . . . . . . . . . . . . . . . .16
REMOTE CONTROL . . . . . . . . . . . . . . . . . . . . . . . . . . . . . . . . . . . . 18
BASIC OPERATION . . . . . . . . . . . . . . . . . . . . . . . . . . . . . . . . . . . . . 20
Switching on/off . . . . . . . . . . . . . . . . . . . . . . . . . . . . . . . . . . . 20
Loading a disc . . . . . . . . . . . . . . . . . . . . . . . . . . . . . . . . . . . . . 20
Ejecting a disc . . . . . . . . . . . . . . . . . . . . . . . . . . . . . . . . . . . . . 20
Auxiliary lighting . . . . . . . . . . . . . . . . . . . . . . . . . . . . . . . . . . . 20
TFT display. . . . . . . . . . . . . . . . . . . . . . . . . . . . . . . . . . . . . . . 20
Starting/stopping playback. . . . . . . . . . . . . . . . . . . . . . . . . . . . . . 22
Pause (still picture) . . . . . . . . . . . . . . . . . . . . . . . . . . . . . . . . . . 22
Fast forward / reverse. . . . . . . . . . . . . . . . . . . . . . . . . . . . . . . . . 22
Skipping chapters/tracks . . . . . . . . . . . . . . . . . . . . . . . . . . . . . . . 22
Repeating chapters/tracks . . . . . . . . . . . . . . . . . . . . . . . . . . . . . . 22
Time displays . . . . . . . . . . . . . . . . . . . . . . . . . . . . . . . . . . . . . 23
MENU function . . . . . . . . . . . . . . . . . . . . . . . . . . . . . . . . . . . . 24
Selecting audio language . . . . . . . . . . . . . . . . . . . . . . . . . . . . . . . 24
Selecting subtitle language (DVD only) . . . . . . . . . . . . . . . . . . . . . . . 24
Zoom (magnification). . . . . . . . . . . . . . . . . . . . . . . . . . . . . . . . . 24
Selecting viewing angle (DVD only) . . . . . . . . . . . . . . . . . . . . . . . . . 24
ADVANCED OPERATION. . . . . . . . . . . . . . . . . . . . . . . . . . . . . . . . . . 25
MP3 disc playback. . . . . . . . . . . . . . . . . . . . . . . . . . . . . . . . . . . 25
JPEG image CDs . . . . . . . . . . . . . . . . . . . . . . . . . . . . . . . . . . . . 26
k
English
7

CONTENTS
SETTINGS . . . . . . . . . . . . . . . . . . . . . . . . . . . . . . . . . . . . . . . . . . 27
Setup Menu . . . . . . . . . . . . . . . . . . . . . . . . . . . . . . . . . . . . . . 27
MAINTENANCE AND CARE . . . . . . . . . . . . . . . . . . . . . . . . . . . . . . . . 29
Replacing batteries of the remote control . . . . . . . . . . . . . . . . . . . . . 29
Changing bulbs . . . . . . . . . . . . . . . . . . . . . . . . . . . . . . . . . . . . 29
Cleaning the unit and the remote control . . . . . . . . . . . . . . . . . . . . . 29
TROUBLESHOOTING . . . . . . . . . . . . . . . . . . . . . . . . . . . . . . . . . . . . 30
Service . . . . . . . . . . . . . . . . . . . . . . . . . . . . . . . . . . . . . . . . .30
GLOSSARY & INTERNET LINKS. . . . . . . . . . . . . . . . . . . . . . . . . . . . . . . 31
Glossary . . . . . . . . . . . . . . . . . . . . . . . . . . . . . . . . . . . . . . . . 31
Internet links . . . . . . . . . . . . . . . . . . . . . . . . . . . . . . . . . . . . . 32
8

Important Information
A
Only trained specialists may install the system.
A
Observe the automotive industry quality standards.
A
Fire hazard. During drilling, be careful not to damage hidden cable harnesses, the fuel tank
and fuel lines.
A
Never drill into supporting or safety-relevant chassis parts.
It is essential to observe the following when installing components in the passenger
compartment:
A
Ensure that the driver has a clear all-round view.
A
Increased risk of injury in the event of an accident. Do not install components in the inflation
range of the airbag or in areas where the head or knees may knock against them.
A
Install only in vehicles with a 12 V on-board voltage and the negative pole on the chassis. Risk
of malfunctions, damage and vehicle fire if installed in unsuitable vehicles.
A
Do not damage cables of the safety systems (airbag etc.). (Lines are normally specially
marked, e.g. by labels.)
A
Do not use inspection lamps to test the voltage, since excessively high currents can damage /
destroy electronic components.
A
Do not use any pinch or cut connectors. Solder all cable connections. Insulate all solder points
with shrinkable hose or insulating tape.
A
If there are earth connections on the chassis, insert toothed washers. Remove paint and dirt
first, if necessary.
A
Use only the parts included with the unit to ensure proper installation. The use of
unauthorized parts can cause malfunctions.
A
Avoid installing the unit where it would be subject to high temperature, such as from direct
sunlight, or from hot air, from the heater, or where it would be subject to dust, dirt or excessive
vibration.
Scope of delivery
1 DVD multimedia system
1 Mounting plate
1 Remote control
1 Power supply cable (3 m) with fuses
1 Audio/video cable (2 m) with special plug for AV2 input
1 Video cable (3 m)
12 Screws4x10mm
5 Screws M4 x 10 mm
5 Screws M4 x 15 mm
3 Rubber stoppers
1 User Manual
Technical data, design and scope of delivery may vary slightly due to product updating.
INSTALLATION INSTRUCTIONS
9
English

Taking safety precautions, Fig. 1
A
Before starting work, disconnect the earth cable from the vehicle battery’s negative terminal
in order to prevent short circuits. For this purpose, follow the vehicle manufacturer’s safety
instructions (alarm system, airbag, immobiliser, etc.).
Electrical connections, Fig. 2
☞
Route all cables with care. For the cabling, refer to the connection illustration on the
cover pages and the following table.
☞
Do not cut off non-assigned cables. Instead, wrap them up and fix them to one side. They
may be necessary for retrofitting additional functions.
Power supply connection
Cable colour Category Connection
Yellow Input + 12 V permanent positive (must be rated for a current of at least 3 amps)
Red Input + 12 V ignition positive (switched plus)
Black Input Battery negative (vehicle chassis)
Blue Output + 12 V remote control output (max. 0.25 A)
White Input Door contact/interior lighting (must be rated for at least 1 A)
A
Only connect electrical signals to suitable connecting points in the vehicle.
A
A If the yellow + 12 V permanent positive lead is extended and connected directly to the
battery, it must be additionally protected by means of a 10 A fuse near the battery (max. 10 -
15 cm).
■ 12 V permanent positive (yellow):
☞
Connect yellow lead to a suitable connector with 12 V permanent positive.
A
This connection should be rated for a current of at least 3 amps.
■
12 V ignition positive (red):
☞
Connect red lead to a suitable 12 V circuit switched through the ignition.
■
Battery negative (black):
☞
Connect black lead to a suitable ground (vehicle chassis).
■
12 V remote control output (blue):
☞
Connect the blue lead to the remote control output for additional devices (e.g.
multimedia interface box).
■
Interior lighting (white):
The DOM 6500 has two built-in lamps that can be connected to the interior lighting system
of the vehicle.
☞
Connect the white lead to a suitable connector for the interior lighting.
Audio/video inputs “AV1 IN” and “AV2 IN”
☞
Connect the rectangular Mitsumi plug to the video input “AV1 IN” of the multimedia
system (in the recess on the top of the unit).
☞
Connect the 4-pin jack of the supplied A/V cable to video input “AV2 IN” on the right side
of the multimedia system.
INSTALLATION INSTRUCTIONS
10

Audio/video output “OUTPUT”
☞
Connect the yellow Cinch/RCA plug to a suitable multimedia unit video input.
☞
Connect the white and red Cinch/RCA plugs to the left and right Line or AUX inputs of an
available audio system.
Installing the DVD multimedia system
A
Only trained specialists may install the system.
A
Observe the automotive industry quality standards.
A
Fire hazard. During drilling, be careful not to damage hidden cable harnesses, the fuel tank
and fuel lines.
A
Never drill into supporting or safety-relevant chassis parts.
A
Do not drill through the vehicle roof!
A
The system must be installed such that it cannot become detached during emergency
braking!
■
Note before installing, Fig. 3
❏
The unit must be installed suspended horizontally (overhead). Deviations of -10° to +30°
are permitted. Larger deviations may result in malfunctions.
❏ A rigid connection to the vehicle body is a prerequisite for correct functioning of the DVD
Player.
Determining the installation location, Figs. 4 - 5
The DVD multimedia system is attached via a mounting plate. Depending on the installation
conditions, the mounting plate can be brought into the relevant installation location by
means of the 12 slots and screwed on. The multimedia system can then be attached to the
mounting plate via five M4 screws.
Depending on the thickness of the headliner, either the M4 x 10 mm or the M4 x 15 mm
screws must be used. Check the screw length required prior to final installation.
1. Carefully lever the two transparent covers for the interior lighting off the unit from the
outside using a screwdriver. This enables access to the two front screw attachment points
(Fig. 4).
2. Open the display to access the three rear screw attachment points.
3. Hold the unit at the intended mounting position and make five marks through the screw
attachment holes (Fig. 5).
4. Align the mounting plate with the marks made previously at the installation location and
draw suitable drill hole marks through the slots.
Attaching the unit, Fig. 6
1. Drill the previously marked holes.
2. Screw the mounting plate into position using the self-tapping screws (4 x 10 mm) provided.
3. Connect all the required leads to the unit.
4. Screw the unit to the mounting plate using the five screws (M4) provided.
5. Block up the three rear screw holes with the rubber stoppers provided.
6. Snap the two interior lighting covers back into position.
INSTALLATION INSTRUCTIONS
11
English

Preparing the remote control
Inserting the batteries
☞
Open the battery compartment on the
back of the remote control.
☞
Insert two new AAA size batteries. Pay
attention to correct polarity (marked in
the compartment).
☞
Close the battery compartment.
Initial operation
1. Reconnect the battery.
2. Restore complete functioning of the electrical system (clock, onboard computer, alarm
system, airbag, immobiliser, etc.).
3. Switch on the ignition.
4. Fold down the display screen of the multimedia system. Press the RESET button (see
page 16) using a paper clip or other suitably thin object.
5. Insert a DVD/VCD/audio/MP3 or JPEG-image CD into the DVD player.
6. Check that the audio and video functions are working perfectly in conjunction with the
other components of the multimedia system. See also to the “Operation” section of this
manual.
Checking the vehicle functions
A
Check the safety-relevant vehicle functions only when the car is stationary or moving at low
speed. Only perform check in an open area.
Brake system, alarm system, lights, immobiliser, speedometer, onboard computer, clock.
INSTALLATION INSTRUCTIONS
12
+
+
–
–

Features
❏
Folding and swivelling 8-inch TFT-LCD display
❏
Overhead installation
❏
PAL and NTSC DVD / Video CD compatible DVD Player
(plays discs recorded in either PAL or NTSC format)
❏
Readable formats: DVD, Video CD, Super Video CD, audio CD, MP3 (CD-ROM) and JPEG
image CD
❏
2 Audio/video inputs
❏
Audio/Video output:
Composite Video (Cinch);
L/R stereo analog audio outputs (Cinch) for connection to existing head unit aux inputs
❏
SMART mode: Switching the AV source for the AV output, depending on DVD playback
on the built-in TFT display
❏
Infrared stereo audio transmission
❏
2 headphone outputs
❏
IR remote control
❏
Built-in lamps for connection to the vehicle interior lighting system
Notes on the Operation Guide
The following reading aids are used to simplify this Operation Guide:
☞
requests you to do something.
:
shows the unit’s reaction.
❏ identifies a list.
A
Safety instructions and warnings contain important information for the safe use of the unit.
Disregarding this information could result in material damage, injury or even death. Please follow
this information carefully.
GENERAL INFORMATION
13
English

Important information for
safe operation
A
For traffic safety reasons, use the DVD
Players’ menus only before starting a journey or
when the vehicle is stationary.
A
Make all inputs via the remote control
only when the vehicle is stationary, or have the
passenger make them. Otherwise, you may
endanger the occupants and other road users.
A
For safety reasons, the driver should not
watch video or operate the DVD Player while
driving. Please note that it is illegal in certain
countries to watch or operate a video source
whilst driving.
A
Avoid inserting any foreign objects into
the slot of this player.
Failure to observe this may cause malfunction
due to the precise mechanism of this unit.
A
Keep the volume level low enough to be
aware of road and traffic conditions.
Class 1 laser product
A
CAUTION: Any inappropriate use of the
device may expose the user to visible/invisible
laser rays which exceed the limits for Class 1
laser products.
A
Do not open covers and do not repair
yourself. Refer servicing to qualified
personnel.
Copyright protection
This product incorporates copyright
protection technology that is protected by
method claims of certain U.S. patents and
other intellectual property rights owned by
Macro vision Corporation and other rights
owners. Use of this copyright protection
technology must be authorized by Macro
vision Corporation, and is intended for
home and other limited viewing uses only
unless otherwise authorized by Macro vision
Corporation. Reverse engineering or
disassembly is prohibited.
Region Code Information
This mobile DVD Player is designed and
manufactured to play DVD discs with Region
codes 2 and 0.
Dolby Digital
Manufactured under license from Dolby
Laboratories.
“Dolby” and the double-D symbol are
trademarks of Dolby Laboratories.
Confidential unpublished works.
© 1992-1997 Dolby Laboratories. All rights
reserved.
14
GENERAL INFORMATION
CLASS 1
LASER PRODUCT

Disc formats
Supported formats
The following 8 cm and 12 cm discs are
supported:
❏
DVD video 5 and 9
❏
DVD video 10 and 18
(must be turned over)
❏
Video CD
❏
Super Video CD
❏
CD Audio
❏
MP3 (CD-ROM)
❏
JPEG image CD
Formats which are not supported
❏
DVD-ROM
❏
DVD-RW/ DVD-RAM
❏
CDV
❏
CD-G
❏
Kodak Photo CD (previously CDI format)
❏ DVDs with a Region code other than “2”
and “0”
Note: As a rule, even self-burned CDs are
supported. However, depending on the
blank disc and burning program used,
playback difficulties may arise.
Handling and cleaning
DVDs and CDs
❏
Avoid leaving fingerprints on the disc
when removing it.
❏
Always store discs in their protective
covers.
❏
Always ensure that discs are clean and
dry before inserting.
❏
Protect discs from heat and direct
sunlight.
❏
Dirt, dust, scratches and warping discs
will cause malfunction.
❏
Do not place stickers or make scratches
on discs.
❏
Do not warp discs.
Disc cleaning
Use a dry soft cloth to wipe the surface.
If the disc is quite dirty, use a soft cloth
slightly moistured with isopropyl (rubbing)
alcohol.
Never use solvents such as benzine, thinner
or conventional record cleaners as they may
mar the surface of the disc.
Preparing new discs with rough
spots
New discs may have some roughness around
the edge. The DVD Player may not work
properly or the video/sound reproduction
may skip if such discs are used.
☞
Use a ballpoint pen, etc., to remove
roughness from the edge of the disc.
DISC NOTES
15
English
Rolf Egon Füchtenschnieder
and Band

1 . . . . . . . . . . . . Switch for interior lighting
2 . . . . . . . . . . . . Reset button
3 . . . . . . . . . . . . Interior lighting
4 V UP . . . . . . . DVD: next chapter;
. . . . . . . . . . . . VCD/CD/MP3: next track
. . . . . . . . . . . . In menus: move cursor upwards
5 EJECT . . . . . . . Eject disc
6 SMART Mode . “SMART mode” is activated
7 DISC IN. . . . . . A disc is inserted
8 W DOWN . . . . DVD: previous chapter;
. . . . . . . . . . . . VCD/CD/MP3: previous track
. . . . . . . . . . . . In menus: move cursor downwards
9 L PLAY. . . . . . Play the disc, pause (freeze frame)
0 • MODE . . . . . Select A/V source (DVD, AV1, AV2)
q AV2 . . . . . . . . AV 2 input selected
w AV1 . . . . . . . . AV 1 input selected
e DVD . . . . . . . . Displays the video signal from the DVD player
r O POWER. . . . Turns multimedia system on / off
t S STOP . . . . . Stop playing the disc
16
CONTROLS
7
5
2
15
13
14
12
11
10
9
6
1
4
3
8
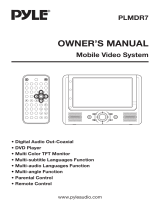
3

1 . . . . . . . . . . . . Headphone socket 1
2 . . . . . . . . . . . . Volume control for headphone socket 1
3 . . . . . . . . . . . . 8-inch TFT display
4 . . . . . . . . . . . . DVD player disc slot
5 . . . . . . . . . . . . Volume control for headphone socket 2
6 . . . . . . . . . . . . Headphone socket 2
7 . . . . . . . . . . . . AV2 input
8 . . . . . . . . . . . . Unlocking button for TFT display
CONTROLS
17
English
1
2
8
3
7
5
6
4

1 O POWER . . . Turn multimedia system on / off
2 0 - 9 . . . . . . . . Numeric key buttons
3 SMART . . . . . . Turn SMART mode on / off
4 P . . . . . . . . . Start playback, Pause (still picture)
5 S . . . . . . . . . . Stop playback
6 8 / 2. . . . . . . DVD: Next / previous chapter
. . . . . . . . . . . . VCD/CD/MP3: Next / previous track
. . . . . . . . . . . . In MENU mode: move the cursor up/down
7 SUB-T . . . . . . Select the SUBTITLE language (depending on the DVD disc)
8 AUDIO . . . . . . Select the audio soundtrack (depending on the DVD disc)
9 SETUP . . . . . . Display the SETUP menu of the DVD player
0 MODE . . . . . . . Selects AV source for TFT display (DVD, AV1 or AV2) or AV1/AV2 for
. . . . . . . . . . . . AV output in SMART mode
q MENU . . . . . . Display the DVD root menu of the DVD disc
18
REMOTE CONTROL
POWER
1
4
7
2
5
8
0
3
6
9
REPEAT
ZOOM
AUDIOSUB-T VOL +
ENTER
SMART
DISP
1
20
19
18
17
16
2
5
7
9
6
3
4
8
11
12
13
10
15
14
TITLESETUP
MENUMODE VOL –
SEL
ANGLE

w VOL - . . . . . . . Reduce volume.
. . . . . . . . . . . . In combination with “SEL”: adjusts display settings.
e TITLE . . . . . . . Display the DVD title menu (depending on the DVD disc)
r SEL . . . . . . . . . Selects TFT display settings (e.g. brightness, contrast, etc.)
t VOL + . . . . . . . Increase volume.
. . . . . . . . . . . . In combination with “SEL”: adjusts display settings.
z ENTER . . . . . . Confirm a selection
u < / > . . . . . Start fast forward / fast reverse
. . . . . . . . . . . . In MENU mode: move the cursor left/right
i ZOOM. . . . . . . Set Zoom mode
ANGLE . . . . . . Select the viewing angle (depending on the DVD disc)
o REPEAT . . . . . Switch on and select Repeat mode
p DISP . . . . . . . Display time information (during playback)
REMOTE CONTROL
19
English

Switching on/off
To switch on the multimedia system:
☞
Switch on the ignition.
☞
Press the POWER button on the
multimedia system or the remote
control.
To switch off the multimedia system:
☞
Press the POWER button on the
multimedia system or the remote
control.
Or:
☞
Switch off the ignition.
Loading a disc
☞
Carefully slide the disc into the player’s
disc slot with the printed side facing
upwards until it is drawn in.
:
The player starts playback automatically.
Ejecting a disc
☞
Press the button on the multimedia
system.
:
The disc is ejected.
☞
Remove the disc..
Auxiliary lighting
■ Permanent on
☞
Set the auxiliary lighting switch to “ON”.
■
Automatic lighting
☞
Set the auxiliary lighting switch to
“AUTO”.
:
The auxiliary lighting for the multimedia
system is controlled by the vehicle
interior lighting system.
■
Lighting off
☞
Set the auxiliary lighting switch to
“OFF”.
TFT display
■
Opening the display
☞
Press the unlocking button for the
display and pull the screen carefully
downwards.
A
Never touch the display screen itself! This
could damage the LCD.
■
Closing the display
☞
Swing the display in the straight
position.
☞
Push it carefully upwards until it snaps
into place.
■
Swivelling the display
☞
The display can be swivelled in either
direction by approx. 30°, to achieve the
optimum viewing angle.
■
Selecting AV source - MODE
The DVD multimedia system allows the
connection of two external AV sources (see
installation instructions) for display on the
multimedia system’s TFT screen.
☞
Press the MODE button on the
multimedia system or the remote control
to select the AV sources DVD, AV1 or
AV2.
:
The selected AV source is then shown on
the TFT display.
:
The corresponding LED (DVD, AV1 or
AV2) illuminates on the front of the
unit.
Note: When SMART mode is activated (see
next section) the picture from the DVD
player is always shown on the TFT display.
The AV source selected using MODE is
output only to the AV output of the
multimedia system.
20
BASIC OPERATION

SMART mode
☞
Press the SMART button on the remote
control to activate SMART mode.
:
The TFT screen now always displays the
picture from the DVD player, regardless
of the AV source set using the MODE
button.
:
Using the MODE button, you can now
select which of the AV inputs AV1 or
AV2 is switched to the AV output.
Notes:
SMART mode can only be activated when a
disc has been inserted.
SMART mode is automatically deactivated
when the unit is switched off.
Display settings
☞
Press the SEL button once or several
times to call up the TFT display settings.
☞
Press the VOL- or VOL+ buttons to
change the value of the selected setting.
☞
Press the ENTER button to store the set
value and exit the display settings.
■ Brightness - “BRIGHTNESS”
☞
Set the brightness to between 0 and 32.
■ Colour saturation - “COLOR”
(AV1/AV2 only)
☞
Set the colour saturation to between 0
and 32.
■
Contrast - “CONTRAST”
☞
Set the contrast to between 0 and 32.
■
Colour balance - “TINT”
(AV1/AV2 only)
☞
Set the colour balance to between 0
and 32.
■
Image sharpness - “SHARPNESS”
(AV1/AV2 only)
☞
Set the sharpness to between 0 and 32.
■
TV standard - “TV TYPE”
☞
Set the TV standard appropriate to the
connected AV source. The options are
“AUTO”, “PAL” and “NTSC”.
■
Display mode - “DISPLAY MODE”
☞
Set the TFT display mode in accordance
with the current video medium. You can
choose between “NORMAL” (4:3),
“FULL” (16:9) und “WIDE1” (extended
16:9).
■
Installation position - “MOUNTING”
☞
Set the installation position to
“CEILING” (overhead).
Note: The “DESKTOP” setting is not
supported by drive of the DVD player.
■
User settings - “USER”
This function allows the display settings,
brightness, contrast, colour, tint and
sharpness to be saved specifically for a
certain user and then subsequently restored.
☞
Set the desired values for the display
settings.
☞
Select “SAVE” by pressing the VOL+
button to save the values as user
settings.
☞
Select “READ” by pressing the VOL-
button to restore the user settings.
* for AV 1 and AV 2 only
■
Default settings - “DEFAULT”
☞
Select “DEFAULT” and press the VOL+
button to reset the display settings to
their default values.
21
English
BASIC OPERATION

Starting/stopping playback
☞
Press the S button to stop playback.
The player stores the current disc
position.
☞
Press the P button to resume playback
at the stored position.
☞
Press the S button twice to stop the
playback and to go back to the initial
track/chapter of the inserted disc.
The player is now in STOP mode.
■
Video CDs with PBC (playback control)
Video CDs with PBC can be played with or
without menu:
☞
Press the MENU button to select between
playback with or without PBC.
Pause (still picture)
☞
Press the P button during playback.
☞
Press the P button once again to
resume normal playback.
Fast forward / reverse
☞
Press the < or > button during
playback.
Each time the button is pressed, the
speed of fast forward / reverse changes
as follows:
■
DVD:
Normal –> 2× –> 4× –> 6× –> 8× –> 20×
■
VCD/CD/MP3:
Normal –> 2× –> 4× –> 6× –> 8×
Skipping chapters/tracks
☞
Press one of the 8 / 2 buttons during
playback.
☞
Press the 8 button to jump to the next
chapter (DVD) or track (VCD/CD).
☞
Press the 2 button to jump to the
previous chapter (DVD) or track
(VCD/CD).
Note: For some VCD2.0 discs (PAC playback
control), the 8 / 2 buttons may not be
available.
Repeating chapters/tracks
☞
Press the REPEAT button one or more
than once to select the REPEAT mode
according to the disc as follows:
■
DVD:
❏
CHAPTER REPEAT ON:
The current chapter is repeated.
❏ TITLE REPEAT ON:
The current title is repeated.
❏ REPEAT OFF:
The repeat function is switched off.
■ VCD/CD:
❏ REP - ONE:
The current track is repeated.
❏ REP - ALL:
All tracks of the inserted disc are
repeated.
❏
REPEAT OFF:
The repeat function is switched off.
22
BASIC OPERATION
/