Ruckus Wireless ZoneFlex 2741 User manual

Category
WLAN access points
Type
User manual
Ruckus Wireless
®
ZoneFlex
®
2925/2942/7942/7962
Access Point
User Guide
Part Number 800-70212-001
Published March 2009
www.ruckuswireless.com
i
About This Guide
Document Conventions . . . . . . . . . . . . . . . . . . . . . . . . . . . . . . . . . . . . . . . . . . . . . . . . . i
Related Documentation . . . . . . . . . . . . . . . . . . . . . . . . . . . . . . . . . . . . . . . . . . . . . . . . .ii
Documentation Feedback . . . . . . . . . . . . . . . . . . . . . . . . . . . . . . . . . . . . . . . . . . . . . . .ii
1
Introducing the ZoneFlex Access Point
Overview of the ZoneFlex Access Point. . . . . . . . . . . . . . . . . . . . . . . . . . . . . . . . . . . . .1
Unpacking the ZoneFlex Access Point . . . . . . . . . . . . . . . . . . . . . . . . . . . . . . . . . . . . . .2
Package Contents . . . . . . . . . . . . . . . . . . . . . . . . . . . . . . . . . . . . . . . . . . . . . . . . . . . 2
Getting to Know the Access Point Features . . . . . . . . . . . . . . . . . . . . . . . . . . . . . . . . .2
ZoneFlex 2925 . . . . . . . . . . . . . . . . . . . . . . . . . . . . . . . . . . . . . . . . . . . . . . . . . . . . . . 3
ZoneFlex 2942/7942 . . . . . . . . . . . . . . . . . . . . . . . . . . . . . . . . . . . . . . . . . . . . . . . . . . 6
ZoneFlex 7962 . . . . . . . . . . . . . . . . . . . . . . . . . . . . . . . . . . . . . . . . . . . . . . . . . . . . . 11
If Your AP is Part of a Wireless Mesh Network . . . . . . . . . . . . . . . . . . . . . . . . . . . . . .14
WLAN/Wireless Device Association LED . . . . . . . . . . . . . . . . . . . . . . . . . . . . . . . . 14
2
Installing the Access Point
Before You Begin . . . . . . . . . . . . . . . . . . . . . . . . . . . . . . . . . . . . . . . . . . . . . . . . . . . . . .17
Prepare the Required Hardware and Tools . . . . . . . . . . . . . . . . . . . . . . . . . . . . . . 17
Perform a Site Survey . . . . . . . . . . . . . . . . . . . . . . . . . . . . . . . . . . . . . . . . . . . . . . . . 18
Determine the Optimal Mounting Location and Orientation . . . . . . . . . . . . . . . 19
Step 1: Preconfigure the Access Point . . . . . . . . . . . . . . . . . . . . . . . . . . . . . . . . . . . . .21
Configuring for Management by ZoneDirector . . . . . . . . . . . . . . . . . . . . . . . . . . 21
Configuring for Standalone Operation or for Management by FlexMaster . . . . 23
Step 2: Verify Access Point Operation . . . . . . . . . . . . . . . . . . . . . . . . . . . . . . . . . . . . .31
Connect the Access Point to the Network . . . . . . . . . . . . . . . . . . . . . . . . . . . . . . . 31
Check the LEDs . . . . . . . . . . . . . . . . . . . . . . . . . . . . . . . . . . . . . . . . . . . . . . . . . . . . 32
Associate a Wireless Client with the Access Point . . . . . . . . . . . . . . . . . . . . . . . . 33
Check the TR069 Status (FlexMaster Management Only) . . . . . . . . . . . . . . . . . . 33
Disconnect the Access Point from the Network . . . . . . . . . . . . . . . . . . . . . . . . . . 33
Step 3: Deploy the Access Point. . . . . . . . . . . . . . . . . . . . . . . . . . . . . . . . . . . . . . . . . .34
Contents
ii
1. Choose a Location for the Access Point . . . . . . . . . . . . . . . . . . . . . . . . . . . . . . 34
2. Connect the Access Point to a Power Source and the Network . . . . . . . . . . . 34
Troubleshooting Installation . . . . . . . . . . . . . . . . . . . . . . . . . . . . . . . . . . . . . . . . . . . . .35
3
Navigating the Web Interface
Logging Into the ZoneFlex Web Interface. . . . . . . . . . . . . . . . . . . . . . . . . . . . . . . . . .37
Navigating the Web Interface. . . . . . . . . . . . . . . . . . . . . . . . . . . . . . . . . . . . . . . . . . . .38
If You Are Using ZoneFlex AP 7962 . . . . . . . . . . . . . . . . . . . . . . . . . . . . . . . . . . . . . . .39
4
Configuring the Access Point
Configuring the System Settings . . . . . . . . . . . . . . . . . . . . . . . . . . . . . . . . . . . . . . . . .41
Configuring Network Settings . . . . . . . . . . . . . . . . . . . . . . . . . . . . . . . . . . . . . . . . . . .42
Default IP Addressing Behavior . . . . . . . . . . . . . . . . . . . . . . . . . . . . . . . . . . . . . . . 42
Obtaining and Assigning an IP Address . . . . . . . . . . . . . . . . . . . . . . . . . . . . . . . . 42
Changing the Network Connection Type . . . . . . . . . . . . . . . . . . . . . . . . . . . . . . . 43
Configuring the L2TP Settings . . . . . . . . . . . . . . . . . . . . . . . . . . . . . . . . . . . . . . . . 44
Renewing or Releasing DHCP . . . . . . . . . . . . . . . . . . . . . . . . . . . . . . . . . . . . . . . . . 45
Configuring Common Wireless Settings . . . . . . . . . . . . . . . . . . . . . . . . . . . . . . . . . . .46
Reviewing the Advanced > Common Options . . . . . . . . . . . . . . . . . . . . . . . . . . . 47
Setting Threshold Options . . . . . . . . . . . . . . . . . . . . . . . . . . . . . . . . . . . . . . . . . . . 49
Configuring WLAN Settings . . . . . . . . . . . . . . . . . . . . . . . . . . . . . . . . . . . . . . . . . . . . .51
Using WEP . . . . . . . . . . . . . . . . . . . . . . . . . . . . . . . . . . . . . . . . . . . . . . . . . . . . . . . . 53
Using WPA . . . . . . . . . . . . . . . . . . . . . . . . . . . . . . . . . . . . . . . . . . . . . . . . . . . . . . . . 55
Customizing 802.1x Settings . . . . . . . . . . . . . . . . . . . . . . . . . . . . . . . . . . . . . . . . . . 57
Controlling Access to the Wireless Network . . . . . . . . . . . . . . . . . . . . . . . . . . . . . . . .59
Changing the Access Controls for a WLAN . . . . . . . . . . . . . . . . . . . . . . . . . . . . . . 59
Removing MAC Addresses from the List . . . . . . . . . . . . . . . . . . . . . . . . . . . . . . . . 60
Access Control Options . . . . . . . . . . . . . . . . . . . . . . . . . . . . . . . . . . . . . . . . . . . . . . 60
Configuring VLAN Settings . . . . . . . . . . . . . . . . . . . . . . . . . . . . . . . . . . . . . . . . . . . . . .62
Navigating the VLAN Page . . . . . . . . . . . . . . . . . . . . . . . . . . . . . . . . . . . . . . . . . . . 62
Changing a VLAN ID . . . . . . . . . . . . . . . . . . . . . . . . . . . . . . . . . . . . . . . . . . . . . . . . 64
Changing the Port State of a VLAN . . . . . . . . . . . . . . . . . . . . . . . . . . . . . . . . . . . . 64
Changing an RJ45 Port’s VLAN Tagged State . . . . . . . . . . . . . . . . . . . . . . . . . . . 65
iii
5
Managing the Access Point
Viewing Associated Wireless Clients . . . . . . . . . . . . . . . . . . . . . . . . . . . . . . . . . . . . . .67
Viewing Local Services. . . . . . . . . . . . . . . . . . . . . . . . . . . . . . . . . . . . . . . . . . . . . . . . . .69
Changing the Administrative Login Settings. . . . . . . . . . . . . . . . . . . . . . . . . . . . . . . .69
Enabling Other Management Access Options . . . . . . . . . . . . . . . . . . . . . . . . . . . . . .70
Viewing FlexMaster Management Status . . . . . . . . . . . . . . . . . . . . . . . . . . . . . . . 74
Pointing the AP to FlexMaster . . . . . . . . . . . . . . . . . . . . . . . . . . . . . . . . . . . . . . . . 75
Enabling Logging and Sending Event Logs to a Syslog Server. . . . . . . . . . . . . . . . .75
Sending a Copy of the Log File to Ruckus Wireless Support. . . . . . . . . . . . . . . . . . .76
Saving a Copy of the Current Log to Your Computer . . . . . . . . . . . . . . . . . . . . . 77
Upgrading the Firmware . . . . . . . . . . . . . . . . . . . . . . . . . . . . . . . . . . . . . . . . . . . . . . . .77
Upgrading Manually via the Web . . . . . . . . . . . . . . . . . . . . . . . . . . . . . . . . . . . . . . 79
Upgrading Manually via FTP or TFTP . . . . . . . . . . . . . . . . . . . . . . . . . . . . . . . . . . . 79
Scheduling an Automatic Upgrade . . . . . . . . . . . . . . . . . . . . . . . . . . . . . . . . . . . . 79
Rebooting the Access Point . . . . . . . . . . . . . . . . . . . . . . . . . . . . . . . . . . . . . . . . . . . . .80
Resetting the Access Point to Factory Default . . . . . . . . . . . . . . . . . . . . . . . . . . . . . .81
Running Diagnostics . . . . . . . . . . . . . . . . . . . . . . . . . . . . . . . . . . . . . . . . . . . . . . . . . . .81
Where to Find More Information . . . . . . . . . . . . . . . . . . . . . . . . . . . . . . . . . . . . . . . . .83
Index
iv
i
About This Guide
About This Guide
This guide describes how to install, configure, and manage the Ruckus Wireless
®
ZoneFlex
®
2925/2942/7942/7962 Access Point. This guide is written for those respon-
sible for installing and managing network equipment. Consequently, it assumes that
the reader has basic working knowledge of local area networking, wireless networking,
and wireless devices.
NOTE:: If release notes are shipped with your product and the information there
differs from the information in this guide, follow the instructions in the release notes.
Most user guides and release notes are available in Adobe Acrobat Reader Portable
Document Format (PDF) or HTML on the Ruckus Wireless Support Web site at:
http://support.ruckuswireless.com/
Document Conventions
Tab le 1 and Table 2 list the text and notice conventions that are used throughout this
guide.
Tabl e 1. Text C onve n tions
Convention Description Example
monospace
Represents information as it
appears on screen
[Device name]>
monospace bold
Represents information that
you enter
[Device name]> set
ipaddr 10.0.0.12
default font bold
Keyboard keys, software
buttons, and field names
On the Start menu, click All
Programs.
italics
Screen or page names Click Advanced Settings.
The Advanced Settings page
appears.
ii
About This Guide
Related Documentation
In addition to this User Guide, each ZoneFlex Access Point documentation set
includes the following:
Quick Setup Guide: Provides essential installation and configuration information
to help you get the AP up and running within minutes.
Online Help: Provides instructions for performing tasks using the Access Point’s
Web interface. The online help is accessible from the Web interface and is
searchable.
Release Notes: Provide information about the current software release, including
new features, enhancements, and known issues.
Documentation Feedback
Ruckus Wireless is interested in improving its documentation and welcomes your
comments and suggestions. You can email your comments to Ruckus Wireless at:
When contacting us, please include the following information:
Document title
Document part number (on the cover page)
Page number (if appropriate)
For example:
Ruckus Wireless ZoneFlex 2925/2942/7942/7962 Access Point User Guide
Part number: 800-70212-001
Page 88
Table 2. Notice Conventions
Icon Notice Type Description
Information Information that describes
important features or
instructions
Caution Information that alerts you to
potential loss of data or
potential damage to an
application, system, or device
Warning Information that alerts you to
potential personal injury
1
1
Introducing the ZoneFlex Access
Point
Overview of the ZoneFlex Access Point
Congratulations on your purchase of the Ruckus Wireless ZoneFlex Access Point!
ZoneFlex Access Points are the industry’s first centrally-managed Wi-Fi access points
that are capable of extending wireless signals two to four times farther than a
conventional access point.
Your ZoneFlex Access Point uses BeamFlex™, a patent-pending antenna technology
from Ruckus Wireless that allows wireless signals to navigate around interference,
extend wireless signal range, and increase speeds and capacity for wireless networks.
The BeamFlex™ antenna system consists of an array of six high-gain directional
antenna elements that allow ZoneFlex Access Point to find quality signal paths in a
changing environment, and sustain the baseline performance required for supporting
data, audio and video applications.
Your ZoneFlex Access Point can be deployed in standalone mode or as part of the
ZoneFlex smart WLAN system, in which it can be managed by either FlexMaster or
ZoneDirector WLAN controller.
NOTE: For more information on the ZoneFlex system (including FlexMaster and
ZoneDirector), BeamFlex, and other Ruckus Wireless technologies,
visit www.ruckuswireless.com
.
In This Chapter
Overview of the ZoneFlex Access Point
. . . . . . . . . . . . . . . . . . . . . . . . . . . . . . . . .1
Unpacking the ZoneFlex Access Point . . . . . . . . . . . . . . . . . . . . . . . . . . . . . . . . . .2
Getting to Know the Access Point Features
. . . . . . . . . . . . . . . . . . . . . . . . . . . . . .2
If Your AP is Part of a Wireless Mesh Network
. . . . . . . . . . . . . . . . . . . . . . . . . . .14
2
Introducing the ZoneFlex Access Point
Unpacking the ZoneFlex Access Point
1. Open the Access Point package, and then carefully remove the contents.
2. Return all packing materials to the shipping box, and put the box away in a dry
location.
3. Verify that all items listed in Package Contents
below are included in the package.
Check each item for damage. If any item is damaged or missing, notify your
authorized Ruckus Wireless sales representative.
Package Contents
A complete Access Point package contains all of the items listed below:
ZoneFlex 2925/2942/7942/7962 Access Point
A 3-foot (0.9 meter) Category 5 Ethernet cable
A power supply adapter
A wall mounting kit, with printed instructions
Software License Agreement/Product Warranty Statement
ZoneFlex 2925/2942/7942/7962 Access Point Quick Setup Guide
Getting to Know the Access Point Features
This section identifies the physical features of each ZoneFlex Access Point model that
is discussed in this guide. Before you begin the installation process, Ruckus Wireless
recommends that you become familiar with these features.
ZoneFlex 2925
ZoneFlex 2942/7942
ZoneFlex 7962
3
Introducing the ZoneFlex Access Point
Getting to Know the Access Point Features
ZoneFlex 2925
The following illustrations and tables describe the physical features of ZoneFlex 2925.
Front Panel
Figure 1 shows the front view of a ZoneFlex 2925 AP, highlighting the four LED
indicators that can be used to assess both device and network status. Refer to Table
3 for information on what the LEDs indicate.
Figure 1. ZoneFlex 2925 front panel
1
2
4
3
4
Introducing the ZoneFlex Access Point
Getting to Know the Access Point Features
Refer to Table 4 below for all possible LED states and what they indicate.
Table 3. ZoneFlex 2925 LED behavior
LED Description
Off: No power is available, or the AP is not connected to a power
source.
Green: The AP is connected to a power source.
Off: No link activity is detected
Yellow: A 10Mbps-capable device has been detected.
Flashing yellow: Data is being exchanged through the WAN port at
10Mbps.
Green: A 100Mbps-capable device has been detected.
Flashing green: Data is being exchanged through the WAN port at
100Mbps.
Off: No WLAN is enabled.
Amber: One of the WLANs is enabled, but no wireless client has
associated.
Green: At least one wireless client has associated.
Off: There is no network activity; no station detected at the WLAN
port
Amber: There is a hardware problem affecting the WLAN port.
Flashing red and green alternately: A signal is being detected at the
WLAN port, but at the lowest level.
Flashing green: A moderate signal is being detected at the WLAN
port.
Green: A strong signal is being detected at the WLAN port.
5
Introducing the ZoneFlex Access Point
Getting to Know the Access Point Features
Rear Panel Features
Figure 2 shows the rear panel of ZoneFlex 2925. For a description of each rear panel
part, refer to Tab le 4
.
Figure 2. ZoneFlex 2925 rear panel
Table 4. ZoneFlex 2925 rear panel ports, buttons, and connector
Number Description
1
Connect the power adapter to this socket (Input 12V 1.0A DC or 5V 2.0A
DC)
2
Four RJ-45 ports, supporting 10/100Mbps connections
3
One RJ-45 port, dedicated to ISP/broadband source connection
4
OTA (Over the Air) button. Not active in this model at this time.
5
Use to reset AP to “factory default” state. For more information, refer
to “Resetting the Access Point to Factory Default”
on page 81.
1 2
3
4
5
6
Introducing the ZoneFlex Access Point
Getting to Know the Access Point Features
ZoneFlex 2942/7942
The side panel of ZoneFlex 2942/7942 features four LED indicators that can be used
to assess both device and network status. The rear view displays the connector panel,
which includes the LAN ports and the optional external antenna connection. Refer to
the following illustrations and tables to learn more.
Side Panel Features
The ZoneFlex 2942/7942 chassis includes a Kensington lock (on the side of the unit
opposite the OPT and DIR LEDs) and a lockable “sliding door” (shown in Figure 3
)
that hides and protects the rear connector I/O panel and status LEDs. As your AP may
be placed in a public location, the lock and door mechanisms can help prevent
tampering or theft.
Figure 3. ZoneFlex 2942/7942 side panel features
6
5
1
2
3
4
7
Introducing the ZoneFlex Access Point
Getting to Know the Access Point Features
Tabl e 5 lists all possible LED states on ZoneFlex 2942/7942 and describes what each
LED state means. It also describes how to use the HARD RESET button and other
elements on the side panel.
Table 5. ZoneFlex 2942/7942 side panel elements
Number LED/Button Name Description
1 OPT LED Not used in this model
2 DIR LED Off: The Access Point is not being managed by
ZoneDirector (standalone mode).
Green: The Access Point is being managed by
ZoneDirector.
Flashing green: The Access Point is being
managed by ZoneDirector, but is currently unable
to communicate with ZoneDirector.
3 AIR LED Green: The Access Point is functioning as a mesh
AP (MAP) and the wireless signal to its uplink MAP
is good (> 24dbm).
Fast flashing green (two flashes every second):
The Access Point is functioning as a mesh AP
(MAP) and the wireless signal to its uplink MAP is
poor (< 24dbm).
Slow flashing green (one flash every two seconds):
Mesh networking is enabled, but the Access Point
cannot find a mesh uplink.
Off: The Access Point is operating in standalone
mode or, if mesh networking is enabled, the
Access Point is functioning as a root AP (RAP).
8
Introducing the ZoneFlex Access Point
Getting to Know the Access Point Features
4 WLAN LED Green: The wireless LAN (WLAN) service is up and
at least one wireless client is associated with it. If
mesh networking is enabled, there are no
downlink MAPs connected to this Access Point.
Fast flashing green (two flashes every second):
The WLAN service is up and at least one wireless
client is associated with it. Mesh networking is
enabled and at least one downlink MAP is
connected to this Access Point.
Slow flashing green (one flash every two seconds):
The WLAN service is up, but no wireless clients
are currently associated with it. Mesh networking
is enabled and at least one downlink MAP is
connected to this Access Point.
Amber: The WLAN service is up, but no wireless
clients are currently associated with it. Mesh
networking is disabled.
Off: Either the WLAN is down, or it is up but no
wireless clients are currently associated with it. If
mesh networking is enabled, there are no
downlink MAPs connected to this Access Point.
5 HARD RESET
Button
Pushing and quickly releasing this internal button
reboots the AP. Pushing and holding it for six
seconds resets the AP to factory defaults.
6 Sliding Door Protects the ports, buttons, and connector on rear
panel
7 Kensington Lock The Kensington lock feature, located on the
opposite side of the unit from the pictured LEDs, is
designed to prevent the sliding door from opening,
thus locking the unit. The Kensington lock works with
a Kensington MicroSaver lock.
Table 5. ZoneFlex 2942/7942 side panel elements
Number LED/Button Name Description
9
Introducing the ZoneFlex Access Point
Getting to Know the Access Point Features
Rear Panel Features
Figure 4 shows the rear panel of ZoneFlex 2942/7942. For a description of each rear
panel part, refer to Table 6
.
Figure 4. ZoneFlex 2942/7942 rear panel features
WARNING: For units with Power over Ethernet (PoE).These products and all inter-
connected equipment must be installed indoors within the same building, including
the associated LAN connections, as defined by Environment A of the IEEE 802.3af
Standard.
CAUTION: The external antenna connectors are for indoor use only. Do not connect
them to outdoor antennas.
1
2 3
4
5
6
10
Introducing the ZoneFlex Access Point
Getting to Know the Access Point Features
Table 6. ZoneFlex 2942/7942 rear panel elements
Number Item Name Description
1 Power Adapter Plug Connect the power adapter to this socket. (Input
110-240V AC, Output 12V 1.0A DC). Power can also
be supplied via 10/100 POE port.
2 Lock Hasp The lock hasp works with a cable or Ruckus mounts.
The recommended lock type is Masterlock 120 series
(D, T, Q, KAD types).
3 External RP-SMA
Connector
ZoneFlex 2942: One external antenna connector.
ZoneFlex 7942: Two external antenna connectors.
4 LAN Ports ZoneFlex 2942: Two RJ-45 ports, supporting 10/
100 POE (Power over Ethernet) and 10/100Mbps
connections.
ZoneFlex 7942: Two RJ-45 ports, supporting 10/
100/1000 POE (Power over Ethernet) and 10/100/
1000Mbps connections.
5 OPTIONAL Button Not active in this model at this time.
6 SOFT RESET
Button
Use to reset AP. This is a normal reset and does not
set AP back to factory defaults.
11
Introducing the ZoneFlex Access Point
Getting to Know the Access Point Features
ZoneFlex 7962
The physical features of ZoneFlex 7962 are very similar to ZoneFlex 2942/7942. It uses
the same dome-type chassis with the sliding door and Kensington lock on the side
panel. There are slight differences, however, in the side panel and rear panel elements.
The following illustrations call out these differences Figure 5
for a photo of the
ZoneFlex 7962 side panel.
Side Panel Features
Figure 5 illustrates the side panel features of ZoneFlex 7962. For a description of each
rear panel part, refer to Tab l e 7
.
Figure 5. ZoneFlex 7962 side panel
1
2
3
4
5
6
12
Introducing the ZoneFlex Access Point
Getting to Know the Access Point Features
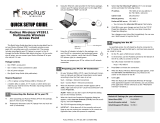
Table 7. ZoneFlex 7962 side panel elements
Number LED/Button Name Description
1 OPT LED Not used in this model
2 DIR LED Off: The Access Point is not being managed by
ZoneDirector (standalone mode).
Green: The Access Point is being managed by
ZoneDirector.
Slow flashing green (one flash every two seconds):
The Access Point is being managed by
ZoneDirector, but is currently unable to
communicate with ZoneDirector.
Fast flashing green (two flashes every second):
The Access Point is being managed by
ZoneDirector and is currently being receiving
configuration settings (provisioning) or a firmware
update.
3 2.4G LED (WLAN) Green: The wireless LAN (WLAN) service is up and
at least one wireless client is associated with it.
Flashing green (two flashes every second): The
WLAN service is up and no wireless client is
associated with it.
Off: The WLAN service is down.
4 5G LED (WLAN) Green: The wireless LAN (WLAN) service is up and
at least one wireless client is associated with it.
Flashing green (two flashes every second): The
WLAN service is up and no wireless client is
associated with it.
Off: The WLAN service is down.
5 HARD RESET
Button
Pushing and quickly releasing this internal button
reboots the AP. Pushing and holding it for six
seconds resets the AP to factory default settings.
CAUTION! Resetting the AP to factory default
settings will erase all settings that you configured
previously.
6 Sliding Door Protects the ports, buttons, and connector on the
rear panel
7 Kensington Lock The Kensington lock feature, located on the
opposite side of the unit from the pictured LEDs, is
designed to prevent the sliding door from opening,
thus locking the unit. The Kensington lock works with
a Kensington MicroSaver lock.
  • Page 1 1
  • Page 2 2
  • Page 3 3
  • Page 4 4
  • Page 5 5
  • Page 6 6
  • Page 7 7
  • Page 8 8
  • Page 9 9
  • Page 10 10
  • Page 11 11
  • Page 12 12
  • Page 13 13
  • Page 14 14
  • Page 15 15
  • Page 16 16
  • Page 17 17
  • Page 18 18
  • Page 19 19
  • Page 20 20
  • Page 21 21
  • Page 22 22
  • Page 23 23
  • Page 24 24
  • Page 25 25
  • Page 26 26
  • Page 27 27
  • Page 28 28
  • Page 29 29
  • Page 30 30
  • Page 31 31
  • Page 32 32
  • Page 33 33
  • Page 34 34
  • Page 35 35
  • Page 36 36
  • Page 37 37
  • Page 38 38
  • Page 39 39
  • Page 40 40
  • Page 41 41
  • Page 42 42
  • Page 43 43
  • Page 44 44
  • Page 45 45
  • Page 46 46
  • Page 47 47
  • Page 48 48
  • Page 49 49
  • Page 50 50
  • Page 51 51
  • Page 52 52
  • Page 53 53
  • Page 54 54
  • Page 55 55
  • Page 56 56
  • Page 57 57
  • Page 58 58
  • Page 59 59
  • Page 60 60
  • Page 61 61
  • Page 62 62
  • Page 63 63
  • Page 64 64
  • Page 65 65
  • Page 66 66
  • Page 67 67
  • Page 68 68
  • Page 69 69
  • Page 70 70
  • Page 71 71
  • Page 72 72
  • Page 73 73
  • Page 74 74
  • Page 75 75
  • Page 76 76
  • Page 77 77
  • Page 78 78
  • Page 79 79
  • Page 80 80
  • Page 81 81
  • Page 82 82
  • Page 83 83
  • Page 84 84
  • Page 85 85
  • Page 86 86
  • Page 87 87
  • Page 88 88
  • Page 89 89
  • Page 90 90
  • Page 91 91
  • Page 92 92
  • Page 93 93
  • Page 94 94

Ruckus Wireless ZoneFlex 2741 User manual

Category
WLAN access points
Type
User manual

Ask a question and I''ll find the answer in the document

Finding information in a document is now easier with AI