Page is loading ...

ROBOTICS
Installation and Wiring
Robot controller
User manual

© Copyright 2015
This documentation – also in part – may be reproduced or made available to third parties only with the
express approval of YASKAWA Europe "Robotics Division GmbH".
We have checked the content of this publication for compliance with the hardware described.
Nevertheless, discrepancies cannot be ruled out. Therefore, we cannot guarantee full compliance.
However, the information given in this publication is checked regularly and any necessary corrections
will be made in subsequent editions.
Subject to technical modifications.
Created on: 2015-10
Revision: 06
Document number: E1102000143GB06 Author: WOE
Changes made in revision:
Rev. 01: Revision in YEU-R style
Rev. 02: Revision of the entire manual
Rev. 03: Added chapter recommended spare parts (11-2013
Rev. 04: Added chapter robot controller specification, Revised version of the original RE-
CTO-A220.5 (2015-01)
Rev. 05: Revision of the chapter: Wiring
Rev. 06: Correction of the chapter „Connection to main power supply“ and „Connection of
the robot controller“/ Cover new in all languages (2015/WAC)

3
Table of contents
Table of contents
1 General. . . . . . . . . . . . . . . . . . . . . . . . . . . . . . . . . . . . . . . . . . . . . . . . . . . . . . . . . . . . . . . . . . . . 6
1.1 Notes for safe operation . . . . . . . . . . . . . . . . . . . . . . . . . . . . . . . . . . . . . . . . . . . . . . . . . . 6
1.2 Frequently used terms . . . . . . . . . . . . . . . . . . . . . . . . . . . . . . . . . . . . . . . . . . . . . . . . . . . 6
1.3 Target group . . . . . . . . . . . . . . . . . . . . . . . . . . . . . . . . . . . . . . . . . . . . . . . . . . . . . . . . . . . 7
1.4 Intended use . . . . . . . . . . . . . . . . . . . . . . . . . . . . . . . . . . . . . . . . . . . . . . . . . . . . . . . . . . . 7
1.5 Improper use. . . . . . . . . . . . . . . . . . . . . . . . . . . . . . . . . . . . . . . . . . . . . . . . . . . . . . . . . . . 8
1.6 About this manual . . . . . . . . . . . . . . . . . . . . . . . . . . . . . . . . . . . . . . . . . . . . . . . . . . . . . . . 9
1.7 Safety . . . . . . . . . . . . . . . . . . . . . . . . . . . . . . . . . . . . . . . . . . . . . . . . . . . . . . . . . . . . . . . 10
1.7.1 For your security. . . . . . . . . . . . . . . . . . . . . . . . . . . . . . . . . . . . . . . . . . . . . . . . . 12
1.7.2 YASKAWA manual list . . . . . . . . . . . . . . . . . . . . . . . . . . . . . . . . . . . . . . . . . . . . 13
1.7.3 Personal protection. . . . . . . . . . . . . . . . . . . . . . . . . . . . . . . . . . . . . . . . . . . . . . . 14
1.7.4 Safety during installation and wiring . . . . . . . . . . . . . . . . . . . . . . . . . . . . . . . . . . 16
1.8 Manufacturer. . . . . . . . . . . . . . . . . . . . . . . . . . . . . . . . . . . . . . . . . . . . . . . . . . . . . . . . . . 22
1.9 Authorized representative . . . . . . . . . . . . . . . . . . . . . . . . . . . . . . . . . . . . . . . . . . . . . . . . 22
2 Supply . . . . . . . . . . . . . . . . . . . . . . . . . . . . . . . . . . . . . . . . . . . . . . . . . . . . . . . . . . . . . . . . . . . 23
2.1 Checking the scope of delivery . . . . . . . . . . . . . . . . . . . . . . . . . . . . . . . . . . . . . . . . . . . . 23
2.2 Position type plate. . . . . . . . . . . . . . . . . . . . . . . . . . . . . . . . . . . . . . . . . . . . . . . . . . . . . . 24
3 Transportation. . . . . . . . . . . . . . . . . . . . . . . . . . . . . . . . . . . . . . . . . . . . . . . . . . . . . . . . . . . . . 25
3.1 Transporting method. . . . . . . . . . . . . . . . . . . . . . . . . . . . . . . . . . . . . . . . . . . . . . . . . . . . 25
3.1.1 Using a crane . . . . . . . . . . . . . . . . . . . . . . . . . . . . . . . . . . . . . . . . . . . . . . . . . . . 26
3.1.2 Using a forklift. . . . . . . . . . . . . . . . . . . . . . . . . . . . . . . . . . . . . . . . . . . . . . . . . . . 26
3.1.3 Using a lifting truck . . . . . . . . . . . . . . . . . . . . . . . . . . . . . . . . . . . . . . . . . . . . . . . 27
4 Assembly and installation . . . . . . . . . . . . . . . . . . . . . . . . . . . . . . . . . . . . . . . . . . . . . . . . . . . 28
4.1 Protection measures . . . . . . . . . . . . . . . . . . . . . . . . . . . . . . . . . . . . . . . . . . . . . . . . . . . . 28
4.2 Ambient conditions and installation location . . . . . . . . . . . . . . . . . . . . . . . . . . . . . . . . . . 29
4.3 Installation options . . . . . . . . . . . . . . . . . . . . . . . . . . . . . . . . . . . . . . . . . . . . . . . . . . . . . 29
4.4 Installation example . . . . . . . . . . . . . . . . . . . . . . . . . . . . . . . . . . . . . . . . . . . . . . . . . . . . 30
5 Wiring. . . . . . . . . . . . . . . . . . . . . . . . . . . . . . . . . . . . . . . . . . . . . . . . . . . . . . . . . . . . . . . . . . . . 31
5.1 Notes on cable junctions. . . . . . . . . . . . . . . . . . . . . . . . . . . . . . . . . . . . . . . . . . . . . . . . . 32
5.2 Power supply / feed . . . . . . . . . . . . . . . . . . . . . . . . . . . . . . . . . . . . . . . . . . . . . . . . . . . . 32
5.2.1 Installing residual current circuit breakers (optional) . . . . . . . . . . . . . . . . . . . . . 33
5.2.2 Installation of primary power supply breaker . . . . . . . . . . . . . . . . . . . . . . . . . . . 35
5.3 Cable connections . . . . . . . . . . . . . . . . . . . . . . . . . . . . . . . . . . . . . . . . . . . . . . . . . . . . . 35
5.3.1 Connection to main power supply. . . . . . . . . . . . . . . . . . . . . . . . . . . . . . . . . . . . 36
5.3.2 Connection of the robot controller. . . . . . . . . . . . . . . . . . . . . . . . . . . . . . . . . . . . 38
5.3.3 Connecting the programming pendant . . . . . . . . . . . . . . . . . . . . . . . . . . . . . . . . 39
6 Technical data . . . . . . . . . . . . . . . . . . . . . . . . . . . . . . . . . . . . . . . . . . . . . . . . . . . . . . . . . . . . . 40
6.1 Basic specifications robot controller . . . . . . . . . . . . . . . . . . . . . . . . . . . . . . . . . . . . . . . . 40
6.2 Programming pendant specifications . . . . . . . . . . . . . . . . . . . . . . . . . . . . . . . . . . . . . . . 41

4
Table of contents
7 Maintenance and inspection . . . . . . . . . . . . . . . . . . . . . . . . . . . . . . . . . . . . . . . . . . . . . . . . . 44
7.1 Periodic inspection . . . . . . . . . . . . . . . . . . . . . . . . . . . . . . . . . . . . . . . . . . . . . . . . . . . . . 44
7.2 Cooling fan inspections. . . . . . . . . . . . . . . . . . . . . . . . . . . . . . . . . . . . . . . . . . . . . . . . . . 45
7.3 Emergency Stop Button Inspections. . . . . . . . . . . . . . . . . . . . . . . . . . . . . . . . . . . . . . . . 45
7.4 Inspection of the enabling switch . . . . . . . . . . . . . . . . . . . . . . . . . . . . . . . . . . . . . . . . . . 46
7.5 Check battery unit . . . . . . . . . . . . . . . . . . . . . . . . . . . . . . . . . . . . . . . . . . . . . . . . . . . . . . 47
7.6 Check the power supply . . . . . . . . . . . . . . . . . . . . . . . . . . . . . . . . . . . . . . . . . . . . . . . . . 48
7.7 Open Phase Check. . . . . . . . . . . . . . . . . . . . . . . . . . . . . . . . . . . . . . . . . . . . . . . . . . . . . 48
8 Description of Units and Circuit Boards. . . . . . . . . . . . . . . . . . . . . . . . . . . . . . . . . . . . . . . . 50
8.1 Power ON unit. . . . . . . . . . . . . . . . . . . . . . . . . . . . . . . . . . . . . . . . . . . . . . . . . . . . . . . . . 51
8.2 Axes control circuit board . . . . . . . . . . . . . . . . . . . . . . . . . . . . . . . . . . . . . . . . . . . . . . . . 51
8.2.1 Major axes control circuit board . . . . . . . . . . . . . . . . . . . . . . . . . . . . . . . . . . . . . 51
8.2.2 External axes control circuit board . . . . . . . . . . . . . . . . . . . . . . . . . . . . . . . . . . . 53
8.3 CPU unit configuration . . . . . . . . . . . . . . . . . . . . . . . . . . . . . . . . . . . . . . . . . . . . . . . . . . 53
8.3.1 Unit and circuit board in the CPU unit. . . . . . . . . . . . . . . . . . . . . . . . . . . . . . . . . 55
8.4 CPS. . . . . . . . . . . . . . . . . . . . . . . . . . . . . . . . . . . . . . . . . . . . . . . . . . . . . . . . . . . . . . . . . 55
8.5 Machine safety I/O logic circuit board . . . . . . . . . . . . . . . . . . . . . . . . . . . . . . . . . . . . . . . 56
8.5.1 Connection for tool shock sensor (SHOCK) . . . . . . . . . . . . . . . . . . . . . . . . . . . . 58
8.6 Machine safety terminal block circuit board (JANCD-YFC22-E). . . . . . . . . . . . . . . . . . . 59
8.7 External emergency stop signal . . . . . . . . . . . . . . . . . . . . . . . . . . . . . . . . . . . . . . . . . . . 66
8.8 Safety plug . . . . . . . . . . . . . . . . . . . . . . . . . . . . . . . . . . . . . . . . . . . . . . . . . . . . . . . . . . . 66
8.9 Installation of safety plug . . . . . . . . . . . . . . . . . . . . . . . . . . . . . . . . . . . . . . . . . . . . . . . . 68
8.10 External enable switch . . . . . . . . . . . . . . . . . . . . . . . . . . . . . . . . . . . . . . . . . . . . . . . . . . 68
8.11 Full speed test. . . . . . . . . . . . . . . . . . . . . . . . . . . . . . . . . . . . . . . . . . . . . . . . . . . . . . . . . 70
8.12 Slow speed mode . . . . . . . . . . . . . . . . . . . . . . . . . . . . . . . . . . . . . . . . . . . . . . . . . . . . . . 72
8.13 External hold . . . . . . . . . . . . . . . . . . . . . . . . . . . . . . . . . . . . . . . . . . . . . . . . . . . . . . . . . . 72
8.14 External SERVO-ON. . . . . . . . . . . . . . . . . . . . . . . . . . . . . . . . . . . . . . . . . . . . . . . . . . . . 74
8.15 SYSRUN Signal Output . . . . . . . . . . . . . . . . . . . . . . . . . . . . . . . . . . . . . . . . . . . . . . . . . 75
8.16 External axes overrun . . . . . . . . . . . . . . . . . . . . . . . . . . . . . . . . . . . . . . . . . . . . . . . . . . . 76
8.17 SERVO-ON enable input . . . . . . . . . . . . . . . . . . . . . . . . . . . . . . . . . . . . . . . . . . . . . . . . 78
8.18 Emergency stop button output . . . . . . . . . . . . . . . . . . . . . . . . . . . . . . . . . . . . . . . . . . . . 79
8.19 Universal safety input . . . . . . . . . . . . . . . . . . . . . . . . . . . . . . . . . . . . . . . . . . . . . . . . . . . 79
8.20 Universal safety output . . . . . . . . . . . . . . . . . . . . . . . . . . . . . . . . . . . . . . . . . . . . . . . . . . 80
8.21 Direct-in (SERVO) 1 to 6. . . . . . . . . . . . . . . . . . . . . . . . . . . . . . . . . . . . . . . . . . . . . . . . . 82
8.22 Universal input (SERVO) . . . . . . . . . . . . . . . . . . . . . . . . . . . . . . . . . . . . . . . . . . . . . . . . 83
8.23 Universal output (SERVO) . . . . . . . . . . . . . . . . . . . . . . . . . . . . . . . . . . . . . . . . . . . . . . . 83
8.24 Universal I/O circuit board (JANCD-YIO22-E) . . . . . . . . . . . . . . . . . . . . . . . . . . . . . . . . 84
8.25 Brake control circuit board (JANCD-YBK21-3E). . . . . . . . . . . . . . . . . . . . . . . . . . . . . . . 89
8.26 Converter (SRDA-COA30A21B-E) . . . . . . . . . . . . . . . . . . . . . . . . . . . . . . . . . . . . . . . . . 90
8.27 Capacitor module (SRDA-CUA AA) . . . . . . . . . . . . . . . . . . . . . . . . . . . . . . . . . . . . . . 91
8.28 Amplifier module (SDRA-SDA A01A-E). . . . . . . . . . . . . . . . . . . . . . . . . . . . . . . . . . . 92
8.29 Assignment of general I/O signal . . . . . . . . . . . . . . . . . . . . . . . . . . . . . . . . . . . . . . . . . . 92
8.29.1 ARC welding. . . . . . . . . . . . . . . . . . . . . . . . . . . . . . . . . . . . . . . . . . . . . . . . . . . . 99
8.29.2 Handling . . . . . . . . . . . . . . . . . . . . . . . . . . . . . . . . . . . . . . . . . . . . . . . . . . . . . . 100
8.29.3 General application. . . . . . . . . . . . . . . . . . . . . . . . . . . . . . . . . . . . . . . . . . . . . . 100
8.29.4 Spot welding . . . . . . . . . . . . . . . . . . . . . . . . . . . . . . . . . . . . . . . . . . . . . . . . . . . 101
8.29.5 JANCD-YEW01-E circuit board (Standard) . . . . . . . . . . . . . . . . . . . . . . . . . . . 104

5
Table of contents
8.29.6 The list of the Equipment configuration by model. . . . . . . . . . . . . . . . . . . . . . . 105
9 Robot controller specification. . . . . . . . . . . . . . . . . . . . . . . . . . . . . . . . . . . . . . . . . . . . . . . 108
9.1 Specification list . . . . . . . . . . . . . . . . . . . . . . . . . . . . . . . . . . . . . . . . . . . . . . . . . . . . . . 109
9.2 Function list. . . . . . . . . . . . . . . . . . . . . . . . . . . . . . . . . . . . . . . . . . . . . . . . . . . . . . . . . . 109
9.3 Programming Pendant . . . . . . . . . . . . . . . . . . . . . . . . . . . . . . . . . . . . . . . . . . . . . . . . . 112
9.4 Device configuration . . . . . . . . . . . . . . . . . . . . . . . . . . . . . . . . . . . . . . . . . . . . . . . . . . . 113
10 Recommended spare parts list . . . . . . . . . . . . . . . . . . . . . . . . . . . . . . . . . . . . . . . . . . . . . . 115

General
1 - 6
1 General
1.1 Notes for safe operation
DANGER!
Indicating immediate danger at high risk, hazard that can cause death or serious bodily
injuries if no precautions are taken.
WARNING!
Indicating possible medium risk hazard situation which can cause death or serious bodily
injuries if it is not avoided.
CAUTION!
Indicating potentially dangerous situation with low risk of minor or moderate bodily injuries
result if it is not avoided. This signal word can also be used for property damage warnings.
1.2 Frequently used terms
The YASKAWA robot is a product of YASKAWA Electric Corporation, and is provided by
default with the robot control, the programming pendant and robot cable.
The terms are designated as follows in this manual:
Term Description
Control Robot control
Industrial robot Robot
Programming pendant / teach box Programming pendant
Supplying cable between robot and robot
control
Cable
Robot, robot control and cable Robot system
Yaskawa Electric Corporation YEC
YASKAWA Robotics Division YEU-R
Moving, calibrating and setting up of the ro-
bot
Teachen
Movement sequences of the robot JOBs
Technical customer service TCS

General
1 - 7
1.3 Target group
This manual is directed at users with the following knowledge:
• Advanced knowledge of mechanical engineering
• Advanced knowledge of electrical engineering
• System knowledge of the robot control
• Specially trained staff
NOTICE
According to the international DIN EN ISO 10218-1 standard, operators of a robot system
must receive training before they operate the robot.
For optimal use of our products, we recommend our customers to take part in a training
session at the YASKAWA Academy. For more detailed information on the training
programme, please visit www.yaskawa.eu.com or directly get in touch with your YASKAWA
branch office.
1.4 Intended use
Typical applications:
• Flange-mounting tools
• Installation of spot welding guns
• Installation of arc welding equipment
• Installation of grippers
• Machining and transporting workpieces or products

General
1 - 8
1.5 Improper use
Any use that deviates from the intended use shall be regarded as impermissible misuse.
This includes:
• Transport of people and animals
• Use as ascending aid.
• Use outside the permissible operating limits.
• Use in environments with risk of explosion (except for ATEX-approved robots).
• Overload
• Use without protective equipment.
NOTICE
Modifications to the robot, e.g. drilling holes or similar modifications, can damage parts.
This will be regarded as improper use (i.e. use that deviates from the intended use) and will
lead to loss of warranty and liability claims as well as loss of the declaration of incorporation.
CAUTION!
The robot system is an incomplete machine.
The robot system may be put into operation only after it has been determined that the
incomplete or complete machine in which the robot system is being installed:
Corresponds to the provisions of the machinery directive.
Complies with all relevant (harmonized) standards.
Corresponds to the state of the art.

General
1 - 9
1.6 About this manual
• This manual explains the various components of the robot controller and the general
operating functions. Be sure to read and understand this instruction manual thoroughly
before installing and operating the robot controller.
• To ensure correct and safe operation, read the robot controller operating instructions
(Basic Information, Installation and Wiring and System Setup).
• In order to illustrate details clearly, some drawings are shown with the protective covers
or shields removed. All protective covers and shields must be mounted before the robot
is operated.
• The drawings and figures in this manual are representative illustrations. They may differ
from the product delivered.
• YEU-R reserves the right to make technical changes. These changes may include
product improvements, modifications or changes in specifications
• If your copy of the operating and maintenance instructions is damaged or lost, please
contact the local YASKAWA branch office to order a new copy. The official branch
offices are listed on the last page. Please mention the manual number in your order.
• YASKAWA Europe GmbH is not responsible for damage caused due to unauthorized
modification of the system. If any impermissible modifications are made to the system
and to the robot, all warranty and liability claims as well as the declaration of
incorporation will expire.
Descriptions of the programming pendant, buttons, and displays are shown as
follows:
Programming pendant Manual designation
Character keys The keys which have characters printed on them are
denoted with [ ], e. g. [ENTER]
Symbol keys The keys which have a symbol printed on them are il-
lustrated with a small picture.
e. g. There is no picture for the cursor key.
Mode selection switch Three kinds of modes that can be selected by the mode
key are denoted as follows: REMOTE, PLAY and
TEACH
Keys There are three keys on the programming pendant,
which are referred to as follows: HOLD key; START
key; Emergency stop button
Axis keys Controlling the axes
Numeric keys Number input
Simultaneously pressed keys A plus sign between the keys indicates that it is neces-
sary to press two keys simultaneously.
e.g. [SHIFT] + [COORD] .
Display The menu displayed is denoted with { }.
e.g. {JOB}
SHIFT
TOOL SEL
COORD

General
1 - 10
Description of the operation procedure
In the explanation of the operation procedure, the expression "Select",
• means that the cursor is moved to the object item and the [SELECT] key is pressed.
• that the item is directly selected by touching the screen.
Registered Trademark
The names of companies and/or products used in this manual are trademarks. The
indications of ® and are omitted.
1.7 Safety
Fig. 1-1: Programming pendant
WARNING!
Death or injury because of danger of crushing
If the emergency stop button does not function properly, the robot cannot be stopped in the
event of an emergency.
The robot should not be used if the emergency stop button does not function.
Before operating the robot check the function of the emergency stop button. The
SERVO power has to immediately go off once the emergency stop button on the
programming pendant has been pressed (seeFig. 1-3: "Emergency Stop button").
When the SERVO power is turned OFF, the SERVO ON LED on the programming
pendant goes off (see Fig. 1-2: "LED SERVO ON").
Fig. 1-2: LED SERVO ON
Fig. 1-3: Emergency Stop button
Emergency Stop button
1
Short Cut
Main Menu
JOB CONTENT
0000
0001
0002
0003
0004
0005
0006
0007
0008
0009
0010
0011
-TEST01
TOOL:
CONTROL GROUP:R1
S:0000
NOP
SET B000 1
SET B001 0
MOVJ VJ=80.00
MOVJ VJ=80.00
DOUT OT#(10) ON
TIMER T=3.00
MOVJ VJ=80.00
MOVJ VJ=100.00
MOVJ VJ=100.00
MOVJ VJ=100.00
MOVJ VJ=100.00
Turn on servo power
JOB
EDIT DISPLAY UTILITY
MOVJ VJ=0.78
S-
SELECT
X-
S+
X+
L-
Y-
L+
Y+
U-
Z-
U+
Z+
R-
X-
R+
X+
B-
Y-
B+
Y+
T-
Z-
T+
Z+
TEACH
PLAY
REMOTE
START HOLD
SLOW
8- 8+
.
2
FAST
TEST
START
HIGH
SPEED
BWD
FWD
INTER
LOCK
WELD
ON/OFF
ASSIST
SERVO ON
CANCEL
SERVO
ON
READY
MAIN
MENU
AREA
PAGE
GO BACK
DIRECT
OPEN
TOOL SEL
COORD
Multi
LAYOUT
Multi
MANUAL SPEED
TOOL SEL
LAYOUT
ENTR
YENTRY
DELETE
MODIFY
SHIFT
ENTER
INSERT
9
6
3
-
.
2
5
8
7
4
1
0
MOTION
TYPE
INFORM
LIST
ROBOT
EX.AXIS
AUX
MAIN
MENU
SIMPLE
MENU
SIMPLE
MENU
COORD
SERVO
ON
READY
PAGE
AREA
CANCEL
DIRECT
OPEN
GO BACK
SERVO ON
SHIFT
E- E+
1
SERVO ON
SERVO ON
SERVO ON

General
1 - 11
WARNING!
Death or injury because of danger of crushing
Before you release the emergency stop button (see Fig. 1-4: "Release of emergency stop
button by turning") note the following:
Make sure that there is no one within the maximum working range of the robot.
Clear the cell of all items which could collide with the robot.
Now you can switch ON the SERVO power by pressing the enable switch on the
programming pendant.
Fig. 1-4: Release of emergency stop button by turning
WARNING!
Death or injury because of danger of crushing
if anyone enters the working area of the robot during operation or any problems occur,
always press the emergency stop button immediately. The emergency stop button is
located on the programming pendant (see Fig. 1-1: "Programming pendant").
Observe the following precautions when performing teaching operations within the robot’s
working range:
View the Robot from the front whenever possible.
Always follow the prescribed operating procedure (see the instructions on robot control
as well as the operating instructions on "Handling" or "Universal Application").
An area must be left clear so that the operator can retreat to it in case of emergency.
The following inspection procedures must be performed prior to teaching the robot. If
problems are found, correct them immediately, and be sure that all other necessary
measures have been performed.
• Check for problems in robot movement.
• Check the connectors for tight fit and all cables for damage.
• Hang the programming pendant back on the robot control after use.
• Make sure that the key for the key switch (Teach/Automatic) of the programming
pendant is kept by a skilled person who has been specially trained.
• The key may be inserted in the key switch of the programming pendant only during
teach operation; after the teach operation it must be immediately removed and kept in
a safe place.

General
1 - 12
1.7.1 For your security
Robots generally have requirements,different from other manufacturing equipment, such
as larger working areas, high-speed operation, rapid arm movements, etc., which may pose
safety hazards.
Please read and understand the instruction manuals and related documents. Observe all
precautions in order to avoid the risk of injury to personnel and damage to equipment.
The user’s responsible for ensuring that all local, state, and national codes, regulations,
rules, or laws relating to safety and safe operating conditions are met and followed.
CAUTION!
In the Industrial Safety and Health Law teaching and maintaining the robot are specified as
"Hazardous Operations" and teaching maintenance of the robot have to be conform to
following rules and regulations:
– Industrial Safety and Health Law.
– Enforcement Order of Industrial Safety and Health Law.
– Ordinance of Industrial Safety and Health Law.
Other related laws are as follows:
– Occupational Safety and Health Act in USA.
– Machinery Directive 2006/42/EC
Fig. 1-5: CE marking
Please note the international standard DIN EN ISO PROTECTED-1, for safe operation of
the robot or the jigs of robot.
Increase the efficiency of your safety management system by specifying authorized
personnel and safety managers and conduct training regularly.
NOTICE
According to the international DIN EN ISO 10218-1 standard, operators of a robot system
must receive training before they operate the robot.
For optimal use of our products, we recommend our customers to take part in a training
session at the YASKAWA Academy. For more detailed information on the training
programme, please visit www.yaskawa.eu.com or directly get in touch with your YASKAWA
branch office.

General
1 - 13
1.7.2 YASKAWA manual list
It is important to have all the manuals on the YASKAWA control or robot available and to
know their contents. Please make sure you have all these manuals. If you are missing any
manual, please contact the local YASKAWA branch office.
You must have the YASKAWA manuals listed below available.
• Beginner's Reference (E1102000144XX01* or higher).
• Install and Wiring (E1102000143XX01* or higher).
• Basic programming (E1102000147XX01* or higher).
• System Setup (E1102000145XX01* or higher).
• Alarm list (E1102000146XX01* or higher).
• Operating and maintenance instructions for the specific robot type.
* "XX" is the language of the document.
1.7.3 Personal protection
The entire working area of the robot is potentially dangerous. The following staff must work
with appropriate preparation and subject to the maxim "Safety First" to ensure the safety
of all.
• Safety management
• Assembly staff
• Operating staff
• Maintenance staff
DANGER!
Death by electric shock; serious injury from fire hazard;
Avoid dangerous actions in the area where the robot is installed. Be sure to take safety
precautions
Unauthorised persons should not have access to the robot.
Unauthorised persons should not have access to the peripheral equipment.
Put up signs in the respective working area, such as "Highly flammable","High
voltage","Stop" and "No unauthorized access" .
WARNING!
There is a risk of injury if there is contact with the robot or peripheral equipment.
Strictly observe the following items:
Always wear approved work clothes (no loose-fitting clothes).
Do not wear gloves when operating the robot.
Personal Protective Equipment (PPE) is subject to the provisions of the 89/656/EEC
guideline.
Do not wear large jewellery, such as earrings, rings or pendants.
Always wear protective safety equipment such as protective helmets, safety shoes
(with anti-slip soles), face shields, safety goggles and gloves as necessary.

General
1 - 14
CAUTION!
Injury and material damage due to unforeseen movements.
Observe the following note:
• Never forcibly move the robot axes.
• Never lean against the robot control.
• Avoid inadvertent pressing of the keys.
• Do not allow unauthorised persons to touch the robot control during operation.
Fig. 1-6: Do not lean on

General
1 - 15
1.7.4 Safety during installation and wiring
For further details of the installation and the electrical connection please see Chapter 5.3.2
"Connection of the robot controller" on page 38.
DANGER due to electric current!
Death and serious injury from electrical shock and fire hazard.
Carry out earthing in accordance with all applicable electrical regulations.
Comply with the standard "Electrical Equipment of Machines" according to IEC 60204-
1:2005 (EN 60204-1:2006).
WARNING!
Injury and material damage due to unforeseen movements.
When planning installation, draw up easy-to-observe guidelines to ensure safety. Take
safety aspects into consideration when planning the installation. Observe the following
when installing the robot:
Select an area such as that described below to install the robot
Make sure the area is large enough so that the fully extended arm with tool does not
collide with the wall, the safeguards or the robot controller.
During installation, pay attention to the following figure "Required installation planning".
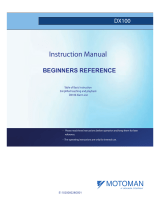
Fig. 1-7: Required installation planning
Safeguarding Maximum P-point range of the robot
Robot controller door Maximum working area of the robot in-
cluding tool or workpiece
Safety distance with respect to the
stopping time of the robot type
3
1
2
3
3
3
5
4
1
4
2
5
3

General
1 - 16
CAUTION!
Danger of injury and material damage from improper means of transport
Crane, forklifts or slings may only be operated by authorised personnel. When lifting the
robot controller, please check the following:
As a rule, handling of robot controller must be performed using a crane with wire rope
threaded through attached eyebolts.
Be sure to use wire that is strong enough to handle the weight of the robot controller
(Weight of robot controller 140 - 180 kg).
Check that the eyebolts are securely fastened.
To lift the robot, use a crane with wire rope threaded through the eyebolts and
positioner(s). Lift the body in an upright position as described in the robot operator's
manual (see Fig. 1-8: "Using a crane").
If storing the robot temporarily before installation, make sure to place it on a stable and
flat surface, and take precautions to prevent unauthorized personnel from touching it.
Fig. 1-8: Using a crane
CAUTION!
Risk of injury during maintenance work
Make sure there is sufficient room for maintenance work on the robot, the robot controller
and the peripheral equipment (see the following illustration).
Wire rope 4 M16 eye bolts
!
Xxxxxxxxx Xxxxxx
XXX
1
2
1
2

General
1 - 17
Fig. 1-9: Space for maintenance
CAUTION!
Danger of injury and material damage in case of non-compliance with protective
measures
For safe operations, the following points must be observed.
The equipment may be operated only by persons with sufficient training.
Install the controller only in a safe location from which the robot is visible at any time.
Fasten the robot with the specified bolts (listed in the operating and maintenance
manual for each robot model).
Pay attention to the size and type of bolts (specified in the operation and maintenance
manual for each robot model).
Install the robot controller outside the safeguarding of the manipulator’s safety
enclosure.
CAUTION!
Danger of injury and material damage from falling or movements
In case of improper installation of the robot controller it may move unexpectedly or fall down
(see the figure below: "Attaching the robot control").
Secure the position of the robot controller after setting up.
Fasten the robot controller to the ground or slot.
Use the screw holes on the underside of the robot controller.
Door At least 1,000 mm
Robot controller maintenance area All dimensions in mm
500650
800
1000
800 800800
690
782
520 500
!
Xxxxxxxxx Xxxxxx
XXX
1
2 3
1
3
2

General
1 - 18
Fig. 1-10: Fixing the robot controller
CAUTION!
Personal injury and damage from improper connections and unforeseen movements
Operators and other personnel may sturnble on exposed wiring or piping. Damaged cables
may cause unexpected robot movements.
Familiarize yourself with the wiring diagram and take notice thereof when establishing
the connections.
Take precautions when wiring and piping between the robot controller, robot, and
peripheral equipment.
Run the piping, wiring, or cables through a pit or use a protective cover, so that they are
not stepped on by personnel or run over by a forklift.
Fig. 1-11: Protective cover for forklift
2 holes Ø 12 Threaded holes for M10 screws
Piping Cables and tubes
Cable duct
1
2
!
Xxxxxxxxx Xxxxxx
XXX
1
2
1
2
3
1
3
2
4

General
1 - 19
1.7.4.1 Safety in the work area
WARNING!
Risk of injury from movements of the robot
To ensure safety, enforce the following precautions:
Install a safeguarding.
Post a warning sign stating "Off-limits During Operation" at the entrance of the
enclosure.
The gate of the barrier must be equipped with a safety interlock.
Make sure the interlock operates correctly before operation.
CAUTION!
Risk of injury from collisions of objects or equipment
Do not store items and equipment near the robot and robot control.
Keep the tools at appropriate locations outside the barrier.
Keep the equipment at appropriate locations outside the barrier.
Tools and loose equipment must not be deposited on the floor around the robot, robot
controller and other components.
1.7.4.2 Operating safety
DANGER!
Death and fire caused by short circuiting
Switching on the power supply during tool installation may result in electric shock.
Before fixing a tool (e.g. welding torch), make sure the power supply to the robot
controller is turned off.
Lock the switch, and display a warning sign (refer to EN 60204-1).
Never exceed the rated capacity of the robot (the robot capacity can be found in the
"Technical Data" section of this manual).
WARNING!
Danger of injury and material damage caused by unforeseen movements of the robot
If possible, teach jobs from outside the robot’s maximum work area.
Observe the following precautions when performing teaching operations within the
manipulator’s operating range:
Always view the robot from the front.
Always follow the predetermined operating procedure.
Always have an escape plan in mind in case the robot comes toward you unexpectedly.
Ensure that you have a place to retreat to in case of emergency.

General
1 - 20
Fig. 1-12: Secure the robot controller with a padlock
External safety
The robot and its auxiliary equipment must be surronded by a safetyguard. Entrances
(doors, gates, etc.) must be protected by interlockings, electro-sensitive devices or similar.
Opening of the gates or entrance to the robot working area must stop all motions inside the
cell. Before taking the robot into operation, the complete machine must fulfill the “Essential
health and safety requirements relating to the design and construction of machinery”
according to the EU Machinery Directive.
Emergency stop function
The emergency stop circuits are designed according to category 1 (EN 418 item 4.1.5)
Using power to the servo motor to achieve the stop and then removal of power when stop
is achieved. If stop is not achieved after 0.8 seconds, mechanical brakes are engaged
automatically to support stopping.
"OFF" position Padlock
!
Xxxxxxxxx Xxxxxx
XXX
1
1
1
2
/