Electrolux E23CS75DSS9 Installation guide
- Type
- Installation guide

Installation
Tools Necessery:
1 PrepareTheInstallationSite
Yourcounter-depthrefrigeratoris designedto bepartofa built-inkitchencabinet
system.Be sureto coordinatesite preparationand instaflationwith your kitchen
contractor.
Includethese minimumguidelinesin yoursitepreparation:
, Choosea placeneara groundedelectricaloutlet.
, Donot useanextensioncord oranadapterplug.
, Avoid directsunlightandcloseproximityto arange,dishwasheror other
heatsource.
, Floorshouldbelevelandable10supportafully loadedrefrigerator.
, The refrigerator'sIce& WaterDispenserrequireswater supplyaccess.
, Planfor easyaccessto countertops whenremovingfood.
, Forcompleteaccesstodrawersandfreezerbaskets,doorsmustbeable to
fully open.
Allowthefollowingclearancesfor easeofinstallation,properaircirculation,and
plumbingand electricalconnections:
Sides&Top:3/8inch Rear: 1inch
2 TransportUnpackagedRefrigeratorToSite
Bynow,you havealreadyremovedyourrefrigerator'sshippingcarton.Youmay
still needto usea handtrucktomoveit throughclose spacesor entrances.Ifthe
refrigeratorislargerthan an entrance,considertwooptions:
, Removethe entrancedoorif oneexists.
, Removethe refrigeratordoors(seehowin yourUse& CareGuide).
When usinga handtruck:
, Loadrefrigeratorfromsideofcabinetonly.
, Donot runretainingstrapsoverhandles.
, Donot over-tightenretainingstraps.
, Neveruse refrigeratorhandlesto movethe refrigerator.
, Removetapefromdoors onlyafterunitis in place.
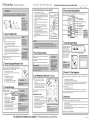
3 ConnectWaterSupply
What you will need:
, Accessto acoldwaterline
with pressureof
20-100psi.
1
, Coppertubingwith ¼-inch
(6.4mm)OD. Lengthfor thi_ Waterline hooku
tubingis thedistancefrom
therear oftherefrigeratorto yourhousehold
watersupplyline plus 7feet(2.1meters).
, A shut-offvalvefor theconnectionbetweenyour household
waterlineandthe refrigeratorsupplyline.
Donot use aself-piercingshut-offvalve.
, A compressionnutandferrule(sleeve)forthe watersupply
connectionatthe rearofyour refrigerator.
Side-By-Side _e[F_geFatoF Thisdocument shouldonly beremovedby customerafter installation. Turn to other sides for
Toconnectthe water supplyto the rear ofyourrefrigerator:
1 Ensurethattherefrigeratoris notpluggedin.
2 Flushthe supplylineuntilwateris clearby placingtheend of the
coppertube in a sinkor bucketandopeningtheshut-offvalve.
3 Unscrewtheplasticcap fromthewater valveinletatthe rear of
yourrefrigerator.Discardthe cap.
4 Slidethebrasscompressionnut,thentheferrule(sleeve)onto
coppertube.
5 Pushthecoppertube intowatervalveinletas far as it willgo
(1/4inch).
6 Slidetheferrule(sleeve)intovalve andfinger-tightenthe
compressionnutontovalve.Tightenanotherhalfturn with a
wrench. Donot over-tighten.
7 Securethecoppertube toyour refrigerator'srearpanelwith a
steelclampandscrew (seeillustration).
8 Coilthe excesscoppertubing(about2_Aturns)behindyour
refrigeratoras shown.Arrangecoiledtubingtoavoidvibrationor
wear againstothersurfaces.
9 Openwatersupplyshut-offvalveandtightenanyconnections
thatleak.
4 Placein PermanentPosition
Ifpossible,usea handtruckto positiontherefrigeratordirectlyinfrontof
itscabinetenclosure.
Becarefulnottomovetherefrigeratorbeyonditswatersupply(copper
tubing) connections.
Pluginthe powercord, and pushtherefrigeratorstraightbackinto
place.
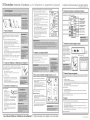
5 LevelRefrigerator&Adjust Doors(ifnecessary)
Guidelinesfor finalpositioningof yourrefrigerator:
• Allfour cornersofthecabinetmustrest firmly
on thefloor.
• The cabinetshouldbelevelatthefrontandrear.
• The sidesshouldtilt _A-inch(6 ram)fromfrontto back
(toensurethat doorscloseandsealproperly).
• Doorsshouldalignwitheach otherandbelevel.
All oftheseconditionscanbemetby raisingor loweringthe
adjustablefront rollers.
Toadjust the front rollers:
1 Openbothdoorsandremovethetoegrilleby
unscrewingitstwomountingscrewsandgentlypulling
forward(see illustration).
2 Closethedoors anduse aflat-bladescrewdriveror3/
8-inchsocketwrenchto raiseor lowerthefront rollers.
3 Ensurebothdoorsare bind-freewith theirseals
touchingthecabinetonall foursides.
4 Replacethetoe grilleby fittingitintoplaceand
refasteningitsmountingscrews.
Spanish 8 French.
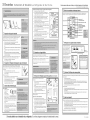
RemoveInternalShippingMaterials
Electroluxusespackingfoamand tapeto securethe internalpartsof yourrefrigeratorfor shipping.Oncethe
refrigeratorisinposition,you canremovethismaterial.
1 PIECE OF TAPEi
1 PIECE OF TAPE_ __ _ =__
1 PIECE OF TAPE_ _ _
1 PIECE OF TAPE_ _
I=I=-- i...--JI =
PIECE OF TAPE OR
2 BLUE SHiPPiNG CLIPS
SPACER WITH TOE GRILLE
PIECE OF TAPE
BOX WITH DOOR BINS AND
DAIRY COMPARTMENT
PIECE OF TAPE
Yourrefrigeratorincludesan ice&
waterdispensingsystem,a digital
temperaturecontrolsystem,
controlsto monitorthe statusofa
waterfilter,andcontrolsfor storage
drawerhumidityandtemperature.
SeetheUse & CareGuideto
learnmoreaboutthestart-up
settingsforthesecontrols.
7 CheckinitialSystemSettings
_ igital
Control
Panel
Problems?TryTheseSuggestions
Operationproblemsarepossibleif any ofthe installationtasksare notcompleted.Hereisa list ofthingsto check
for:
• Isthe refrigerator'spowercordpluggedin?
• Isthe refrigeratorconnectedtothehouseholdwatersupply?
• Ifyou hadto removethe refrigeratorandfreezerdoors, didyou reattachwaterand powerconnectorsatthe
door hinges?(Seethe Use&Care Guidefordetailedinstructionson removingand replacingdoors.)
• Isthe icemakerpowerswitchturnedOn?
Otherpossibilitiestocheck:
• Isthe powertothe receptacleturnedon?
• Isthewaterfilter abovethefresh foodcompartmentfullyseated(see Use& CareGuidefordetails)?
Ifyoustill haveoperationproblemsaftercheckingthesesuggestions,pleaseseethe 'SolutionsTo Common
Problems"sectionin your Use& CareGuide.
9 What'sNext?
Congratulations.Youare readytobeginenjoyingyour newElectroluxrefrigerator.
• Tobecomeawareof importantsafetyinstructionsandlearn howtooperateyourrefrigerator,pleasereadthe
entire Use & CareGuide.
• Y_umaywantt_startwiththe`N_rma_erat_ngSights&S_unds_sect_n_ftheGuidet_earnm_reab_ut
whatto expectduringtypicaloperation.
• Pleaseregisteryourproduct.Youcan usetheCDthatcamewith your refrigeratorto registeronline,or you
can simplysend inthe RegistrationCard.
And thank you for choosing Electrolux.
Not satisfiedwith theinstallationofyour refrigerator? [> Pleasecontactthestoreyoupurchaseditfrom. g4, 4o2o,
Page is loading ...
Page is loading ...
-
 1
1
-
 2
2
-
 3
3


Electrolux E23CS75DSS9 Installation guide
- Type
- Installation guide
Ask a question and I''ll find the answer in the document
Finding information in a document is now easier with AI
in other languages
Related papers
-
Electrolux E23CS78ESS0 Installation guide
-
Electrolux EW23CS65GB0 Installation guide
-
-
Electrolux EI23CS35KS4A Installation guide
-
Electrolux EI27BS26 Installation guide
-
Electrolux EI23BC55IW1 Installation guide
-
Electrolux EI23BC51IW1 Installation guide
-
Other documents
-
Kenmore Pro 25344333603 Installation guide
-
Kenmore 25355333600 User manual
-
Kenmore Elite 25357113601 Installation guide
-
Kenmore Elite CRSE234JQ1 Installation guide
-
Frigidaire FRT21BSDSK2 Installation guide
-
Sears Kenmore 58622 User manual
-
Crosley CRT185ILB8 Owner's Care & Use Manual
-
Frigidaire 25356514402 Installation guide
-
Frigidaire CRT174HLW1 Installation guide
-
Whirlpool 2314473B User guide