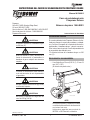
Firepower Deluxe Welding/Cutting Cart Troubleshooting instruction
- Type
- Troubleshooting instruction
This manual is also suitable for
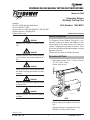
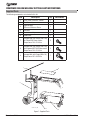
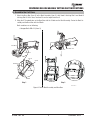
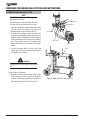
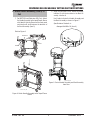
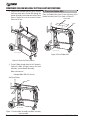
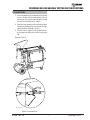
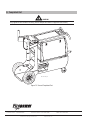
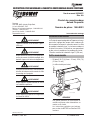
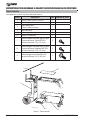
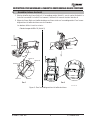
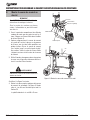
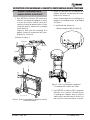
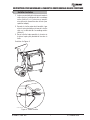
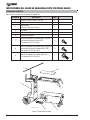
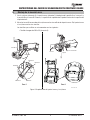
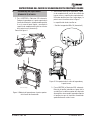
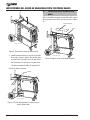
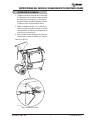
ESAB Firepower Deluxe Welding/Cutting Cart is designed to handle most Cutters and Welders to allow easy transport for the power source, wire feeder, gas cylinder*, welding torch and various accessories. This cart is capable of handling a maximum gas cylinder diameter of 9" (230mm) and a total load capacity of 440lbs. The cart comes with an organizer box, rubber mat, and chain for securing the gas cylinder. It is recommended to use open-ended spanners of sizes 5/16"-.4" (8mm- 10mm), .47"-.55" (12mm- 14mm) for assembly.
ESAB Firepower Deluxe Welding/Cutting Cart is designed to handle most Cutters and Welders to allow easy transport for the power source, wire feeder, gas cylinder*, welding torch and various accessories. This cart is capable of handling a maximum gas cylinder diameter of 9" (230mm) and a total load capacity of 440lbs. The cart comes with an organizer box, rubber mat, and chain for securing the gas cylinder. It is recommended to use open-ended spanners of sizes 5/16"-.4" (8mm- 10mm), .47"-.55" (12mm- 14mm) for assembly.


-
 1
1
-
 2
2
-
 3
3
-
 4
4
-
 5
5
-
 6
6
-
 7
7
-
 8
8
-
 9
9
-
 10
10
-
 11
11
-
 12
12
-
 13
13
-
 14
14
-
 15
15
-
 16
16
-
 17
17
-
 18
18
-
 19
19
-
 20
20
-
 21
21
-
 22
22
-
 23
23
-
 24
24


Firepower Deluxe Welding/Cutting Cart Troubleshooting instruction
- Type
- Troubleshooting instruction
- This manual is also suitable for
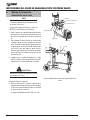
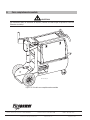
ESAB Firepower Deluxe Welding/Cutting Cart is designed to handle most Cutters and Welders to allow easy transport for the power source, wire feeder, gas cylinder*, welding torch and various accessories. This cart is capable of handling a maximum gas cylinder diameter of 9" (230mm) and a total load capacity of 440lbs. The cart comes with an organizer box, rubber mat, and chain for securing the gas cylinder. It is recommended to use open-ended spanners of sizes 5/16"-.4" (8mm- 10mm), .47"-.55" (12mm- 14mm) for assembly.
Ask a question and I''ll find the answer in the document
Finding information in a document is now easier with AI
in other languages
- français: Firepower Deluxe Welding/Cutting Cart
- español: Firepower Deluxe Welding/Cutting Cart
Related papers
-
ESAB Roll Cage Troubleshooting instruction
-
-
-
-
-
-
-
-
-
Other documents
-
Everbilt 17734 Installation guide
-
-
-
-
Ergotron 97-740 User guide
-
-
ESAB ESAB Fabricator® 252i 3-IN-1 Multi Process Welding Systems User manual
-
-
-