Page is loading ...

1-888-PROTHANE
3560 Cadillac Ave., Costa Mesa, CA 92626
Please refer to a factory service manual before any disassembly or
reassembling of your vehicle for proper instructions. Check service manual to
ensure proper torque specs during installation.
NOTE:
•Prothane bushings generally do NOT meet in the center. The “crush” or amount the
bolt can be tightened is determined by the length of the sleeve.
•For all articulating bushings, make sure to apply SUPER GREASE (supplied) to ALL
SURFACES of bushings that contact metal.
•For all stationary bushings, we recommend applying a light coat of lithium or teflon
grease (not supplied) to OD and ID of bushings to aid installation.
•REUSE all factory hardware unless replacement pieces are supplied.
!
INSTALLATION:
REMOVAL:
-SUPPORT vehicle on jack stands or lift.
-REMOVE front wheels and UNINSTALL front control arms from vehicle (refer to factory service manual for proper procedure).
-NOTE: It is recommended you remove only one link at a time so that the axle housing remains in correct position and so you may refer back to assembled
side of suspension.
PREPARATION:
(For axle housing bushings):
-Use heat or saw to DEBOND old bushing from outer shell, taking care not to damage axle housing or outer shell in process.
(For control arm bushings):
-PRESS OUT all old bushing and inner sleeves from control arm using hydraulic press.
-NOTE: Be sure all bores are clean and free of burs and rubber material before installing urethane bushings.
INSTALL:
-INSTALL Prothane polyurethane bushings after applying supplied grease to all surfaces contacting metal. INSTALL steel inner sleeves after applying
grease to OD of sleeves and flanged faces of bushings (SEE ASSEMBLY VIEW).
-REINSTALL suspension arms onto vehicle (refer to factory service manual for proper procedure).
-TORQUE all fasteners to factory specifications.
-NOTE: In order to remove passenger side upper control arm, exhaust pipe must be removed for clearance to remove the factory bolt. An alternative is to
cut the head off the bolt with a saw and remove. Then replace with supplied bolt (BOLT-148) inserting it from the outside (use with NUT-142 & WASH-140).
FORM 1-211FOR TECHNICAL ASSISTANCE CALL 1-888-PROTHANE
**NOTE: All factory bushings and inner sleeves MUST BE REMOVED before installing new PROTHANE bushings.
Factory outer shells MUST BE REUSED on axle housing bushings. DO NOT REMOVE outer shells from axle housing.**
**Prothane Motion Control highly recommends this and all our polyurethane suspension kits be installed by a qualified technician.**
PARTS LIST:
PART#: DESCRIPTION QTY:
19-1750-001 TEFLON LUBE 5 GRM TUBE, PRINTED 8
BOLT-148 M12-1.75 X 90 HHCS G10.9 ZINC 1
NUT-142 M12-1.75 STOVER LOCKNUT CL10 ZINC 1
SLV-60820 3/4 X .120 X 2.020" GOLD ZINC 2
SLV-60874 1.0X.250X1.960" GOLD ZINC 2
SLV-61057 1.00 X .563 X 2.625 GOLD ZINC 4
U-64128 JEEP (TJ) FT&RR UPPER C-ARM BUSH 2
U-64130 JEEP(TJ) THRUST WASH FT&RR UP C-A 2
U-74001 JEEP JK 07-11 FRT UPR C/ARM BUSH 4
U-74004 JEEP JK 07-11 FRT LWR C/ARM BUSH 8
WASH-140 1/2 SAE FLAT WASHER G8 ZINC YLW 2
Installation Instructions:
Kit#: 1-211
FRONT CONTROL ARM BUSHING KIT
JEEP JK WRANGLER 07-11
**After installation of Prothane polyurethane bushings, it is recommended to have the wheels re-aligned at a qualified service center. DO NOT HESITATE TO
GET THIS DONE, AS PREMATURE TIRE WEAR CAN RESULT.**
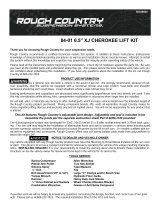
Lower Control Arm
Assembly View:
Upper Control Arm
FRONT AXLE
SLV-61057
SLV-61057
U-64128
SLV-60820
U-64130
U-74004 U-74004
SLV-60874
U-74001
U-74004
Upper Control Arm
Lower Control Arm
/