Page is loading ...

Garden Light Transformers
Instruction Manual
Cat.No: RGL11, RGLTR60, RGLTR105, RGLTR220
2
1
3
3
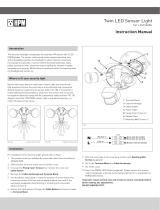
Steps for Garden Light Configuration
Specification
Things To Consider Before Installation
Things To Consider Before Installation (cont..)
Please read carefully: Read through these instructions completely before commencing installation. Retain for future use.
STEP 1
CHOOSE YOUR LIGHTS
You can add LED and halogen lights on the same cable so you can mix
and match.
STEP 2
CHOOSE A TRANSFORMER
Add up the wattage of the lights you selected, then choose a transformer
with a wattage higher than the total wattage of the lights.
STEP 3
CHOOSE A CABLE
The Accessories section below will help you determine the best cable for your
installation.
■ Installing your transformer outdoors - while HPM RGL Series transformers
are rated IP56, your powerpoint might not be waterproof. So, if installing
outdoors ensure the transformer is mounted in a semi protected area or fit
with HPM Aqua Series.
■ All HPM RGL series transformers are fitted with “Self Resetting Thermal
Overload Protection” which will shut down the system when overheating
occurs. Once the unit has cooled, the transformer will automatically restart.
■ Do not power ON until all wiring is completed.
■ Always choose a transformer of a higher rating than total load of all
lights put together.
■ When installing 12V garden lights, a transformer is required to reduce the 240V
mains voltage to the extra low voltage (12V) used by HPM D.I.Y. garden lights.
■ Transformer selection is simple – just add up the total wattage of the garden
lights in your installation and choose the next highest rating for
your transformer.
■ If mixing halogen and LED globes then follow equation below to determine
the right size transformer.
(Number of LED globes x Wattage x 2) + (Number of halogen
globes x Wattage) = total wattage of the required transformer
■ For example, 10W halogen light + 20W halogen light + 10W halogen light +
(3W LED light x 2) + (2W LED light x 2) = 50W. In this case, RGLTR60 can be used.
■ For a 60VA transformer, you can use up to 60W of halogen
lamps or 30W of LED lamps.
Cat. No. RGL11 RGLTR60 RGLTR105 RGLTR220
Output Voltage 12 V a.c. ± 5%
Power VA (Rated Max.) 150 60 105 200
Input voltage 230 -240 V a.c. 50 Hz
Thermal Overload Protection Yes - Self Resetting
Supply Cable 2 Core 1.0 mm2 Circular Flexible Heavy-Duty Cable, 1.8 m long
IP Rating IP56 (Body only)
Terminal blocks
RGLTR60: Ø 4.0 mm
RGL11, RGLTR105, RGLTR220: Ø 4.8 mm

Warranty
Legrand warrants this product for a period of 3 years from the date of purchase.
These goods come with guarantees that cannot be excluded under the Australian and New
Zealand Consumer Laws. You are entitled to a replacement or a refund for a major failure and for
compensation for any other reasonably foreseeable loss or damage. You are also entitled to have
the goods repaired if the goods fail to be of acceptable quality and the failure does not amount to
a major failure.
See the Warranty card enclosed with this product for further details.
LE12972AA 07/2021
Product Notes
Customer Service
For all Customer Service and Technical Support
please call Monday to Friday during business hours.
Legrand Australia
1300 369 777
www.hpm.com.au
Legrand New Zealand
0800 476 009
www.hpm.co.nz
ABN: 31 000 102 661
Paper
1. This product must be installed and used as per these instructions. 2. The mounting screws on this product should be tightened to a maximum torque of 0.8 Nm. Over
tightening may damage the product. 3. This product contains no serviceable parts and no attempt should be made to repair it. If the product is faulty it should be discarded.
4. This product is not suitable for installation in hazardous and/or corrosive areas. 5. Electrical installations periodically receive transient over-voltages. This product has been
designed to minimise the effect of such voltages on connected equipment. It may not give full protection for extreme over-voltage transients such as those resulting from a
close lightning strike. 6. An IP rating of IP56 is generally considered suitable for fully exposed external installations and for areas subject to hose down. 7. Extended
exposure to UV rays (such as exposure to direct sunlight) may cause discolouration of this product. 8. The material in this product may vary in colour from batch to batch.
Colour matching from one batch to another cannot be guaranteed. 9. This product utilises intellectual property in the form of registered designs, trademarks, and/or patents.
Such intellectual property remains the property of Legrand in all cases. 10. Legrand reserves the right to modify the specification of this product at any time.
Problems Explanation Possible solution
Lights are dim
This occurs with any garden light set-up and is referred to
as ”Voltage Drop”. Each light connected to the cable will
reduce in brightness in relation to the number of lights
preceding it and by the distance, it is away from the
transformer.
a. Do not exceed the rating of your transformer.
b. Limit the number of lamps on long runs of cable.
c. Use the shortest length of cable you can or divide lights evenly using two or more
lengths of cable.
d. Use thicker cable.
Transformer
Switches off
Possible Cause - excessive current, HPM transformer are
fitted with“Self Resetting Thermal Overload Protector” which
automatically switches OFF the power supply, if an overload or
short circuit occur.
a. Reduce the number of lights you have attached to the cable so that it does not
exceed the rating of the transformer.
b. Check globes, connectors or transformer terminals for any poor connections.
6 Troubleshooting
7 Accessories
Outdoor Garden Cables:
RGL8 (2-core 1.3mm², 10m length)
RGL9 (2-core 1.3mm², 20m length)
RGLHSC15 (2-core 0.5mm², 15m length)
Connectors:
CDGLCC4 (pack of 4 cable connector)
Sensor:
(Compatible only with 60VA -200VA transformers)
DGLS150 (150W dusk to dawn sensor) Replacement Globe:
3.5W LED-MR16 (Up to 20W Halogen MR16)
3.5W LED-MR16 (Up to 35W Halogen MR16)
Spotlights:
GLLEDSLSS, GLLEDSLBL
RGLVSPBL, RGL21, RGLVSBL
5 Installation Example
If you have purchased a transformer with build in timer, you can add Automatic switching (PE170/10, PE170R2)
and Dusk to Dawn Sensor (DGLS150).
4 Installation
STEP 1
Connect the cable to the transformer by stripping back a small amount of
insulation from each wire strand (approx.10mm). Be careful not to damage wires.
Twist wire strands to prevent loose wire escaping from terminal and to help
ensure a tight joint. Place stripped end into screw terminals on a transformer and
secure firmly with a screwdriver.
Note: RGLTR220 transformer enables you to install two sets of cable wiring.
STEP 2
Extend cable and layout in required configuration. Position lights along cable line
at desired intervals.
STEP 3
Connect the garden light that will be positioned the furthest away from the
transformer first. Turn ON the power and test that the light is working. Turn OFF
the power and connect each of the remaining lights to the cable.
STEP 4
Before covering the cable, turn ON the power and check that all lights are
working. If any lights are flickering or seem dull go back and check that all lamp
and cable connections are firm.
Compatible products can also be choosen from HPM webpage.
/