Vollrath LidSaver 3 Claw Kit - Installation guide
- Type
- Installation guide
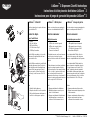
Vollrath LidSaver 3 Claw Kit - perfect for replacing worn-out claws on your LidSaver™ 3 dispenser. The kit includes two claws (left and right) and two claw screws. To install the new claws, simply loosen the screws on the old claws and remove them from the dispenser door. Then, install the new claws in their place and tighten the screws. Be sure to test the dispenser after installing the new claws to make sure they are working properly. With the Vollrath LidSaver 3 Claw Kit, you can keep your dispenser running smoothly and efficiently.
Vollrath LidSaver 3 Claw Kit - perfect for replacing worn-out claws on your LidSaver™ 3 dispenser. The kit includes two claws (left and right) and two claw screws. To install the new claws, simply loosen the screws on the old claws and remove them from the dispenser door. Then, install the new claws in their place and tighten the screws. Be sure to test the dispenser after installing the new claws to make sure they are working properly. With the Vollrath LidSaver 3 Claw Kit, you can keep your dispenser running smoothly and efficiently.

-
 1
1

Vollrath LidSaver 3 Claw Kit - Installation guide
- Type
- Installation guide
Vollrath LidSaver 3 Claw Kit - perfect for replacing worn-out claws on your LidSaver™ 3 dispenser. The kit includes two claws (left and right) and two claw screws. To install the new claws, simply loosen the screws on the old claws and remove them from the dispenser door. Then, install the new claws in their place and tighten the screws. Be sure to test the dispenser after installing the new claws to make sure they are working properly. With the Vollrath LidSaver 3 Claw Kit, you can keep your dispenser running smoothly and efficiently.
Ask a question and I''ll find the answer in the document
Finding information in a document is now easier with AI
in other languages
Related papers
-
Vollrath LidSaver 2 Claw Kit - Installation guide
-
-
-
-
-
-
-
-
-
Other documents
-
Hasbro Zoids Dimetra Ptera ZBuilders Operating instructions
-
Masterbuilt MB20090719 User manual
-
JANOME Magnolia 7360 Owner's manual
-
-
-
-
JANOME Sewing Machine Owner's manual
-
Black & Decker DLS.500HP Owner's manual
-
Facom DLS.500 Owner's manual
-