Page is loading ...

Operator’s Manual
LidSaver
™
In-Counter Lid Dispensers
©
2017 The Vollrath Company L.L.C. Part No. 8012600-1 ml 1/30/17
Please register your product at Vollrath.com/ProductRegistrer
Thank you for purchasing this Vollrath equipment. Before operating the
equipment, read and familiarize yourself with the following operating
and safety instructions. SAVE THESE INSTRUCTIONS FOR FUTURE
REFERENCE. Save the original box and packaging. Use this packaging
to ship the equipment if repairs are needed.
SAFETY PRECAUTIONS
To ensure safe operation, read the following statements and understand
their meaning. This manual contains safety precautions which are
explained below. Please read carefully.
Warning is used to indicate the presence of a hazard that will or can
cause severe personal injury or death.
Caution is used to indicate the presence of a hazard that will or can
cause minor or major personal injury if the caution is ignored.
NOTICE: Notice is used to note information that is important but not
hazard-related.
NOTICE: Each LidSaver™ is factory set to dispense a particular lid
style. If you change lid manufacturers or sizes, your
LidSaver™ will need to modified. Vollrath offers lid
change out kits that are easy to install. Visit
www.Vollrath.com for more information
NOTICE: LidSaver dispensers require regular cleaning to assure
proper operation. See “cleaning” on page 3.
OVERVIEW
WARNING
CAUTION
Item No.
Description
Mounting Length
Faceplate
Color
Accommodates
Lid Diameter
LS01 Horizontal
23"
(58.4 cm)
Clear
2¾"to4¾"
LS01V Vertical
LS01B Horizontal
Black
LS01VB Vertical
LS01S18 Horizontal
18"
(45.7 cm)
Clear
LS01S18B Horizontal Black
LS01VS18 Vertical Clear
LS01VS18B Vertical Black
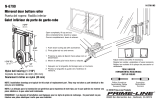
A Bezel/Housing
B Door
C Lid Claw Pivot Screws. (6-32 x ³⁄₄ F.H.M.S.)
D “A” Claw. Marked with claw code.
E Door Springs Door Screws. (10-24 x ³⁄₈ R.H.M.S.)
F Piston Lid Plate
G Pivoting Pager Flipper. For smooth lid loading.
H “B” Claw. Marked with claw code.
I Housing Screws
C
D
G
F
E
A
G
I
B
H
G
G

2 LidSaver
™
In-Counter Lid Dispensers Operator’s Manual
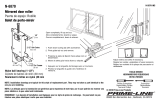
IN-COUNTER INSTALLATION
Tools Needed
• #2 Phillips Screwdriver
• Drill
• 0.125" – 0.136" Drill Bit (For #8 Pilot Hole)
• Sabre Saw or Hand Router
• Cabinet Cut-Out Template (provided)
• (4) #8 x 1.00" Flat Head Wood Screws (included)
1. Use the supplied cabinet cut-out template to cut the LidSaver™ tube
hole and drill four mounting screw pilot holes.
2. Use a screwdriver or pliers to unlock the the door springs from the
door.
3. Remove the four housing screws.
4. Remove the housing by pulling forward and allowing the housing to
flex around the side edges of the open door.
5. Mount the LidSaver into your cabinet using the four #8 round head
wood screws.
6. Replace the housing.
7. Hook the door springs.
#8/ 4.166 mm
WOODSCREW
PILOT (4 PLACES.)
5.437" 138.10 mm WIDTH OF HOLE
6.187" 157.15 mm
HEIGHT OF HOLE
6.875" HEIGHT OF HOUSING
#8/ 4.166 mm
WOODSCREW
PILOT
#8/ 4.166 mm
WOODSCREW
PILOT
#8 / 4.166 mm
WOODSCREW
PILOT
HOUSING
.53"
.53"
.510"
CUTOUT
.343"
.343"
3.437"
.343"
2.906" 53.21mm
2.365" 60.07mm
3.230"
2.437"
1.985" 50.42 mm
.343"
CENTER OF HOUSING
CENTER OF HOUSING
Please read bottom clearance requirements below.
8.81mm
174.63mm
8.71mm
13.46mm
8.71mm
12.95mm
8.71mm
82.04mm
13.46mm
61.9mm
8.71mm
() ( ) () ( )
Service
Fax:
920.459.5462

LidSaver
™
In-Counter Lid Dispensers Operator’s Manual 3
LOADING CLEANING
NOTICE: Do NOT use strong solvents or commercial cleaners
containing ammonia, alcohol, acetone or dry cleaning
products. These will damage the equipment.
Regularly clean the inside and outside of your LidSaver™.
1. Remove all lids from LidSaver™.
2. Remove the bezel/housing (refer to installation instructions).
3. Wipe the interior and exterior with a cotton cloth and warm soapy
water.
4. Saturate each pager assembly with warm soapy water several times.
Flex the flipper portion of the pager to verify flippers operate freely.
5. Push the piston to the back of the tube to expose the bottom of tube.
Wipe the bottom of the tube.
6. Lubricate components:
• Door pivots: Apply lubricant with the door fully open and closed.
• Housing screws
7. Replace the housing.
8. Reattach the door springs.
MAINTENANCE
Tune-Up Your LidSaver™
When lids do not dispense correctly your LidSaver™ may need to be
adjusted. Order a tune-up kit. See www.Vollrath.com for ordering
information.
1. Before loading lids, verify your lids match the manufacturer and lid
number noted on the lid plate label.
2. Separate the lids prior to loading to release any lids that may have been
pressed together during packaging.
3. Load lids or cups.
• Lids must be loaded with the front of the lid stack facing forward.
NOTICE: DO NOT overstock lids. Compressing lids may result in
dispensing problems.
4. If dispensing tabbed lids, align all lid tabs either up (12:00) or
down (6:00) to avoid interference with the lid claws.
NOTICE: Each LidSaver™ is factory set to dispense a particular lid. If
you change manufacturers or sizes, your LidSaver™ will
need to be modified. Vollrath offers lid change out kits that
are easy to install. Visit www.Vollrath.com for more
information.

©
2017 The Vollrath Company L.L.C. Part No. 8012600-1 ml 1/30/17
www.vollrath.com
The Vollrath Company, L.L.C.
1236 North 18th Street
Sheboygan, WI 53081-3201 U.S.A.
Main Tel: 800.624.2051 or 920.457.4851
Main Fax: 800.752.5620 or 920.459.6573
Customer Service: 800.628.0830
Canada Customer Service: 800.695.8560
Technical Services
Induction Products: 800.825.6036
Countertop Warming Products: 800.354.1970
All Other Products: 800.628.0832
TROUBLESHOOTING
Note: Due to manufacturing defects, damaged lids or poorly stacking lid types, some lids may not dispense as planned. Under these rare conditions
your customer is still able to easily retrieve a lid.
SERVICE AND REPAIR
Serviceable parts are available on Vollrath.com.
To avoid serious injury or damage, never attempt to repair the unit or replace a damaged power cord yourself. Do not send units directly to
The Vollrath Company LLC. Please contact Vollrath Technical Services for instructions.
When contacting Vollrath Technical Services, please be ready with the item number, model number (if applicable), serial number, and proof of
purchase showing the date the unit was purchased.
WARRANTY STATEMENT FOR THE VOLLRATH CO. L.L.C.
This warranty does not apply to products purchased for personal, family or household use, and The Vollrath Company LLC does not offer a written
warranty to purchasers for such uses.
The Vollrath Company LLC warrants the products it manufactures or distributes against defects in materials and workmanship as specifically
described in our full warranty statement. In all cases, the warranty runs from the date of the end user’s original purchase date found on the receipt.
Any damages from improper use, abuse, modification or damage resulting from improper packaging during return shipment for warranty repair will
not be covered under warranty.
For complete warranty information, product registration and new product announcement, visit www.vollrath.com.
Problem Might be Caused By Course of Action
Unsatisfactory dispensing
Your lid may be incorrect for your
LidSaver™ settings.
Read label on “lid plate”. If this does not match your lids, order a lid
change kit” to reset your LidSaver™ for your lid.
LidSaver™ may be overfilled with lids.
When lids are compressed too tightly
from overstocking they will not dispense
well. Instruct staff to not overstock lids.
Remove lids and flake the stack. Avoid overstocking lids when
loading.
More than one lid releases when
opening door
Pager flipper not returning to proper
working position after loading lid stack.
Using warm soapy water, thoroughly saturate pager and flipper
until flipper operates freely.
Pager not securely fastened down.
Grasp each pager to determine if it is loose and allows movement
within the adjustment slot. Order a tune-up kit to set these
components accurately.
Single lid dispenses inconsistently.
Lid claw is missing or damaged.
Look for horizontal motion in one or the other claw. If horizontal
motion is noticed, tighten or replace the claw screws. If claw is
broken, order a new claw.
Piston or piston spring may be damaged
and preventing movement to the most
forward position.
The piston or piston spring may be damaged. Clean the inside of
the tube
Lids are frequently damaged.
One or pager flappers have migrated
inward, causing the lids to be held too
firmly.
Remove housing. Inspect the lid claw/lid interaction. Move the door
to check if the lid claw reaches behind the first lid when the door is
completely closed. If the claw does not reach back far enough,
order a Lid Tune Up Kit to reset the pagers.
Door is disengaged from door pivots
or becomes disengaged when
opened too far.
Door pivot screws are sheared.
Remove the door pivot screws. Replace with 0.75-1.00" 10-24
round head screws.
/