Page is loading ...

Installation Instructions for 5" and 8" Planks
Wall Base
Left
Right
Casing
Cutting Line
1 inch
25,4 mm
1
2
Door Jamb
3
For straight
starting walls.
First row only.
4
2 spacers =
1
⁄
4
inch
For uneven starting walls.
5
6
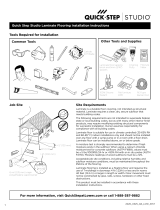
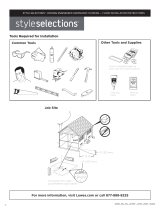
Job Site Conditions
Failure to follow any aspect of these installation instructions will
void the applicable Pergo Limited Warranty.
A moisture test is strongly recommended to determine if excessive
moisture exists in the subfloor. When using a calcium chloride
moisture test for concrete subfloors, readings greater than
5lbs/1000 sq. ft./24 hrs are unacceptable for installation.
When using a moisture meter, readings greater than 4.5%
are unacceptable. Moisture meter readings of wood subfloors
greater than 14% are unacceptable.
Important Note: During a dry season, you may find that you
obtain an acceptable moisture reading even if other job site
conditions are not acceptable. Before installing Pergo floors,
you must be sure that your job site conditions, as well as your
moisture readings, are acceptable. Acceptable job site conditions
and moisture readings, including a relative humidity, 30% to
90%, must be maintained throughout the lifetime of the flooring
installation. For more detailed instructions, see the Pergo
Installation Essentials Guide for Laminate Flooring at
www.pergo.com or call our consumer helpline at
1-800-33-PERGO (1-800-337-3746).
General Installation Instructions
Allow unopened cartons of planks to remain in the room where
they are to be installed at least 48 hours (96 hours in drier or
very humid climates) prior to installation. Pergo flooring can be
installed over most existing subfloors, however, carpeting and pad
must always be removed and wood flooring installed on a concrete
subfloor must always be removed. Your subfloor must be clean,
dry and level. Any spots lower than
3
⁄16 of an inch must be filled
in with a portland cement-based leveling compound and any ridges
must be removed. For flooring installed on all concrete subfloors
that emit a water vapor no greater than 5lbs/1000sq. ft./24 hrs,
including those covered by tile, vinyl, linoleum or sheet flooring,
you must use a non-recycled (100% virgin) resin 6-mil (0.15mm)
with a density of 0.92lbs/cubic ft. and a thickness tolerance
of +/–10% polyethylene film as a vapor barrier. We strongly
recommend the use of Pergo Moisturbloc
TM
or equivalent as a
vapor barrier. A polyethylene film vapor barrier must not be used
over wood subfloors. Foam underlayment must have consistent
density (+/–25%) and thickness (+/–15%). Glue can only be
used with specific flooring that has instructions for applying glue
to flooring joints. Glue must meet or exceed water resistent PVA
glue capable of achieving an ultimate strength of 4000 psi.
Use Pergo Installation Spacers between the planks and the wall,
or any other fixed object, i.e. island counters, to allow for the
required
1
⁄4 inch expansion space (2 spacers placed together,
thick side to thin side, equal
1
⁄4 inch). You will need approximately
one spacer per square foot of installation area.
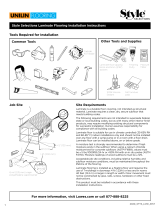
Installing Under Door Frames
10' (3 m)
10 pi
6 mil (0.15 mm) virgin
polyethelene vapor barrier
Pare-vapeur en polyéthylène vierge
de 0,15 mm (6 mil)
Barrera de vapor de 6 mil (0,15 mm)
de polietileno virgen
>5" (130 mm)
>5 po
>8" (200 mm)
>8 po
ground
sol
suelo
Job Site
Chantier de construction
Lugar de trabajo

Fig. 1 Undercut the door frame and wall base. Slide the flooring
at least
1
⁄4 inch underneath the frame and wall base. Also leave
a concealed
1
⁄4 inch expansion space under each. Fig. 2 Assemble
the first row of planks with the tongue side toward the starting
wall. Insert the tongue into the groove of the end joints and
rotate downward. Keep planks aligned and joints closed.
Fig. 3 Use spacers to maintain a
1
⁄4 inch expansion space.
Fig. 4 Remove the tongue on the end of the first plank and the
tongue along the length of all planks against the starting wall
when the starting wall is straight. Fig. 5 If the starting wall is
uneven, scribe or draw the contour of the wall on the planks
and cut along the pencil line. Also remove the tongue on the
end of the first plank of the first row. Fig. 6 Loose lay the first
row of planks approximately 2 feet from the starting wall. Cut
the first plank of row two 32 inches in length and loose lay
several full sized planks for row two. Fig. 7 At a slight angle,
insert the tongue of plank 2 into the groove of plank 1 until the
laminate edges meet, then press downward until the joint locks.
There should not be any gaps at the joints. Fig. 8 Join the short
end of plank 1 to the end of plank 3 while keeping the plank
ends perfectly aligned. Fig. 9 Join the short end of plank 4 to
the end of plank 2. There will be a gap on the long joint
between planks 3 and 4. Installation Tip: Place a weight or
carton of planks on the end of the row that you are installing
when using this method. It will keep the installed planks in
place. Fig. 10 Raise plank 4 upward approximately 1 inch.
Maintain this angle as you take your hands and press against
the long edge of plank 4 until the laminate edges meet. Press
downward on plank 4 until the joint locks. Use these methods to
complete rows 1 and 2 all the way to the opposite wall and to
finish the remainder of the floor. Fig. 11 and 12 – Alternate Tap
Method of Installation Align the tongue into the grooves of the
long and short side. Install the long side first by placing the
tapping block no closer than 8 inches from either end of the
plank and tap along the long side until the joint is closed tightly.
Tap the end joint into locked position. Fig. 13 When there is not
enough space to raise a plank at the end of a row, use the pull
bar. Set the plank flat on the floor. Align the tongue into the
grooves. Use the tapping block to tap in the long joint. Use the
pull bar to tap in the end joint. Fig. 14 Slide the two assembled
rows to the starting wall. Maintain a
1
⁄4 inch expansion space
with spacers. Use pieces cut from the opposite wall to begin the
next row or another row always providing at least a 12 inch or
greater distance between the end joints from one row to the
next. Fig. 15 Cutting the last row: Place a full row of planks
directly on top of the last installed row of full planks. Use the
full width of a scrap piece of plank. Place the tongue side
against the wall and the pencil against the extended groove
and mark a line the length of the wall. Cut along the pencil
line. Fig. 16 When installing around pipes, leave a
1
⁄4 inch
expansion space around the pipes. Use glue to join the cut
pieces. Installing under doorframes: Assemble the short and
long sides using the tapping block and pull bar if needed.
11
1355
2
4
6
5
6
6
13
14
15
> 30 cm, 12 inches
16
12
Alternate Tap
Method
10
4
2
1
3
7
Spacers
8
9
4
/