INSTRUCCIONES IMPORTANTES DE SEGURIDAD
LA BOMBILLA ENCENDIDA ES CALIENTE
ADVERTENCIA: Para disminuir el riesgo de INCENDIO o LESIO-
NES A LAS PERSONAS:
• Apague y deje que se enfríe antes de cambiar la bombilla.
• La bombilla SE CALIENTA RÁPIDAMENTE. Use el interruptor
sólo para apagar.
• NO permanezca en la luz si siente caliente la piel. (La luz es
intensa y puede causar “quemaduras”).
• NO mire directamente a la bombilla encendida.
• Mantenga alejados de la bombilla los artículos que puedan
quemarse.
• Use SOLAMENTE con el vatiaje especicado o mas bajo.
• NO toque la bombilla en ningún momento, use una tela suave.
La grasa de la mano puede dañar la bombilla.
• NO haga funcionar el artefacto con la bombilla dañada o
faltante.
1) APAGAR LA ALIMENTACIÓN DE ENERGIE ELÈTRICA.
IMPORTANTE: Antes de comenzar, NUNCA trate de trabajar
sin antes desconectar la corriente hasta que el trabajo se
termine.
a) Vaya a la caja principal de fusibles, o interruptor o caja
de circuitos de su casa. Coloque el interruptor de la
corriente principal en posición de apagado “OFF”.
b) Desatornille el (los) fusible (s), o coloque el interruptor o
interruptores del breaker en posición de apagado
“OFF”, que controla (n) la corriente hacia el artefacto o
habitación donde está trabajando.
c) Coloque el interruptor de pared en posición de apagado
“OFF”. Si el artefacto que se va a reemplazar tiene un
interruptor o cadena que se jala, colóquelos en la posición
de apagado “OFF”.
2) Encontrar los agujeros roscados correctos en la abrazadera
de montaje. Instalar los tornillos de montaje en los agujeros
roscados.
3) Unir la abrazadera de montaje a la caja de conexiones. (No
se proveen tornillos). La abrazadera de montaje puede
ajustarse para acomodar la posición del artefacto.
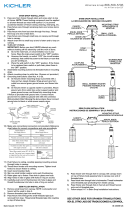
4) Instrucciones de conexión a tierra solamente para los
Estados Unidos. (Vea la ilustracion A o B).
A) En las lámparas que tienen el eje, de montaje con un
agujero y dos hoyuelos realzados. Enrollar el alambre a
tierra de la caja tomacorriente alrededor del tornillo
verde y pasarlo por el aquiero.
B) En las lámparas con una arandela acopada. Fijar el
alambre a tierra de la caja tomacorriente del ajo de la
arandela acoada y tornillo verde, y paser por el eje de
montaje.
Si la lámpara viene con alambre a tierra. Conecter el
alambre a tierra de la lámpara al alambre a tierra de la caja
tomacorriente con un conector de alambres. (No incluido)
Espués de seguir los pasos anteriores. Nunca conectar el
alambra a tierra a los alambres eléctros negro o blanco.
5) Haga les conexiones de los alambres (no se proveen los
connectores.) La tabla de referencia de abajo indica las
conexiones correctas y los alambres correspondientes.
Date Issued: 09/20/17
IS-49149-US
6) Empuje la unidad contra la pared, pasando con cuidado al
tubo roscado a travès del agujero.
7) Sujete la unidad contra la pared apretándola con la tapa
roscada.
8) Inserte la bombilla recomendada. PRECAUCIÓN: NO toque
la bombilla con las manos sin guantes. Si esto sucede, limpie
la bombilla con alcohol desnaturalizado y una tela sin pelusas.
9) Descienda el vidrio sobre el portalámparas.
10) Ajuste el borde inferior del vidrio sobre la taza en el artefacto.
11) Cuidadosamente gire el vidrio para asegurar al vidrio en su
lugar. (NO apriete demasiado).
INSTRUCCIONES PARA EL MONTAJE DEL ARTEFACTO AL
AIRE LIBRE Y/O EN UN LUGAR MOJADO.
12) La supercie de montaje debe estar limpia, seca, ser plana y
1/4” más grande que el esdudete en todos los bordes.
Cualquier espacio libre entre la supercie de montaje y el
escudete que exceda de 3/16” debe corregirse según se
requiera.
13) Calafatee totalmente con compuesto de calafatear de
silicona alrededor donde el escudete sienta en la supercie
de la pared para impedir la entrada de agua en la caja de
conexiones.
Conectar el alambre de
suministro negro o rojo al
Conectar el alambre de
suministro blanco al
Negro Blanco
*Cordon paralelo (redondo y liso)
*Cordon paralelo (cuadrado y estriado)
Claro, marrón, amarillio o negro
sin hebra identificadora
Claro, marrón, amarillio o negro
con hebra identificadora
Alambre aislado (diferente del verde)
con conductor de cobre
Alambre aislado (diferente del
verde) con conductor de plata
*Nota: Cuando se utiliza alambre paralelo
(SPT I y SPT II). El alambre neutro es de forma
cuadrada o estriada y el otro alambre será de
forma redonda o lisa. (Vea la ilustracíón).
Hilo Neutral
ARANDELA
CONCAVA
TIERRA DE LA
CAJA DE SALIDA
TORNILLO DE TIERRA,
VERDE
DEPRESIONES
TIERRA
ARTEFACTO
CONECTOR DE ALAMBRE
TIERRA DE LA
CAJA DE SALIDA
TORNILLO DE TIERRA,
VERDE
TIERRA
ARTEFACTO
A
B
We’re here to help 866-558-5706
Hrs: M-F 9am to 5pm EST
SEE OTHER SIDE FOR ENGLISH TRANSLATIONS.
VEA EL OTRO LADO DE TRADUCCIONES AL INGLÉS.
MOUNTING STRAP
PLANCHA PARA MONTAR
THREADED BALL
BOLA ROSCADO
GLASS
VIDRIO
BULB
BOMBILLA
SOCKET
PORTALÁMPARA
CUP
TAZA