Page is loading ...

SS-OM-011.05 Revised 09/21/2018
Electric Autolift Fryer
MODELS BLF-F & BLF-FC
Installation & Operation Manual
Serial Numbers 811000 and higher


BKI LIMITED WARRANTY
42 Allen Martin Drive • Essex Junction, VT 05452 • USA (802)
PHONE : 658-6600 • FAX : (802) 864-0183
WHAT IS COVERED This warranty covers defects in material and workmanship under normal use, and applies only to the
original purchaser providing that:
The equipment has not been accidentally or intentionally damaged, altered or misused;
The equipment is properly installed, adjusted, operated and maintained in accordance with national
and local codes, and in accordance with the installation and operating instructions provided with this
product.
The serial number rating plate affixed to the equipment has not been defaced or removed.
WHO IS COVERED This
warranty
is
extended
to the original
purchaser
and applies only
to
equipment purchased
for use in the U.S.A.
COVERAGE PERIOD
Warranty claims must be received in writing by BKI within one (1) year from date of
installation or within one (1) year and three (3) months from data of shipment from the
factory, whichever comes first.
COB Models: One (1) Year limited parts and labor.
COM Models: Two (2) Year limited parts and labor. COM convection ovens also have a two (2)
year door warranty.
CO1 Models: Two (2) Year limited parts and labor. Five (5) Year limited door warranty.
BevLes Products: Two (2) Year limited parts and labor.
Warranty period begins the date of dealer invoice to customer or ninety (90) days after
shipment date from BKI, whichever comes first.
WARRANTY COVERAGE This
warranty
covers on-site labor, parts and
reasonable
travel
time
and travel e
xpenses
of the
authorized
service
representative
up
to
(100) miles
round
trip and (2)
hours
travel time and
performed
during
regular,
weekday
business
hours.
EXCEPTIONS Any exceptions must be pre-approved in advance and in writing by BKI. The extended door warranty
on convection ovens years 3 through 5 is a parts only warranty and does not include labor, travel,
mileage or any other charges.
EXCLUSIONS
Negligence
or acts of
God,
Thermostat
calibrations
after (30) days
from
equipment
installation
date,
Air and g
as
adjustments,
Light
bulbs,
Glass doors and
door
adjustments,
Fuses,
Adjustments
to
burner
flames and
cleaning
of
pilot
burners,
Tightening
of screws
or
fasteners,
Failures
caused
by erratic
voltages
or gas
suppliers,
Unauthorized
repair by
anyone
other
than
a BKI F
actory
Authorized
Service Center,
Damage
in
shipment,
Alteration,
misuse or
improper
installation,
Thermostats
and safety valves with
broken
capillary tubes,
Freight
–
other
than
normal UPS charges,
Ordinary
wear and
tear,
Failure to follow
installation
and/or
operating
instructions,
Events
beyond
control
of the
company.
INSTALLATION Leveling, as well as
proper
installation
and check out of all
new
equipment
-
per
appropriate
installation
and use materials – is t
he
responsibility of the
dealer
or installer, not the
manufacturer.
REPLACEMENT PARTS
BKI
genuine
Factory OEM parts receive a (90) day
materials
warranty
effective from the date of
installation
by a BKI F
actory
Authorized
Service
Center.
Warranty
is in lieu of all
other
warranties,
expressed
or implied, and all
other
obligations
or
liabilities on the
manufacturer’s
part. BKI shall in no
event
be liable for any
special,
indirect
or
consequential damages,
or in any
event
for
damages
in excess of the
purchase
price of the
unit. The repair or
replacement
of
proven
defective
parts shall
constitute
a
fulfillment of all
obligations
under
the terms of this
warranty.

Electric Autolift Fryer Table of Contents
1
Table of Contents
Table of Contents .......................................................................................................................................... 1
Introduction ................................................................................................................................................... 2
Safety Precautions ...................................................................................................................................... 2
Safety Signs and Messages ................................................................................................................... 2
Specific Precautions ............................................................................................................................... 3
Equipotential ground plane ................................................................................................................ 3
Full Disconnection .............................................................................................................................. 3
Safe Work Practices ............................................................................................................................... 4
Safety Labels .......................................................................................................................................... 8
Installation ..................................................................................................................................................... 9
Unpacking and Handling ............................................................................................................................. 9
Installation Procedure ................................................................................................................................. 9
Wiring ........................................................................................................................................................ 10
Initial Test and Adjustment ....................................................................................................................... 11
Operation ..................................................................................................................................................... 12
Controls and Indicators ............................................................................................................................. 12
Care of the Shortening .............................................................................................................................. 14
BLF-F Operation ....................................................................................................................................... 15
System Programming ........................................................................................................................... 15
Product Programming .......................................................................................................................... 17
Start-Up (BLF-F) ................................................................................................................................... 18
Cooking (BLF-F) ................................................................................................................................... 19
BLF-FC Operation .................................................................................................................................... 21
System Programming ........................................................................................................................... 21
Product Programming .......................................................................................................................... 24
Start-Up (BLF-FC) ................................................................................................................................ 27
Cooking (BLF-FC) ................................................................................................................................ 28
Maintenance ................................................................................................................................................ 30
Scheduled Maintenance ........................................................................................................................... 30
Filtering Procedure ............................................................................................................................... 31
Boil-Out Procedure ............................................................................................................................... 33
Filter Pad Replacement ........................................................................................................................ 35
Troubleshooting ........................................................................................................................................ 36
Notes ............................................................................................................................................................ 37

Electric Autolift Fryer Introduction
2
Introduction
The BLF Fryer is compact, attractive and functional in design. It is constructed of a stainless steel fryer pot
for cleaning ease. Exclusive BKI patented features and safety devices offer flexibility, efficiency and
reliability plus PERFECTION IN FRYING!
The BKI name and trademark on this unit assures you of the finest in design and engineering -- that it has
been built with care and dedication -- using the best materials available. Attention to the operating
instructions regarding proper installation, operation, and maintenance will result in long lasting
dependability to insure the highest profitable return on your investment.
PLEASE READ THIS ENTIRE MANUAL BEFORE OPERATING THE UNIT. If
you have any questions, please contact your BKI Distributor. If they are unable to
answer your questions, contact the BKI Technical Service Department
(802) 658-6600.
Safety Precautions
Always follow recommended safety precautions listed in this manual. Below is the safety alert symbol.
When you see this symbol on your equipment, be alert to the potential for personal injury or property
damage.
Safety Signs and Messages
The following Safety signs and messages are placed in this manual to provide instructions and identify
specific areas where potential hazards exist and special precautions should be taken. Know and
understand the meaning of these instructions, signs, and messages. Damage to the equipment, death or
serious injury to you or other persons may result if these messages are not followed.
This message indicates an imminently hazardous situation which, if not avoided,
will result in death or serious injury.
This message indicates a potentially hazardous situation, which, if not avoided,
could result in death or serious injury.
This message indicates a potentially hazardous situation, which, if not avoided,
may result in minor or moderate injury. It may also be used to alert against
unsafe practices.
This message is used when special information, instructions or identification are
required relating to procedures, equipment, tools, capacities and other special
data.

Electric Autolift Fryer Introduction
3
Specific Precautions
Risk of fire exists if the oil level drops below 5mm of the maximum oil level.
Use of oil/shortening older than the manufacturers recommendations for life of the
oil is prone to surge boiling and flash fires. Follow the oil manufacturers
guidelines for the life cycle of oil/shortening.
Do not open the drain valve or the fill valve while the fryer is under pressure.
Serious burns may result.
California Residents Only
This product can expose you to chemicals including chromium, and lead which
are known to the State of California to cause cancer and birth defects or other
reproductive harm. For more information go to www.P65Warnings.ca.gov.
Follow operator instructions regarding effects of surge boiling of over-wet foods
and proper load size.
This unit may incorporate components that contain Mercury. The use of Mercury
relays is an industry standard.
Equipotential ground plane
When a high current flows through a conductor, differences in potential appear
between the conductor and nearby metallic surfaces near the appliance. As a
result, sparks may be produced between the appliance and surrounding metal
surfaces. These sparks could cause serious injury, damage, or fire.
BKI provides an Equipotential ground terminal for the connection of a bonding
conductor after the installation of the appliance per lEC60417-1. This terminal is
located on the inside of the Power Entry Supply box near the Earth connection
and is marked with this symbol.
Full Disconnection
In accordance with Local and/or National wiring codes, the installer must provide
a means of full disconnection under over voltage Category III conditions. An IEC
approved cord and plug combination will meet this requirement.
Units not provided with a cord and plug do not meet this requirement. In
accordance with Local and/or National wiring codes, the installer must provide the
means of full disconnection.
The fryer is designed to hold a maximum of 75 lb (34 kg) of oil/shortening.

Electric Autolift Fryer Introduction
4
Safe Work Practices
Keep The Casters Locked
To avoid spilling shortening, keep the casters locked. If any
shortening spills near your fryer, clean it up immediately.
Noncombustible Floors Only
Make sure your floor is noncombustible. Do not operate your fryer
on floors that are wood, carpeted or have rubber mats.
• Placing your fryer on a combustible floor could cause a
fire. Serious injury could result.
• Examples of noncombustible floors where you can safely
place your fryer are concrete, tile, and ceramic.
Keep The Area Around Your Fryer
Uncluttered
Make sure to keep the area around your fryer clear of any
obstacles.
Serious injury can occur if you trip or fall near the fryer. You could
be burned by hot shortening that splashes out of the fryer or by
falling against the hot metal of the fryer.
Keep The Floor Around Your Fryer Clean Of
Shortening
Make sure to keep the floor around your fryer clean of shortening
and other liquids.
Serious injury can occur if you slip near your fryer. You could be
burned by hot shortening that splashes out of the fryer or by falling
against the hot metal of the fryer.

Electric Autolift Fryer Introduction
5
Do Not Overfill The Fryer With Shortening
Hot shortening and steam may escape and burn you if you put too
much shortening in the fryer. Fill the fryer to approximately one
inch below the fill marks that are inside the fryer pot. Heat the
shortening. If needed, carefully add more shortening to bring the
level to the fill marks.
Do Not Let Any Water Get Into The Fryer
Always remove excess moisture from food before placing it into
the fryer basket. Water will cause the hot shortening to spatter.
You could be burned.
Do Not Overload The Basket With Food
Hot shortening and steam may escape and burn you if you place
too much food in the basket.
Wear Safe Clothing Appropriate To Your
Job
Always wear your insulated mitts when handling the fryer basket or
touch any hot metal surfaces. You received a pair of insulated
mitts with your fryer. If you lose or damage your mitts, you can buy
new ones at your local restaurant equipment supply store or from
your local BKI Distributor.
Always wear non-skid shoes when working around the fryer or any
other equipment that uses shortening. Never wear loose clothing
such as neckties or scarves while operating your fryer. Keep loose
hair tied back or in a hair net while operating your fryer.
Always wear appropriate personal protection equipment during the
filtering process to guard against possible injury from hot oil.
Always wear appropriate personal protection equipment during the
boil-out process to guard against possible injury from hot cleaning
solution.

Electric Autolift Fryer Introduction
6
Keep this manual with the Equipment
This manual is an important part of your equipment. Always keep it
near for easy access.
If you need to replace this manual, contact:
BKI
Technical Services Department
42 Allen Martin Drive
Essex Junction, VT 05452
(802) 658-6600
Protect Children
Keep children away from this equipment. Children may not
understand that this equipment is dangerous for them and others.
NEVER allow children to play near or operate your equipment.
Keep Safety Labels Clean and in Good
Condition
Do not remove or cover any safety labels on your equipment. Keep
all safety labels clean and in good condition. Replace any
damaged or missing safety labels. Refer to the Safety Labels
section for illustration and location of safety labels on this unit.
If you need a new safety label, obtain the number of the specific
label illustrated on page 8, then contact:
BKI
Technical Services Department
42 Allen Martin Drive
Essex Junction, VT 05452
(802) 658-6600

Electric Autolift Fryer Introduction
7
Be Prepared for Emergencies
Be prepared for fires, injuries, or other emergencies.
Keep a first aid kit and a fire extinguisher near the equipment. You
must use a 40-pound Type BC fire extinguisher and keep it within
25 feet of your equipment.
Keep emergency numbers for doctors, ambulance services,
hospitals, and the fire department near your telephone.
Know your responsibilities as an Employer
• Make certain your employees know how to operate the
equipment.
• Make certain your employees are aware of the safety
precautions on the equipment and in this manual.
• Make certain that you have thoroughly trained your employees
about operating the equipment safely.
• Make certain the equipment is in proper working condition. If
you make unauthorized modifications to the equipment, you will
reduce the function and safety of the equipment.

Electric Autolift Fryer Introduction
8
Safety Labels

Electric Autolift Fryer Installation
9
Installation
Serious injury, equipment damage or death could result if attempting to install
this fryer yourself. Ensure that an authorized BKI service agent installs the fryer.
Unpacking and Handling
It is the owners’ responsibility to file all freight claims with the delivering truck line. Inspect all cartons and
crates for damage as soon as they arrive. If damage to cartons or crates is found, or if a shortage is found,
note this on the bill of lading (all copies) prior to signing.
If damage is found when the equipment is opened, immediately call the delivering truck line and follow up
the call with a written report indicating concealed damage to your shipment. Ask for an immediate
inspection of your concealed damage item. Packaging material MUST be retained to show the inspector
from the truck line.
Installation Procedure
1. Remove the shipping packing materials from the interior and exterior of the fryer.
Risk of electric shock – Fryer must be secured to building structure. Follow
restraining device instructions for proper installation.
2. Install an ANSI Z83.11/CGA 1.8 compliant restraining device (such as BKI part number FT0279)
per the instructions below:
• Mount the wall attachment according the restraining device manufacturer instructions.
• Attach the spring-loaded hook on the restraining device to the eye-bolt mounted to the fryer
then attach the other spring-loaded hook to the wall attachment.
3. Lock the casters so the fryer does not move. Every time the fryer is used, make sure the casters
are locked so the fryer cannot move.
4. Clean the fryer pot before filling with shortening.
5. Place the DRAIN handle in the CLOSED position.

Electric Autolift Fryer Installation
10
Wiring
Electrocution, equipment failure or property damage could result if an unlicensed
electrician performs the electrical installation. Ensure that a licensed electrician
perform the electrical installation in accordance with local codes, or in the
absence of local codes, with the National Electrical Code, ANSI NFPA 70-20XX.
This unit, when installed by an authorized BKI service agent, must be wired for use in accordance with all
applicable local, state, and federal codes. For specific electrical requirements and connections refer to the
wiring diagram attached to the unit or provided in the Service Manual.

Electric Autolift Fryer Installation
11
Initial Test and Adjustment
1. Place the DRAIN handle in the CLOSED position.
2. Fill pot with shortening to above the “MIN OIL LEVEL” mark.
Risk of fire exists if the oil level drops below the minimum oil level. The level of oil
within the pot must not fall below 5mm of the maximum oil level.
Use of oil/shortening older than the manufacturers recommendations for life of
the oil is prone to surge boiling and flash fires. Follow the oil manufacturers
guidelines for lifecycle of oil/shortening.
Overfilling the fryer pot with shortening could lead to serious injury. Ensure that
the fryer pot is filled with shortening only to the fill mark when shortening is hot.
Do not use any shortening other than what is specified in this manual and do not
overfill the fryer pot.
The fryer has a maximum temperature setting of 375º F/191º C. Do not use
oil/shortening with a flashpoint less than 554º F (290º C)
Use only high-quality shortening that has low moisture content, a high smoke
point and no additives.
3. On the FILTER/OFF/FRY switch, touch the FRY button. The shortening should begin to heat and
begin to reach the fill mark inside the pot. Add more shortening as required to reach the fill mark.
Refer to the troubleshooting section if this does not occur.

Electric Autolift Fryer Operation
12
Operation
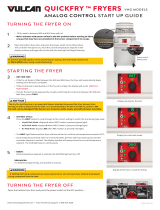
Controls and Indicators
Refer to the figure and table below for an explanation of the fryer’s controls and indicators.
FILTER
OFF
FRY
N0683
DOWN
BASKET
UP
BASKET
R
Auto-Lift Fryer
BLF-F
FILTER
OFF
FRY
DOWN
BASKET
UP
BASKET
Auto-Lift Fryer
BLF-FC
SCAN
PROG
TEMP
ENTER
TOGGLE
CLEAR
1
IDLE
09
HOLD
2 3 4 5 6 7 8
BOIL
OUT
N0687
R

Electric Autolift Fryer Operation
13
Item #
Description
Function
1
Computer
Used to program the cooking computer and activate the programs.
2
Capacitive Touch
Switch Basket Up/
Basket Down
BASKET UP – Momentarily touching the button causes the lift
mechanism to rise. This is enabled only when the FILTER/OFF/FRY
switch is in the FRY position.
BASKET DOWN – Momentarily touching the button causes the lift
mechanism to lower. This is enabled only when the FILTER/OFF/FRY
switch is in the FRY position.
3
Capacitive Touch
Switch Filter/Off/Fry
FILTER – When touched, the LED light next to it will light up and
power is applied to the motor and shorting is pumped into the pot
directly or thru the fill hose.
OFF – When touched, the LED light next to it will light up and power is
removed from the pump motor, heating elements and lift mechanism.
FRY – When touched, the LED light next to it will light up and power is
supplied to the thermostat, heating elements and lift mechanism.
4
Digital Timer /
Thermostat
The digital timer / thermostat consists of 3 LEDs, display, beeper and
6 buttons described below:
LED indicators
P, C, H
During the MLt & HEAt cycle the P LED will flash. When running a
timing cycle the C LED will flash. When idle and rdY the C LED is on.
H is not used
1, 2, 3, 4, 5 & 6
preset buttons
These buttons are used to save and recall preset cycle times, saving
operator time and minimizing error when changing interval cycle time.
To recall any preset time, press and quickly release the appropriate
button and the time starts to count down.
Beeper
A beeper sounds when the timer counts down to 0. Pressing any of
the number button stops the beeper and resets the timer to the rdY
state.
Display
Used to display the time & temperature. It also displays the words
“MLt” then “HEAt” until the frying temperature is reached and rdY
when the fryer is ready to cook.
5
High Limit Reset
Switch
Located under the control panel. If the heating elements inside the pot
reach an unsafe temperature, power is automatically removed from
the control panel, lift mechanism and elements. Pressing this switch
returns power to the control panel, lift mechanism and elements.
6
Drain Lever
DRAIN OPEN – When placed in this position, the drain valve opens
and shortening in the pot drains into the vat. Also, power is removed
from the control panel, lift mechanism and elements.
DRAIN CLOSED – When placed in this position, the drain valve is
closed to prevent shortening from draining into the pot.
7
Fill Lever
FILL THRU POT – When placed in this position, shortening can be
pumped automatically from the vat to the pot if the rocker switch is in
the FILTER position.
FILL THRU HOSE – When placed in this position, shortening can be
pumped from the vat to the pot via a connected hose if the rocker
switch is in the FILTER position.
8
Rinse Hose
Connector
Used to connect the Rinse hose for cleaning and refilling the pot.

Electric Autolift Fryer Operation
14
Care of the Shortening
To extend the life of your shortening, for the best possible flavor in your products, and for economy and
efficiency of operation, we urge you to follow these recommendations:
1. Use only high-quality frying shortening without additives, of low moisture content and with a high
smoke point.
2. Press excess moisture from products before breading. The more moisture released in the
shortening, the quicker it will break down.
3. Filter at least once a day or once every three loads during frequent cooking.
4. Clean any residue or crust formations from the sides and bottom of the pot each time you filter the
shortening.
5. Add fresh shortening as needed to maintain the proper shortening level TO THE FILL MARK ON
THE POT WALL.
6. DO NOT HOLD SHORTENING AT HIGH TEMPERATURE when the fryer is not in use. If you
expect an elapsed time of one hour or more between cooking, press the “0” button on the BLF-FC
model. On the BLF-F, set the thermostat to 150º F, see Product Programming to change the set
temperature.
7. Shortening changes are determined by the quantity and type of food prepared. Excessive boiling
and foaming are definite signs of shortening breakdown.
8. After you have finished frying for the day, filter the shortening and replace the filter pad. Also,
thoroughly clean the pot of sediment and crumbs and empty the condensate pan.
9. IMPORTANT! Before the first cooking operation each day, stir the shortening freely while it is
heating to provide a balanced shortening temperature for excellent results with the first cooking.
Failure to do this can result in a crusty skin on the product surface with an undercooked product
internally. In addition, in some cases, failure to stir the shortening while it is initially heating may
cause the HI-LIMIT safety to disable the power due to a false overshoot condition.

Electric Autolift Fryer Operation
15
BLF-F Operation
System Programming
The controller must be configured with its basic operating parameters before using. These parameters are
the operational mode (cooking or frying), the temperature units, and the control hysteresis. You may also
display the current temperature and test the output relays in this configuration mode. To access these
parameters, press and hold the [5] button, apply the AC operating power by touching the FRY button on
the FILTER/OFF/FRY switch, and then release the [5] button.
Operating Mode – The controller now displays its basic operating mode as shown in the table below. Use
the [2] and [5] buttons to change to the desired operating mode. Press the [3SET] button to save and
advance to the next parameter which is the temperature units
. LED Display
Operating Mode
OP:CF
Cooking controller with fan output on K2 (default)
OP:CO
Cooking controller with no fan output
OP:FL
Frying controller with Lift output on K2, 1 sec @ end
OP:Fr
Frying controller with no lift output
OP:FP
Frying controller for pressure, K2 on for fry cycle
Temperature Units – The unit can display temperature in either degrees Fahrenheit or Centigrade. Use the
[2] and [5] buttons to change to the desired temperature units, [3SET] saves and advances to the
next parameter which is the temperature control hysteresis.
LED Display
Temperature Units
Un:°F
Temperature in degrees Fahrenheit (default)
Un:°C
Temperature in degrees Centigrade
Melt Cycle Parameters – The control provides a built in melt cycle for fryers, the configuration items are the
heat on time, the heat off time, and the temperature where the controller transitions to standard
temperature control. Use the [2] and [5] buttons to change to the desired values, [3SET] saves and
advances to each item and then finally to the temperature control hysteresis.
LED Display
Parameter
Setting
On:08
Heat On Time
Set between 1 and 60 sec (default = 8 sec)
OF:15
Heat Off Time
Set between 1 and 60 sec (default = 15 sec)
225°
Transition Temp
Set between 150° and 275° (default = 225°)
Control Hysteresis – This value is the number of degrees Fahrenheit above and below the setpoint at
which the temperature control relay switches. The output relay will be on until the current temperature
reaches the current setpoint plus the control hysteresis value, and the relay will be off until the temperature
drops down to the setpoint minus the control hysteresis value. This value can be set anywhere from 3°F to
20°F and is set to the default value of 5°F during the factory testing. Use the [2] and [5] buttons to
change to the desired value, [3SET] advances to the next parameter which is the temperature control
hysteresis.
LED Display
Hysteresis Value
Hy:XX
XX = the value in °F from 03 – 20 (default = 5)

Electric Autolift Fryer Operation
16
Temperature Display, Temperature Adjustment & Relay Check – Once you press the [3SET] button again
the unit displays the current temperature. The following features are available in this mode:
Temperature Offset: The control can apply small temperature adjustments to compensate for probe
location within the equipment. Press and release the [2] button to add 1°F, press and release it again to
add another 1°F. Press and release the [5] button to subtract 1°F, press and release it more to subtract
more. The control limits the adjustment to ±10°F.
Relay Check: Pressing and releasing the [4] button turns relay K1 (heating relay) on. Press and release
the [4] button again to turn it off. Pressing and releasing the [6] button turns relay K2 (Pressure
solenoid/lift relay) on. Press and release the [6] button again to turn it off.
This mode can be very useful for testing a new piece of equipment by turning the heaters on and watching
the temperature rise (and/or current draw) to confirm proper heating operation and then using the fan relay
to cool the system down. Press and release the [3SET] button and the configuration wraps around back to
the Operating Mode display.
Once the configuration is complete turn the controller off and then back on again to begin using the
controller in its configured mode.

Electric Autolift Fryer Operation
17
Product Programming
The product programs must be set before cooking can begin.
To enter editing mode press and hold the [3SET] button for two seconds until the controller emits a double
chirp, then the controller first displays the frying temperature.
To change the temperature, use the [2] button to increase the highlighted digit value, to decrease that
digit press the [5] button. To move the highlight to the other digits, use the [4] and [6] buttons
accordingly. Once the temperature is set properly press the [3SET] button to save it and advance to the
time cycle editing.
Once the [3SET] button is pressed and released the controller displays Edit. To view or edit the time
associated with any of the six buttons simply press and release that button and the time is displayed. The
time value is adjusted in the same manner as the oil temperature: use the [2] button to increase the
highlighted digit value, to decrease that digit press the [5] button. To move the highlight to the other
digits, use the [4] and [6] buttons accordingly. Once the time value is set press the [3SET] button and
the display returns to displaying Edit. Once the values are all set properly press and hold the [3SET]
button for 2 seconds until the controller chirps twice and release the button, the controller is now back to
ready mode displaying rdY.
/