Page is loading ...

w
[
KEATING)
OF CHICAGO,
INc.
@
COOKING
COMPUTER
OPERATOR'S
MANUAL
SECTION
I
FEATURES
The Keating cooking computer automatically adjusts time to compensate for temperature variation, and assures
a consistent-tasting product. Cooking times and temperatures may'be programmed using a special program
mode. When programmed, frying is as simple as pressing a button.
The Keating computer features:
1-1.
MULTI-PROGRAMMABILITY
--
.
Eight different cook cycles may be programmed into
L
the computer. Each cook cycle has a separate control
with a range between
1
-second and 99-minutes, 59-
seconds. Cooking times and temperatures cannot be
altered by kitchen help.
1-2. CONSTANT COOKING TEMPERATURES
A cooking range of
290°F. to 39g°F. may be
programmed into the computer. Cooking at constant
temperatures provides a more consistent-tasting
product. The computer will automatically adjust time
for any variations in the oil temperature.
1-3. PRE-ALARM
One pre-alarm may be programmedfor each cooking
cycle (cook key). The pre-alarm may be used to:
1.
Warn your cook that a cook cycle is near
completion.
2. Notify your cook when a basket needs to be
shaken or a product needs to be turned.
3. Coordinate two products with different cooking
times which must be finished at the same time.
A
pre-alarm of
1
-second to 99-minutes, 59-seconds
may be programmed for each cook key.
w
1-4. HOLD CYCLE
Hold cycle automatically activates at the end of the
cook cycle and indicates to your cook when an unsold
product should be discarded.
1-5. HI
LIMIT SAFETY SENSOR
The Hi Limit is a safety device which continually
checks the temperature of the cooking oil. If the oil
rises
40° above the set temperature, "Hi"will appear
in the display window. If the temperature reaches
425OF., the fryer automatic Hi Limit control is
activated. The
burnerdelements will automatically
shut off. The fryer will not operate until the oil has
cooled and the fryer Hi Limit is reset.
NOTE: The reset button is located under the control
panel inside the fryer cabinet.
1-6. MANUAL MODE
A malfunction in the thermostat probe will result in
the word "Probe" appearing in the display window.
Turning off the computer will automatically engage
the back-up thermostat which is set at
350'. To
increase or decrease this temperature, remove the
control panel and adjust the thermostat dial. (See
Fryer Operator's Manual.)
1-7.
MELT CYCLE
The computer comes pre-programmed with a melt
cycle. This allows solid shortening to be safely
melted.
The burnerdelements will cycle on for 5-seconds
and off for 50-seconds, until the shortening is melted.
At that point, the
burnerdelements will stay on until
the shortening reaches cooking temperature. Once
cooking temperature has been reached,
[--
-
-1
will
appear in the display window. The melt cycle may be
removed from the program if liquid shortening is
used. (See programming instructions, Section
3-7.)

SECTION
2
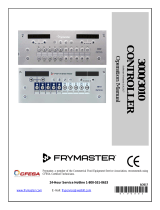
CONTROLS
/I
Computer
Controlled Cooking
1.
LED Display Window
6.
Hold/ Boil Control Button
2.
Cook Key
7.
Temp/XFast Control Button
3.
Cook Key lndentifier
8.
Timer/Fast Control 'Button
4.
Cook Key Indicating Light
9.
Test/Slow Control Button
5.
Scan Control Button
2-1.
LED DISPLAY WINDOW Cook
-
Indicates the operation mode of the fryer.
The COOK key activates a pre-programmed cook
cycle. There are eight cook keys, enabling you
tocook
Program
-
ub to eight different products. A cooking cycle is
A display of "PR-A" melt mode indicates the activated by depressing a selected cook key.
computer is in the programming mode.
2-3.
COOK KEY IDENTIFIER
Cook
-
When the computer is turned on, "LO" will appear in
There is one Cook Key Identifier below each cook key.
the display window. This indicates the fryer is not up
The identifier allows the operator to label a cook key
to program temperature. If melt cycle is programmed
with the product for which that particular key is
(PR-A), the burners/elements will cycle on and off
programmed.
until the fryer has reached
250°F. The burners/
elements will then stay on until the fryer has reached
the programmed cooking temperature. If melt cycle is
removed (PR-F),
burners/elements will stay on
continuously until fryer has reached program
temperature. At that point, the display window will
show
[-
- -
-1
and fryer is ready to cook. (See Melt Cycle,
Section
3-7.)
During the cook cycle, the display window will show
the cook time remaining. The shortest cooking time, if
more than one cook key is being used, will be
displayed.
2-2.
COOK KEY
Proaram
-
2-4.
COOK KEY INDICATING LIGHT
Program
-
Cook Key is selected to set cooking time for each of
8
products.
Cook
-
A Cook Key indicating light will flash to tell the cook
which of the eight programs is currently in process. If
more than one Cook Key is in operation at the same
time, the cycle with the least time remaining will
flash. The indicating lights for the other cookcycles in
operation will be lit, but will not flash.
2-5.
SCAN CONTROL BUTTON
Program
-
Q
The SCAN control button is used to enter a command
-
~eGess the COOK key to program a cooking or pre-
into the computer (temperature, time, pre-alarm,
alarm time for each of the eight cooking cycles.
hold).

Cook
-
Cook
-
When SCAN is pressed and held, cooking time BOlL is used when boiling out the fryer during clean-
remaining for each cook cycle in operation will be up. Depress the BOlL button after the fryer has been
displayed for one second in sequence. Pre-alarm, filled with-water. The boil cycle will hold the water
hold alarm or completed cooking cycle alarm will temperature at
212OF. during boil-out.
override the SCAN function.
NEVER leave the fryer unattended during boil
2-6.
HOLD/BOIL CONTROL BUTTON
Program
-
The Hold button is used to program the 4 hold times
which tell your cook when
a product should be
discarded.
The hold button does not need to be depressed to
activate the hold cycle in the
ope.ration mode. The
HOLD cycle will automatically count down, once the
cooking cycle is complete and the cook key has been
depressed.
cycle.
2-7.
'rEMP/XFAST CONTROL BUTTON
Program
-
Depress to program temperature for all cook cycles.
The XFAST button is used in the program mode. It is
the fastest setting at which the displayed time or
temperature may be adjusted.
Cook
-
Depress the TEMP bu'tton at any time to check the oil
temperature. The temperature will be displayed in the
COOK KEY ACTIVATE LED display window.
#1 and #5
HOLD CYCLE (1 H00)
NOTE: No temperature will display if the oil is below
#2 and
#6
HOLD CYCLE (2H00) 250°F.
#3 and #7 HOLD CYCLE (3H00)
2-8.
TIMER/FAST CONTROL
#4 and #8
HOLD CYCLE (4H00)
The FAST button is used in the program mode. It isthe
-
NOTE: Each pair of CookKeys activate the same Hold
second fastest setting at which the displayed time or
b
Cycle. For example, if both Cook Keys #I and #5 are temperature may be adjusted.
being used at the same time, the first cook cycle
completed
will activate Hold #l. If thesum of the time
2-9.
TEST/SLOW CONTROL BUTTON
of Cook Cycle
#1 and Hold Cycle #1 is less than the
The SLOW key is used in the programming mode.
It
is
time required to complete Cook Cycle #5, then HOLD
the slowest setting at which the displayed time or
will sound for Cook Key #l.
temperature may be adjusted.
SECTION
3
PROGRAMMING
3-1.
ENTER PROGRAM MODE
1. ACTION: Simultaneously press SCAN and TEMP.
RESPONSE: LED will display 18.
2. ACTION: Simultaneously press HOLD and TEST.
RESPONSE: LED will display PR-A.
NOTE: If LED displays PR--F, Press TEST 1. (Computer may be programmed in either PR-A or PR-F. See
Section 3-7, MELT CYCLE.)
3-2.
PROGRAM COOKING TEMPERATURE
1. ACTION: Press TEMP.
RESPONSE: LED will display pre-programmed temperature.
2. ACTION:
Press XFAST then FAST then SLOW until
.
.
.
RESPONSE: LED displays desired cooking temperature.
3. ACTION: Press SCAN to enter temperature.
RESPONSE: LED will display PR-A.

3-3. PROGRAM COOK TIME
1. ACTION: Press selected cook key.
RESPONSE: LED will display pre-programmed cook time.
2. ACTION:
Press XFAST then FAST then SLOW until
.
.
.
RESPONSE: LED displays desired cook time (minutes and seconds).
3. ACTION: Press SCAN to enter cook time.
RESPONSE: LED will display pre-alarm time.
NOTE:
Cooking temperature is now set although PRE-ALARM time is being displayed. To program PRE-
ALARM, proceed to Section 3-4, Step 3. If you want to exit program, press SCAN and proceed to
3-6.
3-4. PROGRAM PRE-ALARM TIME
z
NOTE:
Use Steps 1 and 2 only if you have just entered PROGRAM MODE.
1. ACTION: Press selected cook key.
RESPONSE: LED will display pre-programmed cook time.
2. ACTION: Press SCAN key.
RESPONSE:
LED will display PRE-ALARM time.
3. ACTION:
Press XFAST then FAST then SLOW until'.
.
.
RESPONSE: LED displays desired pre-alarm time.
NOTE:
Set time to
000
if no pre-alarm is desired.
4. ACTION: Press SCAN to enter pre-alarm time.
RESPONSE: LED will display PR-A.
NOTE:
To program additional cook keys, return to Step 1. (lo exit, proceed to 3-6.)
-
3-5. PROGRAM HOLD TIME
U
NOTE:
If you are beginning at this point, first enter PROGRAM MODE, Section 3-1, Steps 1 and 2.
1. ACTION: Press HOLD
RESPONSE:
LED will display 1
H00.
NOTE:
Hold time is displayed in minutes only.
2. ACTION:
Press XFAST then FAST then SLOW until
.
.
.
RESPONSE:
LED displays desired hold time.
NOTE:
Set HOLD to
"OC"
if no hold time is desired.
3. ACTION: Press SCAN to enter hold time.
RESPONSE: LED will display
2H00.
NOTE:
Repeat Steps 2 and 3 to program each of 4 hold times.
3-6.
EXIT PROGRAM
NO'CE:
Press SCAN until PR-A or PR-F is displayed.
1. ACTION: Simultaneously press SCAN and TEMP.
RESPONSE:
LED will display
[--
-
-1.
3-7.
MELT CYCLE
ACAIJTION:
MELT CYCLE should be removed from the program ONLY if liquid shortening is
being used.
1. ACTION: Press TEST.
RESPONSE: LED will display PR-F.
2. ACTION: Simultaneously press SCAN and TEMP.
RESPONSE: LED will display
[-
-
-
-1.
/