Page is loading ...

BENEFON
TRACKBOX
Operating
Instructions
Publication number: YZ2650-0 All rights reserved.
© Benefon Oyj, 2003.

2
LANGUAGE
DECLARATION OF CONFORMITY
Spanish Mediante el presente documento, Benefon declara que este teléfono móvil, del tipo TGP78EB, satisface los requisitos
esenciales y todas las demás disposiciones pertinentes de la Directiva 1999/5/EC.
Danish Benefon Oyj erklærer herved, at denne mobiltelefon af typen TGP78EB er i overensstemmelse med de væsentlige
krav og andre relevante betemmelser i Directive 1999/5/EC.
German Hiermit erklärt Benefon Oyj, daß dieses Mobiltelefon vom Typ TGP78EB die wesentlichen Anforderungen und andere
relevante Bestimmungen der Richtlinie 1999/5/EC erfüllt.
Greek Με το παρόν, η Benefon Oyj δη λώνει ότι αυτό το κ ινητό τηλέφωνο, τύπου TGP78EB, συµµορφώνεται µε τις ουσιώδεις
απαιτήσεις και άλλους σχετικούς όρους της Οδηγίας 1999/5/EC.
English Hereby, Benefon Oyj declares that this mobile phone, type TGP78EB, is in compliance with the essential
requirements and other relevant provisions of Directive 1999/5/EC.
French Benefon Oyj déclare par les présentes que ce téléphone mobile, de type TGP78EB, est conforme aux exigences
essentielles et aux dispositions correspondantes de la Directive européenne 1999/5/EC.
Italian Benefon Oyj dichiara che questo modello di telefono cellulare, tipo TGP78EB, risponde alle principali specifiche e
misure previste dalla Direttiva 1999/5/EC.
Dutch Bij deze verklaart Benefon Oyj dat deze mobiele telefoon, type TGP78EB, voldoet aan de voornaamste eisen en
andere relevante voorwaarden van Richtlijn 1999/5/EC.
Portuguese A Benefon Oyj declara pela presente que este telemóvel, do tipo TGP78EB, está em conformidade com os requisitos
essenciais e outras disposições relevantes da Directiva 1999/5/EC.
Finnish Benefon Oyj vakuuttaa, että tämä matkapuhelin, tyyppiä TGP78EB, on direktiivin 1999/5/EC olennaisten vaatimusten ja muiden
asianomaisten määräysten mukainen
Swedish Härmed förklarar Benefon Oyj att denna mobiltelefon, typ TGP78EB, överenstämmer med de grundläggande kraven
och andra relevanta bestämmelser i Direktiv 1999/5/EC.
Information in this manual is subject to change without notice. BENEFON
reserves the right to change or improve their products and to make
changes in the content without obligation to notify any person or
organization of such changes or improvements. BENEFON is not
responsible for any loss of data, income or any consequential damage
whatsoever caused.
Manufacturer: Benefon Oyj, P.O. Box 84,
24101 Salo, Finland
Web site: www.benefon.com

3
CONTENTS
PART A: CONFIGURING SETTINGS FOR THE
TRACKBOX ............................................................7
MPTP MESSAGES AND
REMOTE CONFIGURATION (OTA)...................................7
THE BENEWIN TRACKBOX SOFTWARE.........................7
Connecting the Trackbox to the
Benewin software.......................................................8
THE CONFIGURATION PORT.............................................................. 8
Loading settings from the Trackbox
to the software............................................................9
Saving settings in a computer disk
(working off-line) ........................................................10
Transferring settings from the
software to the Trackbox ...........................................10
Disconnecting the Trackbox
from the software........................................................11
SHORT MESSAGES..........................................................11
Reading and editing existing messages...................11
Deleting a short message ..........................................11
Writing and sending a short message ......................12
PHONE BOOKS.................................................................13
Editing and adding an entry.......................................13
Deleting entries...........................................................13
Arranging entries........................................................13
Moving and copying entries ......................................14
USER SETTINGS...............................................................14
Phone time and date...................................................14
Activity timer...............................................................14
SETTING THE ACTIVITY TIMER.......................................................... 15
Message settings ........................................................15
SMS SERVICE NUMBER...................................................................... 15
MESSAGE TYPE................................................................................... 16
MESSAGE VALIDITY TIME.................................................................. 16
Port and audio settings..............................................16
AUTOMATIC ANSWER......................................................................... 16
DATA PORT ACTIVITY......................................................................... 17
AUDIO.................................................................................................... 17
VISIBLE MODE ..................................................................................... 17
Settings during battery loading.................................18
GPS OPERATING MODE ..................................................................... 18
GSM ACTIVATION................................................................................ 18
GPS settings...............................................................18
GPS OPERATING MODE ..................................................................... 18
GPS ECONOMY POWER INTERVAL .................................................. 19
NMEA OUTPUT..................................................................................... 19
ASSISTED GPS..................................................................................... 19
TELEMATIC SETTINGS.....................................................20
Tracking settings ........................................................20
TRACKING ............................................................................................ 20
Interval...................................................................................... 20
Duration.................................................................................... 21
Activation.................................................................................. 21
REAL TIME TRACKING........................................................................ 22
AREA TRACKING................................................................................. 22
Interval...................................................................................... 22
Center point.............................................................................. 23
Radius ...................................................................................... 23
Alarm mode .............................................................................. 23
Activation.................................................................................. 23

4
General telematic settings......................................... 24
SERVICE CENTER NUMBER............................................................... 25
LIST OF ALLOWED CALLERS............................................................. 25
PROTOCOL SETTINGS ........................................................................ 25
Authorization............................................................................. 25
MPTP protocol message storage.............................................. 25
Message validity ....................................................................... 26
SMS service number................................................................. 26
Emergency settings................................................... 27
EMERGENCY CONFIRMATION ........................................................... 28
EMERGENCY CALL CYCLE MODE..................................................... 28
EMERGENCY CALL CONNECTION WAITING TIME .......................... 28
EMERGENCY CENTER NUMBERS ..................................................... 28
DIGITAL INPUT PIN
FOR EMERGENCY CALLS................................................................... 29
Turning the emergency pin on or off......................................... 29
Setting normal status................................................................ 29
Defining response time............................................................. 29
Authorized numbers .................................................. 30
Status messages........................................................ 31
Creating status messages ........................................................ 31
Pin settings................................................................. 32
DIGITAL OUTPUTS............................................................................... 32
Turning the output pin on or off................................................. 32
Setting normal status................................................................ 32
Sending notification................................................................... 32
DIGITAL INPUTS .................................................................................. 33
Turning the input pin on or off................................................... 33
Setting normal status................................................................ 33
Sending notification................................................................... 33
Defining response time............................................................. 33
ANALOGUE INPUTS............................................................................. 34
Turning the input pin on or off................................................... 34
Setting normal status................................................................ 34
Sending notification................................................................... 34
Defining response time............................................................. 34
Setting reference values........................................................... 34
Log settings................................................................ 35
EVENT LOG .......................................................................................... 35
Turning the Event log on or off................................................. 35
Event log transmission limit...................................................... 35
Event log full procedure............................................................ 36
CSD number............................................................................. 36
SMS number............................................................................. 36
POSITION LOG INTERVAL .................................................................. 37
Waypoint tracking...................................................... 38
CODE SETTINGS .............................................................. 39
Automatic PIN entry................................................... 39
Security code.............................................................. 39
PART B: OPERATING THE TRACKBOX.............. 40
INCOMING CALLS AND MESSAGES............................... 40
Incoming calls ............................................................ 40
Incoming short messages.........................................40
Incoming MPTP messages ........................................ 40
REMOTE CONFIGURATION MESSAGE ............................................. 41
SYSTEM CONNECTOR CONTROL MESSAGE .................................. 41
LOCATION REQUEST MESSAGES..................................................... 41
AT commands............................................................. 41
OUTGOING CALLS AND MESSAGES.............................42
Power notifications ....................................................42
BATTERY LOW MESSAGE.................................................................. 42
MAINS CONNECTION/DISCONNECTION MESSAGE ........................ 42
Emergency cycle (I/O model only)............................ 42
EMERGENCY MESSAGES AND CALLS............................................. 42
EMERGENCY CYCLE CHECK LIST .................................................... 43
Necessary settings ................................................................... 43
Voluntary settings..................................................................... 43
Circumstances which may affect on emergency cycle............. 44
THE EMERGENCY CYCLE WHEN ONLY MAKING CALLS............... 44

5
THE EMERGENCY CYCLE WHEN ONLY
SENDING SHORT MESSAGES............................................................ 44
THE EMERGENCY CYCLE WHEN BOTH
SENDING SHORT MESSAGES AND MAKING CALLS....................... 45
Sending status messages..........................................45
STATUS MESSAGES CHECK LIST..................................................... 45
Necessary settings ................................................................... 45
Voluntary settings..................................................................... 46
Circumstances which may
affect on sending status messages.......................................... 46
Positioning features...................................................47
ACTIVITY TIMER PROCEDURE........................................................... 47
RESPONDING LOCATION REQUEST,
LOC MESSAGES .................................................................................. 47
RESPONDING LOCATION HISTORY REQUEST................................ 48
RESPONDING LATEST POSITION REQUEST, ?HIS MESSAGES.... 48
NETWORK POSITIONING SUPPORT.................................................. 48
Recalling logged data (I/O model only).....................49
LOCAL TRANSFER .............................................................................. 49
REMOTE TRANSFER ........................................................................... 50
OPENING REMOTELY SENT LOG FILE IN BENEWIN....................... 51
PROCESSING EVENT LOG IN BENEWIN........................................... 51
Saving the log file ..................................................................... 51
Deleting the log file................................................................... 51
PROCESSING EVENT LOG BY USING SOME
OTHER APPLICATION ......................................................................... 51
PART C: POWER MANAGEMENT.........................52
POWER SUPPLY...............................................................52
CHARGING ........................................................................52
BATTERY CARE AND MAINTENANCE ............................53
DISPOSAL OF A BATTERY ..............................................53
PART D: ACCESSORIES ...................................... 53
BATTERIES........................................................................................... 53
EXTERNAL ANTENNAS....................................................................... 53
BWTRACKBOX CABLES..................................................................... 53
PART E: IMPORTANT SAFETY INFORMATION.. 54
DEVICE CARE AND MAINTENANCE................................54
SAFETY AND PRECAUTIONS...........................................55
Telematics protocol....................................................55
GPS..............................................................................55
Emergency calls..........................................................55
General ........................................................................55
Radio frequency (RF) energy.....................................56
Ancillary equipment....................................................57
BENEFON WARRANTY.....................................................58

6

MPTP MESSAGES AND REMOTE CONFIGURATION (OTA) 7
PART A: CONFIGURING SETTINGS FOR THE TRACKBOX
PART A: CONFIGURING
SETTINGS FOR THE TRACKBOX
There are two ways to configure settings for the Trackbox:
•You can use MPTP commands and transfer settings
remotely, over the air by sending a protocol message to
the device.
•You can use the Benewin Trackbox software for config-
uring settings and transfer them to the device locally, via
the BWTrackbox data/NMEA cable. The BwTrackbox cable
must be purchased separately, it is not included in the
Trackbox sales package.
MPTP MESSAGES AND
REMOTE CONFIGURATION (OTA)
MPTP configuration commands are used when a remote up-
date of the device configuration is needed.
Update can include all telematics settings and phone num-
bers, such as emergency numbers, status messages, autho-
rized numbers, GPS operating mode. MPTP updates also
include commands for daily usage, such as location request
and tracking commands.
The remote configuration can be used for transferring the
settings only in case the settings are coded as MPTP messag-
es.
THE BENEWIN TRACKBOX
SOFTWARE
The BeneWin Trackbox software is intended for configuring
settings locally for the Trackbox.
Since the BeneWin is very easy to use, it is advisable to make
initial and other major configurations for the device with
this software. The settings done with the BeneWin software
can be transferred to the Trackbox via the BWTrackbox ca-
ble.
Another, slightly quicker way to transfer configurations
made by Benewin is to use the SetupLoad software.
The Benewin software consists of four main groups of set-
tings: Short messages, Phone books, User settings and
Telematics settings. The settings are divided up into pages
and groups including several data fields, such as
Tracking
settings
, Emergency settings, GPS settings, Message settings,
Protocol settings and so on.
When you are finished with editing the settings, you can ei-
ther transfer the settings back to the device via the BWTrack-
box cable immediately, or save them in a computer disk (as
any normal file) for further use.
For more information on MPTP messages, please see the
separate documents: Mobile Phone Telematics Protocol
(MPTP), located at the Web site: www.benefon.com
TRACKBOX OPERATING INSTRUCTIONS

PART A: CONFIGURING SETTINGS FOR THE TRACKBOX
8 THE BENEWIN TRACKBOX SOFTWARE
Connecting the Trackbox to the
Benewin software
1. The BWTrackbox Data/NMEA cable contains two square-
end adapters. Plug the data adapter (1) into a serial
port. Serial ports are located at the back panel of your
computer.
2. Next remove the back cover of the device by screwing it
off. Plug the flat end of the BWTrackbox cable (2) in
the configuration port of the device. Make sure the re-
lease button (3) is facing up.
3. Open the
BeneWin software.
1
2
3
In order to transfer con-
figurations made by Be-
newin, the BWTrackbox
cable must be plugged in
the device´s configuration
port.
The configuration port is
located inside the device,
in the lower part of the ac-
cessory module.
Only in case the BWTrack-
box cable is intended for
continuous use, you may
pierce a hole to the elas-
tomer for the cable inlet.
Otherwise, leave it intact
for improving dust and
water protection.
THE CONFIGURATION PORT

THE BENEWIN TRACKBOX SOFTWARE 9
PART A: CONFIGURING SETTINGS FOR THE TRACKBOX
4. Choose the correct serial port from the toolbar: Click
the pop-up menu and highlight the desired port.
Or, choose Settings from the Edit menu. Select the De-
fault communication port
by clicking the check box. Click
OK to exit the menu.
5. Double-click the main node My Benefon. Or, double-
click the Trackbox icon. Or, choose
Connect from the
Mobile menu. Or, click the button Connect located on
the toolbar.
6. The software establishes a connection to the device and
renames
My Benefon node according to the type and the
model of the device, in this case
Trackbox.
7. At the same time, the software reads data from the de-
vice and loads it in the display. The data contains cur-
rently existing settings and menus from the device.
These settings and menus are shown as sub-nodes, such
as
Messages, User settings, and Telematics settings. The
nodes are structured as the Benetree on the left side of
the display.
8. If the software requests security code while loading the
settings, you must key in the code and press
Ok. For
more information on security code, see
SECURITY CODE
ON PAGE 39
.
9. Click the name label
Trackbox. The sub-nodes will be
displayed as icons on the working area, i.e. the Docu-
ment window, on the right.
10.You can select the desired sub-node/icon by clicking it.
The data fields will be displayed.
Loading settings from the Trackbox
to the software
As you connect the device to the software, all current set-
tings in the Trackbox are copied to the software.
To load only part of the settings to the software, choose
Set-
tings
from the Edit menu (before pressing Connect button).
Check the desired setting groups - the groups are shown in
the
Mobile phone start up tasks. Click Ok while the dialog box
is displayed.
Unloaded settings can be loaded afterwards in the same ses-
sion by choosing
Open XXsettings from the Mobile menu.
THE MAIN IDEA IS THAT THE PORT SELECTED IN SOFTWARE
MATCHES WITH THE PORT, THE DATA ADAPTER IS PLUGGED IN.

PART A: CONFIGURING SETTINGS FOR THE TRACKBOX
10 THE BENEWIN TRACKBOX SOFTWARE
Saving settings in a computer disk
(working off-line)
1. If the device is not currently connected to the software,
you can still make configurations, save them and transfer
them to the device afterwards. When working off-line,
data fields are available for editing via
My computer
node.
2. To save data in a computer disk, choose
Save as... from
the
File menu.
3. Select the destination drive and folder, and rename the
file the way you like. Click
Save. The software stores all
data fields that the chosen node contains.
Transferring settings from the
software to the Trackbox
While the BeneWin software is connected to the Trackbox,
you can save data in the Trackbox.
1. First open the BeneWin document which content you
want to save in the Trackbox.
Settings which are previously stored in a computer disk
can be recalled by choosing
Open from the File menu, or
pressing the corresponding function icon on the tool-
bar.
2. Choose
Save To Mobile from the File menu.
Or, click the function icon on the toolbar.
When transferring data to the device, the previous data is re-
placed with the new data.

SHORT MESSAGES 11
PART A: CONFIGURING SETTINGS FOR THE TRACKBOX
Disconnecting the Trackbox
from the software
1. Choose Disconnect from the Mobile menu.
Or, click the button
Disconnect on the toolbar.
2. Press and hold down the release button while removing
the BWTrackbox cable from the device. (The release but-
ton is located on the top of the flat end of the BWTrack-
box cable.)
3. In case the inlet for the BWTrackbox cable is pierced,
but the cable is taken off, the hole must be covered with
some waterproof material, such as a piece of firm tape
or silicon. This needs to be done for improving water
protection.
4. Screw the back cover back in.
SHORT MESSAGES
In order to read, write, send and receive normal short mes-
sages via the Trackbox, the Trackbox must be connected to
an external device.
The device attached to the Trackbox can be e.g. a computer,
a laptop or a palm computer. Since the Trackbox lacks the
keyboard and screen, the external device must be provided
with these. The physical connection is established with the
BWTrackbox cable.
A suitable software, for example the Benewin Trackbox, is
needed for the communication as well.
Reading and editing existing
messages
1. Open the Benewin software.
2. Double-click the icon
SMS messages.
Messages are listed and can be read.
Editing: Double-click the message you want to edit. Edit text
and other details in the
SMS edit buffer. Click Ok when
ready.
Deleting a short message
To delete a short message, highlight the message and
choose
Sms, Delete message from the Edit menu.
Or, select
Delete by pressing the mouse´s right button.

PART A: CONFIGURING SETTINGS FOR THE TRACKBOX
12 SHORT MESSAGES
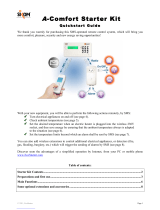
1. Choose Sms, New message from
the
Edit menu. The SMS edit
buffer will be displayed.
2. Key in the message text (1) and
the recipient´s number(2). By
clicking the square next to the
number (3), the recipient´s
number can be fetched from the
Phone book, assuming the num-
ber is found on SIM.
3. Make sure, the
Sms service num-
ber
is correct. The number can
be changed by clicking the
square next to it (4). By select-
ing the option
SIM card default,
the SMS service number will be
picked up from the SIM card. If
the SIM card does not contain
the SMS number, select the op-
tion
Own and key in the SMS ser-
vice number.
4. Select the desired Saving/Send-
ing option by checking one of
the
Action boxes (5).
5. Complete the message by press-
ing
Ok.
3
2
1
4
5
Writing and sending a short message

PHONE BOOKS 13
PART A: CONFIGURING SETTINGS FOR THE TRACKBOX
PHONE BOOKS
As you open the Phone books, the memory entries stored on
the SIM card are listed and can be processed.
Index number
stands for memory slot number.
Editing and adding an entry
1. To edit details of an entry, highlight the desired entry
(1). To add a new phone book entry, click a blank line.
2. Key in the name and number in the lower part of the
Document window (2).
3. By pressing
Tab on the keyboard you can move from a
data field to another.
4. Press
Enter on the keyboard to confirm changes.
Deleting entries
1. To delete a phone book entry, click the desired entry.
2. Press
Delete on the keyboard. You can also choose the
command
Delete from the Edit menu, or by clicking the
mouse´s right button.
Arranging entries
Arrange the phone book by Index, Name, or Number (3) ei-
ther by
- clicking the title
- choosing the option from the Edit menu
- clicking the mouse´s right button.
•View by: This option rearranges the phone book tempo-
rarily. When transferring the phone book data back to the
phone, the data will be arranged by the old order.
•
Sort by: This option rearranges the phone book perma-
nently. When transferring the phone book data back to
the phone, the data will be arranged by the new order.
1
2
3

PART A: CONFIGURING SETTINGS FOR THE TRACKBOX
14 USER SETTINGS
Moving and copying entries
1. To move or copy a phone book entry to another slot,
click the desired entry.
2. Press Ctrl+C (for copy) or Ctrl+X (for cut) on the key-
board. Click the destination line and press Ctrl+V (for
paste) on the keyboard.
You can also choose the commands
Copy, Cut and Paste
from the Edit menu, or by clicking the mouse´s right but-
ton.
Or, you can click the corresponding function icons on
the toolbar.
3. If the destination line is reserved, you also need to con-
firm, whether to overwrite the old information or not.
- To overwrite the old information, click Yes in the dia-
log box.
- To preserve the old information and transfer the new
information to another, free slot (Index number), click
No in the dialog box.
USER SETTINGS
Phone time and date
Time and date can be set in the Benewin software. Key in the
time and date in the GMT format (“Greenwich Time”). Date
and time can be selected by clicking the arrows, as well.
Time stamps associating MPTP messages are displayed in the
GMT format, as well.
Activity timer
Device can be configured to update its position e.g. once a
day and report it to the service center.
Activity timer can also be used to wake up the device peri-
odically to check if there are any incoming messages. If there
are no messages, the timer will return to sleep for the next
wake-up.
Power up/down cycle is reasonable for saving power, espe-
cially in case the device is a plain battery model.
Copy
Cut
Paste

USER SETTINGS 15
PART A: CONFIGURING SETTINGS FOR THE TRACKBOX
SETTING THE ACTIVITY TIMER
Message settings
SMS SERVICE NUMBER
You can store the SMS service number, which is needed for
sending normal short messages and telematics protocol
messages.
The number must be set correctly, otherwise sending short
messages is not possible.
The SMS service number can be found e.g. in the manual of
your local network operator.
However, if you are supplied with a separate SMS service
number for telematics protocol messages, you may store the
number in the
Protocol settings data field. For more infor-
mation, see
GENERAL TELEMATIC SETTINGS ON PAGE 24.
1
2
3
1.
Start time: Key in the date and time, when the
timer is switched on for the first time. Start
time can be selected by clicking the arrows
(1), as well.
2.
Interval: Key in the interval for wake-up (2). If
the interval is set to zero, the timer is NOT in
use.
3.
Positioning skip: It may not be necessary to de-
termine current position each time when the
timer is turned on. By setting a value N for the
position skip (3), the device can be pro-
grammed to only determine the position every
Nth time the timer is turned on.

PART A: CONFIGURING SETTINGS FOR THE TRACKBOX
16 USER SETTINGS
Configuring separate SMS service number for protocol mes-
sages is recommended in case the
Activity timer is used.
MESSAGE TYPE
You can determine what kind of a message you are process-
ing. You can choose the message type from these:
Text, Fax,
X400, Email, Ermes, or Data.
Click the arrow and highlight the desired option.
MESSAGE VALIDITY TIME
You can select the length of validity for normal SMS messag-
es, i.e. for how long the SMS messages are stored in the serv-
er of the operator.
You can choose the message validity from these:
1 hour, 6
hours
, 24 hours, 1 week or Maximum time.
Click the arrow and highlight the desired option.
NOTE: The length of validity for telematics protocol messag-
es is selected in
General telematic settings. For more informa-
tion, see
GENERAL TELEMATIC SETTINGS ON PAGE 24.
Port and audio settings
AUTOMATIC ANSWER
The automatic answer function can be turned on or off.
•If the
Automatic answer is turned on (the box is checked),
a voice call to the device from any number is possible.
•If the
Automatic answer is turned off (the check box is left
blank), making a voice call to the device can only be done
from a number listed as an allowed caller. Allowed
callers are stored in the
General telematics settings. For
more information, see
GENERAL TELEMATIC SETTINGS ON
PAGE 24
.

USER SETTINGS 17
PART A: CONFIGURING SETTINGS FOR THE TRACKBOX
The device contains a built-in microphone. By making a call
to the Trackbox, the caller (e.g. service center) can listen in
the Trackbox and its surroundings. After certain number of
rings, the device answers an incoming call automatically by
opening audio connection.
DATA PORT ACTIVITY
Data port setting must be turned on in case the Trackbox is
needed for data transfer or connected to some external de-
vice.
Turning the data port off decreases power consumption.
•To turn the data port on, check the box.
•To turn the data port off, leave the check box blank.
AUDIO
•Internal: The device contains an internal microphone and
uses it.
•
External: Audio comes from some external device via the
configuration port.
Click the arrow and highlight the currently used option.
VISIBLE MODE
The device can be set to operate
•In visible mode (the box is checked) or
•In invisible mode (the box is left blank).
In
Visible mode the LEDs are lit as described in the Track-
box Installation Guide.
Invisible mode is for making the device more difficult to de-
tect. In invisible mode only some of basic LED patterns are
lit, e.g. powering up/down. This way e.g. sending emergen-
cy messages can be done very discreetly.

PART A: CONFIGURING SETTINGS FOR THE TRACKBOX
18 USER SETTINGS
Settings during battery loading
GPS OPERATING MODE
You can select, which one of the GPS power modes is on
while the device is being charged.
Set the
GPS off, in case
•the time reserved for charging is quite short or
•GPS functions are not needed during charging process.
By selecting
No change, the GPS mode remains in the previ-
ously configured mode.
GSM ACTIVATION
You can select, whether the GSM is turned on or off while
the device is being charged.
In case the GSM functions are needed even during the
charging, this setting must be turned on.
By checking the box, the GSM is activated during charging.
GPS settings
GPS OPERATING MODE
The GPS receiver in the Trackbox uses power saving options
for ensuring maximum battery capacity.
The GPS receiver has three modes:
•
Off
•Low Power with the power saving option
- the time needed for position fix depends on condi-
tions. If the GPS does not manage to calculate the posi-
tion, it will fall asleep for a while and retry to calculate
the position later on

USER SETTINGS 19
PART A: CONFIGURING SETTINGS FOR THE TRACKBOX
•Full power without the power saving option.
Operating mode depends on the way, the device is used.
Autonomous system, i.e. a plain battery model, normally
uses either
Low Power or Off mode, while a device with con-
stant power supply uses
Full Power mode
(i.e. the standard and I/O models).
GPS ECONOMY POWER INTERVAL
Key in the interval for sleeping time in the GPS Economy
mode. In addition to sleeping time, the device needs some
time for searching satellites and calculating position (the
time needed for this depends on present circumstances).
NOTE: This setting is only available in some special models.
NMEA OUTPUT
The NMEA port output can be turned on or off. This device
supports the NMEA 0183 v2.0 output protocol, which is
used for transferring position data between the device and
a navigation system, such as a Search and Rescue applica-
tion. For the connection you also need a BWTrackbox Data/
NMEA cable (an accessory).
- By selecting Off, you will turn the NMEA output port
off.
- By selecting a transferring speed you will turn the
NMEA output port on.
When the NMEA output is turned on, the device will con-
sume slightly more power.
ASSISTED GPS
Trackbox has capability to receive assistance to the GPS re-
ceiver in order to speed up the initial position calculation.
This is very useful feature if the device is in poor satellite
coverage.
Assistance can be supplied over the Mobile Phone Telemat-
ics Protocol in a binary coded protocol message. The mes-
sage will contain ephemeric and almanac data which is
based on a rough position calculated by e.g. GSM network
parameters (Cell-ID, CI-TA etc). The assisted GPS is sup-
plied from a third party station server.
Using the AGPS does NOT affect the accuracy of the posi-
tion. If the last position fix is deemed to be too old, and the
AGPS is set, the AGPS feature is automatically used to speed
up the position determination.
The cost of the AGPS service is determined on the contract
of the service provider.
You can specify settings for ordering assisted GPS informa-
tion from a service provider.
•
Number of satellites: Select the number of satellites.
However, please note that the more satellites selected, the
faster the service but the higher the charge.
•
SMS number: Key in the SMS number of the AGPS service.

PART A: CONFIGURING SETTINGS FOR THE TRACKBOX
20 TELEMATIC SETTINGS
TELEMATIC SETTINGS
Tracking settings
TRACKING
Tracking is remotely controlled by the service center. When
the tracking function is turned on, the position information
is sent to the service center several times in sequence.
If the device is temporarily switched off, battery is removed,
or the power supply is some other way disconnected, the
tracking record (e.g. amount of messages) will be reset and
start from the beginning.
Essential phone numbers, such as
Service center number and
SMS service number, must be configured in the device. In the
Benewin software, these numbers can be set in the
General
telematic settings
. For more information, see GENERAL
TELEMATIC SETTINGS ON PAGE 24
.
Interval
The given interval, e.g. 60 minutes, indicates that the device
will send its position to the service center at intervals of 60
minutes. Key in the tracking interval in minutes.
/