Page is loading ...

1
User Instruction Manual
First-Man-Up
™
Remote Anchorage
Connector System
This manual is intended to meet the Manufacturer’s
Instructions as required by ANSI Z359.1-1992 and
ANSI A10.14-1991, and should be used as part of an
employee training program as required by OSHA.
© Copyright 1995, 1999, DB Industries, Inc.

2

3
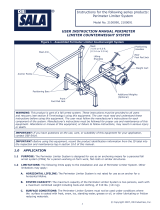
Figure 1

4
WARNING: These instructions must be provided to the user of this equipment. The
user must read and understand these instructions before using this equipment. The user
must follow the manufacturer’s instructions for each component of the system.
Manufacturer’s instructions must be followed for proper use and maintenance of this
equipment. Alterations or misuse of this equipment, or failure to follow instructions, may
result in serious injury or death.
WARNING: Always wear a hard hat when using the First-Man-Up system.
IMPORTANT: If you have questions on the use, care, or suitability of this
equipment for your application, contact DBI/SALA.
DESCRIPTIONS See Figure 1.
2104519: Remote anchorage connector system, six to twelve foot extension pole, tie-off
adaptor connector tool, snap hook connector tool, tie-off adaptor anchorage connector,
carrying bag, instructional video.
2104520: Remote anchorage connector system, eight to sixteen foot extension pole, tie-off
adaptor connector tool, snap hook connector tool, tie-off adaptor anchorage connector,
carrying bag, instructional video.
2104521: Tie-off adaptor connector tool only.
2104522: Snap hook connector tool only.
2104523: Six to twelve foot extension pole only.
2104524: Eight to sixteen foot extension pole only.
2102260: Strap arm for three foot tie-off adaptor.
2102408: Strap arm for four foot tie-off adaptor.
2102409: Strap arm for five foot tie-off adaptor.
2102410: Strap arm for six foot tie-off adaptor.
1.0 APPLICATIONS
1.1 PURPOSE: The First-Man-Up system assists in installing and removing a DBI/SALA
tie-off adaptor anchorage connector and lifeline in overhead installations. The tie-off
adaptor and lifeline (or other device) must be approved for use with the First-Man-Up
system by DBI/SALA. The First-Man-Up system may also be used for attaching a
lifeline or other device to an overhead anchorage point.
2.0 SYSTEM REQUIREMENTS
2.1 ANCHORAGE STRENGTH: The anchorage to which the tie-off adaptor is installed
must meet the following minimum strengths, according to your application:
A. FALL ARREST: Anchorages used for personal fall arrest systems (PFAS) must
sustain static loads, applied in the directions allowed by the PFAS, of at least;
3,600 lbs. with certification of a qualified person, or 5,000 lbs. without
certification. See ANSI Z359.1-1992 for certification definition. When more than
one PFAS is attached to an anchorage, the strengths stated above must be
multiplied by the number of PFAS attached to the anchorage. From OSHA
1910.66 and 1926.502: Anchorages used for attachment of a PFAS shall be
independent of any anchorage being used to support or suspend platforms, and be
capable of supporting at least 5,000 lbs. per user attached, or be designed,

5
installed, and used as part of a complete PFAS which maintains a safety factor of
at least two, and is supervised by a qualified person.
B. RESTRAINT: Anchorages used for restraint applications must sustain static
loads, applied in the directions allowed by the restraint system, of at least 3,000
lbs. Each tie-off adaptor installation must be independently capable of sustaining
these loads.
C. WORK POSITIONING: Anchorages used for work positioning applications
must sustain static loads, applied in the directions allowed by the work positioning
system, of at least 5,000 lbs. Each tie-off adaptor installation must be
independently capable of sustaining these loads.
D. SUSPENSION: Anchorages used for suspension applications must sustain static
loads, applied vertically, of at least 2,500 lbs. Each tie-off adaptor installation
must be independently capable of sustaining these loads.
E. RESCUE: Anchorages used for rescue applications must sustain static loads,
applied in the directions allowed by the rescue system, of at least 2,500 lbs. Each
tie-off adaptor installation must be independently capable of sustaining these loads.
3.0 OPERATION AND USE
WARNING: Maintain a minimum clearance of ten feet between the First-Man-Up
system and electrical power lines.
3.1 USING THE TIE-OFF ADAPTOR CONNECTOR TOOL:
A. ATTACHING THE CORD REEL:
To attach the cord reel
onto the extension
pole, position the
bottom of the cord reel
flush with the handle
grip on the end of the
extension pole as
shown in Figure 2.
Attach cord reel to
extension pole with the
two nylon threaded
rods and lock nuts. The
cord reel must be
positioned on the front
of the extension pole
as shown for proper
functioning. Trim
excess threaded rod,
leaving a minimum of
two full threads above
the lock nuts.
Figure 2

6
Figure 3
B. ATTACHING THE TIE-OFF ADAPTOR CONNECTOR TOOL:
Step 1. Extend the strap arm to its full length by pivoting the strap arm until it locks
into place. Ensure spring plunger full engages and locks strap arm into place.
See Figure 3. See Descriptions section above for optional longer length strap
arms. NOTE: Optional strap arms are one-piece, non-pivoting strap arms.
Step 2. To install the strap arm onto the tie-off adaptor connector tool, pull out the
spring plunger on top of the tie-off adaptor connector tool and slide the strap
arm into the slot as shown in Figure 4. Align the hole on the strap arm with
Figure 4

7
the spring plunger and release spring plunger. Ensure spring plunger locks
into place on the strap arm.
Step 3. To install the tie-off adaptor connector tool onto the extension pole, depress
the snap buttons on each side of the tool insert and slide into the open end of
the extension pole as shown in Figure 4. Ensure the snap buttons lock into the
holes on the extension pole. NOTE: Tie-off adaptor connector tool must be
positioned on the extension pole as shown in Figure 4 for proper functioning.
Step 4. Extend the trip cord from the cord reel and attach to the pin on the lever arm
on the tie-off adaptor connector tool. See Figure 5. The trip cord must pass
straight up, without crossing over the pole.
Figure 5

8
C. ATTACHING THE TIE-OFF ADAPTOR TO THE TIE-OFF ADAPTOR
CONNECTOR TOOL:
See Figure 6. With the strap arm fully extended, place the small D-ring into the
groove on the end of the strap arm, with the narrow web facing up. Run the tie-off
adaptor, with the narrow web against the strap arm, along the bottom of the strap
arm and rotate the strap rod up until it locks in place.
IMPORTANT: The strap rod must fully capture and hold the tie-off adaptor in
place as shown. If the strap rod does not securely lock, adjust the lock tension with a flat
head screw driver as shown in Figure 6. If the strap rod is loose, adjust the strap rod
tension with a 5/32 inch allen wrench as shown in Figure 6.
Figure 6

9
D. SECURING THE TIE-OFF ADAPTOR TO THE ANCHORAGE:
Step 1. Extend the extension pole to the length required to reach the anchorage.
The strap rod must remain in the locked position. Ensure the trip cord
remains attached to the pin on the lever arm.
Step 2. Rest the strap arm with tie-off adaptor on top of the anchorage. The wider
web (which acts as a wear pad) must be against the anchorage, as shown in
Figure 7. Ensure the tie-off adaptor web is not twisted. Pull the trip cord to
release the strap rod, which will allow the tie-off adaptor to drape over the
anchorage with both D-rings hanging below the anchorage. Using the hook
on the tie-off adaptor connector tool, position the tie-off adaptor so that it
drapes evenly over the anchorage.
Figure 7

10
Step 3. Feed the hook on the tie-off adaptor connector tool through the large D-ring
on the tie-off adaptor and hook onto the small D-ring as shown in Figure 8.
Figure 8

11
Step 4. Pull the small D-ring through the large D-ring until the tie-off adaptor is tight
against the anchorage as shown in Figure 9.
Step 5. Retract the extension pole to the minimum length. Detach the trip cord from
the tie-off adaptor connector tool and allow the trip cord to slowly retract into
the cord reel. Remove the tie-off adaptor connector tool from the extension
pole. See section 6.0 for cleaning and storage.
WARNING: The tie-off adaptor must be tight against the anchorage as shown in
Figure 9. To prevent increased free fall distance, do not leave slack in the tie-off adaptor.
Figure 9

12
3.2 USING THE SNAP HOOK CONNECTOR TOOL:
A. ATTACHING THE SNAP HOOK CONNECTOR TOOL:
To install the snap hook connector tool onto the extension pole, depress the
snap buttons on each side of the tool insert and slide into the open end of the
extension pole. Ensure the snap buttons lock into the holes on the extension
pole.
B. ATTACHING THE SNAP HOOK TO THE SNAP HOOK CONNECTOR
TOOL:
Attach the snap hook to the snap hook connector tool between the roller and cam
as shown in Figure 10. The thumb lever must be in contact with and below the
roller, and the gate lock must be in contact with the cam.
Figure 10

13
C. CONNECTING THE SNAP HOOK TO THE TIE-OFF ADAPTOR:
Step 1. See Figure 11. To lock the snap hook open, pull the snap hook up, which
causes the cam to push back the gate lock and the roller to open the gate.
Continue pulling up until the cam rotates and seats under the gate lock,
which locks the gate open. The snap hook must be locked open before
attaching to the tie-off adaptor.
Step 2. To connect the snap hook to the tie-off adaptor, extend the pole to the
required length. Place the snap hook onto the small D-ring on the tie-off
adaptor. See Figure 12.
WARNING: Hold the lifeline against the extension pole, with a small amount of
tension, so that the snap hook does not unintentionally detach and fall.
Figure 11

14
Step 3. To close the snap hook around the D-ring, release the snap hook from the
connector tool, pull down slightly on the lifeline, twist the extension pole
counter-clockwise while pushing up slightly. The snap hook should close
over the D-ring and release from the connector tool. Do not pull down on the
extension pole. Tug on the lifeline to ensure the snap hook is securely
attached to the D-ring.
WARNING: The snap hook must only be attached to the small D-ring on the tie-off
adaptor as shown in Figure 12. Do not attach the snap hook to both D-rings.
Step 4. Retract the extension pole to the minimum length. Remove the snap hook
connector tool from the extension pole. See section 6.0 for cleaning and
storage.
Figure 12

15
3.3 USING THE SNAP HOOK CONNECTOR TOOL WITH A HARNESS
MOUNTED SELF RETRACTING LIFELINE:
When attaching a lifeline from a harness mounted self retracting lifeline, follow the
steps listed in section 3.2, but, because there is significant tension on the lifeline
(which may cause the snap hook to unintentionally disengage), wrap the lifeline two
wraps around the extension pole to relieve the lifeline tension before attempting to
attach the snap hook to the tie-off adaptor D-ring.
3.4 REMOVING THE SNAP HOOK FROM THE TIE-OFF ADAPTOR:
Step 1. To remove the snap hook from the tie-off adaptor, use the snap hook
connector tool. See section 3.2 for attaching the snap hook connector tool to
the extension pole. Extend the extension pole up to the snap hook. With one
hand, hold the lifeline under tension. With the other hand, maneuver the
extension pole to attach the snap hook to the snap hook connector tool, with
the thumb lever in contact with and below the roller, and the gate must be in
contact with the cam. See Figure 10.
Step 2. To lock the snap hook open, pull down on the extension pole, which causes
the cam to push back the gate lock and the roller to open the gate. Continue
pulling the extension pole until the cam rotates and seats under the gate lock,
which locks the gate open. See Figure 11. When the gate is locked open,
remove the snap hook from the tie-off adaptor D-ring.
3.5 REMOVING THE TIE-OFF
ADAPTOR FROM THE
ANCHORAGE:
To remove the tie-off adaptor
from the anchorage, use the tie-
off adaptor connector tool. See
section 3.1 for attaching the tie-
off adaptor connector tool to the
extension pole. Extend the
extension pole up to the large
D-ring on the tie-off adaptor.
Using the tie-off adaptor
connector tool hook, hook the
large D-ring on the tie-off
adaptor as shown in Figure 13.
Pull down while moving away
from the anchorage until the tie-
off adaptor is dragged off the
anchorage. The tie-off adaptor
should remain on the connector
tool hook once removed from
the anchorage, but use caution
to ensure the tie-off adaptor
does not fall.
Figure 13

16
4.0 TRAINING
4.1 It is the responsibility of the user and purchaser of this equipment to be familiar with
these instructions, and are trained in the correct care and use, and are aware of the
operating characteristics, application limits, and the consequences of improper use of
this equipment.
5.0 INSPECTION
5.1 BEFORE EACH USE inspect your First-Man-Up system according to sections 5.2
and 5.3 of this manual. A competent person, other than the user, must inspect this
system at least annually. Record the results of each inspection in the inspection and
maintenance log in section 9.0.
WARNING: If subsystem components (tie-off adaptor, lifeline) have been subjected to
the forces of a fall arrest, remove from service and destroy.
5.2 INSPECTION STEPS:
Step 1. Inspect the tie-off adaptor according to manufacturer’s instructions. All
hardware must be present and undamaged, and webbing must be free of
frayed, cut, or broken fibers.
Step 2. Inspect tie-off adaptor connector tool. The strap arm must lock into place and
hold the tie-off adaptor securely. Inspect the strap rod and lock tension
adjustments. If adjustments are required, see section 3.1.B and 3.1.C for
instructions. Inspect the trip cord. The cord must be free of frayed, cut, or
broken fibers.
Step 3. Inspect the snap hook connector tool. Roller and cam must turn freely.
Step 4. Inspect the extension pole. The pole must extend and retract freely. The
fiberglass pole must be free of broken or splintered parts.
Step 5. Inspect all system components and subsystems according to manufacturer’s
instructions.
Step 6. Inspect labels. All labels must be present and fully legible. See section 8.0.
Step 7. Record the inspection results in the inspection and maintenance log in section
9.0 of this manual.
5.3 If inspection reveals an unsafe or defective condition, remove unit from service and
contact an authorized service center for repair.
IMPORTANT: Only DBI/SALA or parties authorized in writing may make repairs
to this equipment.
6.0 MAINTENANCE, SERVICING, STORAGE
6.1 Clean the First-Man-Up system components with water and a mild detergent solution.
Wipe off hardware with a clean, dry cloth and hang to air dry. Do not force dry with

17
heat. An excessive build-up of paint, dirt, grease, etc. may prevent proper functioning
of the system, and may weaken the system components. If you have questions
regarding the condition of your First-Man-Up system, or have doubt about putting it
into service, contact DBI/SALA.
6.2 Additional maintenance and servicing procedures must be completed by an authorized
service center. Authorization must be in writing. Do not disassemble system
components. See section 5.1 for servicing frequency.
6.3 Store the First-Man-Up system in a cool, dry, clean environment, out of direct sunlight.
Avoid areas where chemical vapors exist. Thoroughly inspect the First-Man-Up system
after extended storage.
7.0 SPECIFICATIONS
7.1 MATERIALS:
Connector Tools and Strap Arms: 6061-T6 aluminum, zinc plated steel.
Extension Pole: Fiberglass and aluminum.
Tie-off Adaptor: Steel hardware, polyester webbing (see manufacturer’s instructions
for complete tie-off adaptor specifications).
7.2 OTHER SPECIFICATIONS:
Extension Pole Reach: 2104519 - six to twelve feet.
2104520 - eight to sixteen feet.
Weight: 7.75 lbs.
U.S. Patent Number: 5,622,399
8.0 LABELING
8.1 The following labels must be present and fully legible:
Extension Pole Label

18
Tie-off Adaptor Connector Tool Labels
Labeling, continued:

19
Snap Hook Connector Tool Labels
Labeling, continued:

20
9.0 INSPECTION AND MAINTENANCE LOG
SERIAL NUMBER: ________________________________________________________
MODEL NUMBER: ________________________________________________________
DATE PURCHASED: ______________________________________________________
NOITCEPSNI
ETAD
NOITCEPSNI
DETONSMETI
EVITCERROC
NEKATNOITCA
ECNANETNIAM
DEMROFREP
:yBdevorppA
:yBdevorppA
:yBdevorppA
:yBdevorppA
:yBdevorppA
:yBdevorppA
:yBdevorppA
:yBdevorppA
:yBdevorppA
:yBdevorppA
:yBdevorppA
/