Page is loading ...

PROGRESSIVE SCAN
USER MANUAL
IMPORTANT
READ THESE INSTRUCTIONS
BEFORE USE AND RETAIN
FOR FUTURE REFERENCE.
AMD-2720

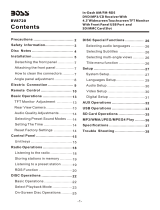
CONTENTS
1.
Disc Handling and Care
3.Remote Control
3.Basic Operation
4. SETUP/LCD SETUP instructions
Setup
System Setup
Language Setup
Audio Setup
Video Setup ............................................................................................
Digital Setup
5. Compatible discs
Safety Instructions
Safety instructions
Battery care ................................................................................................... 2
2.
3. DVD Player and other component connection
4
1.Main component function of side panel
2.Accessories
.UNIT AND CONNECTOR
Description Of The LCD Setup Menu Setting
6. Trouble Shooting Guide
1
1
3
4
8
9
9
11
12
12
12
12
16
16
10
17
18
19
20

IMPORTANT SAFETY INFORMATION
1
The lightening flash with arrowhead symbol, within an equilateral triangle, is
intended to alert the user to the presence of un-insulated “dangerous
voltage” within the products enclosure that may be of sufficient magnitude to
constitute a risk of electric shock to the persons.
The exclamation point within an equilateral triangle is intend to alert the user to
the presence of important operating and maintenance (servicing) instructions in
the literature accompanying the appliance.
The crossed out “Wheelie bin” is intended to show that this appliance must not be
placed with ordinary household waste.
When this appliance has reached the end of its useful life. It must be disposed of
in accordance with local by-laws. Consult your local waste disposal authority.
(WEEE Directive)
CLASS 1 LASER PRODUCT
DANGER : INVISIBLE LASER RADIATION WHEN OPEN
AND INTERLOCKS DEFEATED, AVOID
EXPOSURE TO BEAM
Read and keep these instructions for your safety.
.This appliance is designed to operate from a mains supply of 220 -240V AC 50 Hz.
and 12V DC automotive supply. Do not attempt to connect to alternative supplies.
Not intended for use in HG vehicles unless a 12V DC supply is available.
. Do not place the mains lead where it may be tripped over or walked on.
. When leaving the appliance for long periods disconnect from the mains supply.
. Do not connect the appliance to other apparatus unless the supply is disconnected
to all items.
. Do not place this player near hot radiators or other sources of radiated heat.
. Do not cover the appliance. Ventilation is necessary to keep the apparatus
operating safely.
. Do not operate this appliance in locations where moisture and high humidity are
present such as :- Bathrooms, Kitchens, Near Swimming pools or other areas that
may be wet or damp.
. To clean the appliance, use a soft cloth. If there is stubborn dirt use a lightly damp
soft cloth with mild detergent. Do not use spirit based cleaners.
If the laser becomes dirty DO NOT TOUCH but use a proprietary DVD laser cleaning
disc.
. For your safety do NOT open the appliance. There are no user serviceable parts
inside.

. If the player fails to operate, consult the “Troubleshooting guide” on page 18
. Changes or modifications by the user will invalidate your guarantee.
Battery Information and Care
1 When unpacked the battery will not be fully charged, this is for your safety. You will only
get approximately 30 minutes first time use .
2 To charge the battery use only the original adapter. An empty battery will take
approximately 3.5 hrs to charge fully. A fully charged battery can continuously supply
about 2.5 hour play.
3 Lithium battery's energy is supplied by electrochemical processing. As the batteries
age their storage capacity will reduce (normally over 300 times recharging) and play time
will accordingly decrease. This is normal for chemical products.
4 DO NOT SHORT OUT THE BATTERY TERMINALS fire or explosion could result. Do not
allow the batteries to overheat, such as in direct sunlight or placed on heaters.
Do NOT throw damaged batteries in the domestic waste bin or on the fire. Contact your
local waste disposal authority.
5 If battery contacts become contaminated, please take to your nearest repair agent for
cleaning.
7 When charging the battery do not use the player. Please wait until it has finished.
8 When the battery is fully charged the charger will automatically switch off.
9 The Car Adaptor can be used for charging the battery.
MPORTANT SAFTY INFORMATION
FEATURES OF THIS PLAYER
The control system of this unit automatically detects when the voltage is too low or high
and has a protection function. When the voltage is lower than 6.0V or above 14.4V, there
will appear POWER LOW or POWER HIGH in the top right corner of the display. After one
second, it will power off automatically for protection.
The unit is designed to operate with the cover closed (playing music discs) to reduce
power consumption to approx 55%. Opening the display will revert to normal playing
status.
INSTRUCTIONS
To prolong the life of this unit, each time it is turned on it should be “On” for at least 30
seconds.
Some discs may not play on this player, especially discs burnt on Pc's. If in doubt please
check a known good disc.
Occasionally the player may not operate or stop playing, due to interruption of the power
supply. If this happens disconnect the power for 30 seconds and retry.
2

Disc Handling and Care.
Handling. Do not touch the playing surface. Remove from cases with care and hold
the outer rim of the disc.
Correct
Wrong
Do not stick labels on discs or write on the surfaces.
Storage. When not in the player, store all discs in their cases. Keep discs flat.
Do not scratch the playing surface. Do not store on heaters or in direct sunlight.
Cleaning discs.
Wipe discs with a soft cloth. If it is sticky use a mild detergent on a damp soft cloth.
Wipe discs from the centre outwards, not in a circular motion. Do not use chemical
cleaners or anti static cleaners.
Correct
Wrong
3

STANDBY
ANGLE
AUDIO
SETUP TITLE
MENU
/PBC
MUTE
SLOW
PROGRAM
RETURN
ZOOM
AVin
3
REPEAT
21
6
5
4
98
7
SUBTITLE
0
CLEAR
A-B
LCD
STEP
P/N
CONSOLE
VOL- VOL+
ENTER
OSD
1 .STANDBY:
2 .ANGLE:
Press ANGLE to switch different angles when playing a Multi-angle disk. A hand icon will
indicate an invalid command if the disk is not Multi-angle.
3 .CONSOLE:
Press CONSOLE to enter setup menu to modify LCD display.(Please refer to later LCD menu
setup instruction)
5. SETUP:
For the details, please refer to the menu setup. (page 12)
REMOTE CONTROL
3 CONSOLE
4 AUDIO
7 MENU/PBC
8 MUTE
11 SLOW
12 PROGRAM
14 RETURN
17 ZOOM
19 AVIN
20 A-B
21 REPEAT
22 LCD
25 SUBTITLE
26 STEP
29 VOL+/VOL-
STANDBY 1
2ANGLE
5SETUP
6TITLE
STOP 9
PLAY/PAUSE 10
13FF/FR
16 ENTER
P18RV/NEXT
24 CLEAR
27P/N
28OSD
15 DIRECTION
4
NUMBER KEY(0-9) 23
4 .AUDIO(language/channel):
When playing DVD/SVCD disc, press this button to switch languages.
Press STANDBY after power adapter connection, the power indicator light will change to
blue from red, The player is now in working status.
6. TITLE:
When playing DVD discs press this button to display title directory on the Screen, then
select the right title by moving the cursor or number button.

7. MENU/PBC:
When playing DVD discs, press this button to show the ROOT MENU when playing VCD/
SVCD, press this button to display current PBC status, press again to display the disc format.
8. MUTE:
When disc playing, press this button to mute audio, Mute is displayed on the screen. Press
again or press VOL+ VOL- Un-mute the audio.
9 .STOP:
When disc playing, press this button to Pre-stop,(if the disc is VCD/SVCD under PBC ON status,
press this button to stop), press again to completely stop.
10. PLAY/PAUSE:
PRESS this button to pause and press again to play.
11.SLOW:
When playing discs with dynamic video, press this button to slow play, then press play to
go back to normal playing.
12 .PROGRAM:
When disc playing, press this button to program the playing sequence, to select the right music,
please move the cursor to PLAY and press ENTER.
13. FF/FR:
This player can support X2, X4, X8, X20, speeds. Press PLAY to resume normal playing.
14 .RETURN:
When playing VCD/SVCD disc under in PBC ON status, press this button to go back to PBC menu.
15 .DIRECTION:
When in the setup menu, you may move the cursor by pressing the Up/Down/Left/Right buttons
when playing JPEG files, the four buttons are used to switch the display angle.
16 .ENTER:
Press this button to confirm the selected content.
17 .ZOOM:
When playing discs with video, press this button to zoom up to 8 times. If you zoom no more than
4 times, press the direction button to move the view of the screen.
18 .PREV/NEXT:
Press to jump to previous/next track or chapter when playing.
5

19 .AV IN:
Press to select external or internal video source.
20. A-B:
Press to repeat segment when playing;(For VCD/SVCD/CD discs, repeat segment must be set
within one track, repeat will be automatically cancelled as track changed; For DVD disc, repeat
segments must be set within one title/chapter; No repeat function for JPEG disc.
.
21 .REPEAT:
Press to repeat whole track/disc/title/chapter.
22. LCD:
Press to switch between full screen and 4:3. The display will show in top right corner the mode
selected.
23 .NUMBER-KEY 0-9 :
Press to select required numbers:(To select track 1-9, directly press number buttons 1-9, for
tracks 10+, use number buttons combination). For example, press first 2 then 5 within 2 seconds
to select track 25, track 2 will be selected if the interval is over 2 seconds. If the input track
number doesn't exist, selection is invalid.
24 .CLEAR:
Press to clear content indicated by cursor when programming, or a wrong command input.
25 .SUBTITLE:
Press to select subtitle when playing DVD/SVCD discs, this function is restricted by disc
content.
26 .STEP:
Press to play disc in steps when pause is selected.
27. P/N:
Selects PAL/ NTSC/ AUTO system according to your need.
28 .OSD:
Press to display disc information such as disc type, elapsed and remaining time when playing
discs.
29 .VOL+/VOL-:
Press to adjust volume when playing discs.
6

REMOTE CONTROL
Care of the Remote Control
1.Treat with care. Do not drop or damage case.
2. Do not obstruct the Infra red beam or be out of range.
3. If the Remote control is used in strong sunlight it may not operate correctly.
Change remote control battery
1.Insert finger into A, B place(see picture),
and press down A arrow, take out
battery tray.
2.Take out old battery and put in new
battery, face up.
Li Battery Cr2025
3.Return tray to the original
position
Caution:
If not using the remote control for a long
period. Please remove to batteries to
prevent leakage, damaging the controller.
If leakage does occur, clean the
contacts and install new batteries
Battery Installation and Removal
1.Battery Installation.
Fix the battery carrier carefully, ensuring
the connecting pins are located correctly.
Push and lock the carrier.
2.Battery Removal. Push the Battery
case release lock and carefully remove
the battery.
Attention. If used normally approx 3
hours of playing time can be achieved
with fully charged batteries.
7
Li Battery£¨CR2025£©
FIXED PILLAR
FRONT REAR
BATTERY CONNECTOR
BATTERY LOCK

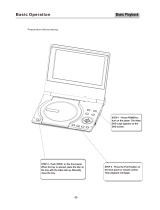
BASIC OPERATION
30
30
5m
Remote control range is 5m.
Caution:
Most of the functions are on the player,
but a few functions are only available on the
remote control.
8
1
2
3
4
5
SPEAKERS
CD LOCK
CD COVER
Lock of screen cover
TFT LCD Screen
Setup key
LCD SETUP KEY
SCREEN SETUP/AUDIO&VIDEO ENTER KEY
DIRECTION KEY
ENTER KEY
VOLUME KEY
POWER ON/PLAY
POWER OFF/STOP
-
6
S
TA
N
D
B
Y
AN
G
LE
A
U
D
I
O
S
E
T
U
P
T
I
TL
E
M
E
N
U
/
PB
C
M
U
T
E
S
LO
W
P
R
O
G
R
AM
R
E
T
U
R
N
Z
O
O
M
A
V
in
3
RE
P
E
A
T
2
1
6
5
4
9
8
7
S
U
B
TI
T
L
E
0
C
L
EA
R
A
-
B
L
C
D
S
T
E
P
P/N
C
ON
S
O
L
E
V
O
L
-
V
O
L+
E
NT
ER
OS
D
1.Outer shell
2.Lid Lock. Slide the lock up and right to
open the screen cover
3.Power indicate light. No light: not
connect to power.
Red light: connect to power and in standby.
To operate press ON key or Power key on
the Remote control. Led will now show
Blue
4.Remote signal receiver
5.Bottom shell
6.Charging LED(If Not full charged ,the LED
displays red ;
if fully charged ,the LED displays green.)

Ö÷»úµ×²¿¹¦ÄÜ
Card remote control
Bag
Car adapter
Headphone
Check accessories
1.Main component function of side panel
9
DC IN 12V
HEADPHONE
AC-DC Adaptor
AV/AUDIO CABLE
Power line
S
T
A
N
D
B
Y
AN
G
L
E
AU
D
I
O
SE
T
U
P
T
I
T
L
E
M
E
N
U
/
PB
C
M
U
T
E
SL
O
W
P
R
O
GRA
M
R
E
TU
R
N
Z
O
O
M
A
V
i
n
3
RE
P
E
AT
2
1
6
5
4
9
8
7
S
UB
T
I
T
L
E
0
C
L
E
AR
A
-
B
L
C
D
S
T
E
P
P
/
N
CO
NS
O
L
E
V
O
L
-
V
O
L+
EN
T
E
R
O
S
D

Connect TV
S -pin
Audio left channel output (white)
Audio right channel output pin (red)
AUDIO IN
L R
VIDEO
IN OUT
TV
TV
S-VIDEO
IN
Connect picture£¨1£©
To input or output video signal, audio signal, digital signal output, TV decoder or
amplifier, connect as shown. Ensure both appliances are disconnected from the Mains
power before connection.
Audio and video cable(attached )
Audio left channel output (white)
Audio right channel output pin (red)
Video input pin(yellow)
Video output pin(green)
Connect picture 2
3. DVD player and other apparatus connections.
10
AUDIO IN/OUT
OPTICAL OUT
VIDEO IN/OUT
S-VIDEO

CONNECTION TO AUDIO AMPLIFIER
Host DVD player
Connect Tv
OPTICAL DIGITAL CORD£¨WITHOUT IN PACKED£©
Signal direction
DIGITAL IN
£ºSINGAL OUTPUT
11
Optical Digital cable.
“Not included”
Digital Audio
Input Connector
Note.
When using an external
amplifier, ensure the
volume is set low,
otherwise overload of the
loudspeakers may occur.

SETUP/LCD SETUP
1/SYSTEM SETUP
1.1 TV SYSTEM
Select system according to the TV set
connected.
For PAL system TV set, select PAL
Mode. (UK and Europe)
For multi-system TV set, select AUTO
mode
For NTSC system TV set, select NTSC
mode
SYSTEM SETUP
SCREEN SAVER
TV SYSTEM
VIDEO
TV TYPE
PASSWORD
RATING
NEXT PAGE
EXIT SETUP
NTSC
PAL
AUTO
SYSTEM SETUP
SCREEN SAVER
VIDEO
TV TYPE
PASSWORD
RATING
NEXT PAGE
EXIT SETUP
ON
TV SYSTEM
OFF
SETUP
1.3 VIDEO OUTPUT MODE
1.S-VIDEO.. S-VIDEO output.
2.CVBS: combined video output.
Note Default setting S-VIDEO output.
SYSTEM SETUP
SCREEN SAVER
VIDEO
TV TYPE
PASSWORD
RATING
NEXT PAGE
EXIT SETUP
S-VIDEO
TV SYSTEM
CVBS
12
1.2 SCREEN SAVER
Enable the screen saver to prevent the
display screen from damage. This
automatically starts a screen saver
image on the display when the player
has stopped, tray open, or no disc, for
over 60 seconds.
.On enable screen saver
.Off cancel screen saver
Default setting :On

SYSTEM SETUP
SCREEN SAVER
VIDEO
TV SYSTEM
TV TYPE
PASSWORD
RATING
NEXT PAGE
EXIT SETUP
1 KID SAFE
2 G
3 PG
5 PG-2
6 R
7 NC-17
8 ADULT
SYSTEM SETUP
SCREEN SAVER
VIDEO
TV TYPE
PASSWORD
RATING
NEXT PAGE
EXIT SETUP
TV SYSTEM
SYSTEM SETUP
SCREEN SAVER
VIDEO
TV TYPE
PASSWORD
RATING
NEXT PAGE
EXIT SETUP
TV SYSTEM
4:3PS
4:3LB
16:9
13
1.4 TV TYPE
1) 16 : 9 wide screen Select this when
connected to a wide screen TV set.
2 ) 4 : 3 LB Select this for a normal screen
scale TV set. A black edge will be seen on
the top and bottom edges when playing
wide screen pictures.
3) 4 :3 PS Fits to normal screen scale TV set.
Left and right sides will be cut off to fit full
screen when playing wide screen pictures.
Default setting is 16 : 9.
NOTE
1.The display effect is related to data on disc, some discs may not display the scale you select.
2.For discs with 4:3 mode only, select a 4 : 3 ratio.
1.5 PASSWORD
To setup a Password, select Password.
To set a “Rating” level you must enter the
initial Password “0000” and press the “Enter”
key to confirm your operation.
To change your password, enter “0000”, then
set a new password and “Enter”.
1.6 RATING
Some discs are not suitable for persons of
certain age groups. To select the “Rating”, you
will need to enter the “Password” (see above).
Discs will then not play if the disc is rated above
the setting chosen.
Note :- Rating control is only active if the
password is set

PREV PAGE
RESUME
EXIT SETUP
DEFAULT
RESTORE
PREV PAGE
RESUME
EXIT SETUP
DEFAULT
OFF
ON
LANGUAGE SETUP
AUDIO LANG
SUBTITLE LANG
MENU LANG
GERMAN
SPANISH
FRENCH
OSD LANGUAGE
EXIT SETUP
PORTUGUESE
ENGLISH
14
1.7 DEFAULT
1.7.1 RESTORE
If you adjust the player and are not able to
reset all the functions, select “Restore”, this
will reset the player to its factory settings.
1.7.2 RESUME
A. Memory Play “OFF”
B. Memory Play “ON”
1.7.3 PREV PAGE
Choose This Item To Return To System
Setup Page.
2/LANGUAGE SETUP
SETUP FRAME AS FOLLOWS
2.1 OSD LANGUAGE
Enter into OSD LANGUAGE setup, and press
the arrow keys to choose which OSD
Language you prefer, then
press “ENTER” to confirm.

LANGUAGE SETUP
SUBTITLE LANG
MENU LANG
OSD LANGUAGE
EXIT SETUP
FRENCH
PORTUGUESE
AUDIO LANG
JAPAN
LATIN
GERMAN
CHINESE
ENGLISH
SPANISH
LANGUAGE SETUP
MENU LANG
OSD LANGUAGE
EXIT SETUP
FRENCH
PORTUGUESE
AUDIO LANG
JAPAN
GERMAN
CHINESE
ENGLISH
SPANISH
OFF
SUBTITLE LANG
LANGUAGE SETUP
OSD LANGUAGE
EXIT SETUP
AUDIO LANG
SUBTITLE LANG
FRENCH
JAPAN
GERMAN
CHINESE
ENGLISH
SPANISH
LATIN
PORTUGUESE
MENU LANG
15
2.2 AUDIO LANGUAGE
Enter AUDIO LANG, press direction buttons
to select a desired language and then press
“ENTER”.
2.3 SUBTITLE LANGUAGE
Enter SUBTITLE LANG, press direction
buttons to select a desired language for
subtitle and then press “ENTER”.
2.4 MENU LANGUAGE
Enter MENU LANGUAGE, press direction
buttons to select a desired language for
menu and then press ENTER .
Note :- If the selected language is not on
the DVD disc, then the player will play the
default language on the disc.

3. AUDIO SETUP
SETUP TABLE:
AUDIO SETUP
SPDIF/PCM
SPDIF/RAW
ANALOG
AUDIO OUT
EXIT SETUP
4/VIDEO SETUP
SETUP TABLE
4.1 BRIGHTNESS
Use arrow buttons to move slide to
adjust the brightness
VIDEO SETUP
BRIGHTNESS
CONTRAST
12
10
8
6
4
2
0
HUE
STATURATION
EXIT SETUP
4.2 CONTRAST
Use arrow buttons to move slide to
adjust the video output contrast
VIDEO SETUP
BRIGHTNESS
CONTRAST
12
10
8
6
4
2
0
HUE
STATURATION
EXIT SETUP
16
3/AUDIO SETUP
Enter AUDIO OUT (digital output), press
direction buttons to select a desired option
and
then press [ENTER] to confirm. There are
three options: ANALOG, SPDIF / RAM,
SPDIF / PCM.
1)ANALOG: No signal output from optical
terminal.
(2)SPDIF/RAM If the player and amplifier
connect through an optical lead please select
this option. When playing disc recorded with
DTS, MPEG, the player outputs a digital data
signal through the
optical terminal. If using this method the
amplifier
should be set with the decoding function for
DTS, MPEG.
(3)SPDIF/PCM When the player connects to a
2CH digital stereo amplifier, please select this
option. When playing discs recorded with
MPEG, the optical terminal will adjust to PCM
and output the signal as 2CH.

DYNAMIC RANGE
DUAL MONO
EXIT SETUP
DIGITAL SETUP
OP MODE
FULL
6/8
4/8
2/8
OFF
4.3 HUE
Use arrow buttons to move slider to
modify video output HUE (only on NTSC)
VIDEO SETUP
BRIGHTNESS
+6
+4
+2
0
-2
-4
-6
EXIT SETUP
CONTRAST
HUE
STATURATION
4.4 SATURATION (COLOUR)
Use arrow buttons to move slider to
modify saturation of video output
5/DIGITAL SETUP
Configuration as following
5.1 OP MODE
1 LINE OUT: Linear compact input signals.
Volume relative low, recommended for use
at night.
2 RF REMOD High volume recommended for
use in the daytime.
DIGITAL SETUP
LINE OUT
OP MODE
DYNAMIC RANGE
DUAL MONO
EXIT SETUP
17
5.2 DYNAMIC RANGE
When line out is chosen, select dynamic
range to modify linear compression ratio
to get required effect. Choose FULL , the
audio frequency is the lowest. Choose
OFF , it is the highest.

DYNAMIC RANGE
DUAL MONO
EXIT SETUP
DIGITAL SETUP
OP MODE
STEREO
MONO R
MONO L
MIX MONO
Description of the LCD SETUP menu setting
18
5.3 DUAL MONO (Left + Right)
The function is a mode set for audio L
and audio R output. There are four
modes: Stereo, Left audio output, Right
audio output, Mix audio output.
1.BRIGHTNESS
Press direction key to choose BRIGHTNESS , then press to adjust.
The range is 0-100 .
2.CONTRAST
Press direction key to choose CONTRAST , then press to adjust. The
range is 0-100.
3.SHARPNESS
Press direction key to choose SHARPNESS , then press to adjust.
The range is 0-6 .
4.COLOUR
Press direction key to choose COLOUR , then press to adjust.
he range is 0-100 .
5.HUE (NTSC only)
Press direction key to choose HUE , then press to adjust. The range is
0-100 .
6.RESET
Choose RESET , press ENTER , all settings revert to Factory Default.
/