Page is loading ...

INSTRUCTION MANUAL
Wraparound
SAFETY INFORMATION
IMPORTANT: Read all safety precautions and installation instructions carefully before installing
◆Do not handle any energized fixture or attempt to energize any fixture with wet hand or while standing on a
wet or damp surface or in water.
◆Assure that the fixture is mounted onto a sound structurally surface that will support the fixture.
◆The fixture is designed for use in a 100-277VAC,60Hz fused circuit. Do not use in a dimming circuit.
◆Do not look inside the lights.
◆Product can be used in garages,basements,work areas,utility rooms and recreation rooms.
◆Do not install on radiant-heating type ceiling.
WARNING:IF NOT FOLLOW THESE INSTRUCTION MAY LEAD TO A POTENTIALLY FATAL
ELECTRICAL SHOCK OR PROPERTY DAMAGE
PRE-INSTALLATION
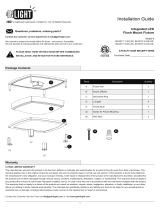
HARDWARE INCLUDED
AA:Small pin Cross
Machine Screws
BB:Wire Nut
CC:large Pointed Pin
Cross Wood Screws
DD:Wall Anchors
EE:Expansion screws

PRE-INSTALLATION(CONTINUED)
PARTS
A:Housing (customization)
C:Diffuser (customization)
INSTALLATION
CAUTION:Before beginning installation turn off the circuit breaker and light switch
Junction box is required for assembly
1.Gently pull the plate(A-1) along the arrow,Remove diffuser (Part C) from housing(Part A) near one and of housing grasp
edge of diffuser and carefully squeeze to release diffuser from housing,Continue down length of diffuser to fully disengage.
INSTALLATION(CONTINUED)
CONNECTING THE WIRES
1.Install the two screws(AA) into the junction box.(Figure2)
2.Connect the house ground wire to the yellow/green ground wire on the mounting plate (Part A) using the wire nut (BB).
3.Connect the house white wire to the mounting plate (Part A) white wire using the wire nut (BB).
4.Connect the house black wire to the mounting palate (Part A) black wire using the wire nut (BB).
NOTE:For proper connection,place the wire nuts (BB) over wires and twist clockwise until light (Figure 3).
OPTIONAL:Wrap connected wire nuts with electrical tape.
Figure 1
Figure 3
Figure 2

INSTALLATION(CONTINUED)
ATTACHING THE HOUSING
1.Attach the housing to the junction box by aligning the hoes on the Housing (Part A) with the screws on the junction box.
2.Turn housing clockwise to lock in place and tighten screws to ensure the fixture is secure and will not move .(Figure4)
3. InstallationⅠ:Put the screws(CC) through the housing(Part A),attaching it in the ceiling.Fasten all the four screws(CC)
with screwdriver.
InstallationⅡ:Put the screws(EE) through the housing(Part A),attaching into the bolts(EE) in the ceiling.Fasten all the
four screws(EE) with screwdriver.
ATTACHING THE DIFFUSER
4. Gently pull the plate(A-1) along the arrow,To install diffuser(Part C) starting at one of housing insert diffuser slot onto
edge of housing-see Fig6 Carefully squeeze diffuser to engage opposite side with housing.Continue this action down length
of diffuser until fully installed onto housing.(Figure6)
Figure 4
Figure 6
Figure 5
/