
IOLAN User’s Guide V5.0
IOLAN User’s Guide V5.0
Updated: Feb 2019
Revision: A.02.19-2019
Document Part: 5500429-10 (Rev B)

2
IOLAN User’s Guide V5.0
Preface
Audience
This guide is for the networking professional managing your IOLAN. Before using this guide, you should be
familiar with the concepts and terminology of Ethernet and local area networking.
Purpose
This guide provides the information that you need to configure and manage your Perle IOLAN Product.
For Web Manager (GUI) users, this guide provides the navigation reference that can be used within web
sessions for each feature.
Product installation information can be found in the IOLAN Hardware Installation Guide for your product
model on our Perle website at
www.perle.com and in the Quick Start Guide that came with your product.
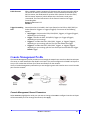
Additional Documentation
Document Conventions
This document contains the following conventions:
Most text is presented in the typeface used in this paragraph. Other typefaces are used to help you identify
certain types of information. The other typefaces are:
Note: Means reader take note: notes contain helpful suggestions.
Guide Updates
This guide may be updated from time to time and is available at no charge from the download area of Perle’s
web site at
https://www.perle.com/downloads/
Licensing
All Perle software pre-installed in Perle Products or downloaded from any other source or media is governed
by Perle’s End User License Agreement. USING THIS PERLE PRODUCT CONSTITUTES ACCEPTANCE OF THIS
AGREEMENT. Please review the country specific End User License Agreement located at the following
location prior to usage;
https://www.perle.com/EULA.shtml/
https://www.perle.com/EULA-Germany.shtml/
You also agree that Perle may collect, use, or disclose customer information in the course of fulfilling its obli-
gations under the End User License Agreement, and such collection, use, and disclosure will be in accordance
with Perle’s privacy policy available at
https://www.perle.com
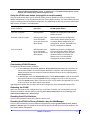
Document Description
IOLAN Hardware Installation Guide Product specific hardware guide on how to install your IOLAN.
IOLAN Quick Start Guide Product specific Quick Start Guide that came with your IOLAN.
IOLAN CLI (Command Reference
Guide) Guide V5.0 and greater
Command reference guide using CLI commands to configure the
IOLAN (this is an advanced way to configure the IOLAN)

3
IOLAN User’s Guide V5.0
IF YOU DO NOT AGREE TO ALL OF THE TERMS AND CONDITIONS OF THIS AGREEMENT, You have no right to
use the Perle Software and You should return the purchased product to Perle or the applicable reseller or dis-
tributor from whom you obtained the product.
Copyright Statement
This document must not be reproduced in any way whatsoever, either printed or electronically, without the
consent of:
Perle Systems Limited,
60 Renfrew Drive
Markham, ON
Canada
L3R 0E1
Perle reserves the right to make changes without further notice, to any products to improve reliability, func-
tion, or design.
Perle, the Perle logo, and IOLAN are trademarks of Perle Systems Limited.
Microsoft, Windows NT®/Windows 2000®/Windows Vista®/Windows Server 2003®/Windows 2003 R2®/Win-
dows 2008®/Windows2008 R2®/Windows XP®/Windows 7®/Windows 8®/Windows 8.1®/Windows Server
2012®/Windows Server 2012 R2® /Windows Server 2016
®
/Windows 10 and Internet
Explorer® are trademarks of Microsoft Corporation.
Solaris® is a registered trademark of Sun Microsystems, Inc. in the USA and other countries.
Perle Systems Limited, 2005-2018.
FCC Note The IOLAN Device Server series has been found to comply with the limits for a Class A digital device,
pursuant to Part 15 of the FCC rules. These limits are designed to provide reasonable protection against harm-
ful interference when the equipment is operated in a commercial environment. This equipment
generates, uses, and can radiate radio frequency energy and, if not installed and used in accordance with the
instructions in this Guide, may cause harmful interference to radio communications. Operation of this
equipment in a residential area is likely to cause harmful interference, in which case the user will be required
to correct the interference at his/her own expense.
EN 55022: 1998, Class A, Note
WARNING This is a Class A product. In a domestic environment this product may cause radio interference in
which case the user maybe required to take adequate measures.
Caution: the IOLAN product is approved for commercial use only.

4
IOLAN User’s Guide V5.0
Publishing History
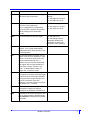
Date Revision Update Details
July 2018 A.07.04.2018 Initial release of the IOLAN SCG series.
Feb 2019 A.02.19.2019 Increased length of SNMP community and trap fields to 64
characters.

5
IOLAN User’s Guide V5.0
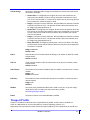
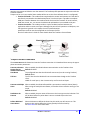
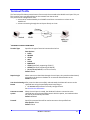
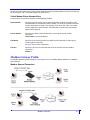
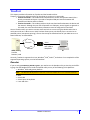
About the IOLAN
The IOLAN is an Ethernet communications/terminal server that allows serial devices to be connected
directly to your network. The IOLAN attaches to your network using TCP/UDP/IP and allows serial devices
such as modems and terminalsto access the LAN. It also allows LAN devices to access devices or equip-
ment attached to IOLAN serial ports.
The IOLAN can connect to a wide range of devices including:
• Terminals for multi-user UNIX systems
• Data acquisition equipment (manufacturing, laboratory, scanners, etc)
• Retail point-of-sale equipment (bar coding, registers, etc.)
• PC’s using terminal emulation
• Configurable serial modems
The performance and flexibility of the IOLAN allows you to use a wide range of high speed devices in
complex application environments. The IOLAN products will work in any server environment.
Hardware Features
See the IOLAN Hardware Installation Guide that came with your model for more information.
General Features
This section highlights the software components you can expect to find in your IOLAN model.
Basic IOLAN software features are available on all IOLAN models.
•IPv6 support
• Support for TCP/IP and UDP protocols including telnet and raw connections
• Virtual modem emulation
• ‘Fixed tty’ support for several operating systems using Perle’s TruePort utility
• DHCP/BOOTP for automated network-based setup
• Dynamic statistics and line status information for fast problem diagnosis
• Modbus master/slave/gateway support
• An SDK (Software Development Kit) for custom programs and plugin support
• Ability to disable services (for example, Telnet, TruePort SNMP,) for additional security
• Logging via syslog
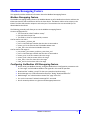
Security
Security features will vary depending on your IOLAN model
• Supervisory and serial port password protection
• Ability to set serial port access rights
• Ability to assign users access level rights to control their access
• Idle port timers, which close a connection that has not been active for a specified period of
time
• Ability to individually disable network services that won’t be used by the IOLAN

1
IOLAN User’s Guide V5.0
Preface .............................................................................................................. 2
Publishing History........................................................................................... 4
About the IOLAN............................................................................................ 5
Hardware Features.......................................................................................................... 5
General Features ............................................................................................................. 5
Security........................................................................................................................... 5
Setting Up the Network................................................................................... 6
Methods of Configuring the IOLAN .............................................................................. 6
Configuring an IP Address ............................................................................................. 6
DeviceManager ................................................................................................ 7
Installing the DeviceManager to your PC ...................................................................... 7
Command Line Interface................................................................................ 14
Connecting through the Network.................................................................................... 14
Connecting to the Console Port(s).................................................................................. 15
DHCP/BOOTP ................................................................................................ 15
Using DHCP/BOOTP..................................................................................................... 15
SNMP................................................................................................................ 16
Connecting to the IOLAN Using SNMP........................................................................ 16
Using the SNMP MIB .................................................................................................... 18
Network Settings ............................................................................................. 19
IPv4 Settings................................................................................................................... 19
Host Table ........................................................................................................ 31
Routes ............................................................................................................... 32
DNS/WINS ....................................................................................................... 33
RIP .................................................................................................................... 33
Serial Ports....................................................................................................... 38
Console Management Profile ......................................................................... 46
Trueport Profile............................................................................................... 50
TCP Sockets Profile ........................................................................................ 55
UDP Sockets Profile ........................................................................................ 60
Terminal Profile .............................................................................................. 65
Table Of Contents

2
IOLAN User’s Guide V5.0
User Service Settings....................................................................................... 68
Serial Tunneling Profile.................................................................................. 78
Virtual Modem Profile.................................................................................... 80
Modbus Gateway Profile ................................................................................ 84
Custom Application Profile ............................................................................ 101
Remote Port Buffers ....................................................................................................... 102
Serial Settings Advanced Parameters ........................................................... 103
Modem Parameters ......................................................................................... 105
Adding/Editing a Modem ............................................................................................... 105
Trueport Baud Rate Parameters ................................................................... 105
Setting Up Users .............................................................................................. 106
Adding/Editing Users ..................................................................................................... 106
User Services Parameters ............................................................................................... 107
Authentication ................................................................................................. 112
Security Overview .......................................................................................................... 112
Alerts ................................................................................................................ 138
Email Alerts.................................................................................................................... 138
Email Alert Parameters................................................................................................... 138
Syslog Parameters........................................................................................................... 139
Management .................................................................................................... 140
SNMP Parameters........................................................................................................... 140
SNMP Trap Parameters .................................................................................................. 141
Custom App/Plugin ......................................................................................... 143
Custom App Parameters ................................................................................................. 143
Applications ..................................................................................................... 175
Configuring Modbus....................................................................................................... 178
Virtual Modem Initialization Commands..................................................... 1
TruePort........................................................................................................... 1
Modbus Remapping Feature.......................................................................... 2
Data Logging Feature ..................................................................................... 3
Trueport Profile .............................................................................................................. 3
TCP Socket Profile ......................................................................................................... 3

3
IOLAN User’s Guide V5.0
Setting Up the Network
The most important part of setting up the network is assigning an IP address to the IOLAN, whether this is
a static IP address or enabling a DHCP/BOOTP-assigned IP address. You should also assign a name to the
IOLAN, to make it easier to recognize. This section deals primarily with setting the IP address.
Methods of Configuring the IOLAN
There are two ways you can access the IOLAN, through the network or through the serial connection. If
you are accessing the IOLAN through the network, the IOLAN must already have a known IP address
configured; for information see Configuring an IP Address.
Some of the IOLAN configuration methods have the capability of configuring an IP address, which is the
first required configuration step for a new IOLAN. Once the IOLAN has been assigned an IP address, any of
the configuration methods can be used to configure the IOLAN.
Configuring an IP Address
Following is a list of methods for setting the IOLAN IP address and a short explanation of when you would
want to use that method:
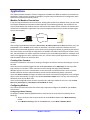
• DeviceManager—Use this method when you can connect the IOLAN to the network and
access the IOLAN from a Windows
®
PC. The DeviceManager is a Windows
®
-based application
that can be used for IOLAN configuration and management. The DeviceManager can be used
to assign an IP address and perform the complete configuration and management of the
IOLAN.
See DeviceManager for more information on using the DeviceManager.
• WebManager—Use this method when you have already set the IOLAN with an IP address. This
method cannot be used to initially set an IP address on the IOLAN. See Downloading the Con-
figuration with WebManager for more information on using the WebManager.
• Direct Connection—Use this method when you can connect to the IOLAN from a serial termi-
nal or from a computer running terminal emulation software over a serial port. Using this
method, you will need to configure and/or manage the IOLAN using the CLI.
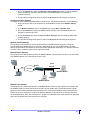
• DHCP/BOOTP—Use this method when you have a BOOTP or DHCP server running and you can
connect the IOLAN to your network. The IOLAN will automatically obtain an IP address from a
local network DHCP/BOOTP server when this service is enabled (it is disabled by default). You
can also configure certain IOLAN parameters that will be passed from the DHCP/BOOTP server
to the IOLAN when it boots up. Other configurators such as DeviceManager or CLI can be used
to set this option, and obtain the initial IP address.
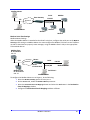
• ARP-Ping—Use this method when you can connect the IOLAN to the network and want to
assign a temporary IP address to the IOLAN by adding an ARP entry to your PC and then ping-
ing it.
• IPv6 Network—When the IOLAN is connected to an IPv6 network, its local link address is
determined using stateless auto configuration.
DeviceManager
The DeviceManager is a Windows
®
-based application that can be used to connect to the IOLAN to actively
manage and configure it or can create new IOLAN configurations off-line. The DeviceManager can be run
from Windows 2000
®
/Windows Vista
®
/Windows Server 2003
®
/Windows 2003 R2
®
/Windows 2008
®
/Win-
dows 2008 R2
®
/Windows XP
®
/Windows 7
®
/Windows 8
®
/Windows 8.1
®
/ Windows Server 2012
®
/ Win-
dows Server 2012
®
R2, Windows Server 2016
®
and Windows 10.
Device Manager Features
Some DeviceManager features are:

4
IOLAN User’s Guide V5.0
• The ability to download the same configuration file to several IOLANs in one
operation.
• The ability to save a configuration file locally in text format, in addition to the binary format.
• The ability to create a configuration file without being connected to the IOLAN.
• The ability to open a session to the IOLAN and download a (saved) configuration file to it.
• The ability to download/upload keys/certificates to/from the IOLAN.
• The ability to download custom files, such as new terminal definitions and custom
languages
to the IOLAN.
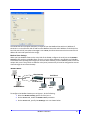
Installing the DeviceManager to your PC
Before you can use DeviceManager, you need to install it on your Windows operating system from the
Perle website at www.perle.com. After the DeviceManager application is installed, select the Start
icon, then scroll through the Applications and select the Perle Folder, then select the Perle
Devicemanager application. When you launch the DeviceManager, it will scan the network for IOLANs.
All discovered IOLANs will be displayed on the list along with their name and IP address. When a new
IOLAN is discovered on the network, that has not yet been assigned an IP address, it will be displayed with
an IP Address of Not Configured. If routers on the network have been setup to propagate
multi-casts, DeviceManager will also be able to discover IOLANs in other networks. To configure the IP
address, select the IOLAN and then select the
Assign IP button.
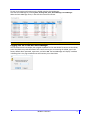
Assigning a Temporary IP Address to a New IOLAN
A new IOLAN will show in the display list as Not Configured. You can temporarily assign an IP address to
the IOLAN that is connected to your local network segment, for the purpose of connecting to it and down-
loading a configuration file (containing a permanent IP address). To temporarily assign an IP address to
the IOLAN, do the following:
1. Select the Refresh button. The IOLAN will be displayed in the IP Address column as
Not Configured.
2. Type a valid temporary IP address into the address field or enable the Have the IOLAN
automatically get a temporary IP address
. If you enable the temporary IP address, the IOLAN
will enable DHCP/BOOTP on your IOLAN and attempt to get an IP address from the DHCP/
BOOTP server (this will permanently enable DHCP/BOOTP in your IOLAN’s configuration, until
you change it). If your network does not have a DHCP/BOOTP server, the IOLAN will
temporarily assign an IP address of
192.168.1.124 with a subnet of 255.255.255.0 (this IP
address is only assigned for the duration of the DeviceManager/IOLAN connection).
3. Select the Assign IP button.
4. After you configure the IP address, select the Assign IP button.
Starting a New Session

5
IOLAN User’s Guide V5.0
To start a new session and connect to the IOLAN using the DeviceManager:
Start the DeviceManager by selecting
Start, All Programs, Perle, DeviceManager, DeviceManager.
When the DeviceManager starts, it searches the network for IOLANs.
Logging into the IOLAN with DeviceManager
The refreshed list will now display the assigned IP address for the new IOLAN. To connect to the IOLAN,
select the IOLAN entry and select
OK. If this is the first time you are accessing the IOLAN, type in the
factory default admin password,
superuser, and select OK. The DeviceManager will display a window
indicating that it is trying to authenticate and connect you to the IOLAN.
Note:
If you are not seeing IPv6 addresses in the list (you must expand the entry).

6
IOLAN User’s Guide V5.0
Adding/Deleting IOLANs Manually
To permanently add the IOLAN to the IOLAN list, select the Add button and type in the IPv4 or IPv6
address of the IOLAN. To permanently delete the IOLAN from the IOLAN
list, select the IOLAN’s IP address
and select the
Delete button.
If the authentication and connection are successful, the IOLAN’s
Server Info window is displayed.
If you cannot connect to the IOLAN, you can highlight the IOLAN and selecting the
Ping button to verify
that the DeviceManager can communicate with the IOLAN’s IP Address. If the ping times out, then you
might need to set up a Gateway in your IOLAN or verify that your network is communicating correctly.
If your IOLAN is not in the local network and you do not have a multi-cast enabled router in your network
and therefore the IOLAN is not displayed in the selectable list, but can be pinged from your PC, you can
add it to the selectable list by selecting the
Add button.
You are now ready to configure the IOLAN.
Navigating the DeviceManager
The DeviceManager has a navigation tree that you can use to access the available Configuration and Sta-
tistics pages in the display area. When you select an option in the navigation tree, you can often navigate
the tabs or buttons in the display area to access the various configuration and statistics options.
Note: The DeviceManager does not automatically update the IOLANs configuration. You must download the
configuration changes to the IOLAN and then reboot the IOLAN to make the configuration changes take effect.

7
IOLAN User’s Guide V5.0
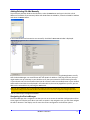
Navigating the Options
The left-hand navigation tree allows you to quickly and easily navigate the various Configuration and
Statistics pages of DeviceManager. Further navigation is available in the form of buttons and tabs in the
display area of DeviceManager, depending on where you are in the navigation tree, as shown in the
below.
Notice that when you expand a parent node in the tree (e.g.,
Serial), the tree displays the same options
that appear as buttons in the display area, as shown below. This gives you the choice of using the
navigation tree or buttons to navigate the options.
Downloading the Configuration with DeviceManager
When you have completed all your configuration changes, select the Download All Changes button to
download the configuration to the IOLAN. You must reboot the IOLAN for your configuration changes to
take effect.
Display Area
Download Button
Menu/Quick Access Buttons
Navigation Screen

8
IOLAN User’s Guide V5.0
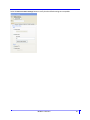
Creating a New IOLAN Configuration in DeviceManager
In DeviceManager, when you select File, New, the New Configuration window is displayed.
Select the IOLAN model for which you want to create a new configuration file. Any configuration file cre-
ated in this manner can only be save locally. To download a created configuration file, you must first con-
nect to the IOLAN, import the created configuration file into DeviceManager (this is not available in
WebManager), and then download the configuration file to the IOLAN and reboot it.Opening an Existing
Configuration File
If you select the
File, Open, a browse window is opened so you can select the configuration file you want
to edit. IOLAN configuration files saved in the DeviceManager can be in the IOLAN-native binary format
(
.dme) or as a text file (.txt), which can be edited with a text editor. Either configuration version can be
imported into the DeviceManager. IOLAN configuration files saved from WebManager can also be opened
into DeviceManager.
Importing an Existing Configuration File
If you have a local, saved configuration file that you want to download to the IOLAN, you must first con-
nect to the IOLAN that you want to download the configuration file to. Once you have successfully logged
into the IOLAN, in DeviceManager select
Tools, Import Configuration from a File and in WebManager select
Administration, Restore/Backup. You need to download the file in DeviceManager and in both managers
you need to reboot the IOLAN.
WebManager
Using the WebManager
The Perle WebManager is an embedded Web based application that provides an easy to use browser
interface for managing the IOLAN. This interface provides the ability to configure and manage the IOLAN.
This is accessible through any standard desktop web browser. You must have preconfigured a valid IP
address on the IOLAN before connecting with the WebManager.
WebManager Features
Some Perle WebManager features are:
• The ability to downloading firmware to the IOLAN.
• The ability to reset serial ports.

9
IOLAN User’s Guide V5.0
• The ability to download/upload keys/certificates to/from the IOLAN.
• The ability to download custom files, such as new terminal definitions and custom languages
to the IOLAN
Logging in to the IOLAN using WebManager
WebManager can connect to IOLANs that already have an assigned IP address.
To connect to the IOLAN, type the IP address of the IOLAN into the
Address bar on your browser such as:
http://10.10.234.34. (Your IOLAN IP address)
You will see the login screen. You will be prompted for the admin Password (the default is
superuser).
If the authentication and connection are successful, the IOLAN’s
Server Info window is displayed.
You are now ready to configure the IOLAN.
Navigating the WebManager
The WebManager uses a expandable/collapsible buttons with folders and pages for the navigation tree.
You can expand the buttons to view the folders and pages to see the available configuration options.
When you access a configuration page, you can often navigate the tabs in the configuration area to access
all of the configuration options.
When using WebManager, you are required to select the
Apply button each time you make a change to a
configuration window/tab.
Downloading the Configuration with WebManager
The configuration is automatically downloaded when you select the apply button on each page. Most
changes require a reboot of the IOLAN in order to take effect. Some changes such as serial port parame-
ters can be made to take effect by simply resetting the serial port.
System Info/
Navigation
Navigation
Tree
Configuration Area

10
IOLAN User’s Guide V5.0
Command Line Interface
The Command Line Interface (CLI) is a command line option for IOLAN configuration/management. See
the IOLAN Command Line Interface Reference Guide V5.0 for a full breakdown of commands. The CLI is
accessed by any application that supports a Telnet session to the IOLAN’s IP address, such as Putty, Secu-
reCRT, or you can connect directly to the admin console port.
After you have successfully logged in, you can start configuring/managing the IOLAN by typing in com-
mands at the prompt. If you are not sure what commands are available, you can type a
? (question mark)
at any time during a command to see your options.
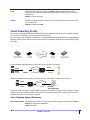
Connecting through the Network
To connect to the IOLAN through the network to configure/manage it using the CLI, do the following:
1. Start a Telnet session to the IOLAN’s IP address (IP address must be preconfigured).
2. You will get a Login: prompt. You can login as the admin user or as a user with Admin Level
rights. If the login is successful, you will get a prompt that displays the IOLAN model and
number of ports:
Login: admin
Password:
for example DG1#
You will see a prompt that displays the model and number of serial ports on the IOLAN. You are now ready
to start configuring/managing your IOLAN using the CLI.
See the IOLAN Command Line Interface Reference Guide V5.0 and greater for more information about
using the CLI.
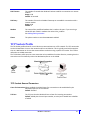
Connecting to the Console Port(s)
Depending on the model of IOLAN you purchased, connecting to the console port can be done in a variety
of ways; using a DIP switch to set the port to Console mode, then connecting with a null modem serial
cable, connecting to the IOLAN with the DB9 to RJ45 adapter that was shipped with your product or
connecting to the standard Micro-B USB port via a USB cable to the front of the IOLAN. After you have
established a connection to the IOLAN, you will get a
Login: prompt. You can login as the admin user or as
a user with Admin Level rights. If you are not sure what commands are available, you can type a ? (ques-
tion mark) at any time during a command to see your options. See the IOLAN Hardware Installation
Guide for your model to determine the method of connecting to your specific model.
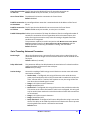
DHCP/BOOTP
Connecting to the IOLAN Using DHCP/BOOTP
The IOLAN will automatically request an IP address from the DCHP/BOOTP server when the Obtain IP
address automatically using DHCP/BOOTP
parameter is enabled. By default, DHCP is disabled
Using DHCP/BOOTP
To use DHCP/BOOTP, edit the bootp file with IOLAN configuration parameters. You can use DHCP/BOOTP
to perform the following actions on a single or multiple IOLANs on boot up:
• auto-configure with minimal information; for example, only an IP address
• auto-configure with basic setup information (IP address, subnet/prefix bits, etc.)
• download a new version of firmware
• download a full configuration file
DHCP/BOOTP is particularly useful for multiple installations: you can do all the IOLANs’ configuration in
one DHCP/BOOTP file, rather than configure each IOLAN manually. Another advantage of DHCP/BOOTP is

11
IOLAN User’s Guide V5.0
that you can connect the IOLAN to the network, turn on its power and let autoconfiguration take place.
All the configuration is carried out for you during the DHCP/BOOTP process.
DHCP Parameters
The following parameters can be set in the DHCP/BOOTP bootp file:
• SW_FILE—The full path, pre-fixed by hostname/IP address (IPv4 or IPv6), and file name of the
firmware update.
• CONFIG_FILE—The full path, pre-fixed by hostname/IP address (IPv4 or IPv6), and file name of
the configuration file.
• GUI_ACCESS—Access to the IOLAN from the HTTP or WebManager. Values are
on or off.
• SECURITY—Restricts IOLAN access to devices listed in the IOLANs host table. Values are
yes or
no.
• TFTP_RETRY—The number of TFTP retries before aborting. This is a numeric value, for exam-
ple, 5.
• TFTP_TMOUT—The time, in seconds, before retrying a TFTP download/upload. This is a
numeric value, for example, 3.
• CUSTOM_LANG—The full path, pre-fixed by a hostname/IP address (IPv4 or IPv6), and file
name of a translated language file. For example,
192.101.34.211 /accounting/Iolan_ds_german.txt.
• EXTRA_TERM1—(EXTRA_TERM2, EXTRA_TERM3) The full path, pre-fixed by a hostname/IP
address (IPv4 or IPv6), and file name of a termcap file for a specific terminal type.
Several IOLAN parameters can be configured through a DHCP/BOOTP server during the IOLAN boot up.
This is particularly useful for configuring multiple IOLANs.
Using ARP-Ping
You can use the ARP-Ping (Address Resolution Protocol) method to temporarily assign an IP address and
connect to your IOLAN to assign a permanent IP address. To use ARP-Ping to temporarily assign an IP
address:
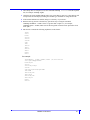
From a local UNIX/Linux host, type the following at the system command shell prompt:
arp -s a.b.c.d aa:bb:cc:dd:ee:ff
On a Windows
®
2000 or newer system, type the following at the command prompt:
arp -s a.b.c.d aa-bb-cc-dd-ee-ff
(where
a.b.c.d is the IPv4 address you want to temporarily assign to the IOLAN, and
aa:bb:cc:dd:ee:ff is the Ethernet (MAC) address of IOLAN (found on the back of the unit).
Whether you use UNIX or Windows
®
, you are now ready to ping to the IOLAN. Here is a UNIX example of
the sequence to use:
arp -s 192.168.209.8 00:80:d4:00:33:4e
ping 192.168.209.8
From the ping command issued in step 2, the IOLAN will pickup and use the IP address entered into the
ARP table in step 1. You are now ready to configure the IOLAN.
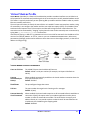
Connecting to an IPv6 Network
The IOLAN has a factory default link local IPv6 address based upon its MAC Address.
For example:
For an IOLAN with a MAC Address of 00-80-D4-AB-CD-EF, the Link Local Address would be
fe80::0280:D4ff:feAB:CDEF.
By default, the IOLAN will listen for IPV6 router advertisements to obtain additional IPV6 addresses. No
configuration is required, however, you can manually configure IPV6 addresses and network settings; see
Connecting to an IPv6 Network for more information on IPv6 configuration options.

12
IOLAN User’s Guide V5.0
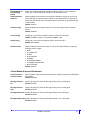
SNMP
The IOLAN supports configuration and management through SNMP. SNMP Management tools (SNMP cli-
ent/MIB browser software) can be used to set IOLAN configuration parameters and/or view IOLAN
statistics.
Connecting to the IOLAN Using SNMP
Before you can connect to the IOLAN through an SNMP Management tool or MIB browser, you need to
set the following components through another configuration method.
1. Configure a known IP address on the IOLAN.
2. Configure a read-write user for SNMP version 3 or a community for SNMP version 1 or 2 on
the IOLAN.
3. Reboot the IOLAN to make sure the changes take effect.
To connect to the IOLAN through an SNMP Management tool or MIB browser, do the following:
1. From the Perle website, load the MIB, for your model, into your SNMP manager.
2. Verify that the read-write user for SNMP version 3 or a community for SNMP version 1 or 2
match the configuration on the IOLAN.
3. Type in the IOLAN’s IP address and connect to the IOLAN.
4. You are now ready to start configuring the IOLAN using SNMP.
Note:
You need to have the following MIBs installed in your SNMP manager (these are usually part of the
standard SNMP client/MIB browser):
SNMPv2-SMI
SNMPv2-TC
IPV6-TC

13
IOLAN User’s Guide V5.0
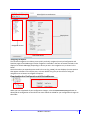
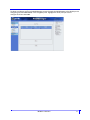
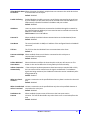
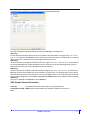
Using the SNMP MIB
After you have successfully connected to the IOLAN through your SNMP Management tool or MIB
browser, expand the MIB folder to see the IOLAN’s parameter folders. Below is an example of the configu-
rable parameters under the
ServicesInfo folder.
The first variable in each folder is the
Status variable, for example, serviceStatus. When you perform a GET
on this variable, one of the following values will be returned:
• 1—Indicates that the container folder is active with no changes.
• 2—Indicates that the container folder is active with change(s).
Once you have completed setting the variables in a folder, you will want to submit your changes to the
IOLAN. To do this, set the
Status variable to 4. If you want to discard the changes, set the Status variable to
6.
• 4—Indicates that the changes in the container folder are to be submitted to the IOLAN.
• 6—Indicates that the changes in the container folder are to be discarded.
If you want to save all the changes that have been submitted to the IOLAN, you need to expand the
admin-
Info container folder and SET the adminFunction to 1 to write to FLASH. To make the configuration changes
take effect,
SET the adminFunction to 3 to reboot the IOLAN.

14
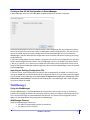
IOLAN User’s Guide V5.0
To select a serial port profile in the WebManager, connect through the WebManager to the IOLAN you are
configuring and select
Serial Port, in the navigation pane. Highlight the serial port you want to
configure and then select
Edit.

15
IOLAN User’s Guide V5.0
Network Settings
The Network section is used to configure the parameters that identify the IOLAN within the network and
how the IOLAN accesses hosts on the network. Select Network from the navigation tree on the left hand
side.
• IP Settings—Configure IPv4, IPv6 settings, Default Gateway and Ethernet settings
• Advanced—Configure Host table, Routes.
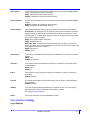
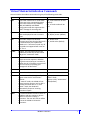
IPv4 Settings
The parameters in IPv4 settings are used to access the IOLAN and how the IOLAN accesses the network.
Select IPV4 from the Network Configuration screen and configure the parameters for your network.
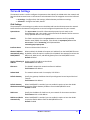
System Name The System Name is used for informational purposes by such tools as the
DeviceManager and is also used in conjunction with the Domain field to construct
a fully qualified domain name (FQDN).
Domain This field is combined with the
System Name to construct the fully qualified
domain name (FQDN). For example, if the domain is mycompany.com and the
Server Name is set to accounting, the FQDN would be
accounting.mycompany.com.
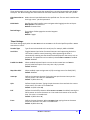
Interface Name Ethernet 1Select either Ethernet 1
Obtain IP Address
automatically using
DHCP/BOOTP
When enabled, the IOLAN will request an IP address from the DHCP/BOOTP server.
By default, when this option is enabled, the IOLAN will also attempt to retrieve the
DNS server, WINS server, and default gateway from the DHCP/BOOTP server.
Default: Disabled
Use the following IP
Address
Assign a specific IP address to the IOLAN.
Field Format: IPv4 address
Ethernet 1 The IOLAN’s unique IPv4 network Interface 1IP address.
Field Format: IPv4 address
Subnet Mask The network subnet mask. For example, 255.255.0.0.
Default Gateway Specify the gateway IP address that will provide general access beyond the local
network.
Field Format: IPv4 address
Default Gateway
Obtain Automatically
When DHCP/BOOTP is enabled, you can enable this option to have the IOLAN
receive the Default Gateway IP address from the DHCP/BOOTP server.
Default: Enabled
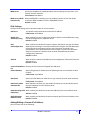
DNS Server Specify the IP address of a DNS host in your network for host name resolution.
Field Format: IPv4 or IPv6 address
DNS Server Obtain
Automatically
When DHCP/BOOTP is enabled, you can enable this option to have the IOLAN
receive the DNS IP address from the DHCP/BOOTP server.
Default: Enabled
Page is loading ...
Page is loading ...
Page is loading ...
Page is loading ...
Page is loading ...
Page is loading ...
Page is loading ...
Page is loading ...
Page is loading ...
Page is loading ...
Page is loading ...
Page is loading ...
Page is loading ...
Page is loading ...
Page is loading ...
Page is loading ...
Page is loading ...
Page is loading ...
Page is loading ...
Page is loading ...
Page is loading ...
Page is loading ...
Page is loading ...
Page is loading ...
Page is loading ...
Page is loading ...
Page is loading ...
Page is loading ...
Page is loading ...
Page is loading ...
Page is loading ...
Page is loading ...
Page is loading ...
Page is loading ...
Page is loading ...
Page is loading ...
Page is loading ...
Page is loading ...
Page is loading ...
Page is loading ...
Page is loading ...
Page is loading ...
Page is loading ...
Page is loading ...
Page is loading ...
Page is loading ...
Page is loading ...
Page is loading ...
Page is loading ...
Page is loading ...
Page is loading ...
Page is loading ...
Page is loading ...
Page is loading ...
Page is loading ...
Page is loading ...
Page is loading ...
Page is loading ...
Page is loading ...
Page is loading ...
Page is loading ...
Page is loading ...
Page is loading ...
Page is loading ...
Page is loading ...
Page is loading ...
Page is loading ...
Page is loading ...
Page is loading ...
Page is loading ...
Page is loading ...
Page is loading ...
Page is loading ...
Page is loading ...
Page is loading ...
Page is loading ...
Page is loading ...
Page is loading ...
Page is loading ...
-
 1
1
-
 2
2
-
 3
3
-
 4
4
-
 5
5
-
 6
6
-
 7
7
-
 8
8
-
 9
9
-
 10
10
-
 11
11
-
 12
12
-
 13
13
-
 14
14
-
 15
15
-
 16
16
-
 17
17
-
 18
18
-
 19
19
-
 20
20
-
 21
21
-
 22
22
-
 23
23
-
 24
24
-
 25
25
-
 26
26
-
 27
27
-
 28
28
-
 29
29
-
 30
30
-
 31
31
-
 32
32
-
 33
33
-
 34
34
-
 35
35
-
 36
36
-
 37
37
-
 38
38
-
 39
39
-
 40
40
-
 41
41
-
 42
42
-
 43
43
-
 44
44
-
 45
45
-
 46
46
-
 47
47
-
 48
48
-
 49
49
-
 50
50
-
 51
51
-
 52
52
-
 53
53
-
 54
54
-
 55
55
-
 56
56
-
 57
57
-
 58
58
-
 59
59
-
 60
60
-
 61
61
-
 62
62
-
 63
63
-
 64
64
-
 65
65
-
 66
66
-
 67
67
-
 68
68
-
 69
69
-
 70
70
-
 71
71
-
 72
72
-
 73
73
-
 74
74
-
 75
75
-
 76
76
-
 77
77
-
 78
78
-
 79
79
-
 80
80
-
 81
81
-
 82
82
-
 83
83
-
 84
84
-
 85
85
-
 86
86
-
 87
87
-
 88
88
-
 89
89
-
 90
90
-
 91
91
-
 92
92
-
 93
93
-
 94
94
-
 95
95
-
 96
96
-
 97
97
-
 98
98
-
 99
99


Ask a question and I''ll find the answer in the document
Finding information in a document is now easier with AI
Related papers
-
Perle Console Server User guide
-
-
Perle IOLAN SCR1618 RDAC Console Server User guide
-
Perle Server Quick start guide
-
-
Perle IOLAN DS/TS User guide
-
 Chase Research IOLAN+Rack User guide
-
-
-

Other documents
-
 Perle Systems Switch DS1 User manual
-
 Perle Systems IOLAN SCS User manual
-
 Perle Systems 4030370 User manual
-
 Perle Systems DS1 User manual
-
 Perle Systems 5500208-41 User manual
-
 Perle Systems TS2 User manual
-
 Perle Systems STS User manual
-
 Perle Systems SDS User manual
-
 Perle Systems TS2 User manual
-
Infocus INF7520AG User guide


