Page is loading ...

VWD1066BLS
CAUTION: Before using water
dispenser, read this manual and
follow all safety rules and
operating instructions.
PRECAUCIÓN: Antes de usar
el dosificador de agua, lea este
manual y siga todas las reglas
de seguridad e instrucciones de
funcionamiento.
great taste, great health, great life.
High Efficiency Bottom Load
Water Dispenser
Dosificador de agua
de Alta Eficiencia con Montaje
de Agua en la Sección Inferior
Use & Care Guide
Manual d uso
y cuidado
REV00
SAVE THESE INSTRUCTIONS
GUARDE ESTAS INSTRUCCIONES

Thank you for purchasing a Vitapur (Bottom Mount) Water Dispenser. This unique design offers
the benefits of :
• Nomorestrugglingandliftingofheavywaterbottles
• Nomoreaccidentalwaterspillageduringwaterbottleinstallation
• Nomorelookingatbruisedandbatteredrecycledwaterbottles
Please read the enclosed operating instructions carefully and retain this booklet for future
reference.WehavecarefullyengineeredyourVitapurWaterDispensertogiveyouyearsof
enjoyment and trouble free operation.
IMPORTANT SAFEGUARDS
PROTECTING THE EARTH'S OZONE LAYER
• WARNING: Do not damage the refrigeration cooling system.
• IMPORTANT:Refrigerantsmustbehandledanddisposedofbyqualiedservice
personnel only. Before discarding this water dispenser to landfill, contact local
authoritiesforadviceonproperdisposalmethodsforrefrigerants.
WARNING: This water dispenser is designed for indoor applications only.
DONOTuseoutdoors.
IMPORTANT NOTE: Yourvitapur®waterdispenserisdesignedwithaspecialsafetyfeature
(lowwaterlevelsensor)thatcontrolsactivation/operationoftheKettleFeaturehotwatertank
heatingsystem.Ifnowaterispresentand/orlowwaterlevelsaredetectedinsidetheinternal
waterreservoir,activation/operationofthe
KettleFeaturehotwaterheatingsystemisnotpossible.Likewise,ifthehotwaterheating
systemisoperationalandwaterisbeingdrawnsimultaneouslycausinginternalwaterlevelsto
dropbelowtheestablishedminimallevelsetpoint,hotwatertankoperationisautomatically
suspended.Toreactivatethehotwaterheatingsystem,youmustreplenishyourwatersupply.
NOTE: Operation of the cold water system is not affected by this safety feature.
• Neverturnthedispenserupsidedownortiltmorethan45degrees.Iftheunithasbeen
resting on its’ side for a long period of time, place the water dispenser in the upright
position for approximately 12 hours before turning it on.
• Forusewith3or5gallon(12or19liter)waterbottles.
• Neverusethisdispenserwithwaterthatisunsafetodrinkorisfromanunknown
source.
• Neveruseanyotherliquidinthedispenserotherthanknownandmicrobiologicallysafe
bottled water.
• Neverallowchildrentodispensehotwaterwithoutproperanddirectsupervision.
• Thiswaterdispenserisequippedwithagroundedpowercordplugforyoursafety.
• Keepyourwaterdispenserinadryplaceawayfromdirectsunlight.
• Neverputanythingammableclosetothedispenser.
• Leaveaminimumof2”(5cm)aroundthebackandsidesofthedispenserforproper
ventilation.
• Alwaysinstallyourwaterdispenseronaleveloor.Wait3minutesbeforerestarting
machine after shutting it down.
• Alwaysunplugthewaterdispenserbeforeservicing.
• Regularcleaningofyourwaterdispenserisrequiredforyourwarranty.
Please follow the cleaning instructions outlined in this manual and clean the dispenser
every4months.

GROUNDING INSTRUCTIONS
• Improperuseofthegroundingplugcanresultinariskofelectricshockcausingserious
injury,evendeath.
• Thisappliancemustbegrounded.Intheeventofanelectricalshortcircuit,grounding
reducestheriskofelectricshockbyprovidinganescapewirefortheelectriccurrent.
• Thisapplianceisequippedwithapowercordhavingagroundingwirewithagrounding
plug and must be connected into a properly grounded polarized outlet. Consult a
qualified electrician if the grounding instructions are not completely understood, or if
doubt exists as to whether the appliance is properly grounded. If the wall outlet is a
standard2prongoutlet,itisyourpersonalresponsibilityandobligationtohaveit
replacedwithaproperlygrounded3-prongwalloutlet.
• Donotunderanycircumstancescutorremovethethird(ground)prongfromthepower
cord plug.
• Donotuseanadapterplugwiththisappliance.
• Donotuseanextensioncordwiththisappliance.Ifthepowercordistooshort,havea
qualified electrician install an electrical outlet near the appliance.
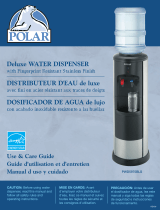
YOUR Vitapur® WATER DISPENSER
1
4
5
6
7
8
9
3
2
10
13
14
15
16
17
11
12

1. Control panel
2. KettleFeature(on/off)activationbutton
3. Ready-to-dispenseindicatorlights
RedLight:“Flashing”= Heater(hotwatertank)isoperational
RedLight:“SteadyOn”= Thehotwaterhasreachedoptimumtemperature
and is ready for dispensing.
RedLight:“Off”= Hotwatertankheatingsystemisoff,howeverwaterwithin
thetankmaystillbeveryhot,alwaysexercisecautionwhen
d i s p e n s i n g a n d / o r d r a i n i n g w a t e r f r o m t h e h o t w a t e r t a n k .
BlueLight:“SteadyOn”= Thecoldwaterhasreachedoptimumtemperatureandis
ready for dispensing.
BlueLight:“Off”= Thecoolingcycleisinprogress,itispossibletodispense
waterduringthecoolingcycle,however,optimumcooling
temperaturemaynotyetbeachieved.
YellowLight:“Flashing”= Lowwaterlevelinsideinternalreservoir,waterbottleempty.
YellowLight:“Off”= Thestatusofallwaterlevelsarenormal.
4. Child resistant safety switch
5. Hotwaterdispensingbutton
6. Room temperature water dispensing button
7. Cold water dispensing button
8. Removabledriptray
9. Lowerdoor(bottlestoragecompartment)
10. Water dispensing spigot
11. Stainlesssteelstraw(waterbottle)
12. DoorSwitch(Controlswaterpumpoperation)
13. Adjustable“cold”waterthermostat.
(Note:hotwatertemperatureisfactorysetandcannotbeadjusted)
14. Carry handle
15. Drainvalve
16. Condenser coil
17. Door latch assembly
OPERATING INSTRUCTIONS
Initial Product Cleaning Procedure
Likemostappliances,yourwaterdispenserrequiresperiodicmaintenanceformaximum
efciencyandperformanceandmustbecleanedonaregularbasis(i.e.every4months).To
maintainahygienicenvironmentwithinyourwaterdispenserandpreventpotentialformation
(growth)ofbacteria,westronglyrecommendregularcleaning.Acleaningkitisavailable
throughourCustomerServiceDepartmentat1-866-253-0447 or can be ordered on line
at www.greenwayhp.com.
1. Makesurethelowercompartmentstoragedooris“open”(thiswillpreventactivation
of the water pump).
2. Make sure the power cord is plugged into electrical outlet.
3. Usingacleanjug/containerpre-mix(50ml/1.7ozs)waterdispensercleanerwith
2L/0.5galofhotwater.Placethejug/containerontheoorofthebottlestorage

compartment. Insert the stainless straw into the cleaning solution, (make sure the
jug/containerdoesnottipover)andclosethestoragedoor.Thewaterpumpwillstart
automaticallyanddrawthecleaningsolutionintothedispenserreservoirs.Whenallof
the cleaning solution has been drawn, the pump will continue to operate for
approximately20secondsandstopautomatically,followedbyaashingyellowlight
(addwater)condition(thisisnormal).Simplyopenthestoragedoortocancelthe
ashingyellowlight.Allowthecleaningsolutiontositinsidethedispenserfor20min.
4. Placeajug/containerunderthedispensingspigotsandpressboththehotandcold
dispensingbuttonsuntilthecleaningsolutionstopsowing.Discardcleaningsolution.
5. Usingajug/container,draintheremainingcleaningsolutionfromtheinternalreservoirs
byunscrewingthedraincapandremovingthedrainplugfromthedrainvalvelocatedat
the back of the unit. Discard the cleaning solution.
6. Re-installthedrainpluganddraincapontheunitandushthesystemusing2Lclean
wateronly(nocleaningsolution)followingthesamebasicstepsoutlinedabove.(See
step#3)Placejug/containerunderdrainvalveandremovedraincapanddrainplug
allowingrinsewatertodrain.Whentherinsewaterstopsowing,re-installthedrainplug
and drain cap and tighten. The cleaning process is now complete.
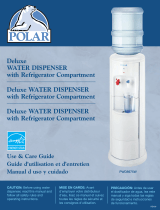
Installing the Water Bottle
IMPORTANT: Always wash your hands first before handling water bottle! Clean the top of the
water bottle with a clean cloth. Water bottles can be purchased from your local retailer.
1. Make sure the lower door (bottle storage compartment) is open. The water pump cannot
operate as long as the door is in the open position.
2. Removetheprotectivelabelfromthetopofthebottle.
3. Mostwaterbottleshaveapuncturablemembraneinthetopcap.Topuncturethe
membrane, insert the straw
into the cap and push
downward until the
membrane opens.
Insert the straw all the way
into the bottle until the
bottom of the straw touches
the bottom of the water
bottle.NOTE:Thewater
bottle drinking straw features
anexclusivetelescopic
design for use with either
18.9L(5gal)and11.4L(3gal)
waterbottles.(SeeFig.1&
Fig.2)Toadjustthelengthof
the water bottle drinking
straw, hold the upper portion
ofthestrawandsimplypull/
push the lower portion of the
straw to the desired length.
4. To attach the water bottle
straw onto the neck of the
water bottle, make sure the
handle is positioned
FIG. 1. 11.4L (3gal) bottle FIG. 2. 18.9L (5gal) bottle
FIG. 3. Handle Open FIG. 4. Handle Closed

“horizontally”andpressrmlyontothetopofthebottleneck.(SeeFig.3).Whenthehandle
isinthe“vertical”(locked)position,(SeeFig.4)itispossibletoliftthewaterbottle.However,
wheninstallingthe18.9L(5gal)waterbottleinsidethestoragecompartment,thehandlemust
beinthe“horizontal”position.(SeeFig.3).
IMPORTANT: DO NOT BREAK OR REMOVE THE SEAL FROM AROUND THE NECK
OF THE WATER BOTTLE, (See Fig. 5) OTHERWISE YOU WILL NOT BE ABLE TO
LIFT/CARRY THE WATER BOTTLE WITH THE CARRY HANDLE. (See Fig. 6)
5. To install the water bottle inside the bottle storage compartment, simply position the
bottle in front of storage compartment ramp and (push) slide inside using the side of
your leg until the bottle comes to a stop.
6. Closethelowercompartmentdoorandthewaterpumpwillstartdeliveringwaterinto
thedispenserautomatically.Whentheinternalreservoirsarefull,thewaterpumpwill
stop automatically.
IMPORTANT NOTE:Yourvitapur®waterdispenserisdesignedwithaspecialsafetyfeature
(lowwaterlevelsensor)thatcontrolsactivation/operationoftheKettleFeaturehotwatertank
heatingsystem.Ifnowaterispresentand/orlowwaterlevelsaredetectedinsidetheinternal
waterreservoir,activation/operationoftheKettleFeaturehotwaterheatingsystemisnot
possible.Likewise,ifthehotwaterheatingsystemisoperationalandwaterisbeingdrawn
simultaneouslycausinginternalwaterlevelstodropbelowtheestablishedminimallevelset
point,hotwatertankoperationisautomaticallysuspended.Toreactivatethehotwaterheating
system, you must replenish your water supply.
NOTE: Operation of the cold water system is not affected by this safety feature.
NOTE:Thewaterpumpsystemalsoincorporatesaspecialsafetyfeaturethatprevents/stops
operation in the absence of water. (i.e. empty water bottle conditions) Water pump operation is
also linked to a door switch system mounted inside the lower storage compartment.
i.e.Dooropen=pumpoperationsuspended.
Doorclosed=normalpumpoperation.
Dispensing Room and Cold Water
Placeaglassunderthedispensingspigotinthecenterofthewateroutletpanel.Forcold
water,press/holddispensingbutton(#7)untilthedesiredamountofwaterisdispensedand
release.Forroomtemperaturewater,press/holddispensingbutton(#6)untilthedesired
amount of water is dispensed and release.
FIG. 5. Water bottle seal intact
CORRECT INCORRECT
FIG. 6. Water bottle seal removed

Adjusting the Temperature (Cold water only)
By turning the thermostat at the back of the unit, the temperature
can be adjusted. Turn the dial clockwise between the Min. (cool)
andMax.(colder)levelsuntilthedesiredtemperatureisreached.
If the water dispenser is not dispensing water, there could be a
possible ice build up due to the thermostat being set too cold. If
thishappens,unplugthedispenserovernightandthenreset.Set
thermostat to Min, slowly increasing based on your use and need
for cold water.
Dispensing Hot Water
TheKettleFeaturedispensingsystemonthisunitisdesignedtosaveenergyandmoney.
Conventionalhotwaterdispensingsystemsoperate24/7regardlessofwaterusage.The(on
demand)KettleFeatureactivatesthehotwatersystem"only"whentheKettleFeature(red)
buttonisactivateddeliveringsteaminghotwaterinlessthan3minutes.
Tostop/canceltheKettleFeatureduringacycle,simplypresstheKettleFeaturebuttona
secondtimeandtheredLEDlightwillstopashing.
IMPORTANT NOTE: Yourvitapur®waterdispenserisdesignedwithaspecialsafetyfeature
(lowwaterlevelsensor)thatcontrolsactivation/operationoftheKettleFeaturehotwatertank
heatingsystem.Ifnowaterispresentand/orlowwaterlevelsaredetectedinsidetheinternal
waterreservoir,activation/operationoftheKettleFeaturehotwaterheatingsystemisnot
possible.Likewise,ifthehotwaterheatingsystemisoperationalandwaterisbeingdrawn
simultaneouslycausinginternalwaterlevelstodropbelowtheestablishedminimallevelset
point,hotwatertankoperationisautomaticallysuspended.Toreactivatethehotwaterheating
system, you must replenish your water supply.
NOTE: Operation of the cold water system is not affected by this safety feature.
Child Resistant Safety Switch
Topreventhotwaterfrombeingdispensedaccidentallyand
possibly harming a child, the hot water dispensing tap can
only be operated when the child resistant safety feature is
activated.Toactivatethisfeature,pushtheredbuttononthe
front of the hot water button and hold.
DANGER:Thehotwaterisheatedtoapproximately194˚F
/90˚C.Temperaturesabove125˚F/52˚Ccancausesevereburnsfromscalding.DONOT
ALLOWCHILDRENTOUSETHEHOTWATERDISPENSING
BUTTONWITHOUTPROPERANDDIRECTSUPERVISION.
CLEANING AND MAINTENANCE
Likemostappliances,yourwaterdispenserrequiresperiodicmaintenanceformaximum
efciencyandperformanceandmustbecleanedonaregularbasis(i.e.every4months).To
maintainahygienicenvironmentwithinyourwaterdispenserandpreventpotentialformation
(growth)ofbacteria,westronglyrecommendregularcleaning.Acleaningkitisavailable
throughourCustomerServiceDepartmentat1-866-253-0447orcanbeorderedonlineat
www.greenwayhp.com.Pleasesee“InitialProductCleaningProcedure”andfollow
instructions.
Child resistant
safety switch
Max.
Min.
TEMP

Cleaning the Outside of the Water Dispenser
The outside of the dispenser can be wiped clean with a
vitapur®waterdispensercleaningsolutionoramildsoapand
watermixture.Neveruseharshchemicalsorabrasivecleaners.
Rinse thoroughly with clean water and then dry surfaces.
Cleaning the Drip Tray
Toremovethedriptray,(Fig.8)pullthetrayforwarddislodgingitfromtheguides.Drainand
clean.
Thedriptrayshouldbeemptiedandcleanedregularlytoremovespottingandanymineral
deposits.Cleanwithvitapur®waterdispensercleaningsolutionoramildsoapandwater
mixture.Fortoughdeposits,addvinegarandletitsoakuntilthedepositscomeloose.Then
wash, rinse and dry thoroughly. To replace, put the grill back on the tray and slide the tray onto
the guides (not dishwasher safe).
Cleaning the Condenser
Vacuum or sweep away the dust from the condenser coils at
thebackofthedispenser.Forbestresults,youcanpurchase
a brush designed specifically for this purpose from your local
appliancestore.Thiswillimprovecooling
and efficiency.
Draining the Reservoirs
Drainthereservoirsbeforeandaftercleaning,whengoing
onlongvacationsorifnotusingthedispenserforlongperiods
of time.
IMPORTANT! Unplug the dispenser before performing this
procedure. Dispense hot water until temperature drops to a
safeleveltoavoidtheriskofscalding.
1. Removethewaterbottle.
2. Press both dispensing taps until water no longer comes out.
3. Placeabucketbeneaththedrainvalveonthebackofthedispenser.
4. Removethecapandplugfromthedrainvalveandletthewaterowintothebucket.
Replace the cap and plug.
IMPORTANT: Collect the water in a container, not the drip tray.
5. Replace the water bottle (see Installing the Water Bottle).
Going Away on Vacation
Whennotusingthedispenserforlongperiodsoftimeorwhengoingonvacation,conserve
energy,unplugthedispenseranddrainthereservoirs(see Draining the Reservoirs).Follow
Initial Product Cleaning Procedures upon return and startup of the dispenser.
Troubleshootingtipswww.greenwayhp.com.Pleasesee“InitialProductCleaningProcedure”
and follow instructions.
FIG. 8. Drip tray
and Grill
Drain Valve

TROUBLESHOOTING TIPS
Problem Possible Cause Suggested Solution
Water dispenser
is leaking
Drain cap and silicone seal are not
secure.
Ensuresealissecureindrainplug
and
tighten drain cap.
Water is not hot
or cold enough
All the water in the tank has been
used.
Replace with full bottle and wait;
60minutesforwatertocool,3
minutes for water to heat (after
activating"Kettle"featurebutton).
The unit is unplugged. Plug it into the outlet.
"Kettle"Featurewasnotactivated. Activate"Kettle"Featureby
pressing the button.
The circuit breaker in your home is
tripped or the fuse has blown.
Reset the breaker or replace the
fuse.
Temperature limit tripped. Allow the temperature of the
hot water tank to cool for
approximately15-30minutes.
The temperature limit thermostat
willre-setautomaticallyonce
sufficiently cooled, and the
coolingsystemwillreactivate
automatically. To operate the hot
watersystem,presstheKettle
Featurebutton.
Thermostat needs to be adjusted
colder.
Adjust thermostat between high
(cool)andlow(colder)levelsto
achievedesiredtemperature.
Water dispenser
is not dispensing
water
Emptywaterbottle. Replace with full bottle.
Mineral deposits clogging tanks. SeeCleaningtheReservoirs.
Possible air pocket. Push down on the dispenser
buttons to prime the unit.
Possible ice build up due to
thermostat set too cold.
Unplugovernight,thenreset.
Setthermostattohigh,slowly
increasing based on your use and
need for cold water.
Water dispenser
is noisy
Bottle making a gurgling noise as it
fills the tank.
This is normal.
Waterdispenserisuneven. Make sure the dispenser is on an
even
surface that can support its full
weight.

Warranty
DO NOT RETURN THIS PRODUCT TO THE STORE:
PleasecontactCustomerServiceat:1-866-253-0447 or [email protected]
GreenwayHomeProductswarrantsyourwaterdispensertobefreefrommanufacturer’s
defects in workmanship or material under normal operating conditions for one (1) year from the
original date of purchase. This warranty applies only in the country in which it is sold, and is
availabletotheoriginalpurchaseronly.Thiswarrantyisnon-transferable.
ThiswarrantyandtheCSAInternationallistingforthiswaterdispenserarevoidifthewater
dispenserisaltered,modied,orcombinedwithanyothermachineordevice.Alterationofthis
waterdispensermaycauseseriousoodingand/orhazardouselectricalshockorre.
The provisions of this warranty shall not apply to the following:
• Waterbottles.
• Servicetripstoyourhometoteachyouhowtousetheproduct.
• Improperinstallation,delivery,ormaintenance(failuretomaintaintheproductaccording
totheinstructionsoutlinedintheproductmanualwillautomaticallyvoidthewarranty).
• Failureoftheproductifitisabused,misused,altered,usedcommercially,orusedfor
other than the intended purpose.
• Productsthatareusedoutsidearesidentialorofceenvironment.
• Replacementofhousefusesorresettingofcircuitbreakers.
• Useofthisproductwherewaterismicrobiologicallyunsafeorofunknownquality.
• Damagetotheproductifusedtodispenseanythingotherthanwater.
• Damagetotheproductcausedbyaccident,re,oods,oractsofGod.
• Anyservicetotheproductbyunauthorizedpersonnel.
• Incidentalorconsequentialdamagecausedbypossibledefectswiththisappliance,
its installation or repair.
ThiswarrantyshallbefullledatanauthorizedGreenwayRepairFacility.Allwarrantyrepairs
mustbepre-authorizedbyGreenwayHomeProducts.Greenwaywill,atitsoption,repair
orreplacefreeofchargeanydefectivepart,wherethePurchaserhasnotiedtheirRetailer
orGreenwayHomeProductswithinthewarrantyperiod.TheobligationofGreenwayHome
Products under this warranty is expressly limited to such repairs or replacement. This warranty
doesnotcoverthefreightcoststoandfromtheauthorizedrepairfacility.
Exceptassetforthhereinorrequiredbylaw,theManufacturermakesnootherwarranty,
guarantee, or agreement, express, implied, or statutory including any implied warranty of
merchantability or fitness for a particular purpose. The manufacturer does not assume or
authorize any person to assume any obligations of liability in connection with this water
dispenser.Innoeventwillthemanufacturerbeliableforindirect,special,orconsequential
damages (including, without limitation, economic loss) or for any delay in the performance of
this agreement due to causes beyond its control.

Retailer: ModelNumber:
SerialNumber: DateCode:
Purchase Date:
Warranty
Somestatesorprovincesdonotallowlimitationsonhowlonganimpliedwarrantylasts,
sotheabovelimitationmaynotapplytoyou.Somestatesorprovincesdonotallowthe
exclusionorlimitationofincidentalorconsequentialdamages,sotheabovelimitationor
exclusionmaynotapplytoyou.Thiswarrantygivesyouspeciclegalrights,andyoumay
alsohaveotherrightswhichvaryfromstatetostateorfromprovincetoprovince.
Ifyourequireservice,pleaserstseethe“Troubleshooting”sectionofthismanual.Additional
assistance can be found by checking our website at www.greenwayhp.com, or by calling
ourcustomerservicelineat1-866-253-0447,MondaytoThursdayfrom8:30AMto5:00PM
(EST),Fridayfrom8:30AMto4:00PM(EST),orwrite:GreenwayHomeProducts,Customer
ServiceCenter,400SouthgateDrive,Guelph,ON,CanadaN1G4P5orGreenwayHome
Products,1270FlagshipDrive,Perrysburg,OH,USA43551.
Keepthismanualandyoursalessliptogetherforfuturereference.Youmustprovideproofof
purchaseforin-warrantyservice.
Write down the following information about your water cooler to better help you obtain
assistanceorserviceifyoureverneedit.Youwillneedtoknowyourcompletemodelnumber
and serial number. You can find this information on the back of the water dispenser.
/