VTech Kidizoom Pixi Parents' Manual
- Category
- Toys & accessories
- Type
- Parents' Manual
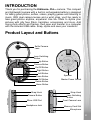
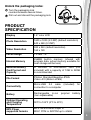
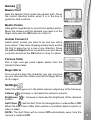
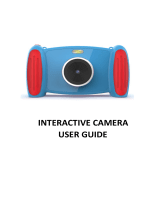
VTech Kidizoom Pixi is a compact and lightweight camera designed for kids to take great photos, selfies, videos, play games, and listen to music. With dual camera lenses, a wrist strap, and 50+ filters, kids can stylize their pictures with silly face filters, hairstyles, accessories, and more. They can also add photo effects, frames, and save and transfer their creations to a computer with the included USB cable.
VTech Kidizoom Pixi is a compact and lightweight camera designed for kids to take great photos, selfies, videos, play games, and listen to music. With dual camera lenses, a wrist strap, and 50+ filters, kids can stylize their pictures with silly face filters, hairstyles, accessories, and more. They can also add photo effects, frames, and save and transfer their creations to a computer with the included USB cable.


-
 1
1
-
 2
2
-
 3
3
-
 4
4
-
 5
5
-
 6
6
-
 7
7
-
 8
8
-
 9
9
-
 10
10
-
 11
11
-
 12
12
-
 13
13
-
 14
14
-
 15
15
-
 16
16
-
 17
17
-
 18
18
-
 19
19
-
 20
20
-
 21
21
-
 22
22
-
 23
23
-
 24
24
-
 25
25
-
 26
26


VTech Kidizoom Pixi Parents' Manual
- Category
- Toys & accessories
- Type
- Parents' Manual
VTech Kidizoom Pixi is a compact and lightweight camera designed for kids to take great photos, selfies, videos, play games, and listen to music. With dual camera lenses, a wrist strap, and 50+ filters, kids can stylize their pictures with silly face filters, hairstyles, accessories, and more. They can also add photo effects, frames, and save and transfer their creations to a computer with the included USB cable.
Ask a question and I''ll find the answer in the document
Finding information in a document is now easier with AI
Related papers
-
VTech Kidizoom Action Cam HD Parents' Manual
-
-
VTech 80-077341 - Kidizoom Digital Camera User manual
-
-
-
-
-
-
-
Other documents
-
 SMYTHS TOYS 197426 Interactive Camera User guide
-
V7 VAMSD2GR-1E Datasheet
-
Technaxx 3592 Datasheet
-
V7 VAMSDH16GCL4R-1N Datasheet
-
Sharper Image Smartphone Bluetooth Hat Owner's manual
-
Swann RMC190210T User manual
-
Disney VTech Kidizoom Lightning McQueen Parents' Manual
-
Easypix Kiddypix Blizz User manual
-
-
Uniden DC115 Owner's manual
