Page is loading ...

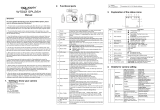
CAMERA FOR CHILDREN
Operating instructions
FR : Un manuel dans votre langue est disponible sur Internet:
IT: Il manuale nella sua lingua può essere trovato su Internet:
ES: Puede encontrar un manual en su idioma en Internet:
PT: Um manual em seu idioma pode ser encontrado na Internet:
PL: Instrukcję w swoim języku możesz znaleźć na stronie:
SV: En handbok på ditt språk finns på Internet:
NL: Een handleiding in uw taal vindt u op internet:
bit.ly/3t0wUIb

EN
1
Table of contents
General information ............................................................ 3
Explanation of symbols ....................................................... 4
Product description............................................................. 4
Intended use ....................................................................... 5
Restrictions ......................................................................... 5
Safety instructions .............................................................. 6
Operating environment ....................................................... 7
Camera description ............................................................. 8
First steps .......................................................................... 12
Camera menu ................................................................... 13
Photo mode ...................................................................... 13
Video mode ...................................................................... 14
Game mode ...................................................................... 15
Audio mode ...................................................................... 16
Playback mode .................................................................. 18
Settings ............................................................................. 18
FAQ ................................................................................... 20
Technical data ................................................................... 22
Scope of delivery............................................................... 23
Disposal ............................................................................ 24
Declaration of conformity ................................................. 26

EN
2
Disclaimer
Easypix makes no representations or warranties in relation to this
manual and, to the fullest extent permitted by law, expressly limits its
liability for breach of any warranty which may arise from substitution
of this manual for any other. Furthermore, Easypix reserves the right
to revise this publication at any time without obligation to notify any
person of such revisions.
Easypix is not responsible or liable for any misuse of the information
contained herein. If you have any suggestions for improvements or
changes, or if you have found any errors in this publication, please let
us know.
When installing and using this product, all relevant state, regional and
local safety regulations must be observed. For safety reasons and to
ensure compliance with the documented system data, only the
manufacturer may carry out repairs on components.
Failure to follow this information may result in injury or equipment
damage.
Copyright © Easypix GmbH
All rights reserved. No part of this publication may be reproduced,
distributed or transmitted in any form or by any means, including
photocopying, recording or other electronic or mechanical methods,
without the prior written permission of the publisher. For permission
requests, please contact the publisher in writing.
Easypix GmbH, Em Parkveedel 11, 50733 Cologne, Germany.
support@easypix.com - www.easypix. com

EN
3
General information
Please read this manual and its safety instructions before
using this product. Follow all instructions. This will prevent
hazards that can lead to property damage and/or serious
injury.
The product may only be used by persons who have fully
read and understood the contents of this user manual.
Ensure that each person using the product has read and
follows these warnings and instructions.
Keep all safety information and instructions for future
reference and pass them on to subsequent users of the
product.
The manufacturer is not liable for damage to property or
personal injury resulting from incorrect handling or failure
to observe the safety instructions.

EN
4
Explanation of symbols
"Warning" indicates a hazard with a risk which, if not
avoided, may result in injury.
"Note" indicates information that is considered important
but is not hazard-related.
Product description
This camera is a dual lens camera for children.
This means it has one lens on the front and a second lens
on the back. With this camera, children can take wonderful
photos and videos, take selfies, record and play back
sounds and voices, discover fun effects and picture frames
and play various games.
WARNING
NOTE!

EN
5
Intended use
This product is suitable for use both indoors and outdoors.
Restrictions
The product is not suitable for children under 3 years.
Contains small parts. Choking hazard.
The product is not waterproof.
It should not be submerged in water or used in a wet
environment.
WARNING
WARNING

EN
6
Safety instructions
This product is only suitable for the purpose described, the
manufacturer is not liable for damage caused by improper
use.
Please read these operating instructions carefully before
use.
• Always protect your camera from drops, bumps
and shocks.
• Keep a sufficient distance from objects that
generate strong magnetic fields or radio waves to
prevent them from damaging the product or
affecting the picture quality.
• In the unlikely event of overheating, smoke or
unpleasant odours coming from the unit,
immediately remove the AA battery and stop
operation.
• Please do not disassemble the product.
Otherwise, any guarantee will be invalidated.
• Please dispose of waste and residues at the end of
the product's life in accordance with local laws
and regulations.
WARNING
WARNING

EN
7
Operating environment
• The product should not be exposed to high
temperature and humidity differences to avoid
condensation inside the housing or behind the lens.
• Store the product in a cool place (at room
temperature) in a dry and dust-free place and never
expose it to high temperatures or permanent direct
sunlight.
• Protect the product from falls, bumps and knocks.

EN
8
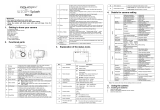
Camera description

EN
9
1. Arrow key:
Up/Down/Right/Left
2. Mode/Back button:
Select the operating mode (Photo, Video, Games, Audio,
Playback, Settings) and confirm with the OK button (10).
3. Loudspeaker
4. Playback button
5. Audio button (audio recording & sound effects):
Press this button to record audio files.
Press the button again to switch between different sound
effects for your audio recording.
You can hear the sound effects by confirming with the OK
button.
6. Delete key:
In playback mode, use the arrow key to select the file you
want to delete and confirm with the delete key.
7. Microphone/Operating display
8. On/Off button

EN
10
9. Photo frame / Effect button:
In photo mode, press this photo frame button.
To switch between frames and effects, press the left and
right arrow keys (1).
You can then simply take photos.
To exit the effect menu, press the photo frame button
again.
10. OK button
11. Viewfinder
12. Rear camera for selfies
13. Display
14. Shutter button - taking photos/videos
Press this button to take a photo or start and stop video
recording.
15. Lightning
Activate / deactivate the flash by pressing the up arrow key
(1).
16. Button to switch between the front and rear camera:
Simply press this button and switch between the front and
rear camera. You can take normal photos and videos with
the front camera. You can take a selfie with the rear
camera.

EN
11
17. Front camera
18. Fixing screw for battery / micro SD card /
USB port cover:
To avoid accidents or injuries, the batteries should be
stored safely.
To insert the batteries and the micro SD card, first open the
screw of the battery compartment cover with the
screwdriver provided.
Make sure the cover is securely closed after inserting the
batteries and memory card.
19. USB connection under the cover
20. Micro SD card slot under the cover:
Please use a high quality Micro SD card. The max. storage
capacity should be 32GB.
Format the memory card before first use via the camera's
settings menu.
The option "Format" can be found under "Settings".
21. Battery compartment cover

EN
12
First steps
To use your camera you need 4x AA batteries and a Micro
SD card. These parts are NOT included in the scope of
delivery.
Please use a high quality Micro SD card. The max. storage
capacity should be 32GB.
Format the memory card before first use via the camera's
settings menu.
The option "Format" can be found under "Settings".
To avoid accidents and injuries, the batteries should be
stored safely.
To insert the batteries and the micro SD card, the cover of
the battery compartment must be opened with the
screwdriver provided.
Please make sure that the cover is securely closed again
afterwards.
NOTE!

EN
13
Camera menu
Photo mode
Press the mode button (2) and select the photo mode using
the arrow button.
Confirm the selection with OK (10).
Now you can take photos by pressing the shutter button
(14).
Your Kiddypix Blizz has a front camera and a rear camera.
With the front camera you can take normal photos and
videos. With the rear camera you can take a selfie. Press
the lens switch button (16) to switch between the front and
rear camera.

EN
14
Use the arrow key (1) for the following functions:
Flash - press upwards
Self-timer - press down
Digital zoom - press and hold up or down button
Photo frame effect:
In photo mode, press the photo frame button (9).
To switch between images and effects, press the left or
right arrow key (1).
Once you have selected a frame, simply press the shutter
button (14) to take a framed photo.
To exit the effect menu, press the photo frame button
again.
Video mode
Press the mode button (2) and select the video mode using
the arrow button (1).
Confirm the selection with OK (10).
Now you can record videos by pressing the shutter button
(14).
Your Kiddypix Blizz has a front camera and a rear camera.
With the front camera you can take normal photos and
videos. With the rear camera you can take a selfie video.

EN
15
Press the lens switch button (16) to switch between the
front and rear camera.
Game mode
Press the mode button (2) and select the game mode using
the arrow button (1).
Confirm the selection with OK (10).
Now you can choose between different games using the
arrow key (1).
Select a game and confirm with OK (10).
You can control all games with the arrow key:
Upwards
Down
To the left
To the right
Have fun!

EN
16
Audio mode
Press the mode button (2) and select the audio mode using
the arrow button (1).
Confirm the selection with OK (10).
Press the release button (14) to record audio files.
Press the button again to stop recording.
To switch between your audio files, please use the arrow
key (1).
Please select a file and confirm the selection with the
OK button (10).

EN
17
Audio effects:
You can add effects to your audio recordings, thus changing
their sound.
Please press the audio button (5) to switch between
effects:
SLOW EFFECT
ECHO EFFECT
HIGH VOICE
DEEP VOICE
UFO EFFECT
Confirm the effect and play your funny audio files by
pressing OK.
Please note: Audio effects are only available during
playback on the camera.
The effect file is not saved on the memory card.

EN
18
Playback mode
Press the mode button (2) and select the playback mode
using the arrow button (1).
Confirm the selection with OK (10).
Now you can view your photos and videos and switch
between them with the arrow key.
To delete a file, press the delete key (6) and confirm with
OK.
Settings
Press the mode button (2) and select the settings menu
using the arrow button (1).
Confirm the selection with OK (10).
You are now in the settings menu.
Here you can change the following settings.
Use the arrow key to select between the different options:

EN
19
• Photo resolution: 1M / 2M / 3M / 5M / 8M
• Video resolution: 640x480p / 320x240p
• Background image:
Choose from 4 different menu backgrounds
• Screen saver: Off / 1 minute / 2 minutes /
3 minutes
• Frequency: 50 Hz / 60 Hz
• Set the time and date:
Press the left and right arrow keys to select between
hour / minute / second, the up and down keys to
increase or decrease the hour / minute / second
values and then press OK to confirm.
For a final confirmation, you must return to the menu
by pressing the menu button (2).
- Date stamp: Off / On
• Volume
• Select the language for the camera menu
• USB connection
• Format your micro SD card:
Press OK and confirm with Yes or No.
Please note: Formatting will delete all files on the
micro SD card.
• Reset to default setting:
Press OK and confirm with Yes or No.
All settings that you have previously set are reset to
the factory settings.
/