Page is loading ...

ENGLISH
13
IMPORTANT REMARKS
m Prior to proceeding with installation, it is essential
the instructions be read in full, since they contain
important information regarding safety, installation, use
and maintenance.
A
UTOMATION MUST BE IMPLEMENTED IN COMPLIANCE WITH
THE EUROPEAN REGULATIONS IN FORCE:
EN 60204-1, EN 12445, EN 12453, EN 13241-1, EN 12635
•
The installer must provide for a device (es. magnetotermical
switch) ensuring the omnipolar sectioning of the equipment
from the power supply.
The standards require a separation of the contacts of at least
3 mm in each pole (EN 60335-1).
• The plastic case has an IP44 insulation; to connect flexible or
rigid pipes, use pipefittings having the same insulation level.
• Installation requires mechanical and electrical skills, therefore it
s
hall be carried out by qualified personnel only, who can issue
the Compliance Certificate concerning the whole installation
(Machine Directive 2006/42/CEE, Annex IIA).
• Also the automation upstream electric system shall comply
with the laws and rules in force and be carried out
workmanlike.
• We recommend to make use of an emergency button, to be
installed by the automation (connected to the control unit
STOP input) so that the gate may be immediately stopped in
case of danger.
• For correct installation of the system, we recommend
following the instructions issued by UNAC very carefully, which
can be consulted at the following web site: www.v2home.com
• This instruction manual is only for qualified technicians, who
specialize in installations and automations.
• The contents of this instruction manual do not concern
the end user.
• Every programming and/or every maintenance service should
be done only by qualified technicians.
• Anything not expressly described in these instructions is
prohibited; unforeseen uses may be a source of danger to
people and property.
• Do not install the product in explosive environments and
atmospheres: the presence of inflammable gases or fumes is a
serious safety hazard.
• Do not make any modifications to any part of the automation
device, or the accessories connected to it, unless described in
this manual.
• Any other modifications will void the warranty on the product.
• The installation steps should be conducted so as to avoid rainy
weather, which can expose electronic circuits to dangerous
water seepage.
• All operations requiring the casing of the device to opened
should be performed with the control unit disconnected from
the electricity supply and with a warning notice displayed, for
example: ”CAUTION, MAINTENANCE IN PROGRESS”.
• Avoid exposing the device close to sources of heat and flame.
• In the event of interventions on automatic or differential
breakers or fuses, it is essential that faults be identified and
resolved prior to resetting. In the case of faults that cannot be
resolved using the information to be found in this manual,
consult the V2 customer assistance service.
• V2 declines all responsibility for failure to comply with good
construction practice standards in addition to structural
deformation of the gate that might occur during use.
• V2 reserves the right to make modifications to the product
without prior warning.
• Installation/maintenance personnel should wear individual
protection devices (IPDs), such as overalls, safety helmets, boots
and gloves.
•
The ambient operating temperature should be that indicated in
the technical characteristics table.
• The automation device should be shut down immediately in
the event of any anomalous or hazardous situation; the fault or
malfunction should be immediately reported to the person
responsible.
• All safety and hazard warnings on the machinery and
equipment should be complied with.
• Electromechanical actuators for gates are not intended to be
used by people (including children) with diminished physical,
sensory or mental capacity, or lacking in experience or
knowledge, unless they are under supervision or have been
instructed in use of the actuator by a person responsible for
safety.
V2 has the right to modify the product without previous
notice; it also declines any responsibility to damage or
injury to people or things caused by improper use or wrong
installation.
TECHNICAL ASSISTANCE SERVICE
For any installation problem please contact our Customer Service
at the number +39-0172.812411 operating Monday to Friday
from 8:30 to 12:30 and from 14:00 to 18:00.
EC DECLARATION OF INCORPORATION
FOR PARTLY COMPLETED MACHINERY
(Directive 2006/42/EC, Annex II-B)
The manufacturer V2 S.p.A., headquarters in
Corso Principi di Piemonte 65, 12035, Racconigi (CN), Italy
Under its sole responsibility hereby declares that:
the partly completed machinery model(s):
URSUS-31, URSUS-A31, URSUS-A41, URSUS-A33, URSUS-A43
Description: hydraulic actuator for gates
- is intended to be installed on gates, to create a machine
according to the provisions of the Directive 2006/42/EC.
The machinery must not be put into service until the final
machinery into which it has to be incorporated has been
declared in conformity with the provisions of the Directive
2006/42/EC and 89/106/CE.
- is compliant with the applicable essential safety requirements
of the following Directives:
Machinery Directive 2006/42/EC (annex I, chapter 1)
Low Voltage Directive 2006/95/EC.
Electromagnetic Compatibility Directive 2004/108/EC.
The relevant technical documentation is available at the national
authorities’ request after justifiable request to:
V2 S.p.A., Corso Principi di Piemonte 65, 12035,
Racconigi (CN), Italy
The person empowered to draw up the declaration and to
provide the technical documentation:
Cosimo De Falco
Legal representative of V2 S.p.A.
Racconigi, 11th January 2010

ENGLISH
14
PRELIMINARY CHECKS AND IDENTIFICATION OF THE TYPE TO BE USED
The automation device should not be used until installation, as specified in “Testing and start-up”, has been performed.
It should be remembered that the device does not compensate for defects caused by improper installation, or poor maintenance, thus,
prior to proceeding with installation, ensure that the structure is suitable and meets current standards and, if necessary, perform any
structural modifications aimed at the implementation of safety gaps and the protection or segregation of all crushing, shearing and transit
zones, and verify that:
• The gate has no friction points, either during closing or opening.
• The gate is well balanced, i.e. there is no tendency to move spontaneously when stopped in any position.
• The position identified for fixing the motor reducer allows easy and safe manual manoeuvring, compatible with the
size of the motor reducer itself.
• The gate shall be equipped with central and side stops, which are fundamental for the good system operation
•
The support on which the automation device will be fixed is solid and durable.
• The mains power supply to which the automation device is connected has a dedicated safety earthing system and
differential breaker with tripping current less than or equal to 30 mA (the breaker gap distance should be greater than
or equal to 3 mm).
Warning: The minimum safety level depends on the type of use; please refer to the following outline:
Group 1 - Only a limited number of people are authorised for use, and closure is not in a public area. Examples of this type are gates inside
business premises, where the sole users are employees, or a part of them who have been suitably informed.
Group 2 - Only a limited number of people are authorised for use, but in this case, closure is in a public area. An example of this may be a
company gate that accesses onto a public street, and which is only used by employees.
Group 3 - Anyone can use the automated closure, which is thus located on public land. For example the access gate to a supermarket or an
office, or a hospital.
Protection A - Closure is activated by means of a control button with the person present, i.e. with maintained action.
Protection B - With the person present, closure is activated by a command controlled by means of a key-switch or the like, in order to
prevent use by unauthorised persons.
Protection C - Restricts the force of the leaf of the door or gate. I.e., in the case of the gate striking an obstacle, the impact force must fall
within a curve established by the regulations.
Protection D - Devices, such as photocells, capable of detecting the presence of people or obstacles. They may be active on just one side or
on both sides of the door or gate.
Protection E - Sensitive devices, such as footboards or immaterial barriers, capable of detecting the presence of a person, and installed in
such a way that the latter cannot be struck in any way by a moving leaf or panel. These devices should be active within the entire “danger
zone” of the gate. The Machinery Directive defines “Danger Zone” as any zone surrounding and/or near machinery where the presence of
an exposed person constitutes a risk to the health and safety of that person.
The risk analysis should take into consideration all danger zones for the automation device, which should be appropriately
protected and marked.
In a clearly visible area, apply a sign with information identifying the motorised door or gate.
The installer should provide the user with all the information relating to automatic operation, emergency opening and
maintenance of the motorised door or gate.
Closure use type
T
ype of activation commands
Group 1
I
nformed people
(use in private area)
Group 2
I
nformed people
(use in public area)
Group 3
I
nformed people
(unlimited use)
Man-present command A B Not possible
Remote control and closure in view
(e.g. infrared)
C or E C or E C and D or E
Remote control and closure not in view
(e.g. radio)
C or E C and D or E C and D or E
Automatic control
(e.g. timed closure control)
C and D or E C and D or E C and D or E

ENGLISH
15
TECHNICAL DATA
URSUS-31
URSUS-A31
URSUS-A33
URSUS-A41
URSUS-A43
Max. leaf lenght m 4 6
Max. leaf weight Kg 700 700
Power supply Vac - Hz 230 - 50 230 - 50
Full load current A 1 1
Maximum Power W 230 230
Capacitor µF 10 10
Max travel mm 265 400
Operating speed m/s 0,01 0,01
Maximum thrust N 7000 7000
Working temperature °C -30 ÷ +90 -30 ÷ +90
Protection IP 65 65
Working cycle % 100 100
Motor weight Kg 9,5 11
MODEL DESCRIPTION
URSUS-31 230V - reversible for leaves up to 4 m
URSUS-A31 230V - reversible for leaves up to 4 m - shock absorber in closing
URSUS-A33 230V - irreversible for leaves up to 4 m - shock absorber in closing
URSUS-A41 230V - reversible for leaves up to 6 m - shock absorber in closing
URSUS-A43 230V - irreversible for leaves up to 6 m - shock absorber in closing
The URSUS operator is constructed to form part of a swing gate
automation system. Allows the requirements of standard
EN 12453 to be fulfilled.
I
t comprises a metal body, which contains a hydraulic pump and
a drive piston.
URSUS-A Models (with mechanical slow down)
The URSUS-A models have mechanical slow down bushing in the
piston rod, meaning the speed slows down when approaching
t
he end of the extension travel (closing travel, when the operator
is installed for inward opening), ending in a soft stop.

ENGLISH
16
INSTALLATION LAYOUT
1 URSUS actuator cable 4 x 0,75 mm
2
2 Control unit cable 3 x 1,5 mm
2
3 Flashing light with built-in antenna power supply cable 2 x 1 mm
2
- antenna cable RG58
4 Photocells cable 4 x 0,5 mm
2
(RX) - cable 2 x 0,5 mm
2
(TX)
5 Key switch cable 2 x 1 mm
2
6 Transmitter -
7 Pillar photocells cable 4 x 0,5 mm
2
(RX) - cable 2 x 0,5 mm
2
(TX)
8 Pillar-mounted digital radio switch -
9 In-ground central stop OBLIGATORY
10 Side stops OBLIGATORY
11 Electrolock OBLIGATORY in reversible models

ENGLISH
17
URSUS-31 - URSUS-A31 - URSUS-A33
A B [mm] C [mm] D [mm] E [mm]
80° 155 130 80 860
85° 140 130 80 860
90° 140 120 80 870
90° 115 145 80 845
95° 125 125 80 865
100° 120 120 80 870
110° 105 120 80 870
URSUS-41 - URSUS-A43
A B [mm] C [mm] D [mm] E [mm]
80° 250 180 80 1080
85° 235 175 80 1085
90° 200 195 80 1065
90° 235 150 80 1110
95° 220 155 80 1105
100° 175 190 80 1070
110° 190 155 80 1105
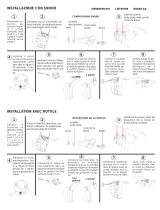
INSTALLATION MEASURES
To carry out a proper installation of the operator parts as well as to ensure the best automation performance, the measurement levels
shown in the following table shall be complied with. Change the gate structure to adapt it to one of the cases in the table, if necessary.
m WARNING: In the case of leaf longer than 2,5 metres, an electric lock must be fitted to ensure an efficent closig.
I
NWARD OPENING

ENGLISH
18
O
UTWARD OPENING
URSUS-31 - URSUS-A31 - URSUS-A33
A B [mm] C [mm] D [mm] E [mm]
80° 150 135 80 735
85° 150 125 80 735
90° 100 155 80 735
90° 130 130 80 735
95° 120 130 80 735
100° 100 135 80 735
110° 95 125 80 735
URSUS-41 - URSUS-A43
A B [mm] C [mm] D [mm] E [mm]
80° 200 235 80 870
85° 180 230 80 870
90° 165 225 80 870
90° 195 200 80 870
95° 160 215 80 870
100° 140 215 80 870
110° 140 195 80 870
INSTALLING THE OPERATOR
m The operator must work horizontally: to do this, the supports must be positioned with a height difference of 19 mm.
Check horizontality using a Spirit level.

ENGLISH
19
A) - Position the front and rear supports
1. Attach the front (1) and rear (2) supports, keeping strictly
to the dimensions shown in the previous section
m The installer should choose the support attachment
system (welding, screwing, molding, etc) in accordance
with the composition of the material to which the
supports are attached (metal, concrete, etc).
m Attach the supports on sufficiently robust
structural elements.
m IT IS VERY IMPORTANT TO RESPECT THE DIMENSIONS:
If the dimensions are not respected, the piston rod will not
make the whole travel, meaning the mechanical slow
down system will not work.
2. Weld the support brackets (3) and (4) to the
supports (1) and (2).
m Carry out the welding with the operator withdrawn
and at a distance. If not, the piston rod may become
damaged from Welding splatter, which could lead to
failures and oil leaks.
B) - Mount the ball bearing joint and the gudgeon
1. Introduce the nut (1) in the ball bearing joint (2).
2. Thread the ball bearing joint-nut set on the piston rod (3).
3. Position the gudgeon (4) in its housing in the rear end cap (5).
4. Introduce the horizontal pin (6), crossing the gudgeon and
the top.
m Horizontal pin: ø = 10mm, L = 57.2mm
5. Secure the pin using the safety washers (7).
6. Position the caps (8) to close the housing.

ENGLISH
20
C) - Mount the operator on the front support
1. Introduce the operator ball bearing joint (1) in the
front support pin (2).
2. Only models with mechanical slow down: adjust the
ball bearing joint in order to achieve the required mechanical
slow down distance.
m T
he mechanical slow down distance reduces as the ball
bearing joint is unthreaded. The mechanical slow down distance
increases as the ball bearing joint is threaded.
3. Secure the ball bearing joint using the safety washer (3).
4. Lock the safety nut (4) against the servo motor spindle.
D) - Mount the operator on the rear support
1. Introduce the gudgeon (1) in the support (2).
2. Position the vertical pin (3), crossing the orifices of
the gudgeon and of the support.
m Vertical pin: ø = 12mm, L = 37mm
3. Secure the pin using the safety washers (4).
4. Position the caps (5) to close the housing.
E) - Mount the cover and the top
1. Introduce the rods (4) through the orifices of the top (1)
and the internal cover guides (2).
2. Thread the rods in the front top of the operator (3)
and tighten firmly
3. Position the caps (5) in the holes in the top

ENGLISH
21
F) - Loosen the discharge screw
Once the operator is mounted on the supports, turn
the discharge screw (1) once to allow the correct
operation of the hydraulic system.
m If you have to dismount the operator from its
supports, first tighten the discharge screw in order to
prevent the hydraulic fluid from leaking.
G) - Mount the gland and introduce the cable
1. Introduce the cable (3) through the gland PG11 (1).
2. Position the gland in the end cap (4) and attach
using the nut PG11 (2).
MANUAL OPERATION
In the event of need, the gate may be operated manually.
In locked models, it is necessary to first run the
unlocking mechanism.
Unlock for manual operation
1. Lift the top and introduce the key (1) in the
unlocking screw (2).
2. Turn the unlocking key in any direction until it is
perpendicular to the operator piston rod.
The operator is unlocked.
3. The gate can now be moved manually.
Locking for automatic operation
1. Lift the top and introduce the key (1) in the
unlocking screw (2).
2. Turn the unlocking key in any direction until it is parallel
to the operator piston rod. The operator is locked.
3. Remove the key and close the lid.

ENGLISH
22
CONNECT THE OPERATOR TO THE
CONTROL UNIT
m Before making any electrical connections,
check the switchboard instructions manual.
1. Connect the operator to the control unit.
C common
G1 turning 1
G2 turning 2
T
earth
2. Connect the capacitor (C) in cable connectors Turn 1
and Turn 2.
m Ensure the earth cable is properly connected.
3. Connect the control unit to the power supply.
4. Activate the power power supply switch.
m Before carrying out any gate movement,
ensure there is no person or object in the radius
of action of the gate and the drive mechanisms.
5. Use the control unit pushbuttons (CLOSE/OPEN) to check the
motor connections are correct (turning direction).
Se il senso di rotazione non è giusto scambiare i cavi
G1 e G2.
6. If the turning direction is not correct,
interchange the cables G1 and G2.
POSITION THE END CAP AND TIGHTEN
THE GLAND
1. Position the end cap (1) in its housing (2) and attach
using the screws (3).
2. Tighten the gland (4) to ensure the electrical cable
input (5) is seal tight.

ENGLISH
23
ADJUST THE OPENING AND CLOSING
FORCE
m The opening and closing forces must be
adjusted to fulfil standard EN 12453:2000.
F
or both screws, clockwork rotation increases the
force. Anti-clockwork rotation reduces the force.
Do not tighten the regulation screws (2) to (3)
t
o the maximum, as this may cause damage
.
SELF LOCKING MODELS
1. Remove the caps (1) which cover the adjustment screws
2. CLOSING FORCE: yellow colour cap, screw (2).
m The "Closing force" is, more exactly, the force
during the extension of the piston rod.
- In inward opening installations, it corresponds to the
closing operation.
- In outward opening installations, it corresponds to
the opening operation
3. OPENING FORCE: white colour cap, screw (3).
m The "Opening force" is, more exactly, the force
during the retraction of the piston rod.
- In inward opening installations, it corresponds to the
opening operation.
- In outward opening installations, it corresponds to
the closing operation.
4. Regulate correctly.
5. Replace the caps (1), respecting the colours.
NONE LOCKING MODELS
1. Remove the cap (1) which covers the adjustment screws.
2. CLOSING FORCE: screw (2).
m The "Closing force" is, more exactly, the force
during the extension of the piston rod.
- In inward opening installations, it corresponds to the
closing operation.
- In outward opening installations, it corresponds to
the opening operation
3. OPENING FORCE: screw (3).
m The "Opening force" is, more exactly, the force
during the retraction of the piston rod.
- In inward opening installations, it corresponds to the
opening operation.
- In outward opening installations, it corresponds to
the closing operation.
4. Regulate correctly.
5. Replace the cap (1).

ENGLISH
24
TESTING AND START-UP
In implementing the automation device, these are the most
important steps for guaranteeing maximum safety.
V2 recommends the application of the following technical
standards:
• EN 12445 (Safety in the use of automated closures, test
methods)
• EN 12453 (Safety in the use of automated closures,
requirements)
•
EN 60204–1 (Safety of Machinery, electrical equipment of
machines, part 1: general principles)
In particular, with reference to the table in the section
“
PRELIMINARY CHECKS and IDENTIFICATION OF THE TYPE OF
USE” in the majority of cases, it will be necessary to measure the
impact force, in accordance with the provisions of EN 12445.
T
he impact force profile should be measured using an appropriate
device (itself also certified and subjected to annual calibration)
capable of tracing the force-time graph.
The result should be in compliance with the following maximum
values:
For a comprehensive guide on the installation of automation
devices and the documentation to be prepared, we recommend
use of the guides issued by the Italian association UNAC,
obtainable from www.v2home.com
MAINTENANCE
m Before carrying out any maintenance operation,
disconnect the device from the power supply.
m If you have to dismount the operator from its
s
upports, first tighten the discharge screw in order to
prevent the hydraulic fluid from leaking.
Maintenance should be performed in full compliance with the
s
afety instructions described in this manual and in accordance
with current legal and regulatory provisions.
The recommended interval between each maintenance operation
is six months, the checks involved should at least relate to:
•
the perfect efficiency of all warning devices
• the perfect efficiency of all safety devices
• measurement of the gate operating forces
• the lubrication of mechanical parts on the automation device
(where necessary)
• the state of wear of the mechanical parts on the automation
device
• the state of wear of the electrical cables on the
electromechanical actuators
The result of each check should be recorded in a gate
maintenance log.
DISPOSAL OF THE PRODUCT
As for the installation operations, even at the end of this
product’s life span, the dismantling operations must be carried
out by qualified experts.
This product is made up of various types of materials: some can
be recycled while others need to be disposed of. Find out about
the recycling or disposal systems envisaged by your local
regulations for this product category.
Important! – Parts of the product could contain pollutants
or hazardous substances which, if released into the
environment, could cause harmful effects to the
environment itself as well as to human health.
As indicated by the symbol opposite, throwing away this product
as domestic waste is strictly forbidden. So dispose of it as
differentiated waste, in accordance with your local regulations, or
return the product to the retailer when you purchase a new
equivalent product.
Important! – the local applicable regulations may envisage
heavy sanctions in the event of illegal disposal of this
product.
Dynamic
IMPACT force
Static CRUSHING
force
Time
Force
/