Page is loading ...

III
EN
III
These precautions are an integral and essential part of the product and must be supplied to the user.
Read them carefully since they contain important information on safe installation, use and maintenance.
These instructions must be kept and forwarded to all possible future users of the system.
This product must only be used for the specific purpose for which it was designed.
Any other use is to be considered improper and therefore dangerous.
The manufacturer cannot be held responsible for any damage caused by improper, incorrect or unreasonable use.
Avoid operating in the proximity of the hinges or moving mechanical parts.
Do not enter within the operating range of the motorised door or gate while it is moving.
Do not obstruct the motion of the motorised door or gate, as this may cause a dangerous situation.
The motorised door or gate may be used by children over the age of 8 and by people with reduced physical, sensorial or
mental abilities, or lack of experience or knowledge, as long as they are properly supervised or have been instructed in the
safe use of the device and the relative hazards.
Children must be supervised to make sure they do not play with the device, nor play/remain in the sphere of action of the
motorised door or gate.
Keep remote controls and/or any other command devices out of the reach of children, to avoid any accidental activation of
the motorised door or gate.
In the event of a product fault or malfunction, turn off the power supply switch. Do not attempt to repair or intervene directly,
and contact only qualified personnel.
Failure to comply with the above may cause a dangerous situation.
Any repair or technical intervention must be carried out by qualified personnel.
Cleaning and maintenance work must be carried out by qualified personnel.
To ensure that the system works efficiently and correctly, the manufacturer’s indications must be complied with and only
qualified personnel must perform routine maintenance on the motorised door or gate. In particular, regular checks are recom-
mended in order to verify that the safety devices are operating correctly.
All installation, maintenance and repair work must be documented and made available to the user.
Only lock and release the door wings when the motor is switched off.
The product may only be uninstalled by qualified technical personnel, following suitable procedures for removing the
product correctly and safely. This product consists of numerous different materials. Some of these materials may be
recycled, while others must be disposed of correctly at the specific recycling or waste management facilities indi-
cated by local legislation applicable for this category of product.
Do not dispose of this product as domestic refuse. Observe local legislation for differentiated refuse collection, or
hand the product over to the vendor when purchasing an equivalent new product. Local legislation may envisage se-
vere fines for the incorrect disposal of this product.
Warning! Some parts of this product may contain substances that are harmful to the environment or dangerous and which
may cause damage to the environment or health risks if disposed of incorrectly.
General safety precautions for the user

VIII
IT
ATTENZIONE: eseguire le operazioni di sblocco e blocco anta in assenza di tensione di rete e con motore fermo.
SBLOCCO E FUNZIONAMENTO MANUALE
Ruotare lo sportellino copriserratura come indicato al punto 1.
Inserire e ruotare la chiave in dotazione di 90° in senso orario, come indicato al punto 2.
Aprire completamente lo sportello di sblocco, come indicato al punto 3.
Movimentare a mano l’anta.
RIPRISTINO DEL FUNZIONAMENTO AUTOMATICO
Per ribloccare le ante richiudere lo sportello di sblocco ruotando la chiave di 90° in senso orario, facendo attenzione alle dita.
Con sportello chiuso, ruotare la chiave di 90° in senso antiorario.
Estrarre la chiave e chiudere lo sportellino copriserratura.
Ridare tensione di rete.
Dopo una interruzione di tensione o dopo lo sblocco manuale, se non è completamente aperto o completamente chiuso, al ricevimento di un comando, il
cancello inizia a muoversi a bassa velocità. Il lampeggiante si accende e si spegne con una frequenza diversa dal solito funzionamento.
ATTENZIONE! NON DARE COMANDI IN QUESTA FASE! LA PROCEDURA DI RECUPERO IMPIEGHERÀ QUALCHE MINUTO A COMPLETARSI.
Tutti i diritti relativi alla presente pubblicazione sono di proprietà esclusiva di ROGER TECHNOLOGY.
ROGER TECHNOLOGY si riserva il diritto di apportare eventuali modifiche senza preavviso. Copie, scansioni, ritocchi o modifiche sono espressamente vietate senza un preventivo consenso
scritto di ROGER TECHNOLOGY.
EN
WARNING: only perform the gate leaf release and lock procedures with the unit disconnected from mains and with
the motor at a standstill.
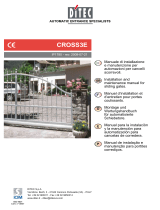
RELEASE AND MANUAL OPERATION
Flip open the lock cover as indicated in step 1.
Insert the key included into the lock and turn clockwise by 90°, as indicated in step 2.
Open the release cover completely, as indicated in step 3.
Move the leaves manually.
RESTORING AUTOMATIC OPERATION
To lock the gate leaf again, lower the release cover with the key inserted, taking care not to trap your fingers.
Turn the key anticlockwise by 90°.
Remove the key and close the lock cover.
Reconnect to mains electricity.
After a mains power outage or after mechanically releasing, if the gate is not completely open or completely closed the next time a command is received, it
starts a low speed manoeuvre.The flashing light flashes with a different duty cycle than normal.
WARNING! DURING THIS PROCEDURE, DO NOT USE ANY CONTROLS. THE PROCEDURE WILL TAKE A FEW MINUTES TO COMPLETE.
ROGER TECHNOLOGY is the exclusive proprietor holder of all rights regarding this publication.
ROGER TECHNOLOGY reserves the right to implement any modifications without prior notification. Copying, scanning or any alterations to this document are prohibited without express
prior authorised from by ROGER TECHNOLOGY.
FIG. 1 FIG. 2
2
1
3
Manovra di sblocco manuale • Manual release • Manuelle Entriegelung

XI
Timbro installatore / Installer’s stamp / Stempel des Installateurs / Cachet
installateur / Sello instalador / Carimbo do instalador
Operatore / Operator / Bediener / Opérateur / Operador / Operador
Data intervento / Date of intervention / Datum des Eingriffs / Date intervention / Fecha intervención / Data da intervenção
Firma tecnico / Technician’s signature / Unterschrift des Technikers / Signature technicien / Firma técnico / Assinatura do
técnico
Firma committente / Customer’s signature / Unterschrift des Auftraggebers / Signature client / Firma ordenante / Assinatura
do comitente
Intervento effettuato / Intervention performed / Eingriff / Intervention / Intervención / Intervenção
Manutenzione • Maintenance • Wartungsplan • Entretien • Mantenimiento • Manutenção
/