Page is loading ...

OVERVIEW
The RO Buddie uses replaceable Sediment, Carbon
and RO Membrane cartridges. The Sediment and
Carbon cartridges are self-contained pre-filters that
remove particulate matter and some compounds
found in the water supply, including chlorine.
The RO Membrane is located in the center canister,
separating the water into a more purified water
and a concentrated waste water.
PARTS LIST
Micron Cartridge
Carbon Cartridge
RO Unit Housing with Mounting Brackets
and Screws
Canister Cap Wrench
Faucet Adapter
¼" Tubing
Reverse Osmosis Membrane
Installation & Maintenance Guide
www.aquaticlife.com
RO Buddie
®
Installation
& Maintenance Guide
Visit www.AquaticLife.com
for helpful videos.
TIP FOR AQUARIUM OWNERS:
Using the RO Buddie to top off evaporation or for
makeup water will significantly reduce the amount
of impurities going into your aquarium. Reduction
of impurities in your water should greatly increase
your success.
WARNING:
Please read carefully before proceeding with
installation. Failure to follow these instructions or
operating parameters may lead to the product’s
failure and possible property damage.
10
REPLACEMENT PARTS
DIAGRAM
NUMBER
ITEM
NUMBER
PART DESCRIPTION
1 9000345 Cap Membrane
2 9000474 Gasket - Cap Membrane
3 9000703 Flow Restrictor
4 9000705 Bracket - Membrane to Cartridge (2 PK)
5 9000706 Bracket - Wall Mount (2 PK)
6 500255 Fitting Press Fit Elbow w Clip (6 PK)
7 500258 Fitting Press Fit Straight w/Clip (7 PK)
8 500297 Tubing Blue 1/4 IN. (50 FT.)
9 500259 Faucet Adapter (2 PK)
10 9000352 Wrench - Membrane Cap
2
6
7
8
1
3
4
5
9

2
1
www.aquaticlife.com
INSTALLATION
The RO Buddie uses replaceable Sediment, Carbon and RO Membrane
cartridges. The Sediment and the Carbon Cartridges are self-contained.
The RO Membrane is located in the center canister and will need to be
installed.
1. Mount the RO Buddie to a solid surface using the two
brackets included. A set of screws have been included,
but depending on the mounting surface different screws
may be required.
2. Remove the shipping plugs from the supply water,
filtered water and waste water connectors.
3. Connect the Faucet Adapter to a cold water supply such as a
standard threaded utility sink or garden hose.
Remove the blue clip from the Faucet Adapter and insert the
supplied ¼” tubing. Replace the blue clip to secure the tubing.
Cut the tubing so that it will reach the supply water connector
on the RO Buddie (labeled).
4. Connect the tubing to the supply water connection on the
RO Buddie. Remove the blue clip, insert the tubing and
reattach the blue clip. Water supply is now setup.
5. Remove the blue clips from the Filtered Water connector
(labeled) and the Waste Water connector (labeled).
Insert a piece of the tubing to the Filtered Water connector and
cut the tubing to the desired length. Insert a piece of the tubing
to the Waste Water connector and cut the tubing so that it
reaches the drain. Replace the blue clips on the connectors.
IMPORTANT:
Review the section titled How to Use the Buddie Fit
™
Press Fittings (pg. 4) before continuing installation.
NOTE: We recommend cutting the tubing with a
razor blade or something similar so the tubing is not
pinched. If the tubing is pinched, it will not seal properly.
All tubing connections will have a “double push” into the
Connectors. You should feel a two-step insert to verify the
tubing is inserted completely into the connectors.
RO Buddie
®
Installation
& Maintenance Guide
Remove
Plugs
Mounting
Brackets
Supply
Water
Waste
Water
Filtered
Water

3
8
9
✓
Correct
✗
Incorrect
www.aquaticlife.com
RO Buddie
®
Installation
& Maintenance Guide
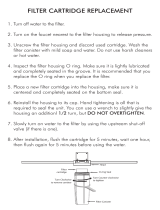
6. With both filtered water and waste water lines in the drain, turn on
the water supply. This will flush the filter cartridges prior to installing
the membrane and extend the membrane life. Flush for 5 minutes
until the water is clear coming from the filtered water line and the
waste water line.
7. After the water runs clear, turn off the water supply and allow
the RO Buddie to drain.
8. Remove the tubing attached to the elbow fitting on top of the
RO membrane, remove the blue clip, depress the collet around
the tubing and remove the tubing.
9. Unscrew the membrane housing lid from the membrane housing.
Remove the membrane from the plastic bag and insert the
membrane into the membrane housing. The membrane should
be inserted so that the top of the plastic pipe in the membrane
is flush with the top of the membrane housing.
10. Replace the membrane housing lid and tighten with the supplied
wrench. Reattach the tubing and replace the blue clip to secure
the tubing to the elbow connection on the membrane housing.
11. Run the RO Buddie for 30 minutes to remove the preservative
from the membrane.
NOTE: If you are using a DI resin filter cartridge, install it
after flushing the membrane. This will prevent exhaustion
of the resin during the membrane flushing.
Reverse Osmosis technology alone cannot eliminate
unusually high concentrations of individual components.
Examples include high levels of silica and nitrate. To remove
residual dissolved solids from the reverse osmosis water,
an additional deionization filter can be utilized.
Remove
Blue Clip
Pull Out
Tubing
Push In
Collet

4
1
3
4
5
2
✓
Correct
✗
Incorrect
www.aquaticlife.com
How to Use the Buddie Fit ™ Press Fittings
Making the connections with the ¼” tubing is easy with the
Buddie Fit™ press fittings included.
To properly connect the ¼" tubing to the press fittings, follow
these simple steps:
1. Remove the blue clip from the press fitting.
2. Make sure the end of the tubing is cut evenly and not at an angle.
3. Push the tubing into the fitting. You will hit the first stop.
The tubing is still not secured properly. Push the tubing a
second time and you will feel the tubing insert completely
into the press fitting.
4. Pull back on the tubing to ensure it is secure.
5. Insert the locking blue clip back onto the end of the press fitting.
RO Buddie
®
Installation
& Maintenance Guide
NOTE: To remove a piece of tubing, remove the blue clip
and press down on the collet where the tubing enters the
fitting. While the collet is depressed, remove the tubing from
the fitting.
Collet
Tubing
Collet Flange
O-ring
Blue
Clip
Tubing
Push 2x
Tubing
Pull
Blue
Clip

5
www.aquaticlife.com
RO Buddie
®
Installation
& Maintenance Guide
TROUBLESHOOTING
• Leaks at the threaded connection: If once installed the
system should leak, use plumbers tape on the threaded
fitting. Typically, no more than three wraps will be
required to seal the connection.
• Leaks at the tubing connections: The fittings on the
RO Buddie use an O-ring inside of them. This will require
the tubing to be inserted past the O-ring. You will want
to make sure that when inserting the tubing you feel the
initial stop when the tubing first meets the O-ring and
a second stop when you push past the O-ring and meet
the end inside the fitting. This is what we call the “double
push”. Also, make sure to cut the tubing with a razor or
similar object so that the tubing is not pinched and
causes the tubing to not seal properly.
• No water production: Make sure the water supply is
turned OFF. Remove the tubing from the elbow on top
of the membrane housing, direct the tubing into a
container and turn on the water. Does the water flow
quickly through the cartridges? If not, the cartridges
likely need to be changed.
• Low filtered water production: The RO membrane is
rated to produce the stated volume of water based on
60 PSI and a 77° F water supply. If you have one or both
of the specifications out of tolerance use the
Temperature and Pressure correction factors above.
RO BUDDIE FILTER BASICS –
CARTRIDGE REPLACEMENTS
The membrane does the majority of the work by removing
up to 95% of the TDS from your water. The other two included
filters protect the membrane from the many malicious
elements that shorten its life. The sediment cartridge removes
suspended particles larger than 1 micron (15 times smaller than
a mold spore). The carbon block removes chlorine. Timely
replacement of the cartridges will increase the membrane's life.
The carbon cartridge is the most important cartridge to
change frequently. The carbon cartridge can filter about 1500
gallons of water before being replaced IF your chlorine level is
1 ppm. With a 2 ppm you should get 750 gallons of filtered
water before needing to change, with a 3 ppm you should get
500 gallons, and so on. Any chlorine not absorbed by a spent
carbon cartridge will break down your membrane, thus greatly
shortening its life.
The 1500 gallon threshold is TOTAL water that passes through
the unit. The RO Buddie has an average rejection ratio of 1:4.5.
That means for every 1 gallon of good water produced you will
reject 4.5 gallons for a total of 5.5 gallons of water passed
through the system. At 1 ppm of chlorine, you can make about
360 gallons of good water before changing the carbon
cartridge, 2 ppm you can make about 180 gallons, 3 ppm you
can make about 120 gallons, and so on.
When the sediment cartridge needs to be changed, the
production of water will reduce. Even with reduced water
production, the cartridge will not allow anything larger than
one micron to pass through the chamber. On average the
sediment cartridge should be changed at every other carbon
change.
With proper filter changes, the membrane could last up to two
years. That is if there is not anything in the water that can get
past both the sediment and the carbon cartridges. Remember,
water quality is the main X factor in the longevity of the
cartridges.
The membrane’s water production rating is based on 77 deg F
water at 60 PSI. Any deviation from this will affect the water
production. Reference the conversion table at right. You will
notice that the warmer the water, the better the production.
It is not advised that you introduce water from your water
heater in an effort to increase water temperature. The
membrane cannot handle temps over 100 deg F and most
water heaters have sediments in their reservoirs that can
damage the filters or membrane.
The optional color changing mixed bed resin DI Cartridge
will absorb the remaining TDS not filtered by the membrane.
By adding a DI Cartridge to the RO Buddie, you can produce
zero TDS water. When mixed bed resin is dry, it is a blue green
color. When it gets wet it will change a dark blue color. When
the medium is spent it will change to a light brownish tan color.
Temperature Correction
Temperature F/C Correction Factor
50/10 0.58
60/16 0.73
70/21 0.87
77/25 1.00
80/27 1.06
90/32 1.23
100/38 1.45
Pressure Correction
Pressure PSI Correction
10 0.17
20 0.33
30 0.5
40 0.67
50 0.83
60 1
70 1.17
80 1.33

6
www.aquaticlife.com
WARRANTY
Lifetime Products LLC warrants that this Filtration Unit (excluding cartridges) shall be free from
defective components and leaks or cracks due to defects in materials or workmanship for a period of
one (1) year from the date of purchase. If a defect is shown, Lifetime Products LLC will, at Lifetime
Product’s sole discretion, either repair or replace the product without charge. No cash refunds will be
made. This warranty is provided solely to the original consumer purchaser of the product and may not
be transferred or assigned. If Lifetime Products chooses to replace the equipment, Lifetime Products
may replace it with reconditioned equipment. Parts used in repairing or replacing the equipment will
be warranted for 90 days from the date the equipment is returned to you or the remainder of the
original warranty period, whichever is longer.
This warranty does not apply to damage resulting from accident, misuse, abuse, lack of reasonable
care, failure to follow safety and installation instructions.
This warranty will be void if defects occur due to failure to observe the following conditions:
• The RO Buddie should only be connected to a potable municipal or well cold water supply.
• Incoming water to the RO cannot exceed 100°F.
• Incoming water pressure must be between 40 and 80 PSI.
• Incoming water pH must not be lower than 2 or higher than 11.
• Incoming water iron content must be less than 0.2 ppm.
• Incoming water hardness must not exceed 10 grains per gallon or 170 ppm.
This warranty will not be effective unless and until the Aquatic Life product is shown to have been
used in accordance with the installation and maintenance instructions accompanying the product.
THIS CONSTITUTES LIFETIME PRODUCTS ENTIRE WARRANTY AND LIFETIME PRODUCTS
MAKES NO OTHER WARRANTIES, WHETHER EXPRESS OR IMPLIED, WITH RESPECT TO THE
PRODUCT. LIFETIME PRODUCTS, LLC SPECIFICALLY DISCLAIMS ANY AND ALL IMPLIED
WARRANTIES, INCLUDING, WITHOUT LIMITATION, WARRANTIES OF MERCHANTABILITY AND
FITNESS FOR A PARTICULAR PURPOSE. IF LIFETIME PRODUCTS, LLC CANNOT LAWFULLY
DISCLAIM IMPLIED WARRANTIES UNDER THIS LIMITED WARRANTY, ALL SUCH
WARRANTIES, INCLUDING WARRANTIES OF MERCHANTABILITY AND FITNESS FOR A
PARTICULAR PURPOSE ARE LIMITED IN DURATION TO THE DURATION OF THIS WARRANTY.
LIFETIME PRODUCTS IS NOT RESPONSIBLE FOR DIRECT, SPECIAL, INCIDENTAL OR
CONSEQUENTIAL DAMAGES RESULTING FROM ANY BREACH OF WARRANTY OR
CONDITION, OR UNDER ANY OTHER LEGAL THEORY. LIFETIME PRODUCTS, LLC EXPRESSLY
DISCLAIMS ALL ALLEGED DAMAGES FOR LOSS OF MARINE LIFE, PERSONAL INJURY,
AND/OR PROPERTY DAMAGE.
Some states and provinces do not allow the exclusion or limitation of incidental or consequential
damages or exclusions or limitations on the duration of implied warranties or conditions, so the above
limitations or exclusions may not apply to you. This warranty gives you specific legal rights, and you
may also have other rights that vary by state or province.
Lifetime Products, LLC shall not have any obligations under this warranty unless the owner notifies
Lifetime Products, LLC in writing of any alleged defect(s) within 30 days of discovery of the defect(s).
Any notice to Lifetime Products, LLC must be delivered by United States or electronic mail to the
following address: U.S. Mail: Lifetime Products, LLC, 9710 Klingerman St., S. El Monte, CA 91733 or
electronic mail: customersupport@aquaticlife.com. Lifetime Products shall be allowed a reasonable
period of time to investigate any warranty claim and to perform any testing Lifetime Products deems
necessary to determine the cause of the defect. This warranty shall be interpreted under the laws of
the State of California.
.
USE & CARE
• Use care not to over tighten the threaded connections –
in particular the elbow connections.
• The RO Buddie should only be connected to a cold water
supply. The optimal water temperature is 77°F. Using
other water temperatures will diminish the effectiveness
of the filtration and can accelerate degradation of the
membrane.
• DO NOT leave the RO Buddie unattended during use.
RO BUDDIE STORAGE
If the RO Buddie will not be active for more than two
weeks, we recommend you remove the membrane and
store it in the refrigerator in a sealed bag with a small
amount of purified water. This will preserve the membrane
for longer periods of time.
RO Buddie
®
Installation
& Maintenance Guide
Additional Purchase Considerations
Item # Description
330249 Sediment Cartridge
330250 Carbon Cartridge
330084 50 GPD Membrane
330093 100 GPD Membrane
500297 50 FT. Blue Tubing
500298 50 FT. Red Tubing
500299 50 FT. Yellow Tubing
500300 Float Valve Kit 1/4 IN.
330242
DI Color Changing Mixed Bed Resin
Cartridge (21CU.IN.)
330283
KDF 85/Catalytic GAC Cartridge –
Chloramine filtration
/