Page is loading ...

THANK YOU for your purchase of the Aquatic Life RO Daddy.
With proper installation and maintenance, this system will provide
you with high quality water for many years. All Aquatic Life
products are tested by us to ensure safety and reliability.
Aquatic Life assumes No Responsibility for water damage
due to leaks. It is the user’s responsibility to ensure the system is
leak-free. If you have any questions or concerns, please contact
our customer support department at 1-888-548-3480
Monday-Friday, 8:00 AM – 4:00 PM Pacific Time or by e-mail
at customersupport@aquaticlife.com.
PARTS LIST
Filter Housing
Filter Cartridges
• Micron
• GAC (Granular Activated Carbon)
• Solid Carbon Block
Tubing
Flush Valve Assembly
Membrane 1,000 GPD (77°F, 65 PSI, 100 TDS)
Pressure Gauge
Canister Wrench
www.aquaticlife.com
RO Daddy
™
Instruction Guide
Visit www.AquaticLife.com
for helpful videos.
WARNING:
Please read carefully before proceeding with installation.
Failure to follow these instructions or operating parameters
may lead to the product’s failure and possible property damage.

INITIAL SET-UP
Your RO Daddy utilizes a metal frame to securely support the
membrane and three large (blue) canisters securely. The frame
can be secured to a wall so that it cannot move easily but it
should NOT be suspended by the frame. The weight of the unit
without water is 75 pounds, when water is added it will exceed
110 pounds, and the frame cannot support the weight if suspended.
The RO Daddy is shipped with the membrane already installed.
This was done to reduce the initial setup time for the unit.
Three filter cartridges are included with the RO Daddy. Each
cartridge is wrapped with a clear protective film that needs to be
removed prior to use. Use the canister wrench to remove the
blue canisters and access the cartridges.
CANISTERS AND CARTRIDGES
After the protective film has been removed from the cartridges
they should be installed in the following locations.
RIGHT - Micron cartridge should be located in the right side
canister; this cartridge is the all-white fiber cartridge.
MIDDLE - GAC cartridge should be located in the center
canister; this cartridge is made with a solid plastic housing
with a top and bottom cap.
NOTE: This cartridge needs to be installed in the proper
manner; it will have a sticker on the film indicating which
end is up.
LEFT - Solid carbon block should be located in the left
canister; it has webbing around it and has a solid feel.
The solid carbon block does not have any specific
orientation in the canister.
When replacing the canisters with the cartridges, make sure the
O-rings are located around the top of each canister. The O-rings
are shipped with a sealing lubricant, but additional can be
applied. The canisters should only require hand tightening but if
during operation you find small leaks, the wrench can be used.
www.aquaticlife.com
RO Daddy
™
Instruction Guide
NOTE: If the canister has a strong leak,
STOP the water flow and check the
O-ring to make sure it is in place.
If the O-ring slipped off the lip of the
canister, re-install the O-ring.

3
www.aquaticlife.com
RO Daddy
™
Instruction Guide
MEMBRANE CONNECTION
The RO Daddy is shipped with a U – shaped connection that
needs to be installed.
This connection allows the pre-filtered water from the canisters
to flow into the membrane housing.
CONNECTING THE WASTE WATER LINE
AND FLUSH VALVE ASSEMBLY
➊
Locate the waste water connection on the right side
of the membrane housing. It should be labeled waste
and the elbow will be threaded directly into the
membrane housing.
➋ Connect the tubing into the elbow by removing the clip
located around the collar of the elbow. A small screwdriver
helps to remove the clip. When the clip is removed, insert
the tubing into the elbow. You MUST make sure the tubing
is pressed into the fitting far enough to secure the tube.
You should feel a “Double Push” into the fitting this is a
result of the tube pushing past the seal in the connector.
➌ The flush valve assembly should now be connected to
the tubing that was just attached to the waste water side
of the membrane housing. The flush valve assembly
includes the flow restrictor and regulates the amount
of water that passes through the assembly. The flush valve
assembly also includes a bypass valve that allows water
to flow around the flow restrictor and flow faster through
the membrane. This “flushes” the membrane of buildup
and increases the life of the membrane. The membrane
should be flushed at least once a month or more if needed.
FilteredFiltered
Waste
Waste

4
www.aquaticlife.com
FILTERED WATER CONNECTION
➊
The filtered water line is connected to the center elbow
fitting on the right side of the membrane housing. The male
connector will insert into the supplied elbow included with
the parts bag. The elbow will have a “filtered” sticker on it;
you will need to remove the clip on the side to be inserted
into the membrane fitting.
➋ Connect the tubing into the elbow by removing the clip
located around the collar of the elbow. A small screwdriver
helps to remove the clip. When the clip is removed, insert
the tubing into the elbow. You MUST make sure the tubing
is pressed into the fitting far enough to secure the tube.
You should feel a “Double Push” into the fitting this is a
result of the tube pushing past the seal in the connector.
Once inserted, replace the clips to secure the elbow and
tubing to the membrane housing.
SUPPLY WATER CONNECTION
➊
The RO Daddy uses a ¾” slip PVC connection to allow for
multiple connection options. Wrap the ¾” male threaded
connection with plumber’s Teflon tape prior to inserting
into the threaded female connection on the side of the
canister housing.
➋ Rotate the connection into the canister until it becomes
hand tight. Position the ¼” tubing adapter toward the back
of the filter so that the pressure gauge tubing can be
connected to the fitting. Remove the clip from the ¼” fitting
and insert the elbow fitting until secure. Reinstall the clip
to prevent accidental removal.
➌ The ¾” supply elbow can now be plumbed to the
supply water.
NOTE: The operating pressure required for
the filter ranges between (55 PSI – 80 PSI)
any pressure supplied to the RO Daddy
that is below this will result in minimal
water production and any pressures above
80 PSI MUST be avoided as the canisters
are not designed to handle pressure above
80 PSI.
NOTE: The initial water production
from the RO unit should be discarded.
The membrane is shipped with a preservative
that should be flushed out prior to use.
We recommend operating the unit for
one hour prior to using the filtered water
production.
RO Daddy
™
Instruction Guide
FilteredFiltered
Waste
Waste

5
www.aquaticlife.com
MEMBRANE REPLACEMENT
With proper use and flushing, the membrane should last 12
months or more. Membrane life depends on the water supply,
maintenance of the filter cartridges and how often the
membrane is flushed to prevent build up.
➊ To replace the membrane, loosen the membrane strap
bolt on the left side of the membrane housing. The strap
screw can be loosened by pressing down on the membrane
housing and reversing the screw to release tension on the
strap. As the tension decreases the membrane housing
will start to relax, making it easier to remove the screw.
The screw DOES NOT need to be completely removed.
➋ Remove the U-shaped connection between the filter
canisters and the membrane housing. Refer to the
membrane connection section referenced previously.
This will allow the membrane housing to be lifted up
to remove the membrane clamps located at the ends
of the membrane housing.
➌ Completely remove the bolts, nuts and washers located
on the front and back sides of the membrane clamps.
The top section of the clamp will lift off easily; the bottom
clamp will require the membrane housing to be lifted up
slightly so that the bottom clamp can be removed.
➍ With both clamps removed, the black membrane plug can
be removed. The plug has two O-rings and it will take some
force to remove the plug. Take care to not damage the plug
and the O-rings located on the inside.
RO Daddy
™
Instruction Guide

6
www.aquaticlife.com
RO Daddy
™
Instruction Guide
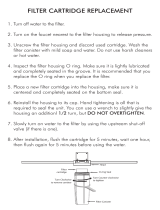
MEMBRANE REPLACEMENT (CONT.)
➎
When the plug is removed, the membrane
located inside the housing is visible. Pull the
membrane out of the housing and replace
with the new membrane.
➏ Reinstall the membrane housing plug.
➐ Install the membrane clamps, secure the
membrane housing strap and replace the
U-Shaped connection between the filter
canisters and the membrane housing.
CARTRIDGE REPLACEMENT - MAINTENANCE
The cartridges should be monitored and logged for best
performance. It is extremely important that you do not run
chlorinated water though the membrane as it will damage the
membrane and cause the filtered water quality to deteriorate.
Micron Cartridge – This mechanical filter removes
particulates only and will not reduce the chlorine levels
in the supply water. The cartridge should be changed
when it either visually looks dirty or if water
production decreases.
Granular Activated Carbon (GAC) Cartridge –
This chemical filter removes approximately 1ppm of
chlorine from the supply water for approximately
15,000 total gallons. If the supply water has 2 ppm
of chlorine, it will filter up to 7,500 gallons total.
Solid Carbon Block Cartridge – This second stage
chemical filter is comprised of compressed carbon
ground into small particles and held together with
a fine mesh. The small size carbon effectively
removes approximately 1ppm of chlorine up to
15,000 total gallons.
Item # Description UPC
330323
Cartridge 20" x 4.5"
810957013233
1 Micron Pre-filter
330324
Cartridge 20" x 4.5"
810957013240
Solid Carbon Block Pre-filter
330325 Cartridge 20" x 4.5" GAC 810957013257
330327 Membrane TFC 1000 GPD 810957013271
NOTE: Observe the water flow direction for
the membrane. The water should flow from
the left side of the membrane housing to the
right side of the housing. The membrane
may indicate the water flow and should have
a gasket or O-ring around the left side of the
membrane. This gasket seals the membrane
inside the housing and prevents water from
bypassing the membrane and into the waste
water stream.
NOTE: The initial water production
from the RO unit should be discarded.
The membrane is shipped with a
preservative that should be flushed out
prior to use. We recommend operating
the unit for one hour prior to using the
filtered water production.
TIP: Use a sealing lubricant on the O-rings
to help prevent leaks and aid with future
removal of the membrane housing plug.
WARNING:
The volume of water that the cartridge will filter must be
calculated to include both the filtered water volume and
the waste water volumes. If you produce a 1,000
gallons of filtered water and use the included flow
restrictor, you produced 1,800 gallons of waste water
for a combined total of 2,800 gallons of filtered
through the cartridges.
It is a good idea to calculate how often you should
change the cartridges based on water production
usage. It is much more cost effective to replace the
cartridges compared to a new membrane.

7
P/N 9000779 03-2014
www.aquaticlife.com
RO Daddy
™
Instruction Guide
CONSIDERATIONS
• Operating pressure less than 55 PSI
may require a booster pump.
• Operating pressure greater than 80 PSI
may require a pressure regulator.
• With initial operation, check for leaks.
If a leak is observed, verify that the tubing
is pushed into the push-fitting far enough
to seal the tubing against the O-ring and
that the canisters and caps are sealed
properly with their O-rings.
• Many of the components in the RO Daddy
are plastic and subject to damage by
ultraviolet light.
• Never store or operate the unit in direct
sunlight or other bright lights.
• Do not store or operate the unit in
temperatures above 100°F.
• Do not store or operate the unit in
freezing temperatures.
• Do not leave the unit unattended while
connected to a water supply.
WARRANTY
Aquatic Life, LLC warrants that this Reverse Osmosis Unit (excluding cartridges and membrane) shall be free from defective electrical components and leaks or cracks due to defects in materials or
workmanship for a period of twelve (12) months from the date of purchase. If a defect is shown, Aquatic Life, LLC will, at Aquatic Life’s sole discretion, either repair or replace the product without charge.
No cash refunds will be made. This warranty is provided solely to the original consumer purchaser of the product and may not be transferred or assigned.
This warranty does not apply to damage resulting from accident, misuse, abuse, lack of reasonable care, failure to follow safety and installation instructions. This warranty will not be effective unless and
until the Aquatic Life product is shown to have been used in accordance with the safety and installation instructions accompanying the product.
THIS CONSTITUTES AQUATIC LIFE’S ENTIRE WARRANTY AND AQUATIC LIFE MAKES NO OTHER WARRANTIES, WHETHER EXPRESS OR IMPLIED, WITH RESPECT TO THE PRODUCT.
AQUATIC LIFE, LLC SPECIFICALLY DISCLAIMS ANY AND ALL IMPLIED WARRANTIES, INCLUDING, WITHOUT LIMITATION, WARRANTIES OF MERCHANTABILITY AND FITNESS FOR A
PARTICULAR PURPOSE. IF AQUATIC LIFE, LLC CANNOT LAWFULLY DISCLAIM IMPLIED WARRANTIES UNDER THIS LIMITED WARRANTY, ALL SUCH WARRANTIES, INCLUDING
WARRANTIES OF MERCHANTABILITY AND FITNESS FOR A PARTICULAR PURPOSE ARE LIMITED IN DURATION TO THE DURATION OF THIS WARRANTY.
AQUATIC LIFE IS NOT RESPONSIBLE FOR DIRECT, SPECIAL, INCIDENTAL OR CONSEQUENTIAL DAMAGES RESULTING FROM ANY BREACH OF WARRANTY OR CONDITION, OR UNDER
ANY OTHER LEGAL THEORY. AQUATIC LIFE, LLC EXPRESSLY DISCLAIMS ALL ALLEGED DAMAGES FOR LOSS OF MARINE LIFE, PERSONAL INJURY, AND/OR PROPERTY DAMAGE.
Some states and provinces do not allow the exclusion or limitation of incidental or consequential damages or exclusions or limitations on the duration of implied warranties or conditions, so the above
limitations or exclusions may not apply to you. This warranty gives you specific legal rights, and you may also have other rights that vary by state or province.
Aquatic Life, LLC shall not have any obligations under this warranty unless the owner notifies Aquatic Life, LLC in writing of any alleged defect(s) within 30 days of discovery of the defect(s). Any notice to
Aquatic Life, LLC must be delivered by United States or electronic mail to the following address: U.S. Mail: Aquatic Life, LLC, 2416 W. Victory Blvd, #136, Burbank, CA 91506 or electronic mail:
customersupport@aquaticlife.com. Aquatic Life, LLC shall be allowed a reasonable period of time to investigate any warranty claim and to perform any testing Aquatic Life, LLC deems necessary to
determine the cause of the defect. This warranty shall be interpreted under the laws of the State of California.
/