Page is loading ...

Skywave - 1
INSTRUCTION MANUEL • GEBRUIKSAANWIJZING • INSTRUCTIONS DE MONTAGE • ANLEITUNG
T0351
WARNING ! This R/C kit and the model
you will build is not a toy.
LET OP ! Deze bouwdoos van een
radiobestuurd vliegtuig is geen
speelgoed.
ATTENTION ! Ce kit d’avion R/C n’est
pas un jouet.
ACHTUNG ! Dieser Bausatz von
ferngesteurte model
ist kein Spielzeug.
version: 16/104/2003 • T0351
RADIO INCLUDED
450 g
11,52 dm
2
1030 mm
750 mm

2 - Skywave
Specifications / Specificaties /
Spécifications / Technische daten
1. Wing
2. Fuselage
3. Elevator
4. Ribbon
5. Rubber bands
6. Propeller
7. Undercarriage
8. Radio
9. Battery pack
10. Chager
Required for operation:
8 x NiCd 1,2V 800 mAh
AA batteries not in-
cluded #P1108
1. Vleugel
2. Romp
3. Hoogteroer
4. Wimpel
5. Elastieken
6. Propeller
7. Landingsgestel
8. Zender
9. Batterij pack
10. Lader
Benodigdheden:
8 x AA batterijen NiCd
1,2V 800 mAh niet
meegeleverd #P1108
1. Aile
2. Fuselage
3. Stabilisateur
4. Ruban
5. Elastiques
6. Hélice
7. Train d’attérissage
8. Emetteur
9. Pack accu
10. Chargeur
Requis:
8 x Accu NiCd 1,2V
800 mAh type AA non
fournis #P1108
1. Flügel
2. Rumpf
3. Höhenleitwerk
4. Wimpel
5. Gummibänder
6. Luftschraube
7. Hauptfahrwerk
8. Fernsteuerung
9. Akkupack
10. Lader
Erforderliches:
8 x AA batterien NiCd
1,2V 800 mAh type AA
nicht in baukasten
enthälten #P1108
1
Kit content / Inhoud van de bouwdoos /
Contenu de la boîte / Bausatzinhalt /
Wing span: 1030 mm
Length: 750 mm
Wing area: 11,52 dm
2
Wing loading: 39,06 g/dm
2
Flying weight: 450 g
Radio required: 2 ch radio
27Mhz AM
Enigine: Electric engine
type 400
Spanwijdte: 1030 mm
Lengte: 750 mm
Vleugelopp.: 11,52 dm
2
Vleugelbel.: 39,06 g/dm
2
Vlieg gewicht: 450 g
Radio besturing:2 ch radio
27Mhz AM
Motor: Electro motor
type 400
Envergure: 1030 mm
Longueur: 750 mm
Surface alaire: 11,52 dm
2
Charge alaire: 39,06 g/dm
2
Poids en vol: 450 g
Radio requise: Radio 2 voies
27 Mhz AM
Moteur: Moteur électrique
type 400
Spannweite: 1030 mm
Länge: 750 mm
Tragflügelinhalt: 11,52 dm
2
Gesamtflachen-
belastung: 39,06 g/dm
2
Fluggewicht: 450 g
Funkfernsteuerung:
2 Kanal
Steuerung
27 Mhz AM
Motor
: Elektro Motor
type 400
2
3
6
7
8
5
4
9
10

Skywave - 3
Important Safety Notes.
Be sure to read right through the instructions covering assembly and operation of your model before you attempt to operate it for the first time. You alone are
responsible for the safe operation of your radio-controlled model. Young people should only be permitted to build and fly these models under the instruction and
supervision of an adult who is aware of the hazards involved in this activity.
Use only matching polarised connectors. All cables, connectors and the battery if home-assembled must be insulated to prevent short circuits. Never attempt to
combine different types of plug and socket - e.g. tin-plated and gold-plated types - as such combinations are bound to be unreliable.
NC batteries are capable of holding and releasing enormous amounts of energy, and as such represent a constant hazard of explosion and fire.
We have no control over the way you build and operate your RC model aircraft, and for this reason we are obliged to deny all liability for accidents. All we can do is
point out the hazards and make sure you are aware of them.
If you need help, please enlist the aid of an experienced modeller, a model club or enrol at a model flying training school, Model shops and the specialist model
press are also good sources of information. The best course is always to join a club and fly at the approved model flying site.
Rubber bands deteriorate with age and become brittle. Replace them from time to time to maintain the safety and reliability of your model. Stretch all rubber bands
before use to check that they are still strong enough for their purpose.
Motors should only be run in the open air! The powerful suction of the propeller and the volume of air which it accelerates can easily lead to accidents in enclosed
spaces (e.g. pictures falling down, curtains sucked into the propeller). The model must be held securely by an assistant at all times.
Keep well clear of the rotational plane of propellers - don't stand in line with it or in front of it. You never know when some part may come loose and fly off at high
speed, hitting you or anybody else in the vicinity. Never touch the revolving propeller with any object.
There must be no chance of any object getting in the way of the propeller and preventing it rotating.
Take care with loose clothing such as scarves, loose shirts etc. Flapping cloth can easily be sucked into the area of the propeller and then get tangled in it.
If you start your motor when the model is standing on loose or sandy ground, the propeller will suck up sand and dust and hurl it around. and it could easily get in
your eyes. Wear protective goggles at such times.
Every time you intend to operate your model check carefully that it and everything attached to it (e.g. propeller, gearbox,RC components etc.) are in good condition
and undamaged. If you find a fault do not fly the model until you have corrected it.
Satisfy yourself that your frequency is vacant before you switch on. Radio interference caused by unknown sources can occur at any time without warning. If this
should happen, your model will be uncontrollable and completely unpredictable. Never leave your radio control system unguarded, as other people might pick it up
and try to use it.
Check that nothing is in the way of the propeller before you switch on the electric motor. Never attempt to stop the spinning propeller.Electric motors with a propeller
attached should only be run when installed securely.
lf you are to fly your model safely and avoid problems it is essential that you are aware of its position and attitude throughout each flight - so don't let it fly too far
away! lf you detect a control problem or interference during a flight,immediately land the model to prevent a potential accident Note that the transmitter throttle stick
must be set to the OFF (motor stopped) position before you switch on the power system. To avoid the electric motor starting unexpectedly, switch on the transmitter
first. then the receiving system. Use the reverse sequence when switching off: receiver first, then the transmitter. Check that the control surfaces move in the correct
"sense" when you operate the sticks.
Please don't misunderstand the purpose of these notes. We only want to make you aware of the many dangers and hazards which can arise if you lack knowledge
and experience, or work carelessly or irresponsibly. If you take reasonable care model flying is a highly creative, instructive, enjoyable and relaxing pastime.
Belangrijke Veiligheidsinstructies
Lees de instructies betreffende montage en werking van je model vooraleer u het de eerste maal in gebruik neemt. U alleen bent verantwoordelijk voor de veilige
werking van uw radiobestuurd model. Kinderen zijn enkel toegestaan om deze modellen te bouwen en te vliegen onder het toeziend oog van een volwassene, die
zich bewust is van de gevaren die dit met zich meebrengt.
Gebruik enkel passende gepolariseerde verbindingsstukken. Alle kabels, verbindingsstukken en de batterij, indien deze zelf samengesteld is, moeten geïsoleerd
worden om kortsluiting te voorkomen. Poog nooit verschillende types van pluggen en contacten te kombineren (vb.tin-en goudcontacten), daar zulke combinaties
onbetrouwbaar zijn.
NC-batterijen zijn geschikt om enorme hoeveelheden energie vast te houden en vrij te geven. Zodoende vertegenwoordigt een batterij een constant risico op
explosie en brandgevaar.
Wij hebben geen controle over de manier waarop u het RC-vliegtuig bouwt en gebruikt. Daarom zijn wij verplicht om alle aansprakelijkheid voor ongevallen van de
hand te wijzen. Het enige dat in onze mogelijkheden ligt is u te waarschuwen voor de risico’s.
Als u hulp nodig heeft, roep dan de bijstand van een ervaren modelbouwer of een modelbouwclub in, of schrijf u in bij een modelvliegclub. Modelshops en de
gespecialiseerde pers zijn eveneens een geschikte bron van informatie. De beste les is echter zich aan te sluiten bij een club en te vliegen op de goedgekeurde
vliegplaatsen.
Rubber elastieken verslijten met het gebruiken en worden broos. Vervang ze tijdig, zodoende stelt u de veiligheid en de betrouwbaarheid van uw model veilig. Span
alle rubber elastieken op vooraleer u ze gebruikt om te controleren of ze nog sterk genoeg zijn.
Motoren mogen enkel buiten in openlucht lopen! De sterke zuigkracht van de propeller en de luchtverplaatsing die deze veroorzaakt, kan in kleine ruimten makkelijk
een ongeval tot gevolg hebben (vb. schilderijen die naar beneden vallen, een gordijn dat in de propeller gezogen wordt). Het model moet steeds stevig worden
vastgehouden door een helper.
Houdt de rotatiebaan van een propeller vrij, sta er nooit voor of in de lijn van de propeller. Er kan steeds een deel loskomen en met hoge snelheid wegvliegen, zodat
het uzelf of iemand anders in de omgeving kan verwonden. Raak de ronddraaiende propeller nooit met enig voorwerp aan. Vermijdt steeds dat welk voorwerp ook
het draaien van de propeller verhindert.
Pas op met losse kleding zoals sjaals, losse shirts, … Losse kleding kan makkelijk in de propeller gezogen worden.
Als u de motor start terwijl deze op losse of zanderige grond staat, zal de propeller het zand opzuigen en rondslingeren zodat het in je ogen kan komen. Draag dus
steeds een veiligheidsbril op zo’n momenten.
Controleer, elke keer als u een model wil gebruiken, zorgvuldig of het model en alles wat erbij hoort (vb. propeller, aandrijving, RC-onderdelen, …) in goede staat en
onbeschadigd is. Als u een fout bemerkt, vlieg dan niet met het model tot u de fout hebt opgelost.
Verzeker uzelf ervan dat de frequentie vrij is vooraleer u de zender aanzet. Radiostoringen veroorzaakt door vreemde bronnen kunnen op elk moment en zonder
waarschuwing voorkomen. Als dit gebeurt is je model oncontroleerbaar en volledig onvoorspelbaar. Laat uw radiobesturing nooit onbewaakt achter, andere mensen
zouden kunnen proberen het te gebruiken.
Controleer of er niets in de baan van de propeller is vooraleer u de electromotor aanzet. Probeer nooit de draaiende propeller te stoppen. Electromotoren verbonden
met een propeller mogen enkel lopen als deze veilig geïnstalleerd is.
Als u uw model veilig wil vliegen en u wil problemen vermijden, dan is het essentieel dat u zich bewust bent van zijn positite en hoogte tijdens iedere vlucht. Laat het
dus niet te ver weg vliegen ! Als u een controleprobleem of storingen ontdekt gedurende een vlucht, landt dan onmiddellijk om een mogelijk ongeval te voorkomen.
Bemerk dat de zenderstick voor de motorfunctie in de off-stand moet staan vooraleer u het systeem aanzet. Om te voorkomen dat de electromotor onverwacht start,
zet eerst de zender aan, later pas de ontvanger. Gebruik de omgekeerde volgorde bij het afzetten : eerst de ontvanger, dan de zender. Controleer of de roeren in de
juiste richting bewegen als u de sticks gebruikt.
Heb begrip voor het doel van deze opmerkingen. Wij willen u enkel opmerkzaam maken voor de vele gevaren en risico’s die zich kunnen voordoen als u kennis en
ervaring mist, nonchalant of onverantwoordelijk te werk gaat.
Als u redelijk zorg draagt, is modelvliegen een zeer creatieve, leerrijke, plezierige en ontspannende vrijetijdsbesteding.

Skywave - 5
Sharp hobby knife / Scherp hobby mes /
Couteau de modéliste / Hobby messer
Philips screw driver / Philips schroevendraaier /
Tournevis Philips / Schraubendreher
To assemble this airplane some tools are needed.
Voor het samenstellen van het vliegtuig zijn er enkele gereedschappen nodig.
Zum bauen dieses Flugzeug werden einige Werkzeuge gebraucht .
Certains outils sont requis pour assembler cet avion.
Tools & items / Gereedschap & benodigdheden /
Outils et équipements / Werkzeuge und erforderliches
Placing the propeller / Plaatsen van de propeller /
Installation de l’hélice / Installieren von die Luftschraube
Push the propeller onto the
motorshaft, leave a space of mini-
mum 2 mm between propeller
and motor. See Fig. 1-2.
Duw de propeller op de motoras.
Laat een opening van minimum 2
mm tussen de propeller en de
motor. Zie Fig. 1-2.
Enfoncez l’hélice sur l’axe du
moteur, en veillant à laisser min.
2mm entre l’hélice et le moteur.
Voir Fig. 1-2.
Fig. 1
Fig. 2
±2 mm
Nut lock / Nut lock / Freine filet / Schrauben Sicher
REF: A600
Drucken Sie die Luftschraube auf
die Motorachse. Lassen Sie mini-
mum 2 mm zwischen
Luftschraube und Motor, Abb. 1-
2.

6 - Skywave
Assembling the V-tail / Samenstellen van de V-staart /
Assemblage de l’empennage / Montierung von das V-Leitwerk
Insert the 2 screws through the
tailmount. Place the V-part on the
tail through the plastic parts. Take
care placing the parts in the cor-
rect position to get the right
angle.
See Fig. 3-4-5-6 and Drw. 1.
Breng de 2 vijzen door de
staartsteun. Bevestig de plastieke
bevestigingsplaatjes op de V-
staart. Let op dat u deze in de
juiste richting plaatst voor een
goede hoek.
Zie Fig. 3-4-5-6 en Drw. 1.
Insérez les 2 vis dans l’empen-
nage. Installez par en-dessous la
pièce plastique sur les 2 vis en
veillant à bien respecter le sens.
Voir Fig.3-4-5-6 et Drw.1
Fig. 3
Fig. 4
Fig. 5
Fig. 6
Drw. 1
Stecken Sie die 2 Schrauben
durch das Höhenleitwerk. Setzen
Sie das V-Teil auf das Endstück
durch das Kunststoffteil. Geb acht
das die Teile in die richtige Posi-
tion sind, um den richtige Winkel
zu erhalten. Sehen Sie Abb.. 3-4-
5-6 und Drw.1.

Skywave - 7
Connecting the pushrods / Bevestigen van de stuurstangen /
Raccordement des commandes / Befestigung von die Gestängen
Connect the pushrods on the
rudderhorn. The upper hole in the
horn gives a smoother move-
ment, so that the reaction of the
plane is more ‘soft’ for the begin-
ning pilot.
Screw the V-tail on the fuselage.
Take care not to damage the an-
tenna wire inside the tube. Install
the tailskid and screw the 2 nuts
on the fuselage. Secure them with
‘Nut Lock’ (Protech Nut Lock
#A600).
See Fig. 7-8-9-10.
Bevestig de stuurstangen op de
roerhoornen. Het bovenste gat
van de roerhoorn geeft weinig
uitslag waardoor het vliegtuig
soepel reageert, wat beter is voor
de beginneling.
Bevestig de V-staart op de romp.
Let goed op dat u de antenne in
de tube niet beschadigd.
Installeer de staartsteun en vijs 2
moeren op de schroeven.
Bevestig de moeren met een
druppel ‘Nut Lock’ (Protech Nut
Lock #A600).
Zie Fig. 7-8-9-10.
Raccordez les tringles de com-
mande aux guignols de direction.
Le trou supérieur du guignol
donne un débattement faible de
la gouverne, par conséquent les
réactions de l’avion sont plus
douces ce qui facilite l’apprentis-
sage.
Installez l’empennage sur le tube
de queue en faisant attention à ne
pas abimer le fil d’antenne qui
passe dans le tube de queue. Ins-
tallez le patin de queue et termi-
nez en vissant les 2 écrous.
Sécurisez en mettant une goutte
de “freine filet“ (Protech Nut lock
#A600).
Voir Fig. 7-8-9-10.
Fig. 7a
Fig. 7
Fig. 8
Fig. 9
Fig. 10
Drw. 2
Rudderhorn / Roerhoorn / Guignol
Low / Weinig / Faible /
Normal / Normaal / Normal /
High / Sterk / Fort /
Antenne Wire
Antennedraad
Fil d’antenne
Antenne
Befestigen Sie das Gestänge auf
den Ruderhorn. Die obere
Bohrung im Horn gibt eine
kleinere Bewegung, also ist die
Reaktion des Flugzeuges mehr
sanft für den anfangende Pilot.
Befestigen Sie das V-Leitwerk auf
dem Rumpf. Gebt acht die
Antennelitse innerhalb das Rohr
nicht zu beschädigen. Bringen Sie
das Leitwerk an und schrauben
Sie es mit 2 Mutter auf dem
Rumpf. Sichern Sie sie mit ‘Nut
Lock’ (Protech Nut Lock #A600).
Sehe Abb. 7-8-9-10.

8 - Skywave
Fixing the landinggear / Bevestigen van het landingsgestel /
Installation du train d’attérissage / Befestigung von das Hauptfahrwerk
Insert the landinggear in the pre-
formed place at the bottom of the
fuselage. See Fig. 11-12-13.
Bevestig het landingsgestel in de
voorgevormde plaats aan de
onderzijde van de romp. Zie Fig.
11-12-13.
Insérez le train d’attérissage dans
le logement situé sur le dessous
du fuselage. Voir Fig. 11-12-13.
Fig. 11 Fig. 12
Fig. 13
Setzen Sie das Hauptfahrwerk im
vorgeformten Platz an der
Unterseite des Rumpfs ein. Sehe
Abb. 11-12-13.

Skywave - 9
Fixing the wing / Bevestigen van de vleugel /
Installation de l’aile / Befestigung von Flügel
Position the wing to the fuselage
and take care it is well centered.
See Fig. 14.
Place 2 rubber bands round the
motor, see Fig. 15 and cross the
rubber bands over the wing. Con-
nect them to the dowel on both
sides of the fuselage. See Fig. 16.
Positioneer de vleugel op de romp
en let erop dat deze goed
gecentreerd is. Zie Fig. 14.
Bevestig 2 elastieken rond de
motor, zie Fig. 15 en kruis de
elastieken over de vleugel.
Bevestig deze aan de houders aan
de zijkant van de romp. Zie Fig.
16.
Positionez l’aile sur le fuselage en
veillant à ce qu’elle soit bien cen-
trée. Voir Fig. 14.
Passez les 2 élastiques autour du
moteur, voir Fig.15, et croisez les
élastiques sur le dessus de l’aile
avant de les accrocher au tenons
sur les côtés du fuselage. Voir
Fig.16.
Fig. 14
Fig. 15
Fig. 16
Bringen Sie den Flügel auf die
Rumpf und machen Sie sicher das
die Zentrierung stimmt. Sehe
Abb. 14.
Befestigen Sie dem Flügel mit 2
Gummiringen durch kreuzen.
Sehe Abb. 16.

10 - Skywave
Connecting the battery / Aansluiten van de batterij /
Installation de l’accu / Anbringen von die Batterie
Open the cockpit, take the con-
nector out, see Fig. 17 and con-
nect the battery, see Fig. 18.
Place the battery into the fuse-
lage, see Fig. 19.
Close the cockpit and pull the
rubber band over the nose of the
fuselage, see Fig. 20.
Open de cockpit, haal de connec-
tor eruit, zie Fig. 17. Bevestig de
aandrijfbatterij aan de connector,
zie Fig. 18.
Plaats de batterij in de romp, zie
Fig. 19.
Sluit de cockpit en trek de elastiek
over de neus, zie Fig. 20.
Ouvrez le cockpit, sortez la fiche
d’alimentation, voir Fig.17, con-
nectez l’accu de propulsion, voir
Fig.18.
Installez l’accu dans le fuselage,
voir Fig.19.
Refermez le cockpit et passez
l’élastique en dessous du nez,
voir Fig.20.
Fig. 17 Fig. 18
Fig. 19
Fig. 20
Öffnen Sie die Kabinehaube, und
nehmen Sie den Stecker heraus,
sehe Abb. 17. Schließen Sie die
Batterie an, sehe Abb. 18.
Setzen Sie die Batterie in den
Rumpf, sehe Abb. 19.
Schließen Sie die Kabinehaube
und ziehen Sie über die Nase des
Rumpfs ein Gummiring, sehe
Abb. 20.

Skywave - 11
Before flying / Vliegklaar maken van uw model /
Avant de voler / Flugfertig machen von das Model
Put 8 charged AA batteries (#P1108) in the transmitter.
Make sure that the trims are in neutral position.
Turn the transmitter on.
Batteries not charged completely causes problems during
transmission.
Plaats 8 geladen AA batterijen (#P1108) in de zender.
Zorg ervoor dat de trims neutraal staan.
Schakel de zender aan.
Niet volledig geladen batterijen geven zendproblemen.
Placez 8 accus chargés (#P1108) dans l’émetteur.
Assurez-vous que chaque trims est bien en position neutre.
Allumez l’émetteur.
L’état des batteries déterminera la portée de l’émetteur.
Platzieren Sie 8 gelädene AA batterien (#P1108) in den Sender.
Machen Sie sicher das die trims sich in mitten stand befinden.
Schalten Sie die Fernsteuerung an.
Nicht komplet geladene Batterien verursachen slecht
Reichweidteproblemen.
1
2
Charge corrrectly the battery (See recommendation).
Connect the battery to the connector of the plane.
Laad de batterij op een correcte manier (Zie aanbevelingen).
Connecteer de batterij aan het model.
Chargez convenablement l’accu de propulsion (voir
recommandation). Connectez l’accu à l’avion.
Laden Sie die Batterie richtig (Sehe Empfelung).
Verbinden Sie die Akku am Stecker des Models.
1
2
3 3
CONTROL MOVEMENTS
Check that the radio is working correctly.
Move the right control stick left. The left elevator must go down,
the right must go up.
Move the right control stick right. The left elevator must go up,
the right must go down.
In neutral position both should be parallel with the tail.
ROERUITSLAGEN
Kontroleer of de zender correct werkt.
Duw de rechter stuurstick naar links. De linker hoogteroer moet
naar boven gaan, het rechter naar onder.
Duw de rechter stuurstick naar rechts. De linker hoogteroer moet
naar onder gaan, het rechter naar boven.
In neutrale positie zijn beide hoogteroeren evenwijdig met de
staart.
CONTROLE
Contrôlez toujours si l’émetteur fonctionne correctement.
Bougez le stick droit vers la gauche. L’élévateur gauche doit
descendre, et le droit doit monter.
Bougez le stick droit vers la droite. L’élévateur gauche doit
monter, et le droit doit descendre.
KONTROL VON RUDERAUSSCHLAGEN
Uberprüfen Sie die werkung von Sender.
Drucken Sie den Steuerknuppel nach Links. Das Linker Ruder
dräht nach Oben, den Rechter nach Unten.
Drucken Sie den Steuerknuppel nach Rechts. Das Linker Ruder
dräht nach Unten, den Rechter nach Oben.
In mitten position sind beide parallel an das V-Leitwerk.
Switch
Schakelaar
Intérrupteur
Schalter
Trim
Trim

14 - Skywave
FLYING
The left controlstick is for controlling the speed of the plane and
also for elevator function. If you release the left stick the motor
will stop working and the plane will descend. If you move the left
stick up the plane will gain speed and start to climb. When
turning, the plane naturally drops and power should be applied
after the plane is leveled again.
Beginning pilots should fly at a height of more than 50 feet (hight
of a 5 floor building). Flying too high will give problems to see the
reactions of the plane and finaly you will loose control. When
flying too low the reactiontime is too long and you could crash
your plane.
The flight time is about 10-15 minutes. When the power is low the
motor will shut off, however the controls will still work so you can
land the plane.
VLIEGEN
De linker stuurstick is voor het kontroleren van de snelheid van
het vliegtuigen hierdoor ook het stijgen en dalen ervan. Als u de
linker stuurstick loslaat stopt de motor met draaien en zal het
model dalen. Als je de linker stuurstick naar boven duwt zal het
model terug snelheid winnen en beginnen te stijgen.
Beginnende piloten moeten op een hoogte van iets meer dan 15
meter (hoogte van een gebouw met 5 verdiepingen) tegen de
wind in vliegen. Te hoog of te laag vliegen kan ervoor zorgen dat
uw model onbestuurbaar wordt. Nadat de batterij te weinig
stroom kan leveren zal de motor stoppen met draaien, de
stuurfuncties blijven nog steed werken zodat u het model veilig
kan landen.
VOLER
Le stick de gauche contrôle la vitesse du moteur et également la
montée et la descente. Si vous poussez le stick de gauche le
moteur accélère et l’avion monte. Si vous relachez le stick le
moteur s’arrête et l’avion descend. Lorsque vous tournez l’ avion
perd de l’altitude et vous devez compenser en donnant un peu
de gas.
Pour débuter ne pas dépasser une altitude 15 mètres (petit
building de 5 étages). Si vous volez trop haut, vous ne distingue-
rez pas les réaction de l’avion et finalement vous perdrez tout
contrôle.
Trop bas, vous n’aurez pas le temps de réagir et votre avion
heurtera le sol ou un obstacle.
L’autonomie de vol est de ± 10-15min., après ce délai le moteur
se coupe mais vous pouvez toujours contrôler la direction durant
la descente de votre avion afin d’attérir.
FLIEGEN
Die linker Steuerknüppel ist für die geschwindigkeit und auch als
Höhenruderfunktion. Wann Sie dem Steuerknüppel im
mittenstand lassen wird den Motor anhalten und das Model wird
herunter gehen.Wann Sie den linker Steuerknüppel nach hoch
bringen wird das Model am Geschwindigkeit zunehmen und
anfangen zu steigen. Anfangende Piloten mussen eine Höhe von
mindestens 15 m in acht nehmen. Zu hoch oder zu niederig
fliegen kann eine Risico einhalten das das Model nicht mehr
steuerbar wird. Nachdem das Akkupack lehr wird halt den Motor
an, die Steuerfunktionen bleiben wirkend sodas das Model sicher
landen kann.
5 5
LOOSE CONTROL
STORINGEN
PERTE DE CONTROLE
STÖRUNG

Skywave - 15
LANDING THE PLANE
When the plane is about 30 feet above the ground turn it into the
wind and lower the speed to land.
LANDEN VAN HET MODEL
Als het vliegtuig op ongeveer 10m hoogte vliegt draai dan in de
wind en verminder de gas zodat u kan landen.
ATTERISSAGE
Amorcez votre descente, virez pour être avec le nez dans le vent.
A une altitude de ±10 m réduisez les gas afin d’attérir.
LANDUNG
Wenn das Flugzeug ungefähr 10 Meter über dem Grund ist
mußen Sie es zu den Wind drehen und betätigen Sie den
Motorsteuerknuppel nach unten um zu landen.
6 6
PRECAUTION DURING FLYING
The plane should fly in a cone shape no more than 100 feet away
from the pilot.
Always fly the plane in front of you. Never let it fly directly
overhead because you could easely loose your perception of how
the plane is flying.
VOORZORGSMAATREGELINGEN TIJDENS HET VLIEGEN
Het model moet steeds in een circelvormige beweging vliegen op
niet meer dan 30 meter van de piloot.
Laat het model steeds voor jou vliegen. Nooit over je hoofd heen
vliegen omdat dit makkelijk voor verwarring kan zorgen bij het
waarnemen van hoe het model nu vliegt.
PRECAUTION PENDANT LE VOL
Votre avion doit évoluer dans un cône de ±30 mètres face à vous.
Toujours garder l’avion face à vous, ne jamais le laisser passer
au-dessus de vous parceque vous perdriez toute perception de
comment l’avion évolue (monte / descend).
VORSORCHSMASNAHMEN WÄHREND DES FLIEGENS
Das Flugzeug sollte nicht mehr als 30 Meter weg fliegen vom
Pilot.
Fliegen Sie immer das Flugzeug in Gezichtsfeld. Lassen Sie es nie
direkt uber dein Kopf fliegen, weil Sie einfach Ihre Vorstellung
verlieren können wie das Flugzeug fliegt.
1 1
Attention / Opgelet /
Attention / Achtung

16 - Skywave
Normal
Normaal
Normal
Normal
Pitch down
Dalen
Descendre le nez
Senkflug
Pitch up
Klimmen
Monter le nez
Steigen
Normal
Normaal
Normal
Normal
Nose light
Neus licht
Nez trop léger
Nase leicht
Nose heavy
Neus zwaar
Nez trop lourd
Nase schwer
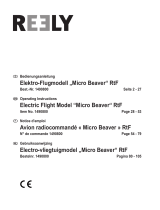
ELEVATION ANGLE
Normaly the plane should fly straight.
If the plane has a pitch up, it shows that the nose is light. You
must adjust the elevation angle from the V-tail by adding a
washer between the V-tail and the fuselage, see drawing (Pitch
down). We recommand you use a washer of 1 mm to begin and
when necessary adjust until the plane flies straight.
If the plane has a pitch down, it shows that the nose is heavy.
You must adjust the elevation angle from the V-tail by adding a
washer between the V-tail and the fuselage, see drawing (Pitch
up). We recommand you use a washer of 1 mm to begin and
when necessary adjust until the plane flies straight.
HOOGTEROERHOEK
Normaal vliegt het model horizontaal.
Als het model stijgt, duidt dit op een te licht neusgewicht. U moet
dan de hoogteroerhoek aanpassen door tussen de V-staart en de
romp een rondel te monteren, zie tekening (Klimmen). Wij raden
aan dat u begint met een rondel van 1mm en indien nodig dit nog
aanpast tot het model horizontaal vliegt.
Als het model daalt, duidt dit op een te zwaar neusgewicht. U
moet dan de hoogteroerhoek aanpassen door tussen de V-staart
en de romp een rondel te monteren, zie tekening (Klimmen). Wij
raden aan dat u begint met een rondel van 1mm en indien nodig
dit nog aanpast tot het model horizontaal vliegt.
REGLAGE
Normalement votre avion doit voler horizontalement.
Si l’avion vole avec le nez en l’air, c’est qu’il est trop léger de
l’avant. Dans ce cas ajustez l’angle de l’empennage en ajoutant
une rondelle entre le fuselage et l’empennage, voir dessin
(Descendre le nez). Nous recommandons d’utiliser une épaisseur
de 1mm pour commencer et ajustez jusqu’à ce que votre avion
vole horizontalement.
Si l’avion pique anormalement du nez, c’est qu’il est trop lourd de
l’avant. Dans ce cas ajustez l’angle de l’empennage en ajoutant
une rondelle entre le fuselage et l’empennage, voir dessin
(Monter le nez). Nous recommandons d’utiliser une épaisseur de
1mm pour commencer et ajustez jusqu’à ce que votre avion vole
horizontalement.
HÖHENRUDER WINKEL
Normals Solte das Flugzeug horizontal fliegen.
Wenn das Flugzeug einen abweichung nach oben hat, zeigt sie
daß die Nase leicht ist. Sie müssen den Höhenwinkel vom V-
Leitwerk justieren. Sie mußen eine Unterlegscheibe zwischen
dem V-Leitwerk und dem Rumpf fügen, sehe Zeichnung
(Steigen).
Wenn das Flugzeug einen abweichung nach unten hat, zeigt sie
daß die Nase schwer ist. Sie müssen den Höhenwinkel vom V-
Leitwerk justieren. Sie mußen eine Unterlegscheibe zwischen
dem V-Leitwerk und dem Rumpf fügen, sehen Zeichnung
(Senkflug).
2 2

20 - Skywave
Conformity / Gelijkvormigheid /
Conformité / Konformität
• This product is in accordance with the R&TTE directive 1999/5/EG.
• Deze apparatuur is overeenkomstig de R&TTE richtlijnen 1999/5/EG.
• Ce produit est conforme la directive R&TTE 1999/5/EG.
• Dieses Produkt ist konform der Richtlinie 1999/5/EG R&TTE.

24 - Skywave
• Your kit is warranted against defects
in material and workmanship.
• This warranty does not apply to any
component parts, which have been
improperly installed, handled,
abused, damaged, modified and
used.
• De kit heeft een garantie voor
materiaalfouten en fabrieksfouten.
• Deze garantie geldt niet voor
onderdelen die niet goed zijn
geïnstalleerd, behandeld, mishandeld,
beschadigd, aangepast en gebruikt.
Limited warranty / Beperkte garantie /
Limitation de garantie / Begrenzte garantie
• Votre kit est garanti contre les défauts
de matériaux et de fabrication.
• Cette garantie ne s’applique pas aux
composants qui ont été
incorrectement montés, manipulés,
modifiés, utilisés ou endommagés.
PROTECH® is a registered trademark
P.O.-Box 60 • B-2250 Olen
Tel.: +32 (0)14 25 92 80
Fax: +32 (0)14 25 92 89
http://www.protech.be
• Ihr Installationssatz wird gegen
Defekte im Material und in der
Kunstfertigkeit gewährleistet.
•
Diese Garantie trifft nicht auf
irgendwelche Bestandteile zu, die
unsachgemäß installiert worden,
angefaßt worden, mißbraucht worden,
beschädigt worden, geändert worden
und benutzt worden sind.
/