Bowens Gemini R Owner's Handbook Manual
- Category
- Camera flashes
- Type
- Owner's Handbook Manual

BWL0510/3 | Gemini R and Pro
12/2010
R & Pro
R & Pro
Owner’s Handbook
BWL-0510 Gemini R and Pro_Gemini Classic User Guide 21/12/2010 09:56 Page 2

contents
All Bowens electrical products are covered by a two year warranty
against any faulty design, materials and workmanship.
If a product does not work on arrival or up to a maximum period of four
weeks from the date of purchase, it should be returned to the
dealer/retail outlet from where it was purchased, to exchange (if
available) the faulty unit for a new one; if the faulty unit was part of a
kit that was purchased, the dealer / retailer may choose to simply
replace the unit and not the entire kit. Alternatively the dealer may offer
to repair the unit as soon as possible at no charge.
If neither an exchange or repair is possible for the faulty unit, then a full
refund may be made.
If a warranty fault occurs after the initial four week period (and within
the max two year warranty period), then the unit should be returned to
the dealer, who will arrange to repair the unit as soon as possible, at
no charge.
This warranty does not apply to consumable items such as flash
tubes, modelling lamps, fuses, consumable type batteries.
Should a unit be returned at any time within the two year warranty
period, and it is judged to have experienced any of the following
points, failure to follow working instructions correctly, accidental or
willful damage, misuse, alteration or repair by a non authorised
Bowens service / repair centre, then the warranty will be deemed
invalid and any repairs that may need carrying out will be payable by
the owner.
The cost of any repairs should be notified to the owner, by the dealer,
in advance of undertaking any work that may be required.
No warranty repairs can be undertaken to any units without proof of
purchase.
All warranty repairs or returns must be conducted with the dealer from
where the product was purchased.
Other terms and conditions may be applicable in specific countries, if
stated by the dealer at the time of purchase.
Information
Warranty 2
CE Mark 2
Safety Notes 3
Operation
Controls 4
Set-up 5
Flash Power Control 6
Ready Indications 7
Modelling Control 8
Photocell 8
Trigering Options 9
Changing the Flash Tube 10
Error Indications 11
Accessories
Travelpak battery system 12
Pulsar Radio Trigger System 13
Light Modifiers 13-14
Specifications 14-15
Trouble Shooting 11
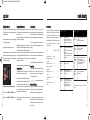
warranty introduction
Accurate, ergonomic and robust, the Gemini R
and Pro ranges have been designed by working
closely with photographers to develop a compact
flash unit that meets the exacting high standards
demanded in professional studios today at the
same time remaining simple and intuitive to use.
All ‘S-Type’ accessories from the Bowens range
can be used with the Gemini as well as the
Bowens Travelpak battery system and
Bowens/PocketWizard radio trigger cards.
For more information about these accessories
and to find details of your nearest Bowens dealer,
please visit the Bowens website.
www.bowens.co.uk.
In order to obtain the full benefit from your
purchase, please take a few moments to
familiarise yourself with this user manual.
safety notes
• Switch power off and disconnect from the power supply
before changing the modelling bulb or flash tube.
• Disconnect the power supply before changing the fuse.
Never replace with a fuse of a different rating.
A spare fuse is fitted in the fuse holder under the AC inlet
(see page.4)
• Exercise care when handling equipment that has been in
use. The reflector & front of the unit can be very hot.
• Avoid placing cables where they can be tripped over.
Protect from heavy, sharp or hot objects, which may
cause damage & replace damaged cables immediately.
• Due to the high voltage / high energy used in Gemini
monolights, all servicing must be carried out by a
Bowens authorised service centre.
• Always remove the power cord by gripping the plug.
NEVER pull the cord.
• Always ensure that any extension cord used has a
suitable current rating to prevent overheating and never
use coiled extension cords.
• Always remove the flash head covers before using.
• Use in an environment where moisture or flammable
vapour is likely to come in contact with the unit.
• Plug your Gemini monolight into an AC supply and a
Travelpak battery at the same time.
• Restrict air vents while in use.
• Use a unit with damaged housing, mouldings, flash tube
or modelling lamp. If the unit is dropped or damaged in
any way, always have it checked before using.
• Operate the unit without a safe grounded AC supply.
always... never...
3 - Gemini R and Pro | Information
All Bowens products are certified by the CE mark. The CE
certified mark is a declaration of conformity to the required EEC
directives 89/336/EEC ‘Electromagnetic Compatibility’ and
73/23/EEC ‘Low Voltage Directive’.
This device complies with Part 15 of the FCC Rules. Operation is
subject to the following two conditions:
• This device may not cause harmful interference.
• This device must accept any interference received, including
interference that may cause undesired operation.
Warning: This equipment has been tested and found to comply
with the limits for a Class B digital device, pursuant to Part 15 of
the FCC Rules. These limits are designed to provide reasonable
protection. This equipment uses radio frequency energy and, if
not installed and used in accordance with the instructions, may
cause interference to radio communications. However, there is no
guarantee that interference will not occur in a particular
installation. If this equipment does cause harmful interference to
radio or television reception, which can be determined by turning
the equipment off and on, the user is encouraged to try to correct
the interference by one or more of the following measures:
• Reorient or relocate the receiving antenna.
• Increase the separation between the equipment and
receiver.
• Connect the equipment into an outlet on a circuit different
from that to which the receiver is connected.
• Consult the dealer or an experienced radio/TV technician for
help.
Notice: Bowens approved cables must be used in order to
comply with emission limits. Note: Changes or modification not
expressly approved by the party responsible for compliance
could void the user’s authority to operate the equipment.
BWL-0510 Gemini R and Pro_Gemini Classic User Guide 21/12/2010 09:56 Page 4

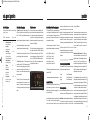
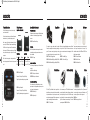
gemini r and pro controls
A: Modelling Lamp
B: Flash Tube
C: Accessory Release Latch
D: 1 Stop Power Adjust Dial
E: LED Display
F: Flash Test Button
G: 1/10 Stop Power Adjust Dial
H: Infra-Red Control Window
I: Photocell
J: Modelling Ready On/Off LED
K: Modelling Function Indicators
L: Ready Beep On/Off LED
M: Photocell On/Off LED
N: Carry Handle
O: 1/4” Jack Sync Socket
P: Modelling Functions Indicator
Q: Modelling Lamp Function Switch
R: Modelling Ready On/Off Switch
S: Ready Beep On/Off Switch
T: Photocell On/Off Switch
U: DC Power Input
V: AC/DC Power Switch
W: Plug-In Radio Trigger Compartment
X: AC Power Input
Y: Fuse Holder
ACEIL
J
MN
BDFGHK
OPQ R S T V W X
UY
4 - Gemini R and Pro | Operation
set-up
5 - Gemini R and Pro | Operation
Operating your Gemini R or Pro
The Bowens Gemini R and Pro monolights can be operated
fromeither an AC (mains) supply or from a Bowens Travelpak
battery.
For AC (mains) operation, the AC switch (page 4) should be in
the upper position.
For DC (battery) operation, the switch should be in the lower
position.
NOTE: When operating from a Travelpak battery, the
modelling functions are not available, this is to preserve
battery life.
• Ensure the power source if off.
• Connect the unit using the appropriate cable.
• If using the Travelpak, ensure the connector locks are fully
tightened.
• Switch the power source on, then switch on the Gemini.
• The unit will charge & indicate it is ready for use by lighting
the green flash-ready LED.
• Press the test button to check the unit fires.
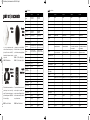
Mounting your Gemini R or Pro
Mount your monolight on a dependable support system.
The mount bush on the ‘L’ bracket allows for two possible
ways of mounting to the stand/support (below).
Method B may be found useful if the light is required to point
down.
User Set-Up Options
To enter the ‘user set-up options’ hold down the ‘flash test’
button (page 4) for 3-4 seconds when the unit is switched on.
Once the unit has entered the user set-up options the LED
display will first show a continuous sequence of numbers
(four sets of two numbers). Firstly the software version will be
displayed (shown by a decimal point i.e. ‘1.1’), followed by a
three, two-digit number sequence, representing the total flash
count for that particular unit (up to 999,999). Each set of
numbers in the flash count sequence will be interspersed with
a dash, for instance 00-15-76 (representing 001,576 flashes).
Once the LED display had cycled through the software
version and the total flash count, the unit will then activate the
‘user set-up options’.
The ‘1/10-stop (TENTHS) power adjust dial’ is used to select
the required function / option for review or change.
Once a user set-up option is selected using the TENTHS dial,
the LED display will show the current setting.
To cycle through / change the setting for any user set-up
option, press the ‘modelling lamp function switch’ (page 4) at
the rear of the unit either up or down.
Once all the user set-up options have been reviewed or
changed as required, press the ‘flash test’ button to save the
amended settings and reboot the unit to normal operation.
WARNING HIGH VOLTAGE! Never connect a Gemini
monolight to a Travelpak battery and AC (Mains)
supply at the same time. This appliance must be
grounded when used with AC. Disconnect the AC
plug when changing modelling lamps and flash
tubes.
A
B
BWL-0510 Gemini R and Pro_Gemini Classic User Guide 21/12/2010 09:56 Page 6

7 - Gemini R and Pro | Operation
operation
Infra-Red Remote Control Power Adjustments
The first position (REM) on the 1-stop power adjust dial sets
the unit to operate from Infra-Red remote control only. Once
the unit is set to operate from IR remote control the power
setting can then only be read from the LED display, as the
power adjust dials will not function.
Once the unit is in remote control mode, the
1
⁄10
th
-stop power
adjustment dial selects the prefered remote control channel:
position 0 (0.0 tenths) = All channels,
position 1 (0.1 tenths) = channel 1,
position 2 (0.2 tenths) = channel 2,
position 3 (0.3 tenths) = channel 3,
position 4 (0.4 tenths) = channel 4 etc.
The IR channel can be adjusted at any time once the unit is in
remote mode (REM).
Automatic Flash Dump
Automatic flash dump (as well as standard resistive dump)
can be selected during the ‘user set-up’ mode, which is
available when the unit is switched on (see page 5 for ‘user
set-up’ mode and options).
Automatic flash dump is a built-in feature of the Gemini R and
Pro level models. The Gemini’s intelligent management
system controls the automatic flash dump function by
monitoring the difference between the current, set flash
power level, and the target power the unit has just been
adjusted to. The management system decides if it would be
quicker for the unit to flash dump the power and recharge to
the desired level or to simply resistive dump the power to the
required level. The automatic flash dump only works 1-2
seconds after the user has stopped adjusting the flash power.
Note: When turning a Gemini R or Pro off, the unit will
automatically dump the charged power, this is to ensure that
no flash power is stored in the capacitors while the unit is
switched off.
Power Charging / Dumping Indicators
The illuminated ‘flash test’ button on the side of the unit (see
page 4) shows the charging status as follows:
Charging - Green LED flashes quickly
Ready - Green LED lit continuously
Dumping - Green LED flashes slowly
Flash Ready Indicators
There are various indications available on the unit to let the
user know when the unit is 100% charged and ready to fire.
Ready Sounder - an audible ready beep is available via an on
/ off rocker switch at the rear of the unit (see page 4); the
ready beep can also be switched on / off from a remote
control (only in REM mode).
The ready sounder can be used in two ways; the user can set
the ready sounder to either emit a continuous beep while the
unit is charging and go off when it is 100% ready, or the unit
can be set to emit a short beep when the unit is charged and
100% ready. The ready sounder options can be set during
‘user set-up’ mode. See page 5 for user set-up mode
instructions.
Modelling Lamp Ready Indications - the modelling lamp
can be used as an indication as to when the unit has fully
charged and is ready to fire. The modelling lamp can be set to
‘intermittent’ or ‘pulse’. When the modelling is set to
intermittent the lamp will extinguish when the unit has fired,
and illuminate again after the unit has charged and is 100%
ready. The modelling lamp ‘ready’ indication settings can be
adjusted during the ‘user set-up’ mode.
If the modelling ready indication is set to pulse, the lamp will
simply pulse during the recharge state and come back to the
current setting once the unit has charged and is 100% ready.
In pulse mode, if the modelling lamp is set to a low level when
the unit is fired the modelling will increase in brightness /
output during the recharge state and then lower again to the
current setting when the unit has charged and is 100% ready.
If the modelling is set to a high level when in pulse mode, the
modelling will decrease in brightness / output once the unit
has been fired and will increase again to the current setting
once the unit has charged and is 100% ready.
set-up and operation
6 - Gemini R and Pro | Operation
User Set-Up Options
The following options are available in the ‘user set-up’ mode
for review or change:
TENTHS Functions & Options Setting Default
0 Reset all options to default 0 & 1 0
(set to 1 to reset options).
1 Invert Display 0 & 1 0
(normal (0) or invert (1)).
2 Photocell Trigger 1,2,3 & 4 1
(can be set to trigger on the
first (1), second (2), third (3)
or the fourth (4) flash detected).
3 Lamp Ready Indication - 0 & 1 0
(intermittent (0) or pulse (1)).
4 Flash Dump 0 & 1 0
(off (0) or on (1)).
5 Ready Sounder - 0 & 1 0
(intermittent (0) or
continuous (1)).
6 Auto Lamp-Saver 0 to 99 30
(off (0) or number of minutes
until activation (1-99)).
Mains / Battery Voltage Supply
The Gemini R range is a single / fixed voltage unit (117V or
230V) and will only operate from a fixed mains (AC) supply
(either 117V or 230V); or via one of Bowens battery systems.
Always check the supply voltage for each unit before using.
The recommended voltage supply for each unit is stated on
the rear panel just below the mains connection (page 4).
To use the Gemini from a mains supply the ‘mains / battery
power switch’ (page 4) must be in the upper position.
The Gemini Pro range units are all multi-voltage and will
operate from a nominal 117V or 230V mains power supply (as
well as from one of Bowens battery systems), once a mains
power supply is connected to a Gemini Pro and the unit is
switched on, the unit will automatically detect the voltage
supply it is connected to.
The battery (DC) input from a Bowens battery system is
automatically detected when connected and the unit
switched on. To use the Gemini from a battery system the
‘mains / battery power switch’ (page 4) must be in the lower
position.
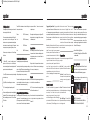
Flash Power Control
The flash power is set using two rotary dials (fig.1); the left-
hand dial is used to increase or decrease the flash power in
full 1-stop adjustments, the right-hand dial is used to control
the power in exact
1
⁄10
th
-stop adjustments. Both settings are
indicated on a scale around each dial; the current setting is
also shown on the LED display.
The maximum F-stop (power setting) depends on the flash
power rating of each individual unit. 250Ws, 500Ws and
750Ws units provide a 5-stop power range, F1.0 to F6.0 (5-
stop power adjustments over 6-stop points is equal to full
power to
1
⁄32). The 1000Ws and the 1500Ws units provide a 7-
stop range, F1.0 to F8.0 (7-stop power adjustments over 8-
stop points is equal to full power to
1
⁄128).
fig1.
BWL-0510 Gemini R and Pro_Gemini Classic User Guide 21/12/2010 09:59 Page 8

operation
8 - Gemini R and Pro | Operation
operation
Modelling Lamp Control
The modelling lamp on the Gemini range has a soft on and off
feature to prolong the life of the bulb.
There are various options available on the Gemini R and Pro
range models to control the modelling output. These
functions can be set using the centre biased modelling lamp
function switch on the rear of the unit (page 4). To change the
lamp output option, simply cycle through, either up or down.
The various output control options on the R and Pro range
Gemini’s are:
1.) Relative (REL) - to control the modelling output in
proportion to the flash output - when the flash output is
altered, the modelling lamp will automatically adjust itself in
proportional to the desired flash power level.
2.) User (USR) - allows the user to manually set the modelling
to the desired output.
3.) Max (MAX) - sets the modelling output to maximum.
4.) Off - the modelling lamp will completely switch off.
The various modelling lamp control options are highlighted by
individual red LED’s on the side and rear of the unit (page 4.)
When the modelling lamp is set is set to ‘Off’, none of the red
LED’s will show.
The red LED’s on the side and rear of the unit will display the
various options as follows:
Relative - REL LED lit continuously.
User - USR LED lit continuously.
User set - USR LED flashes.
Max - MAX LED lit continuously.
Manually Setting the Modelling Output
The modelling lamp output can be adjusted manually.
To manually set the modelling output change the modelling
option to the User (USR) setting by using the modelling lamp
function switch. When the User option is active the USR LED
will flash quickly and then stay on continuously.
Once active the modelling output can then be adjusted by
using the modelling lamp function switch, pressing up to
increase and down to decrease the output setting.
Setting the Modelling Output with IR Remote
The modelling output can also be set manually by using a
remote control. To set the modelling output option to User
(USR) using a remote control, press the ‘Lamp On/Off’ button
on the remote control. Once the User option is selected and
active, press the ‘Master + / -’ button on the remote control
to adjust the output.
When setting the modelling lamp output the 7-segment LED
display on the side of the unit (page 4) will show the current
or desired output level.
Lamp Saver Mode
The modelling lamp on the Gemini R and Pro range features
a ‘lamp saver’ function; this allows the modelling lamp to dim
if no adjustments are made or the unit hasn’t flashed for a
specified amount of time.
The length of time for the ‘lamp saver’ function to activate can
be set from 1 to 99 minutes in ‘user set-up’ mode (see page
5 for ‘user set-up’ mode and options).
Photocell
The Photocell is a built-in light sensitive trigger that allows the
unit to be fired from an external flash source.
The ‘CELL’ switch on the rear of the unit (see page 4) allows
the Photocell to be switched on or off.
If the switch is set to the ‘lower’ position the cell will be turned
‘on’, setting the switch to the ‘upper’ position will turn the
Photocell ‘off
’.
Triggering Using External Flash - To trigger the Gemini
using an external flash source the Photocell must be switch
on. If the photographer is using an external flash source that
uses pre-exposure flashes (like a small on-camera flash) the
Photocell must be set to the ‘Smartcell’ function in order to
sync with the camera.
Smartcell - the Photocell on the Gemini R and Pro range has
a ‘smartcell’ option to enable pre-exposure flashes to be
ignored. These can be used for exposure measurement
and/or red eye reduction. This option allows the Gemini to be
synchronised to the camera shutter on the 1st, 2nd, 3rd or 4th
flash selected by the user (this option is for those who wish to
trigger theIr flash heads without a radio or IR triggering
system or without a sync cable). A recognised 1st flash is the
normal ‘instant’ trigger, where only one flash is used
coincident with the shutter. To set the desired number of
recognised flashes to sync the unit with, the Gemini must be
in ‘User set-up’ mode (see page 5 for ‘user set-up’ mode and
options).
Smartcell ‘Learn’ mode
The ‘smartcell’ can also ‘learn’ the trigger sequence of the
external flash so the number of pre-flashes does not have to
be manually set. For the Gemini to learn the pre-flash
sequence the user must enter the ‘User set-up’ mode and
select the Photocell Trigger option. Once the Photocell Trigger
option is selected red LED’s on the side and rear of the unit
will flash continuously. The Photocell Trigger option on the
Gemini must then be set to the 1
st
flash to enter the learn
mode; when number 1 is highlighted / shown on the 7-
segment display, aim the external flash at the Photocell and
fire the flash. The Photocell will monitor the flash and learn the
sequence / number of flashes. The total number of flashes
detected will then be shown on the 7-segment LED display on
the side of the unit. After the number of flashes is displayed
press the flash test button to save the setting shown and to
enter normal operation.
Triggering Options
There are a number of ways to trigger the Gemini R and Pro
monolights:
Open Flash - For testing or multiple flash
applications the ‘Test Flash’ button can be used.
Sync Socket - The standard
1
⁄4” jack socket on
the rear panel of the unit may be used for direct
connection to a camera or trigger system (i.e.
radio or IR)
Photocell - The Gemini has a built-in switchable
(on/off) photocell enabling the unit to be triggered
by an external flash source.
Plug-in Radio Trigger - The Gemini R and Pro
range models feature an option to include a plug-
in radio trigger module.
Plug-in Radio Trigger Module
The Gemini R and Pro models feature a unique option to
include a plug-in radio trigger module. There are three
different plug-in modules available (sold separately) for
various professional radio triggering systems, depending on
which one the user may already have or wish to use. The
three different plug-in trigger modules that are available for
the Gemini R and Pro range are:
• Bowens Pulsar Radio Trigger System.
• PocketWizard Radio Trigger System (344Mhz and 433Mhz
modules available).
Radio Trigger Card Kits
These simple kits upgrade Bowens Gemini R and Pro (as well
as Gemini Classic monolights) to become compatible wit hthe
Bowens Pulsar and PocketWizard radio trigger systems.
Kits include radio trigger card, plug-in antenna and simple
instructions. Sets up in minutes.
BW5170 - Pulsar Radio Card Kit
BW5180 - PocketWizard Radio Card Kit (433Mhz Euro)
BW5185 - PocketWizard Card Kit (344Mhz US)
9 - Gemini R and Pro | Operation
Plug in antenna into side of unit. Remove radio
module cover.
Insert radio trigger card into slot and replace
radio module cover.
BWL-0510 Gemini R and Pro_Gemini Classic User Guide 21/12/2010 09:59 Page 10

operation
10 - Gemini R and Pro | Operation
Changing the Flash Tube
Ensure that the unit is switched off and disconnected from the
AC supply and then wait thirty minutes before touching or
removing the flash tube.
Remove the protective cap and unwind the twisted trigger
wire from the flash tube support.
Gently pull the flash tube assembly out of the unit.
To replace the assembly, hold the flash tube as shown and
taking care to support both legs of the tube, gently but firmly,
push the flash tube into position, and wind the trigger wire
around the flash tube support.
Always replace with the correct flash tube assembly.
Gemini R range: BW2030 (clear) / BW2032 (UV coated)
Gemini Pro range: BW2980 (clear) / BW1079 (UV coated)
Changing the Modelling Lamp
Switch off the Gemini and disconnect from the power supply.
If the unit has been in use, allow a sufficient amount of time
for the lamp to cool.
Unscrew the modelling lamp from the lamp housing and
replace wit hthe correct lamp type.
When changing the modelling lamp on a Gemini 1000Pro or
1500Pro, first remove the protective glass cover over the flash
tube (ensure the glass has cooled sufficiently before touching
if the unit has been in use), then replace the modelling lamp.
When changing the smaller E11 Halogen lamps, ensure not to
touch the glass with your fingers as the oils from your hands
can reduce the life of the lamp.
Changing the Fuse
The modelling and flash circuitry are protected by a single
20mm fuse mounted in the rear panel of the unit.
A fuse may blow when the modelling lamp fails; always check
the fuse when replacing a bulb. A spare fuse is located in the
draw underneath the mains connection at the rear of the unit.
The fuse draw contains two fuses, the furthest fuse inside the
draw is the live fuse and the nearest one is a spare. Never
replace the fuse with one of a different rating.
Always switch off the unit and disconnect the power supply
before changing a fuse.
Transporting Units
When transporting any Bowens units, ensure that all
equipment is carefully packed into appropriate bags and/or
hard shell cases. Make sure all items are securely placed
inside the appropriate baggage to protect from any knocks.
Flash units can become very hot after use. Always wait a
minimum of 30 minutes before packing to allow units to cool
sufficiently.
If a unit is dropped and / or knocked during transport, always
have the unit checked by an authorised Bowens service /
repair centre before using.
Power Cables
Only use Bowens approved mains or battery cables to power
Bowens products. All mains cables must be used as
appropriate to the flash units rated power voltage, and the
correct mains pin-configuration.
Disposal and Recycling
This product must be recycled in the correct manner. In order
to recycle this product in an environmentally friendly way,
please dispose of at your local electronic waste facility.
If you have any questions regarding the disposal of any
Bowens products, contact your local Bowens retailer and/or
Bowens distributor (a list of which can be found on the
bowens website).
trouble shooting
Error Indications
All of the Gemini R and PRO range models will indicate errors
via the 7-segment LED display, and the red modelling lamp
option LED’s, on the side and rear of the unit. The 7-segment
display will show errors as an ‘E’ (error) number along with the
red modelling lamp option LED’s flashing in a particular order.
The error indications are as follows (V = flashing red
modelling option LED):
Error Display REL USR MAX
No warnings or errors. F-stops
Mains voltage out of range - E1 VV -
(no charge).
Battery low - (no charge). E2 V - V
Overheat - (no charge, E3 V --
modelling off).
Charge Fail - (retry after E4 - VV
warning).
Tube Misfire - (retry after E5 - V -
warning).
Tube glow-on - (retry after E6 --V
warning).
* Note: if any of the above problems persist, please return the unit to an authorised Bowens service
/ repair centre.
11 - Gemini R and Pro | Operation
Problem? Check.
No Power.
• Check the unit is switched ‘on’.
• Check the power cable is inserted correctly.
• If using a mains cable, check the fuse on the
plug, remember to also check the fuse in the unit.
No Flash.
• Check flash tube is inserted into the flash head
correctly.
• Check the trigger wire is in contact with the flash
tube support.
• Change the flash tube. If changing the flash tube
does not correct the fault, the unit may have a
component failure.
Modelling
Lamp not
working.
• Change the modelling lamp.
• Change fuse at rear of unit.
Unit will not
flash from
Photocell.
• Check the Photocell is switched ‘on’.
• Check Photocell is not covered and can ‘see’
the trigger flash.
Unit will not
recharge.
• Check power cable is inserted correctly.
• If using a battery, check battery has sufficient
charge remaining to power the unit.
• Change the fuse at the rear of the unit.
• Check the units voltage supply is correct.
Problem? Check.
Ready ‘beep’
is not working.
• Check the BEEP switch at the rear of the unit is
turned ‘on’.
• Make sure unit is reaching full recharge.
Unit won’t
fire from Sync
connection.
• Check the sync cord / trigger system is inserted
into the sync connection properly.
• Try another sync cord.
Unit appears
ready but will
not fire using
the ‘flash test’
button.
• The unit may be in ‘overheat’ mode. When the
unit is in ovrheat mode, the green ready LED on
the side of the unit will be off.
• If the green LED is displayed and the unit will
not fire from the ‘flash test’ button then there
may be a fault with the unit.
Flash tube only
emits a faint
glow and will
not fire.
• Check flash tube is inserted into the unit
correctly and all connections are made.
• Change flash tube.
BWL-0510 Gemini R and Pro_Gemini Classic User Guide 21/12/2010 09:59 Page 12

accessories
12 - Gemini R and Pro | Accessories
Travelpak Battery System.
The Gemini Classic is great in the studio, but what if you
need to work on location?
Thanks to this handy battery pack, your Bowens Gemini can
leave the studio to go on location anytime, anywhere!
Able to power two Gemini units simultaneously with a total
power of up to 1500Ws, the Travelpak is capable of bringing
a 250Ws unit to full charge as fast as 2.5 seconds, and can
offer in excess of 300 flashes on a single charge. The large
battery offers double capacity compared to its smaller
counterpart.
With a fast/slow charge option to prolong battery life, no
location photographer should be without this unique power
pack.
BW7693 - Small Travelpak kit.
Dimensions: 170mm(w) x 140mm(d) x 205mm(h)
Weight: 5kg Includes small battery, charger and cable.
BW7694 - Large Travelpak kit.
Dimensions: 170mm(w) x 140mm(d) x 240mm(h)
Weight: 6.4kg Includes large battery, charger and cable.
Also available for the Travelpak
Universal Mains Charger.
Replacement or spare mains charger for Travelpak batteries.
Includes a set of international plug types for travelling
overseas.
BW1227 Universal Mains Charger.
Car Charger.
Allows Travelpak batteries to be recharged from a vehicle
cigarette lighter or auxiliary power socket when no mains
power is available.
BW1245 Car Charger
Travelpak - Gemini Cable.
For connecting a Travelpak battery unit to a Bowens Gemini
monolight.
Available in 3m and 8m lengths.
BW7632 3m Travelpak - Gemini cable
BW7632E 8m Travelpak - Gemini cable.
Spare or Replacement Battery.
The modular nature of the Travelpak allows you to have a
spare battery to be fully charged and ready to swap onto the
control panel on long photo sessions.
BW7690 Small Battery Unit
BW7691 Large Battery Unit
Small Battery: Large Battery:
Ws
250
500
1 Head
300 (2.5 sec)
150 (5 sec)
2 Heads
150 (5 sec)
75 (10 sec)
1 Head
600 (2.5 sec)
300 (5 sec)
2 Heads
300 (5 sec)
150 (10 sec)
Battery Performance:
Typical Flashes (Recycle Time)
accessories
13 - Gemini R and Pro | Accessories
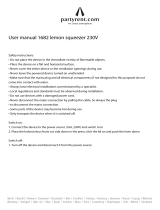
75º Softlite reflector
Pulsar Trigger System
The unique radio trigger modules enbles all compatible
Gemini units to be upgraded to include a plug-in radio trigger
system. This means no more tying, balancing or attaching
your trigger to the flash unit; and no more sync leads - forever.
BW5170 - Pulsar Radio Trigger Module
BW5180 - PocketWizard Radio Trigger Module (EU 433Mhz)
BW5185 - PocketWizard Radio Trigger Module (US 344Mhz)
This is an accessory to the 75° Softlite Reflector that creates
a unique lighting effect by including a Perspex outer diffuser
with a honeycomb grid in the centre. The Grid Diffuser gives
a pool of direct light in the centre, surrounded by soft-diffused
light. The ratio between the centre and edge is 3:1 - ideal for
portrait applications. BW1866 - Grid Diffuser
Trigger Modules
This 38cm (15”) matt-finished reflector is supplied with a
double diffuser cap that covers the flash tube and modelling
lamp for added softness. It is perfect for portraiture, beauty
and small product photography. The diffuser cap be removed,
making it an excellent large-diameter direct reflector.
BW1800 - 75º Softlite Reflector
Whether you’re triggering flash heads or cameras, the Pulsar
is the right tool for the job. Each Pulsar can be used as a
trigger or receiver and can send / receive signals up to 100m
(333’).
BW5150 - Pulsar Radio Trigger
BW5160 - Twin Pulsar Pack Trigger
Grid diffuser (for Softlite)
For creating a simple spot effect, this 10cm (4”) cone can also
be used as a hair light, creating a pool of illumination on the
hair without spilling on to the face or background.
BW1888 Snoot
BW1862 Honeycomb grid for snoot
16º Snoot
These protective glass domes sit over the flash tubes and
allow for greater creativity with the flash output. Only
available for use with the Gemini 1000Pro and 1500Pro. Three
different domes are available:
BW2981 - UV coated Glass Dome
BW2982 - Clear Glass Dome
BW2983 - Frosted Glass Dome
Glass Domes
BWL-0510 Gemini R and Pro_Gemini Classic User Guide 21/12/2010 09:59 Page 14

15 - Gemini R and Pro | Specifications
gemini r and pro accessories
14 - Gemini R and Pro | Accessories & Specifications
Model:
GM500PRO GM750PRO GM1000PRO GM1500PRO
Part Code BW-3925 BW-3935 BW-3945 BW-3955
Max Power 500Ws 750Ws 1000Ws 1500Ws
P
ower Range
5
stops (full to 1⁄32)
5
stops (full to 1⁄32)
7
stops (full to 1⁄128)
7
stops (full to 1⁄128)
Power Control Twin Rotary Dial (1-stop or 1/10-stop control) Twin Rotary Dial (1-stop or 1/10-stop control) Twin Rotary Dial (1-stop or 1/10-stop control) Twin Rotary Dial (1-stop or 1/10-stop control)
Modelling Control full / proportional / user defined / off full / proportional / user defined / off full / proportional / user defined / off full / proportional / user defined / off
Ready Indication Illuminated Test Button Illuminated Test Button Illuminated Test Button Illuminated Test Button
Fan Cooled
Yes Yes Yes Yes
Auto Dump (resistive & flash) Yes Yes Yes Yes
Modelling Lamp 250W Halostar (230V BW-1024/A)
250W Halostar (230V BW-1024/B)
250W Halostar (230V BW-1024/A)
250W Halostar (230V BW-1024/B)
E11 230V 500W (
BW2515)
/ 230V 300W (
BW2510)
E11 117V 500W (BW2530) / 230V 250W (BW2525)
E11 117V 100W (BW2520)
E11 230V 500W (
BW2515)
/ 230V 300W (
BW2510)
E11 117V 500W (BW2530) / 230V 250W (BW2525)
E11 117V 100W (BW2520)
Flash Tube
Three-pin Clear FT - BW-2980
Three-pin UV coated FT - BW-1079
Three-pin Clear FT - BW-2980
Three-pin UV coated FT - BW-1079
Three-pin Clear FT - BW-2980
Three-pin UV coated FT - BW-1079
Three-pin Clear FT - BW-2980
Three-pin UV coated FT - BW-1079
Glass Dome Protective Cover No No Yes Yes
Guide No. (m/100 ISO) 85 104 120 150
Recycle to Full Power 1.1 secs 1.5 secs 2.0 secs 2.8 secs
Flash Duration (at full power) 1/2900 sec. 1/2300 sec. 1/2100 sec. 1/14 00 sec.
Colour Temperature 5600K ±300K 5600K ±300K 5600K ±300K 5600K ±300K
Plug-in Trigger
Module Compatible
Yes Yes Yes Yes
Sync Voltage 5V DC 5V DC 5V DC 5V DC
Operating Voltage
Multivoltage (90-130V AC 60 Hz & 195-250V AC 50Hz) Multivoltage (90-130V AC 60 Hz & 195-250V AC 50Hz) Multivoltage (90-130V AC 60 Hz & 195-250V AC 50Hz) Multivoltage (90-130V AC 60 Hz & 195-250V AC 50Hz)
Travelpak Compatibility Yes Yes Yes Yes
Voltage Stabilisation +/- 0.5% +/- 0.5% +/- 0.5% +/- 0.5%
Ready Light Indication Yes Yes Yes Yes
Flash Inhibit Yes Yes Yes Yes
Audible Ready Sound Yes Yes Yes Yes
Width 170mm (6
3
⁄4”) 170mm (6
3
⁄4”) 170mm (6
3
⁄4”) 170mm (6
3
⁄4”)
Length 410mm (16
1
⁄4”) 410mm (16
1
⁄4”) 459mm (18
1
⁄8”) 519mm (20
3
⁄8”)
Height 133mm (5
1
⁄4”) 133mm (5
1
⁄4”) 133mm (5
1
⁄4”) 133mm (5
1
⁄4”)
Weight 3.5kg (7.7lbs) 4.0kg (8.8lbs) 4.5kg (9.9lbs) 5.0kg (11lbs)
M
odel:
GM250R GM500R
Part Code
2
30V - BW-3900
117V - BW-3905
2
30V - BW-3910
117V - BW-3915
M
ax Power
2
50Ws
5
00Ws
Power Range 5 stops (full to 1⁄32) 5 stops (full to 1⁄32)
P
ower Control
T
win Rotary Dial (Stops or Tenths)
T
win Rotary Dial (Stops or Tenths)
Modelling Control
full / proportional /
user defined / off
full / proportional /
user defined / off
Ready Indication
Illuminated Test Button Illuminated Test Button
Fan Cooled
No No
Auto Dump (resistive & flash) Yes Yes
Modelling Lamp
250W Halostar (230V - BW-1024/A)
250W Halostar (117V - BW-1024/B)
250W Halostar (230V - BW-1024/A)
250W Halostar (117V - BW-1024/B)
Flash Tube
Two-Pin Clear FT - BW-2030
Two-Pin UV coated FT - BW-2032
Two-Pin Clear FT - BW-2030
Two-Pin UV coated FT - BW-2032
Glass Dome Protective Cover No No
Guide No. (m/100 ISO) 60 85
Recycle to Full Power 1.0 sec 1.3 secs
Flash Duration (at full power) 1/1100 sec. 1/900 sec.
Colour Temperature 5600K ±300K 5600K ±300K
Plug-in Trigger
Module Compatible
Yes Yes
Sync Voltage 5V DC 5V DC
Operating Voltage 230V AC 50Hz or 117V AC 60Hz 230V AC 50Hz or 117-V AC 60Hz
Travelpak Compatibility Yes Yes
Voltage Stabilisation
±0.5% ±0.5%
Ready Light Indication Yes Yes
Flash Inhibit Yes Yes
Audible Ready Sound Yes Yes
Width
170mm (6
3
⁄4”) 170mm (6
3
⁄4”)
Length
380mm (14
7
⁄8”) 380mm (14
7
⁄8”)
Height
133mm (5
1
⁄4”) 133mm (5
1
⁄4”)
Weight
2.9kg (6.4lbs) 3.4kg (7.5lbs)
This is a good general-purpose direct
reflector with an even coverage and a high
light output. Since it has a small 20cm (8”)
diameter, the light it produces is moderately
high in contrast.
BW1887 - 65º Maxilite Reflector
This four-leaf barn-door attachment allows a
greater degree of control over the light
spread. This attachment also incorporates a
gel holder allowing the use of the BW2364 Gel
Set for creative lighting.
BW2363 - Barn-Door & Gel Holder
Barn-Door &
Gel holder for
Maxilite
65º Maxilite
Reflector
THese grids fit on to the front of the Maxilite
Reflector and deliver a very tight controlled
pool of illumination, creating a highly efficient
spot effect.
BW1891 -
3
⁄8” (9.525mm) Wide Angle Grid
BW1892 -
1
⁄4” (6.35mm) Narrow Angle Grid
The pocket-sized Gemini remote control
makes working with compatible Gemini
monolights a breeze. Weighing just 34g, this
diminiutive device allows precise control of
many of the main features.
BW3960 - Gemini IR Remote Control
Gemini IR
Remote Control
Honeycomb
Grids for
Maxilite
R specifications Pro specifications
BWL-0510 Gemini R and Pro_Gemini Classic User Guide 21/12/2010 09:59 Page 16
-
 1
1
-
 2
2
-
 3
3
-
 4
4
-
 5
5
-
 6
6
-
 7
7
-
 8
8


Bowens Gemini R Owner's Handbook Manual
- Category
- Camera flashes
- Type
- Owner's Handbook Manual
Ask a question and I''ll find the answer in the document
Finding information in a document is now easier with AI
Related papers
-
Bowens Gemini R Owner's Handbook Manual
-
-
-
-
-
Bowens travelpak User manual
-
-
-
-
Other documents
-
partyrent com 1781 User manual
-
 partyrent com 1682 User manual
-
American DJ Flash-2C User manual
-
 Cononmark i6TEX Operating instructions
-
Kodak DCS Pro 14nx User manual
-
Profoto Sync Radio Receiver User manual
-
 Promaster PRM1000 Remote Studio Monolight Owner's manual
-
Impact VC-500WLN-II Operating instructions
-
Gemini GRV-MIC User manual
-
PocketWizard PLUS II Owner's manual


