Page is loading ...

Four Channel Multiplexed
Digital Video Recorder
Owner’s Manual
Customer Support 1-800-774-0284

1
Content
1. SAFETY PRECAUTIONS...................................................................2
2. INTRODUCTION...............................................................................3
2.1 Product Introduction...................................................................3
2.2 Application................................................................................4
3. FEATURES........................................................................................4
4. PACKING LIST .................................................................................5
5. INSTALLATION................................................................................6
6. NAME and FUNCTION of EACH PART .........................................................7
6.1 Front Panel ................................................................................7
6.2 Rear Panel .................................................................................9
7. OPERATING PROCEDURE.............................................................. 10
7.1 Power On................................................................................. 10
7.2 Monitoring Mode......................................................................10
7.3 Record Mode............................................................................ 12
7.4 Playback Mode.........................................................................13
8. SYSTEM SETUP.............................................................................. 14
8.1 Menu....................................................................................... 14
8.2 System Setup ........................................................................... 15
8.2.1 Time Setup............................................................................16
8.2.2 Password Setup...................................................................... 17
8.2.2.1 Change Password................................................................ 18
8.3 Camera Setup........................................................................... 20
8.3.1 Camera Setup ........................................................................ 22
8.4 Record Setup............................................................................24
8.4.1 RECORD MODE................................................................... 26
8.5 Buzzer Setup............................................................................ 28
8.6 Event List................................................................................ 30
8.6.1 TIME SEARCH..................................................................... 31
8.6.2 EVENT SEARCH.................................................................. 32
8.7 USB SETUP............................................................................. 33
8.7.1 TIME SETUP........................................................................ 34
8.7.1.1 COPY ................................................................................ 35
8.8 Hard Drive Setup......................................................................36
8.8.1 FORMAT/ ERASE................................................................. 37
9. NETWORK REMOTE CONTROL (Optional) ....................................................... 38
9.1 Network DVR Setup ................................................................. 38
9.1.1 Online with DHCP Server.......................................................38
9.1.2 Online without DHCP Server.................................................. 40

2
9.2 Connecting Network DVR......................................................... 40
9.2.1 Online using Intranet or Fixed IP ............................................ 41
9.2.2 Online using ADSL (PPPoE) Router........................................ 41
9.2.3 Online using DDNS Server..................................................... 41
9.2.4 Online Connection................................................................. 41
9.2.4.1 Install ActiveX ................................................................... 42
9.3 Main Display ........................................................................... 45
9.3.1 Live Display.......................................................................... 45
9.3.2 View.....................................................................................46
9.3.3 Rotate................................................................................... 46
9.3.4 Image Recording.................................................................... 46
9.3.5 Save Current Picture .............................................................. 47
9.3.6 DVR Control Setup................................................................ 47
9.3.7 Quality Setting ......................................................................48
9.3.8 Resolution Setting..................................................................49
9.3.9 Advance Settings................................................................... 49
9.4. Configuration.......................................................................... 49
9.4.1 System Setting....................................................................... 49
9.4.2 User Setting .......................................................................... 50
9.4.2.1 User Authorization Setting................................................... 50
9.4.2.2 New user/ Change Password................................................. 51
9.4.2.3 Delete User......................................................................... 51
9.4.3 Network Setting..................................................................... 51
9.4.3.1 Fixed IP ............................................................................. 51
9.4.3.2 DHCP ................................................................................ 52
9.4.3.3 Connect to ADSL by PPPoE mode........................................ 52
9.4.4 DDNS Setting........................................................................53
9.4.5 Firmware Update................................................................... 55
10. HDD Player Software Description.................................................... 57
11. SPECIFICATIONS63
1. SAFETY PRECAUTIONS
VER.:.2.0, CD

3
WARNING: This symbol is intended to alert the user to the presence of un-insulated
“dangerous voltage”.
CAUTION: This symbol is intended to alert the user to presence of important operating
and maintenance (servicing) instructions in the literature accompanying the appliance.
Disposal of old Electrical & Electronic Equipment (Applicable in the European
Union and other European countries with separate collection systems).
This symbol on the product or on its packaging indicates that this product shall not be treated as
household waste. Instead it should be handed over to the applicable collection point for the
recycling of electrical and electronic equipment. By ensuring this product is disposed of correctly,
you will help prevent potential negative consequences for the environment and human health,
which could otherwise be caused by inappropriate waste handling of this product. The recycling
of materials will help to conserve natural resources. For more detailed information about
recycling of this product, please contact your local city administration or your household waste
disposal service.
Do not install the product in an environment where the humidity is high.
Do not drop the product or subject it to physical shocks.
Keep the product out of direct sunlight.
Do not spill liquid of any kind on the product.
Disconnect power immediately if the product is exposed to liquid.
Keep the product well ventilated.
Use the power adapter supplied with the product.
2. INTRODUCTION
2.1 Product Introduction
The product is perfect for office safety, personnel home security, public
Please read the Safety Precaution Guide through carefully
before operating this product.
CAUTION
RISK OF ELECTRIC SHOCK.
DO NOT OPEN!
CAUTION :
TO REDUCE THE RISK OF ELECTRICAL SHOCK,
DO NOT OPEN COVERS (OR BACK).
NO USER SERVICEABLE PARTS INSIDE.
REFER SERVICING TO QUALIFIED
SERVICE PERSONNEL.

4
environments, industry surveillance, school, or any security application.
The 4-channel M-JPEG Network (optional) digital video recording, enables
monitoring through the internet or local area network (LAN). Video can be searched by
time and event. The administrator can setup an administrator password to prevent any
user from randomly changing the setup.
2.2 Application
??Security:
ATM (auto teller machine), banks, convenience stores, shop and parking lots.
??Factory/ Office:
Factory, warehouse, remote technology support, conference room, and outdoor parking
lots.
??Education/ Military/ Government Organization:
Important facilities, important areas, rapid transit system, and railroad safety.
??Recreation/ Activities:
Sports and news broadcast.
??Home: Monitor & record events while you are away.
3. FEATURES
??Video system auto detection
Auto detects video input (NTSC/ PAL) and supports combined use of color and BW
cameras.
??Supports high quality digital video recording
Adopts M-JPEG compression technology (NTSC: 30fps).
??Video Size
Video Resolution
• NTSC: 640x 224
• PAL: 640x 272
Monitoring Resolution
• NTSC: 720x 480
• PAL: 720x 576
??Replaces the conventional VCR.
Stores video on hard disks instead of video tapes.
??Built-in motion detection function.
Motion detection sensitivity is adjustable for your application.

5
??High efficient event recording, saving storage capacity.
Motion detection function enables recording only when system detects motion, and
increases the amount of time available for recording.
??Easy access to the desired record.
Time & date search supports instant retrieval of video. Alarm event search
Allows the user to retrieve events created by motion detection or an alarm input.
??Live monitoring of the DVR via the internet from anywhere (optional).
Built-in TCP/ IP network interface allows the user to view the DVR through the
local area network (LAN) on a PC, or through the wide area network (WAN or
internet). The DVR and your cable or DSL router will need to be configured to
allow outside (internet) communication to your DVR.
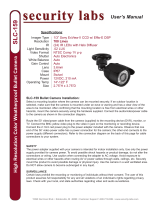
4. PACKING LIST
Check to make sure all of the items shown below are included in your product package.
Item Description Item Picture
QTY
DVR
1
DC 12V/410mA Power Adapter
Input: AC 100~240V
Output: DC 12V/410mA
1

6
Power Cord
1
CD-Viewing and configuration
software
1
Quick Start Guide
1
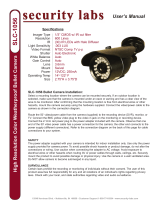
5. INSTALLATION
Rear Panel Connections
Connect your system components to the DVR according to the following illustration
(network is an optional feature and may not be on your DVR):

7
6. Connections & Panel Buttons
6.1 Front Panel
(1) : Record LED indicator.
(2) : Rewind button.
(3) : Fast forward button.
(4) : Left direction button / CH 2 screen display / Number button 2

8
(5) : Up direction button / CH 1 screen display / Number button 1
(6) : Right direction button / Enter Selection/ CH 4 screen display / Number button 4
(7) : Enter / Exit Menu
(8) : Down direction button / CH 3 screen display / Number button 3
(9) : Record / Stop button
(10) : Play / Pause button
(11) : Power LED indicator

9
6.2 Rear Panel
(1) RJ45: Internet connection terminal (optional).
(2) USB: Connect to external USB storage device (Plug and Play).
(3) Video Input [VIDEO IN]: Connect to cameras.
(4) Video Output [VIDEO OUT]: Connect to the monitor.
(5) DC 12V [Power Input terminal]: power socket.

10
7. OPERATING PROCEDURE
7.1 Power On
After power on, DVR will auto-detect its peripherals (self-testing, auto detects the hard
disk, and the optional network connection.
The system will detect the video input and judge whether the video system is NTSC
or PAL. When video input is unable to be detected (VIDEO LOSS), the system will
send out an alarm, press any button to stop the alarm This alarm will not affect the
actual recording. If the DVR senses no video inputs, the DVR will stop recording.
7.2 Monitoring Mode
This mode is the default after power on. During this mode, the system supports live
view for monitoring. Press button, the system will enter the record mode.
Press button to start playback. Press button to enter the menu setup display.
During playback, press button to return to the monitoring mode. Press to
change the speed (FF1, FF2 or FF3), or press button to start reverse playback.
?? To reset the system (while in quad or single display), press the« ? » button 5
times and the message«ALL SETTING DATA IS INITIALIZED.» will be displayed by
flashing 3 times. After reset the password will be set as default value (111111).
?? When the reset procedure has been completed, the message“DVR RESET
COMPLETED. TURN OFF AND ON THE DVR”will be displayed. Re-start the
DVR.

11

12
7.3 Record Mode
Note:CH1: A square block next to the CH number indicates it is recording that
channel
EACH: Record Type QUAD: Record Type
(T): TIMER RECORD (A): MOTION RECORD (M): MIX RECORD
(? ): Currently recording.
VIDEO LOSS: The DVR does not detect video on that CH.
CAMERA1: Title for CH 1.
OFF: Channel is set to “OFF”.

13
7.4 Playback Mode
>01 TIME
Total 7
>07
1. First press the«STOP»button to stop recording, then press the PLAY»button to enter
the search display.
2. Press the « FAST FORWARD» button, then the« PLAY » button to playback
video from old to new. Use the up and down « ? /? » button to move the
cursor to the desired playback time. Press the« ?/? »button to start playback.
3. When wish to view recorded videos of a specific time, use up/ down/ left/
right button and« ? »button to make changes.
4. During playback press the« PAUSE»button to pause and press again to playback.
5. Press the« FAST FORWARD» button to fast forward playback and the
« REWIND» button to rewind.
6. Press the« STOP» button to stop playback.
TIME SEARCH
03/11/27 18:20:42 - 03/11/27 19:32:32
>01 TIME 2003/11/27 18:20:42
02 TIME 2003/11/27 16:43:56
03 TIME 2003/11/27 15:07:11
(??) MOVE ( ? )CHANGE (PLAY)PLAY
(MENU) EXIT (FF)SELECT EVENT OR TIME

14
8. SYSTEM SETUP
8.1 Menu
(1) MAIN MENU: Root directory of the setup menu
(2) Sub-menu Indictors:
(3) Menu Operation and Setup
Press the« ? » or« ? » button to move the cursor ( > ).
Press the« ? » button enter the sub menu.
Press the« MENU» button:
?? Under second or third menu layer, the system will return to the previous
menu layer (second layer to first layer or third layer to second layer) and auto
update the modified/changed setting.
?? Under the main menu (first menu layer), the system will enter the live mode.
Press the« ? » button, to increase or decrease the setting values that has been
highlighted/selected.
¦
: First Menu Layer (Main Menu)
¦¦
: Second Menu Layer
¦¦¦
: Third Menu Layer
¦¦¦¦
: Fourth Menu Layer
(2)
1
(3) > SYSTEM SETUP
CAMERA SETUP
RECORD SETUP
BUZZER SETUP
EVENT LIST
USB DEVICE SETTING
HARD DRIVE SETUP
(4) PRESS (??), THEN (? )
PRESS (MENU) TO EXIT

15
8.2 System Setup
1. The cursor (>) position indicates the current function selected.
2. Press the« ? » and« ? » button to move the cursor.
3. Press the« ? » button to proceed.
4. Press the« MENU» button to exit “System Setup”.
5. “System Setup”is situated on the second menu layer. Under this menu layer the
user may setup the system time, password, return system to default value, and
language preference, etc (VERSION displayed represents the FIRMWARE
version of your DVR).
SYSTEM SETUP
> TIME SETUP
PASSWORD SETUP
LOARD DEFAULT
LANGUAGE SETUP ENGLISH
VERSION V1.4
PRESS(??), THEN (? )
PRESS (MENU) TO EXIT

16
8.2.1 Time Setup
1. The cursor (^) position indicates the current time and date selected.
2. Use the« ? » or« ? » button to move the cursor.
3. Use the« ? » button to setup time and date.
4. Use the« MENU» button to exit “Time Setup”.
TIME SETUP
2005/01/11 17: 23: 06
^
PRESS (??), THEN (? )
PRESS (MENU) TO EXIT

17
8.2.2 Password Setup
1. Cursor (>) position indicates the current function selected.
2. Use the« ? » and« ? » button to move the cursor to the desired item .
3. Use the« ? » button to make changes.
4. Use the« MENU» button to exit “Password Setup”.
5. When the password is setup to “ON”, user will be requested to enter the
correct password for entering from live display to menu selection (default
password: 111111).
6. When the password is setup to “ON”, user will be requested to enter the
correct password to stop recording (default password: 111111).
? When the incorrect password has been entered, “PASSWORD INCORRECT”
PASSWORD SETUP
>
PASSWORD CHANGE
MENU PASSWORD OFF
STOP REC PASSWORD OFF
PRESS (??), THEN (? )
PRESS (MENU) TO EXIT

18
will be shown on the display. To disable the message, press button: QUAD,
CH1, CH2, CH3, or CH4.
8.2.2.1 Change Password
1. Press the« ? » button to show the display above.
2. Enter the current password (CURRENT PASSWORD).
3. Enter new password (NEW PASSWORD).
4. Confirm the new password (CONFIRM PASSWORD).
5. When password change is successful, the system will display “PASSWORD
CHANGED”.
? Default Value: 111111
If password entered is incorrectly, you will receive a message “NO
PASSWORD CHANGED” to inform you (message flashes three times) and the
CURRENT PASSWORD _ _ _ _ _ _
NEW PASSWORD _ _ _ _ _ _
CONFIRM PASSWORD _ _ _ _ _ _
PRESS (MENU) TO EXIT

19
system returns to “Password setup” selection.
? All buttons may be used as a password during password setup, except for the
MENU button.
8.2.3 Load Default
1. Press the« ? » button to show the display above.
2. Press the« ? » button. The message« ALL SETTING DATA IS INITIALIZED»
will be displayed by flashing 3 times, and then returns to default value. When the
reset procedure has been completed, the message“DVR RESET COMPLETED
TURN OFF AND ON THE DVR”will be displayed. Please restart the DVR.
3. Press the« MENU» button to exit “Load Default Setup” selection.
LOAD DEFAULT
PRESS (? ) TO RESET
PRESS (MENU) TO EXIT
/