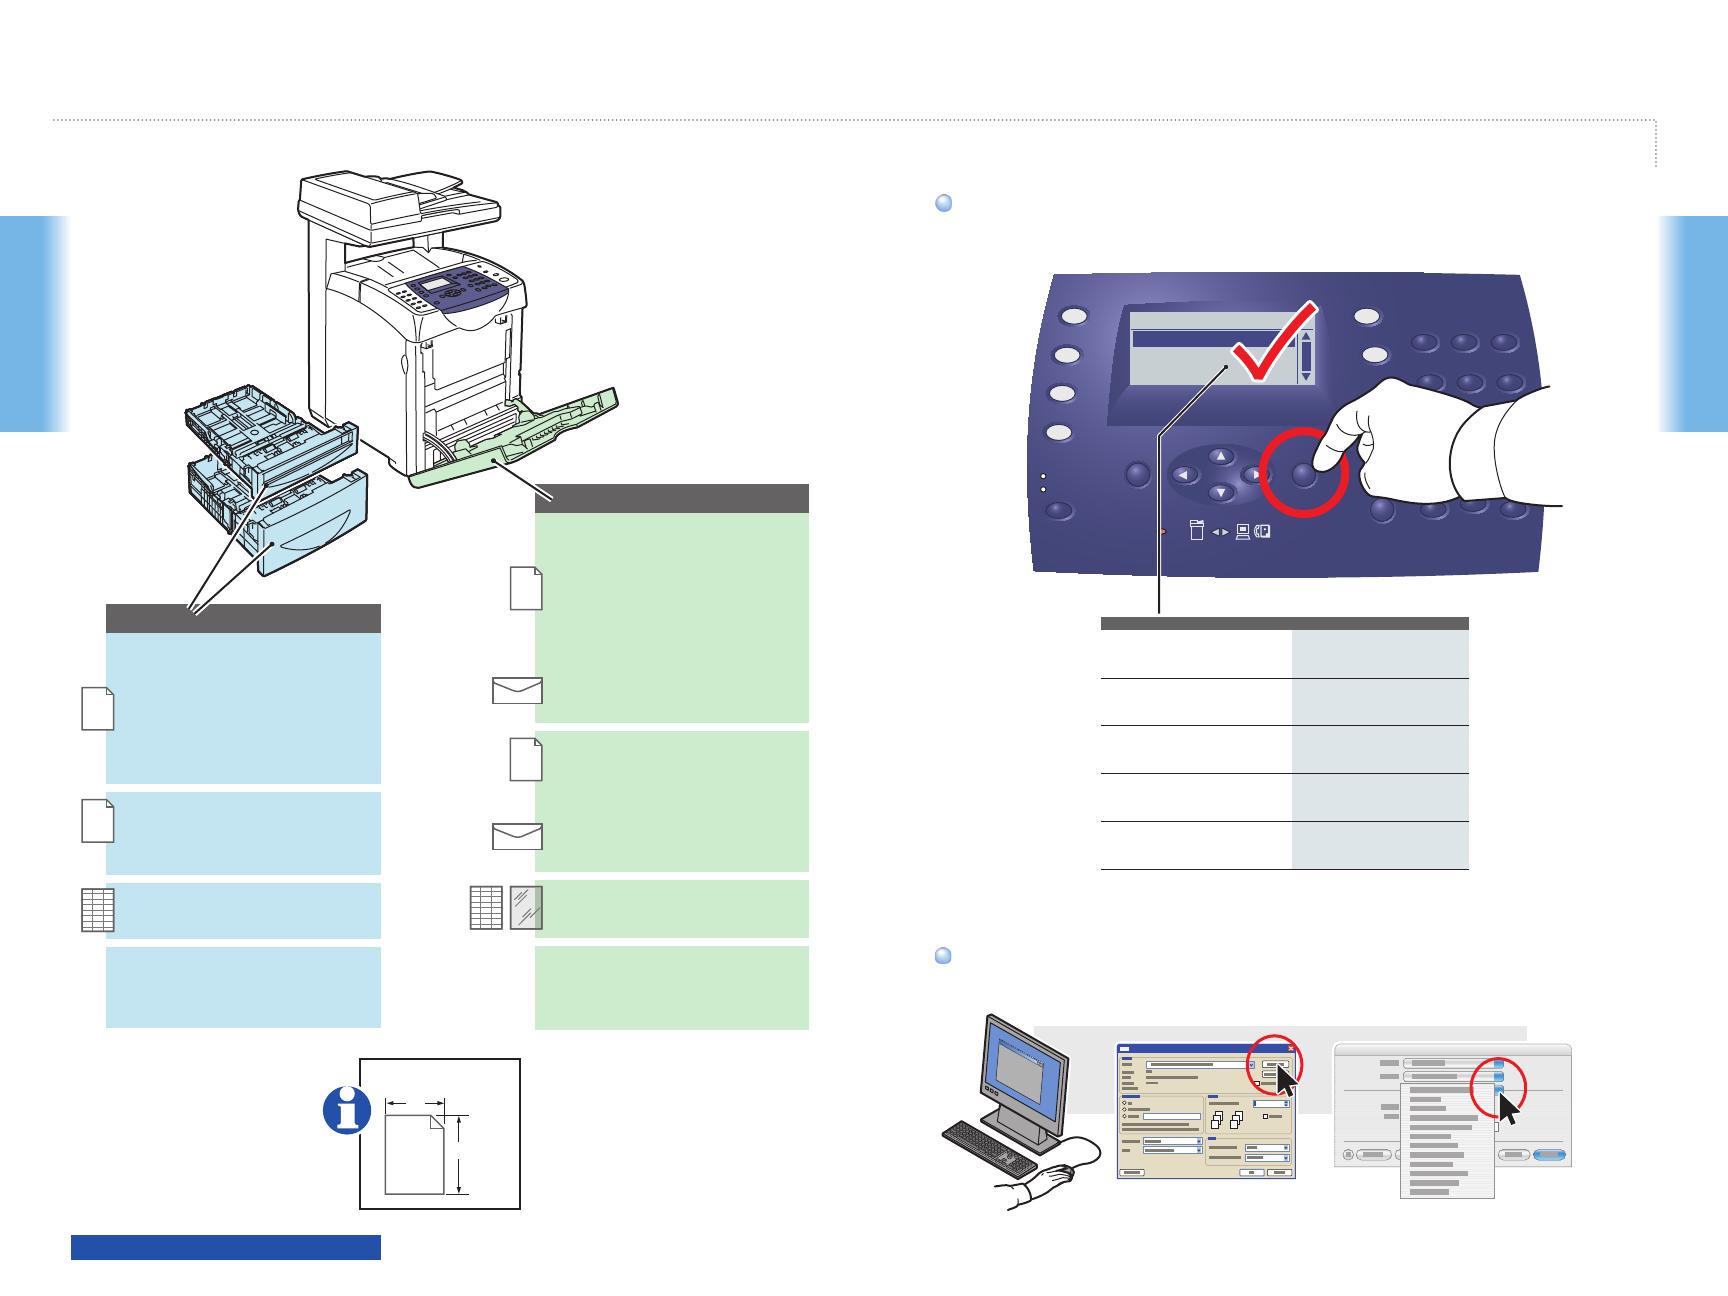
Xerox 6180MFP User manual

Category
Multifunctionals
Type
User manual

This manual is also suitable for

multifunction printer
Phaser
®
6180MFP
Quick
Use
Guide
www.xerox.com/office/6180MFPsupport
www.xerox.com/msds (U.S./Canada)
www.xerox.com/environment_europe
www.xerox.com/office/businessresourcecenter
English Rev A
Copyright © 2007 Xerox Corporation. All rights reserved.
www.xerox.com/office/6180MFPsupport
More Information
Printer drivers and utilities
Quick Start Tutorials
User manuals and instructions
Online Support Assistant
Safety specifications (in User Guide)
Material Safety Data Sheets
Templates, tips, and tutorials
Printer Tour
Printing
Copying
Scanning
Faxing
Troubleshooting
2
Printer Tour
Printer Tour
C
M
Y
K
K
Y
M
C
www.xerox.com/office/6180MFPsupplies
www.xerox.com/office/6180MFPsupport
Printer Tour
Print CartridgesPrint Cartridges
See the label.
Automatic Document
Feeder (ADF)
Automatic Document
Feeder (ADF)
Tray 1 (MPT)Tray 1 (MPT)
Tray 2Tray 2
Tray 3Tray 3
ScannerScanner
Door ADoor A
550-Sheet Feeder550-Sheet Feeder
Transfer UnitTransfer Unit
Fuser
Print CartridgesPrint Cartridges
For ordering supplies, contact your
local reseller, or visit the Xerox Supplies
website.
3
Printer Tour
Printer Tour
001 002
003 004
005 006
007 008
009 010
Copy
Fax
E-mail
Scan
Color Mode
B&W
Color
OK
Job in Memory
Job Status
ABC
GHI
PQRS
Redial/
Pause
Speed Dial
-_~
TUV WXYZ
JKL MNO
@:./
C
DEF
System
Manual Dial
1 2 3
4
5 6
7
8
0
#
9
Clear All
Error
Wake Up
Stop
Start
C M Y K
Ready
OK
www.xerox.com/office/6180MFPsupport
One touch Fax numbers 001 – 010
Selects a function.
Selects the color mode.
Alphanumeric keypad
Power Saver wake up
Enters the Setup menu.
Displays the active jobs
or Walk-Up Features.
Starts a copy, scan, or
fax job.
Resets the job settings
to defaults.
Cancels the current
job.
Accesses fax numbers.
Deletes alphanumeric
characters.
Scrolls up or down.
Goes up one level, or
decreases a numeric
value.
Goes down one level, or increases
a numeric value.
OK
Goes up one menu level.
Enters fax numbers.
Email and fax address book
4
Printing
Printing
Tray 2, 3
Tray 1(MPT)
LE
SE
Mac
www.xerox.com/office/6180MFPsupport
PC
Copy
Fax
E-mail
Scan
Color Mode
B&W
Color
OK
Job in Memory
Job Status
ABC
GHI
PQRS
Redial/
Pause
Speed Dial
-_~
TUV WXYZ
JKL MNO
@:./
C
DEF
System
Manual Dial
1 2 3
4
5 6
7
8
0
#
9
Tray 2
Paper Type Plain Paper
Paper Size.... Auto
65-120 g/m
2
(17-32 lb. Bond)
100-163 g/m
2
(28 lb. Bond – 60 lb. Cover)
100-160 g/m
2
(28 lb. Bond – 60 lb. Cover)
160-220 g/m
2
(60-80 lb. Cover)
160-220 g/m
2
(60-80 lb. Cover)
Supported Papers
A/Letter......................... 8.5 x 11.0 in.
Legal............................. 8.5 x 14.0 in.
Executive...................... 7.25 x 10.5 in.
Folio.............................. 8.5 x 13.0 in.
A4.................................. 210 x 297 mm
A5.................................. 148 x 210 mm
B5.................................. 176 x 250 mm
A/Letter......................... 8.5 x 11.0 in.
A4.................................. 210 x 297 mm
Custom.......................... (SE) x (LE)
SE: 148 – 216 mm (5.8 – 8.5 in.)
LE: 210 – 355.6 mm (8.2 – 14.0 in.)
A/Letter......................... 8.5 x 11.0 in.
Legal............................. 8.5 x 14.0 in.
Executive...................... 7.25 x 10.5 in.
Folio.............................. 8.25 x 13.0 in.
#10 Commercial........... 4.1 x 9.5 in.
Monarch....................... 3.8 x 7.5 in.
A4.................................. 210 x 297 mm
A5.................................. 148 x 210 mm
B5.................................. 176 x 250 mm
DL................................. 110 x 220 mm
C5.................................. 162 x 229 mm
A/Letter......................... 8.5 x 11.0 in.
A4.................................. 210 x 297 mm
Custom.......................... (SE) x (LE)
SE: 76.2 – 220 mm (3.0 – 8.7 in.)
LE: 127 – 355.6 mm (5.0 – 14.0 in.)
65 – 220 g/m
2
(17 lb. Bond – 80 lb. Cover)
65 – 220 g/m
2
(17 lb. Bond – 80 lb. Cover)
Custom (SE) x (LE)
When Printing: Select properties. Use the Xerox
printer driver.
When Printing: Select properties. Use the Xerox
printer driver.
When loading paper: Select appropriate settings
on the control panel.
When loading paper: Select appropriate settings
on the control panel.
Plain Paper
Thin Card Stock
Thick Card Stock
Glossy Paper
Thick Glossy Paper
5
Printing
Printing
1
1
2
2
4
3
5 6
2.1
2.2
3
www.xerox.com/office/6180MFPsupport
063-0000-00a
Phaser
®
6180MFP Software and
Documentation CD-ROM
Printer Drivers
and Utilities
Installation Video
Win dow s
®
,
Mac OS
®
Basic Printing
See Printing
Basics in the
User Guide for
more information.
6
Copying
Copying
1
3
65 – 120 g/m
2
(17 – 32 lb. Bond)
H
W
W: 148 – 216 mm (4.1 – 8.5 in.)
H: 210 – 355.6 mm (8.3 – 14 in.)
OK
ABC
GHI
PQRS
-_~
TUV WXYZ
JKL MNO
@:./ DEF
1 2 3
4
5 6
7
8
0
#
9
Color Mode
B&W
Color
Ready to Copy Set 5
Paper Supply... Tray 2: Letter
Reduce/Enlarge.... 100%
Document Type... Text&Photo
Ready to Copy Set 5
Paper Supply... Tray 2: Letter
Reduce/Enlarge.... 100%
Document Type... Text&Photo
5
4
Start
www.xerox.com/office/6180MFPsupport
2
Copy
5.1
5.2
063-0000-00a
Phaser
®
6180MFP Software and
Documentation CD-ROM
Printer Drivers
and Utilities
Installation Video
Win dow s
®
,
Mac OS
®
Basic Copying
Load the original.Load the original.
See Copying
in the User Guide for
more information.
Select the number of copies.Select the number of copies.
Select the Color Mode and then
press the Start button.
Select the Color Mode and then
press the Start button.
Navigate the menus for special
features or paper.
Navigate the menus for special
features or paper.
Press the Copy button.Press the Copy button.
7
Scanning
Scanning
063-0000-00a
Phaser
®
6180MFP Software and
Documentation CD-ROM
Printer Drivers
and Utilities
Installation Video
Win dow s
®
,
Mac OS
®
65 – 120 g/m
2
(17 – 32 lb. Bond)
H
W
W: 148 – 216 mm (4.1 – 8.5 in.)
H: 210 – 355.6 mm (8.3 – 14 in.)
USB
Ethernet
www.xerox.com/office/6180MFPsupport
Scanning
Depending on the printer’s
connection (USB or Ethernet), you
can send scanned files directly from
the printer’s control panel to a
computer, an FTP server, or to
email. You can also scan directly
into an application from a
computer. To set up scanning for
your connection, see the Features
Setup Guide (printed booklet or
web) or Scanning in the User
Guide.
Loading the original
8
Scanning
Scanning
1
2
3 4
PC
PC
PC
USB
Mac
Mac
Mac
www.xerox.com/office/6180MFPsupport
Scanning from a computer
Launch the application to
scan into (import method
varies by application).
Launch the application to
scan into (import method
varies by application).
Select the scan settings.Select the scan settings.
Click the Preview button for a preview.Click the Preview button for a preview.
Click the Scan button.Click the Scan button.
The ADF cannot
preview.
9
Scanning
Scanning
USB
1
5 6
4
32
Start
Scan
Copy
Fax
E-mail
Scan
Color Mode
B&W
Color
OK
Job in Memory
Job Status
System
Manual Dial
PC
Mac
Service
Computer (Network)...
Server (FTP)...
Computer (USB)...
OK
OK
File Format
TIFF
JPEG
PDF
BMP
x2
OK
OK
6.1
6.2
063-0000-00a
Phaser
®
6180MFP Software and
Documentation CD-ROM
Printer Drivers
and Utilities
Installation Video
Win dow s
®
,
Mac OS
®
www.xerox.com/office/6180MFPsupport
Scanning to a computer
Select settings in the
Express Scan Manager
(application).
Select settings in the
Express Scan Manager
(application).
Scroll to select the file format.Scroll to select the file format.
Press OK, and then Start.Press OK, and then Start.
Press twice to display the file
format options.
Press twice to display the file
format options.
Scroll to select
Computer (USB)...
Scroll to select
Computer (USB)...
Press the Scan button.Press the Scan button.
See Scanning
in the User Guide
for more information.
10
Scanning
Scanning
5
4
6
2 31
Ethernet
Start
Scan
Service
Computer (Network)...
Server (FTP)...
Computer (USB)...
Service
Computer (Network)...
Server (FTP)...
Computer (USB)...
[ ] Detail, [Enter]: Save
01 MyComputer
02 Jack Computer
03 Lab Computer
[ ] Detail, [Enter]: Save
05 ftp.mycolor.com
09 ftp.maxserver
Ready to Scan: 01 MyComputer
Scan to: 01 MyComput...
File Format... MultipageTIFF
Resolution... 150 x 150
Ready to Scan: 05 ftp,mycolor.com
Scan to: 05 ftp.mycolo...
File Format... MultipageTIFF
Resolution... 150 x 150
OK
OK
x2
OK
Ready to Scan: 01 MyComputer
Scan to: MyComput...
File Format... MultipageTIFF
Resolution... 150 x 150
OK
Ready to Scan: 05 ftp,mycolor
Scan to: 05 ftp.mycol...
File Format... MultipageTIFF
Resolution... 150 x 150
www.xerox.com/office/6180MFPsupport
063-0000-00a
Phaser
®
6180MFP Software and
Documentation CD-ROM
Printer Drivers
and Utilities
Installation Video
Win dow s
®
,
Mac OS
®
Scanning to a computer or FTP server
Scroll to select other settings.Scroll to select other settings.
Scroll to select an address, and
then press the OK button.
Scroll to select an address, and
then press the OK button.
Scroll to select
Computer (Network)...
or Server (FTP)...
Scroll to select
Computer (Network)...
or Server (FTP)...
Press twice to display the
address menu.
Press twice to display the
address menu.
Press the Scan button.Press the Scan button.
Press the Start button.Press the Start button.
See Scanning
in the User Guide for
more information.
11
Scanning
Scanning
Ethernet
21
3
4 5
ABC
GHI
PQRS
-_~
TUV WXYZ
JKL MNO
@:./ DEF
1 2 3
4
5 6
7
8
0
#
9
Start
OK
Enter Recipient
Email to... xybusiness@xyz
From Setting....
File Format... MultiPage TIFF
E-mail
Enter Recipient
Email to...
From Setting...
File Format... MultiPageTIFF
Recipient
Email Address...
Address Book...
Email Group...
Enter Email, [Enter]: Save
xybusiness@xy_
OK
OK
3.1
3.2
OK
3.3
www.xerox.com/office/6180MFPsupport
063-0000-00a
Phaser
®
6180MFP Software and
Documentation CD-ROM
Printer Drivers
and Utilities
Installation Video
Win dow s
®
,
Mac OS
®
Scanning to Email
Scroll to select Email to..., and
then press the OK button.
Scroll to select Email to..., and
then press the OK button.
Press the E-mail button.Press the E-mail button.
Scroll to select an address type,
and then press the OK button.
Scroll to select an address type,
and then press the OK button.
Enter an Email address if
required, and then press the
OK button.
Enter an Email address if
required, and then press the
OK button.
Scroll to select other settings.Scroll to select other settings.
Press the Start button.Press the Start button.
See Scanning
in the User Guide for
more information.
12
Faxing
Faxing
063-0000-00a
Phaser
®
6180MFP Software and
Documentation CD-ROM
Printer Drivers
and Utilities
Installation Video
Win dow s
®
,
Mac OS
®
65 – 120 g/m
2
(17 – 32 lb. Bond)
H
W
W: 148 – 216 mm (4.1 – 8.5 in.)
H: 210 – 355.6 mm (8.3 – 14 in.)
www.xerox.com/office/6180MFPsupport
You can enter fax numbers
manually or store them in an
address book. To set up faxing, see
the Features Setup Guide (printed
booklet or web) or Faxing in the
User Guide.
You can send a fax directly from a
computer using the PCL driver. See
Faxing in the User Guide.
You can enter fax numbers
manually or store them in an
address book. To set up faxing, see
the Features Setup Guide (printed
booklet or web) or Faxing in the
User Guide.
You can send a fax directly from a
computer using the PCL driver. See
Faxing in the User Guide.
Faxing
Loading the original
13
Faxing
Faxing
1
5
2
Fax
Enter Recipient
Fax to...
Resolution... Standard
Ducument Type... Text
Enter Fax Number, [OK]: Save
503555_
OK
3 4
Recipient
Fax Number...
Phone Book...
Group Dial...
OK
ABC
GHI
PQRS
-_~
TUV WXYZ
JKL MNO
@:./ DEF
1 2 3
4
5 6
7
8
0
#
9
OK
4.1
4.2
Ready to Fax: 5035551234
Fax to... 5035551234
Resolution... Standard
Ducument Type... Text
6
Start
www.xerox.com/office/6180MFPsupport
063-0000-00a
Phaser
®
6180MFP Software and
Documentation CD-ROM
Printer Drivers
and Utilities
Installation Video
Win dow s
®
,
Mac OS
®
Press the Fax button.Press the Fax button.
Confirm the fax number.Confirm the fax number.
Select Fax to...Select Fax to...
Select Fax Number...Select Fax Number...
Enter a fax number, and then
press the OK button.
Enter a fax number, and then
press the OK button.
Press the Start button.Press the Start button.
Basic Faxing
See Faxing in the
User Guide for more
information.
14
Troubleshoooting
Troubleshoooting
1
1
1
2
2
www.xerox.com/office/6180MFPsupport
Troubleshooting
Paper Jams
15
Troubleshoooting
Troubleshoooting
1
2
3
www.xerox.com/office/6180MFPsupport
063-0000-00a
Phaser
®
6180MFP Software and
Documentation CD-ROM
Printer Drivers
and Utilities
Installation Video
Win dow s
®
,
Mac OS
®
Paper Jams
See Troubleshooting in the User Guide for
more information on:
Paper jams
Print-quality problems
Color registration
Error messages
To clean the document glass: use a
moistened lint-free cloth.
1 / 1

Xerox 6180MFP User manual

Category
Multifunctionals
Type
User manual
This manual is also suitable for

Ask a question and I''ll find the answer in the document

Finding information in a document is now easier with AI

Ask the document