Thank you for purchasing this PIONEER
product
To ensure proper use, please read through this
manual before using this product. It is especially
important that you read and observe WARN-
INGs and CAUTIONs in this manual. Please
keep the manual in a safe and accessible place for
future reference.
FCC ID: AJDK042
MODEL NO.: DEH-6400BT/DEH-5400BT/DEH-
64BT
IC: 775E-K042
This device complies with Part 15 of FCC
Rules and Industry Canada licence-exempt
RSS standard(s). Operation is subject to the
following two conditions: (1) this device may
not cause interference, and (2) this device
must accept any interference, including inter-
ference that may cause undesired operation
of this device.
This transmitter must not be co-located or op-
erated in conjunction with any other antenna
or transmitter.
The antenna for Bluetooth cannot be removed
(or replaced) by user.
This equipment complies with FCC/IC radia-
tion exposure limits set forth for an uncon-
trolled environment and meets the FCC radio
frequency (RF) Exposure Guidelines in Sup-
plement C to OET65 and RSS-102 of the IC
radio frequency (RF) Exposure rules. This
equipment has very low levels of RF energy
that it deemed to comply without maximum
permissive exposure evaluation (MPE). But it
is desirable that it should be installed and op-
erated keeping the radiator at least 20 cm or
more away from person’s body (excluding ex-
tremities: hands, wrists, feet and ankles).
Information to User
Alteration or modifications carried out with-
out appropriate authorization may invalidate
the user’s right to operate the equipment.
Note
This equipment has been tested and found to
comply with the limits for a Class B digital de-
vice, pursuant to Part 15 of the FCC Rules. These
limits are designed to provide reasonable protec-
tion against harmful interference in a residential
installation. This equipment generates, uses and
can radiate radio frequency energy and, if not in-
stalled and used in accordance with the instruc-
tions, may cause harmful interference to radio
communications. However, there is no guaran-
tee that interference will not occur in a particu-
lar installation. If this equipment does cause
harmful interference to radio or television recep-
tion, which can be determined by turning the
equipment off and on, the user is encouraged to
try to correct the interference by one or more of
the following measures:
- Reorient or relocate the receiving antenna.
- Increase the separation between the equip-
ment and receiver.
- Connect the equipment into an outlet on a cir-
cuit different from that to which the receiver is
connected.
- Consult the dealer or an experienced radio/TV
technician for help.
The Safety of Your Ears is in
Your Hands
Get the most out of your equipment by playing it
at a safe level—a level that lets the sound come
through clearly without annoying blaring or dis-
tortion and, most importantly, without affecting
your sensitive hearing. Sound can be deceiving.
Over time, your hearing “comfort level” adapts to
higher volumes of sound, so what sounds “nor-
mal” can actually be loud and harmful to your
hearing. Guard against this by setting your
equipment at a safe level BEFORE your hearing
adapts.
ESTABLISH A SAFE LEVEL:
! Set your volume control at a low setting.
! Slowly increase the sound until you can hear
it comfortably and clearly, without distortion.
! Once you have established a comfortable
sound level, set the dial and leave it there.
BE SURE TO OBSERVE THE
FOLLOWING GUIDELINES:
! Do not turn up the volume so high that you
can’t hear what’s around you.
! Use caution or temporarily discontinue use
in potentially hazardous situations.
! Do not use headphones while operating a
motorized vehicle; the use of headphones
may create a traffic hazard and is illegal in
many areas.
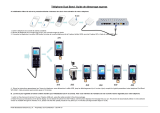
About this unit
The tuner frequencies on this unit are allocated
for use in North America. Use in other areas
may result in poor reception.
WARNING
Handling the cord on this product or cords asso-
ciated with accessories sold with the product
may expose you to chemicals listed on proposi-
tion 65 known to the State of California and
other governmental entities to cause cancer and
birth defect or other reproductive harm. Wash
hands after handling.
CAUTION:
USE OF CONTROL OR ADJUSTMENT OR
PERFORMANCE OF PROCEDURES
OTHER THAN THOSE SPECIFIED HEREIN
MAY RESULT IN HAZARDOUS RADIATION
EXPOSURE.
CAUTION:
THE USE OF OPTICAL INSTRUMENTS
WITH THIS PRODUCT WILL INCREASE
EYE HAZARD.
CAUTION
! Do not allow this unit to come into contact
with liquids. Electrical shock could result.
Also, damage to this unit, smoke, and over-
heating could result from contact with
liquids.
! Always keep the volume low enough to hear
outside sounds.
! Avoid exposure to moisture.
! If the battery is disconnected or discharged,
any preset memory will be erased.
Important (Serial number)
The serial number is located on the bottom of
this unit. For your own security and conven-
ience, be sure to record this number on the en-
closed warranty card.
Note
Function setting operations are completed even
if the menu is cancelled before the operations
are confirmed.
Before you start
2
Section
Before you start
En
01