V-ZUG 266 Installation guide

Type
Installation guide
Installation instructions
Convenient storage drawer
for washing machines
J265.050-1
23.3.11 ZES
10
These installation instructions apply to the models: 266, 268, 269
The appliance should be installed by qualified personnel only. Each step must be carried out and checked in full in the order
specified.
Validity
General notes
A full repair can only be guaranteed providing the non-destructive deinstallation of the complete appliance is possible at any
time.
Supplied installation accessories
Designation Number of items
Floor mounting plate incl. double sided adhesive discs 2
Nylon plug Delta size 6 2
Countersunk head wood screws 5 × 30 2
Installation template for floor mounting plate 1
Hexagon nuts 0.8D St EZN 4
U-washers St EZN 4
Combi spanner 19 mm 1
Combi spanner 27 mm 1
Hexagon box spanner 1
Allen key 1
Dimensions
550
45821
~340
550
595
Top view
Installation instructions
Convenient storage drawer
for washing machines
J265.050-1
23.3.11 ZES
11
Note
Residual water can flow out of the pipes and the detergent drawer if the appliance is tilted.
The packing material (PS boards) can be used as an installation underlay.
The appliance shipping restraint must not be mounted for the installation of the convenient storage drawer.
Preparation
Unplug the mains connection plug or switch off at the wall switch.
Remove the water drain pipe at the appliance and the water supply at the cock.
Carry out emergency draining in accordance with the appliance operating instructions.
Installation
1. Pull the appliance out of the niche and remove the
installation plate from the floor; this is no longer
required.
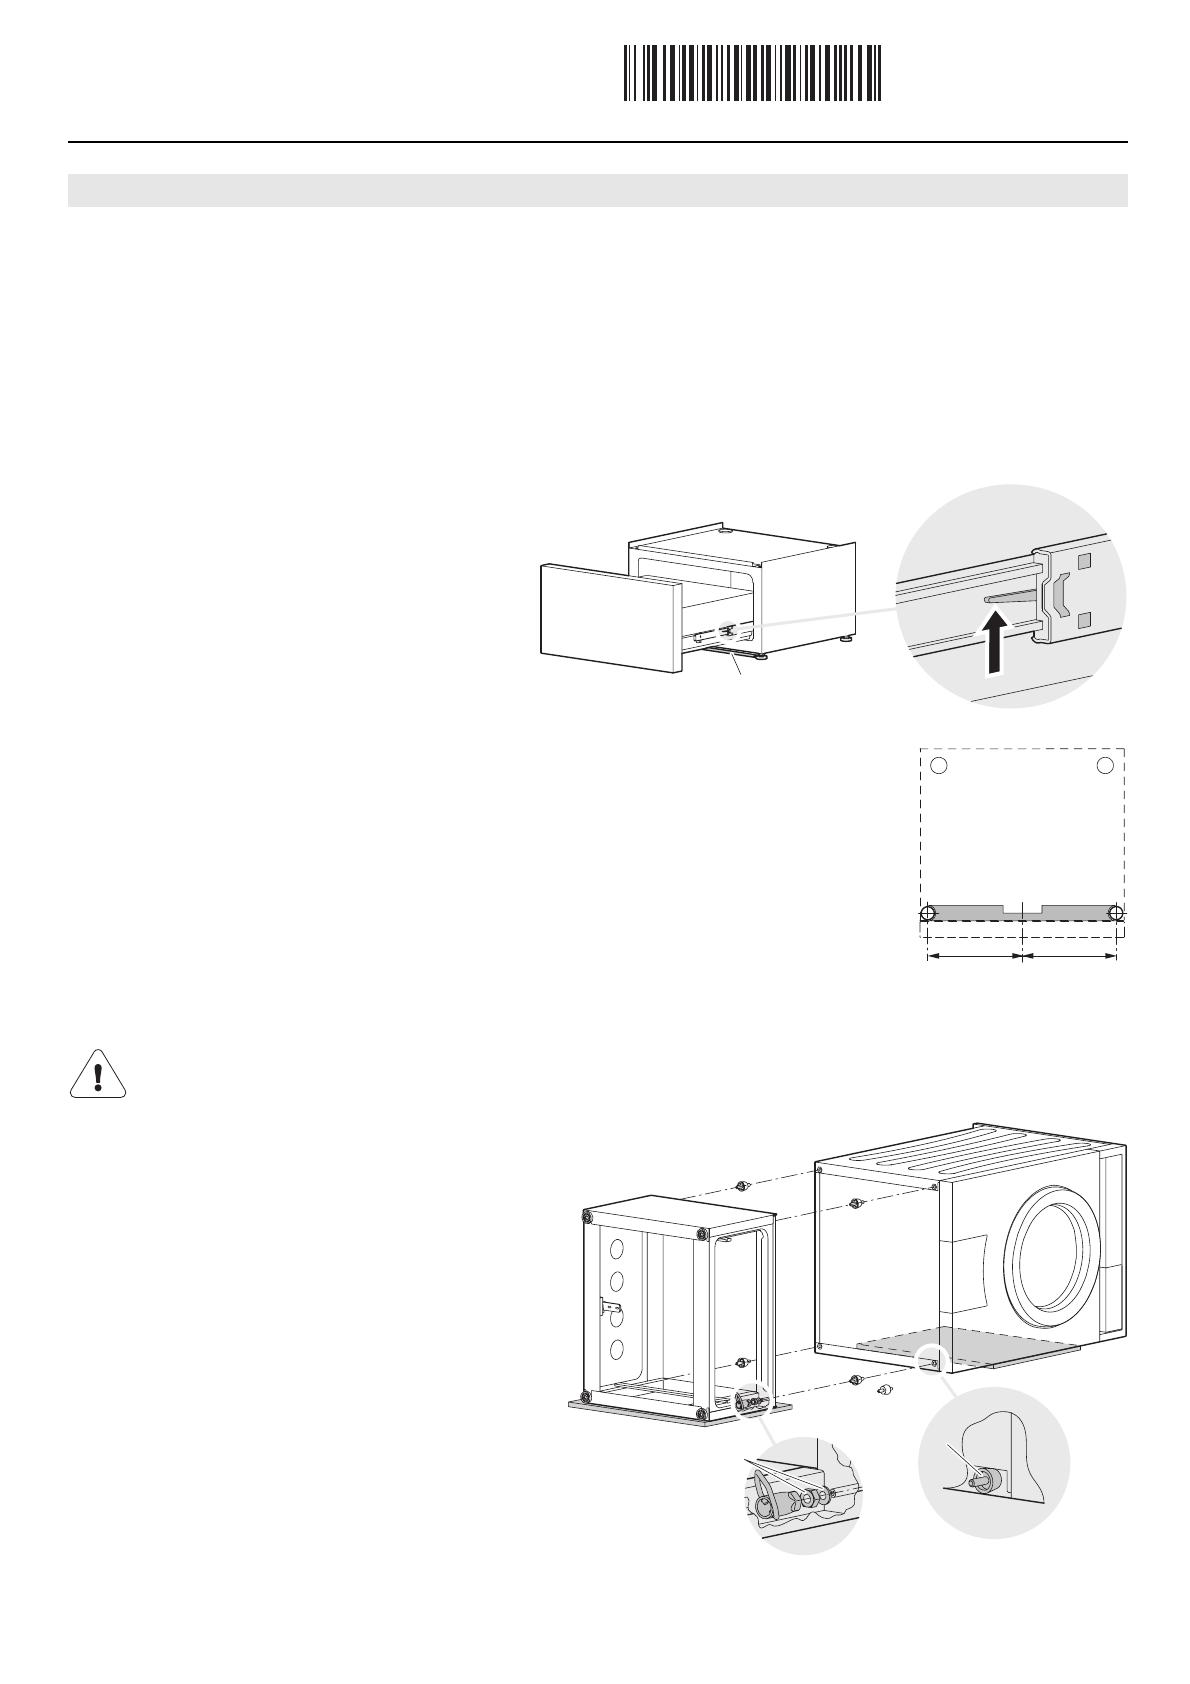
2. Place the convenient storage drawer 1 on the same
spot and remove the drawer 2 by lifting the black rail
springs 4 at the side.
3. Stick the installation template 3 to the floor centrally
between the adjustable feet.
4. Affixing the floor mounting plates
Remove the protective film from the mounting plates.
Lift up the convenient storage drawer and the appliance at the front and move it aside in order to stick
the mounting plates in position.
Clean the adhesive zone with pure benzine or acetone.
Taking the fixing position from the installation template 3, stick the mounting plates to the floor.
Screwing the floor mounting plates
Move the convenient storage drawer aside to drill the mounting plates.
Mark the centre of the holes, using the installation template 3.
Drill ø 6 mm holes and insert plugs. Screw the mounting plate in place. Drilling inaccuracies can be
compensated by means of the eccentric hole in the mounting plate.
5. Pull the convenient storage drawer out of the niche and remove the installation template.
6. Lay the appliance according to drawing on its right-hand side, using packing material as an underlay.
7. Loosen the lock nuts using the combi spanner (19 mm)
and unscrew the adjustable feet. Screw mount the feet
connectors 6 by hand as shown in the detail drawing.
8. Screw mount the convenient storage drawer 1 to the
appliance from below, using the hexagon box spanner,
the 4 nuts and the washers 5.
9. Align and position appliance and convenient storage
drawer. Insert the drawer and slide in until the rail springs
reengage.
Installation
It is important that the appliance is placed on its right-hand side; otherwise troubles can occur in subsequent operation.
4
2
1
3
3
==
6
5
1
Installation instructions
Convenient storage drawer
for washing machines
J265.050-1
23.3.11 ZES
12
Tools: Combi spanner 19 mm 7 (supplied) and spirit level 8
Rear adjuster feet
Loosen lock nuts 9.
Align convenient storage drawer vertically by turning the foot by hand.
Tighten the lock nuts firmly.
Front adjuster feet
Place the appliance in the floor mounting plate.
Loosen lock nuts 9.
Align convenient storage drawer vertically by turning the foot by hand.
Convenient storage drawer and appliance must be absolutely stable.
Tighten the lock nuts.
Plug the appliance in at the mains or turn the wall switch on.
The appliance switches on.
If there are any items in the drum, remove them and then close the appliance door.
Turn the water tap on.
Depress the , and buttons simultaneously for 3 seconds.
The spinning sequence is carried out.
After about 2 minutes the following appears in the display: resp. .
Check the stability of the appliance.
The appliance must stand perfectly vertically with all 4 feet firmly on the floor and must not wobble.
Press the button to complete the initial set-up of the appliance.
The spinning sequence is finished. The appliance is then drained.
If necessary, repeat Levelling.
Levelling
For fault-free operation the convenient storage drawer must stand perpendicular to the appliance with all feet firmly on the
ground and the lock nuts 9 must be firmly tightened.
Levelling check
9
7
8
Check stability
  • Page 1 1
  • Page 2 2
  • Page 3 3
  • Page 4 4
  • Page 5 5
  • Page 6 6
  • Page 7 7
  • Page 8 8
  • Page 9 9
  • Page 10 10
  • Page 11 11
  • Page 12 12

V-ZUG 266 Installation guide

Type
Installation guide

Ask a question and I''ll find the answer in the document

Finding information in a document is now easier with AI