
310 Series
User’s Guide
User’s Guide

User’s Guide
Edition: June 2004
The following paragraph does not apply to any country where such provisions are inconsistent
with local law: LEXMARK INTERNATIONAL, INC., PROVIDES THIS PUBLICATION “AS IS”
WITHOUT WARRANTY OF ANY KIND, EITHER EXPRESS OR IMPLIED, INCLUDING, BUT NOT
LIMITED TO, THE IMPLIED WARRANTIES OF MERCHANTABILITY OR FITNESS FOR A
PARTICULAR PURPOSE. Some states do not allow disclaimer of express or implied warranties in
certain transactions; therefore, this statement may not apply to you.
This publication could include technical inaccuracies or typographical errors. Changes are periodically
made to the information herein; these changes will be incorporated in later editions. Improvements or
changes in the products or the programs described may be made at any time.
Comments about this publication may be addressed to Lexmark International, Inc., Department F95/
032-2, 740 West New Circle Road, Lexington, Kentucky 40550, U.S.A. In the United Kingdom and
Eire, send to Lexmark International Ltd., Marketing and Services Department, Westhorpe House,
Westhorpe, Marlow Bucks SL7 3RQ. Lexmark may use or distribute any of the information you supply
in any way it believes appropriate without incurring any obligation to you. You can purchase additional
copies of publications related to this product by calling 1-800-553-9727. In the United Kingdom and
Eire, call +44 (0)8704 440 044. In other countries, contact your point of purchase.
References in this publication to products, programs, or services do not imply that the manufacturer
intends to make these available in all countries in which it operates. Any reference to a product,
program, or service is not intended to state or imply that only that product, program, or service may be
used. Any functionally equivalent product, program, or service that does not infringe any existing
intellectual property right may be used instead. Evaluation and verification of operation in conjunction
with other products, programs, or services, except those expressly designated by the manufacturer,
are the user’s responsibility.
Lexmark and Lexmark with diamond design are trademarks of Lexmark International, Inc., registered
in the United States and/or other countries. Photo Jetprinter is a trademark of Lexmark International,
Inc.
Other trademarks are the property of their respective owners.
© 2004 Lexmark International, Inc.
All rights reserved.
UNITED STATES GOVERNMENT RIGHTS
This software and any accompanying documentation provided under this agreement are commercial
computer software and documentation developed exclusively at private expense.
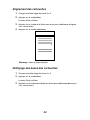
Safety information
• Use only the power supply provided with this product or the manufacturer's authorized
replacement power supply.
• Connect the power supply cord to an electrical outlet that is near the product and
easily accessible.
• Refer service or repairs, other than those described in the user documentation, to a
professional service person.
CAUTION: Do not set up this product or make any electrical or
cabling connections, such as the power supply cord or telephone,
during a lightning storm.
Conventions
Note: A note identifies something that could help you.
CAUTION: A caution identifies something that could cause you
harm.
Warning: A warning identifies something that could damage your
product hardware or software.

3
Contents
Understanding your printer ..............................................7
Printer parts .................................................................................. 7
Control panel ................................................................................. 8
Loading paper ..................................................................10
Supported photo paper types ...................................................... 10
Loading the photo paper ............................................................. 10
Inserting memory cards ..................................................11
Supported memory cards ............................................................ 11
Inserting memory cards .............................................................. 12
Printing from a memory card ..........................................13
Step 1: Load photo paper ........................................................... 13
Step 2: Insert a memory card ...................................................... 13
Step 3: View your photos ............................................................ 13
Step 4: Select a photo to print ..................................................... 13
Step 5: Customize the photo ....................................................... 14
Step 6: To select another photo, repeat steps 4 and 5. .............. 14
Step 7: Print photo(s) .................................................................. 14
Step 8: Remove the memory card .............................................. 14

4
Printing from a digital camera ........................................15
Customizing your photo prints .......................................16
Printing an index page ................................................................ 16
Printing all photos ....................................................................... 16
Printing a photo in black and white ............................................. 17
Cropping a photo ........................................................................ 18
Adjusting the brightness .............................................................. 19
Adjusting the number of prints .................................................... 20
Viewing slide show ...................................................................... 21
Printing DPOF selection .............................................................. 21
Customizing your printer settings .................................22
Changing the blank paper size ................................................... 22
Changing the blank paper type ................................................... 22
Changing the print quality ........................................................... 23
Adjusting preview before print ..................................................... 23
Changing the control panel display language ............................. 23
Changing the power save ........................................................... 24
Clearing photo settings ............................................................... 24
Restoring factory defaults ........................................................... 25
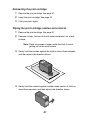
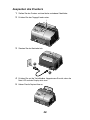
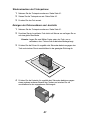
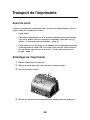
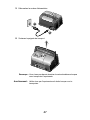
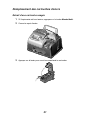
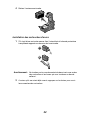
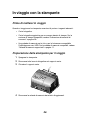
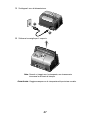
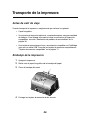
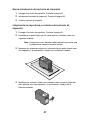
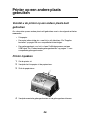
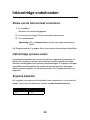
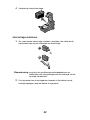
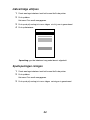
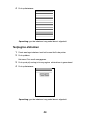
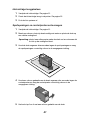
Traveling with your printer .............................................. 26
Before you travel ......................................................................... 26
Packing the printer ...................................................................... 26
Unpacking the printer .................................................................. 28

5
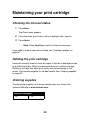
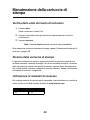
Maintaining your print cartridge .....................................30
Checking the ink level status ...................................................... 30
Refilling the print cartridge .......................................................... 30
Ordering supplies ........................................................................ 30
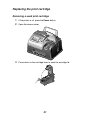
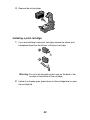
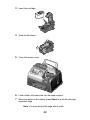
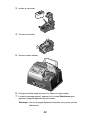
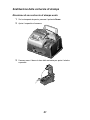
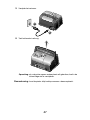
Replacing the print cartridge ....................................................... 31
Aligning the print cartridge .......................................................... 34
Cleaning the print cartridge nozzles ............................................ 34
Printing a test page ..................................................................... 35
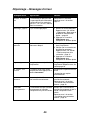
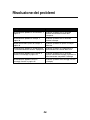
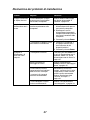
Troubleshooting ...............................................................36
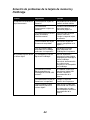
Setup troubleshooting ................................................................. 37
Print troubleshooting ................................................................... 38
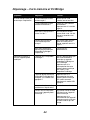
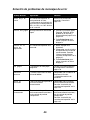
Improving print quality ................................................................. 40
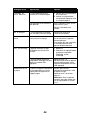
Jams and misfeeds troubleshooting ........................................... 43
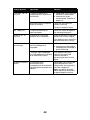
Memory card and PictBridge troubleshooting ............................. 44
Error messages troubleshooting ................................................. 45
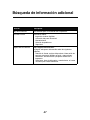
Finding more information ............................................... 47
Notices .............................................................................. 48
Index ..................................................................................51
Page is loading ...

7
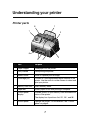
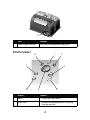
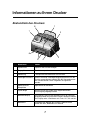
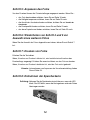
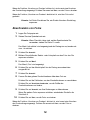
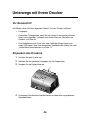
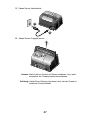
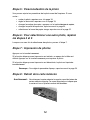
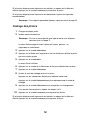
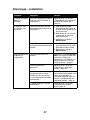
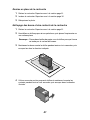
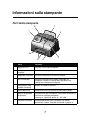
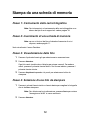
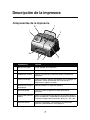
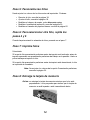
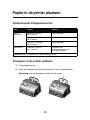
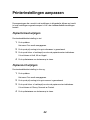
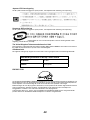
Understanding your printer
Printer parts
# Part Purpose
1 Paper support Load paper into the printer.
2 Carry handle Transporting the printer.
3 Access cover Install or replace print cartridge.
4 PictBridge port Connect a PictBridge-enabled digital camera to the
printer. Use the controls on the camera to select and
print your photos.
5 Memory card slots Insert memory cards.
6 Paper exit Allows paper to exit after printing is complete.
7 Control panel
display
Preview photos on your memory card and check the
status of the printer.
The display has 4 positions: flat, 25°, 50°, and 90°.
8 Control panel Operate the printer. For more details, see “Control
panel” on page 8
1
2
8
7
6
5
4
3

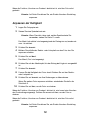
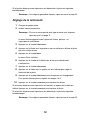
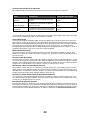
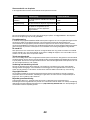
8
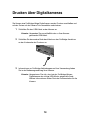
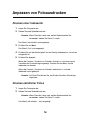
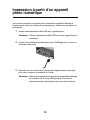
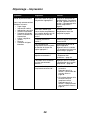
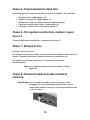
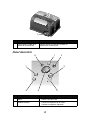
Control panel
# Part Purpose
1 Power supply cord port Install the provided power supply cord.
# Button Purpose
1Menu • Display the Photo menu.
2 Stop/Clear • Deselect the displayed photo for printing.
• Stop the print job.
1
3
2
1
8
7
65
4

9
3 Start Begin printing the selected photos.
4 Power Turn the printer on and off.
5 Up arrow • Scroll through menu options.
• Change the selected area when cropping an
image.
• Skip forward through the pictures on the
memory card 10 at a time.
Down arrow • Scroll through menu options.
• Change the selected area when cropping an
image.
• Skip backward through the pictures on the
memory card 10 at a time.
Right arrow (+) • Increase the number of prints.
• Change the selected area when cropping an
image.
• Increase the value of a menu item.
• Display the next picture on a memory card.
Left arrow (-) • Decrease the number of prints.
• Change the selected area when cropping an
image.
• Decrease the value of a menu item.
• Display the previous picture on a memory
card.
6 Number of Prints • Change the number of photos you want to
print.
• Change the size of the green crop box when
cropping an image.
7 Rotate Rotate the image on the control panel display
90° counterclockwise for easier viewing.
8 Select • Choose a menu option.
• Choose a displayed photo for printing.
# Button Purpose

10
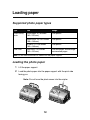
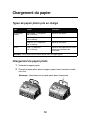
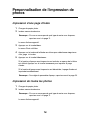
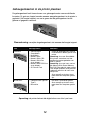
Loading paper
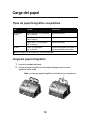
Supported photo paper types
Loading the photo paper
1 Lift the paper support.
2 Load the photo paper into the paper support with the print side
facing you.
Note: Do not force the photo paper into the printer.
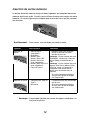
Type Size Usage
Photo/Glossy
cards
Photo paper: 4 x 6 inches
(102 x 152 mm)
Print photos
Hagaki card: 3.9 x 5.8 inches
(100 x 148 mm)
Print photos
A6 card: 4.1 x 5.8 inches
(105 x 148 mm)
Print photos
Card stock Index card: 4 x 6 inches
(102 x 152 mm)
Print test pages and cartridge
maintenance pages
Note: Do not load more than 25 sheets into the paper support.

11
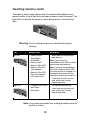
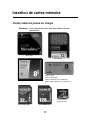
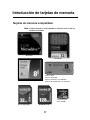
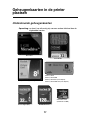
Inserting memory cards
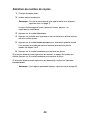
Supported memory cards
Note: Your card manufacturer may differ from the ones
pictured.
Secure Digital (SD)
xD Picture Card
(up to 512MB)
Memory Stick
Memory Stick PRO
Memory Stick Duo (with adapter)
Memory Stick PRO Duo (with adapter)
SmartMedia
MultiMedia Card
Microdrive
CompactFlash Type I and Type II

12
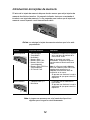
Inserting memory cards
The memory card reader has two slots to accommodate different size
memory cards. A small light turns on when a memory card is inserted. The
light blinks to indicate the memory card is being read or is transmitting
data.
Warning: Do not remove the memory card while the light is
blinking.
Note: Your printer recognizes only one digital media source for
photos at a time.
Slot Memory card Installation
Left slot • Secure Digital
• SmartMedia
• MultiMedia
• Memory Stick
• Memory Stick PRO
• Memory Stick Duo
(with adapter)
• Memory Stick PRO
Duo (with adapter)
• xD Picture Card.
• Insert card with brand name
label face up.
Note: If you are using
SmartMedia cards, make sure the
gold contact area faces up.
Note: If you are using a Memory
Stick Duo or Memory Stick PRO
Duo card, be sure to connect it to
the adapter that came with the
card before inserting it in the slot.
• If you have an arrow on your
card, make sure it points
toward the printer.
Right slot • CompactFlash Type I
and Type II
• Microdrive
• The name label faces up.
• If you have an arrow on your
card, make sure it points
toward the printer.

13
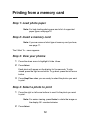
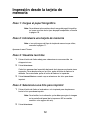
Printing from a memory card
Step 1: Load photo paper
Note: For help loading photo paper and a list of supported
paper types, see page 10.
Step 2: Insert a memory card
Note: If you are unsure of what type of memory card you have,
see page 11.
The I Want To... menu appears.
Step 3: View your photos
1 Press the down arrow to highlight Slide Show.
2 Press Select.
Each photo will appear on the display for five seconds. To skip
ahead, press the right arrow button. To go back, press the left arrow
button.
3 Press Stop/Clear when you are ready to select the photos you want
to print.
Step 4: Select a photo to print
1 Press the right or left arrow buttons to scroll to the photo you want
to print.
Note: For easier viewing, press
Rotate to rotate the image on
the display 90° counterclockwise.
2 Press Select.

14
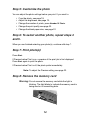
Step 5: Customize the photo
You can adjust the photo settings before you print. If you want to:
• Crop the photo, see page 18.
• Adjust the brightness, see page 19.
• Change the number of prints, press Number Of Prints.
• Change the print quality, see page 23.
• Change the blank paper size, see page 22.
Step 6: To select another photo, repeat steps 4
and 5.
When you are finished selecting your photo(s), continue with step 7.
Step 7: Print photo(s)
Press Start.
If Preview before Print is on, a preview of the print job is first displayed.
Press
Start again to print the photo.
If Preview before Print is off, the photo prints immediately.
Note: To adjust the Preview setting, see page 23.
Step 8: Remove the memory card
Warning: Do not remove the memory card while the light is
blinking. The light blinks to indicate the memory card is
being read or is transmitting data.

15
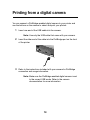
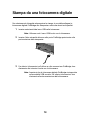
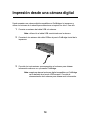
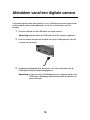
Printing from a digital camera
You can connect a PictBridge-enabled digital camera to your printer and
use the buttons on the camera to select and print your photos:
1 Insert one end of the USB cable into the camera.
Note: Use only the USB cable that came with your camera.
2 Insert the other end of the cable into the PictBridge port on the front
of the printer.
3 Refer to the instructions included with your camera for PictBridge
connection and usage information.
Note: Make sure the PictBridge-enabled digital camera is set
to the correct USB mode. Refer to the camera
documentation for more information.

16
Customizing your photo prints
Printing an index page
1 Load photo paper.
2 Insert a memory card.
Note: If you are unsure of what type of memory card you have,
see page 11.
The I Want To... menu appears.
3 Press Menu.
The Photo menu appears.
4 Press the down arrow button until you highlight Print Index
Page.
5 Press Select.
If Preview before Print is on, a preview of the print job is first
displayed. Press
Start to print the index page.
If Preview before Print is off, the index page prints immediately.
Note: To adjust the Preview setting, see page 23.
Printing all photos
1 Load photo paper.
2 Insert a memory card.
Note: If you are unsure of what type of memory card you have,
see page 11.
The I Want To... menu appears.

17
3 Press the down arrow button until you highlight Print All
Photos.
4 Press Select.
If Preview before Print is on, a preview of the print job is first
displayed. Press
Start to print the photos.
If Preview before Print is off, the photos print immediately.
Note: To adjust the Preview setting, see page 23.
Printing a photo in black and white
1 Load photo paper.
2 Insert a memory card.
Note: If you are unsure of what type of memory card you have,
see page 11.
The I Want To... menu appears with View Photos or Print
highlighted.
3 Press Select.
4 Press the right or left arrow buttons to scroll to the photo you want
to adjust.
5 Press Select.
6 Press Menu.
The Photo menu appears.
7 Press the down arrow button until you highlight Print Color.
8 Press the right arrow button until you highlight Black & White.
9 Press Select.
To adjust other photos, repeat steps 4–8.
10 Press Start to print the photo(s).

18
If Preview before Print is on, a preview of the print job is first displayed.
Press
Start again to print the photo.
If Preview before Print is off, the photo prints immediately.
Note: To adjust the Preview setting, see page 23.
Cropping a photo
1 Load photo paper.
2 Insert a memory card.
Note: If you are unsure of what type of memory card you have,
see page 11.
The I Want To... menu appears with View Photos or Print
highlighted.
3 Press Select.
4 Press the right or left arrow buttons to scroll to the photo you want
to adjust.
5 Press Menu.
The Photo menu appears.
6 Press the down arrow button until you highlight Crop.
7 Press Select.
8 Adjust the green crop box over the photo.
Press the arrow buttons to move the crop box.
Press
Number Of Prints to change the size of the crop box.
9 Press Select to accept your changes.
To adjust other photos, repeat steps 4–9.
10 Press Start to print the photo(s).
If Preview before Print is on, a preview of the print job is first displayed.
Press
Start again to print the photo.

19
If Preview before Print is off, the photo prints immediately.
Note: To adjust the Preview setting, see page 23.
Adjusting the brightness
1 Load photo paper.
2 Insert a memory card.
Note: If you are unsure of what type of memory card you have,
see page 11.
The I Want To... menu appears with View Photos or Print
highlighted.
3 Press Select.
4 Press the right or left arrow buttons to scroll to the photo you want
to adjust.
5 Press Menu.
The Photo menu appears.
6 Press the down arrow button until you highlight Brightness.
7 Press Select.
8 Press the right or left arrow buttons to adjust the brightness of the
photo.
9 Press Select to accept your changes.
To adjust other photos, repeat steps 4–9.
10 Press Start to print the photo(s).
If Preview before Print is on, a preview of the print job is first displayed.
Press
Start again to print the photo.
If Preview before Print is off, the photo prints immediately.
Note: To adjust the Preview setting, see page 23.

20
Adjusting the number of prints
1 Load photo paper.
2 Insert a memory card.
Note: If you are unsure of what type of memory card you have,
see page 11.
The I Want To... menu appears with View Photos or Print
highlighted.
3 Press Select.
4 Press the right or left arrow buttons to scroll to the photo you want
to adjust.
5 Press Number Of Prints until you reach the desired quantity.
To adjust the number of prints of other photos, repeat steps 4 and 5.
6 Press Start to print the photo(s).
If Preview before Print is on, a preview of the print job is first displayed.
Press
Start again to print the photo.
If Preview before Print is off, the photo prints immediately.
Note: To adjust the Preview setting, see page 23.

21
Viewing slide show
1 Insert a memory card.
Note: If you are unsure of what type of memory card you have,
see page 11.
The I Want To... menu appears.
2 Press the down arrow button until you highlight Slide Show.
3 Press Select.
4 Press Stop/Clear when you are ready to select the photos you want
to print.
Printing DPOF selection
The Digital Print Order Format (DPOF) is an option available on some
digital cameras. If you take pictures with a camera that supports DPOF,
you can specify which photos to print and the number of copies of each
photo while the memory card is still in the camera.
1 Load photo paper.
2 Insert a memory card.
Note: If you are unsure of what type of memory card you have,
see page 11.
The I Want To... menu appears.
3 Use the down arrow button to highlight Print DPOF Selection.
4 Press Select.
If Preview before Print is on, a preview of the print job is first displayed.
Press
Start to print the DPOF selections.
If Preview before Print is off, the DPOF selections print immediately.
Note: To adjust the Preview setting, see page 23.
Page is loading ...
Page is loading ...
Page is loading ...
Page is loading ...
Page is loading ...
Page is loading ...
Page is loading ...
Page is loading ...
Page is loading ...
Page is loading ...
Page is loading ...
Page is loading ...
Page is loading ...
Page is loading ...
Page is loading ...
Page is loading ...
Page is loading ...
Page is loading ...
Page is loading ...
Page is loading ...
Page is loading ...
Page is loading ...
Page is loading ...
Page is loading ...
Page is loading ...
Page is loading ...
Page is loading ...
Page is loading ...
Page is loading ...
Page is loading ...
Page is loading ...
Page is loading ...
Page is loading ...
Page is loading ...
Page is loading ...
Page is loading ...
Page is loading ...
Page is loading ...
Page is loading ...
Page is loading ...
Page is loading ...
Page is loading ...
Page is loading ...
Page is loading ...
Page is loading ...
Page is loading ...
Page is loading ...
Page is loading ...
Page is loading ...
Page is loading ...
Page is loading ...
Page is loading ...
Page is loading ...
Page is loading ...
Page is loading ...
Page is loading ...
Page is loading ...
Page is loading ...
Page is loading ...
Page is loading ...
Page is loading ...
Page is loading ...
Page is loading ...
Page is loading ...
Page is loading ...
Page is loading ...
Page is loading ...
Page is loading ...
Page is loading ...
Page is loading ...
Page is loading ...
Page is loading ...
Page is loading ...
Page is loading ...
Page is loading ...
Page is loading ...
Page is loading ...
Page is loading ...
Page is loading ...
Page is loading ...
Page is loading ...
Page is loading ...
Page is loading ...
Page is loading ...
Page is loading ...
Page is loading ...
Page is loading ...
Page is loading ...
Page is loading ...
Page is loading ...
Page is loading ...
Page is loading ...
Page is loading ...
Page is loading ...
Page is loading ...
Page is loading ...
Page is loading ...
Page is loading ...
Page is loading ...
Page is loading ...
Page is loading ...
Page is loading ...
Page is loading ...
Page is loading ...
Page is loading ...
Page is loading ...
Page is loading ...
Page is loading ...
Page is loading ...
Page is loading ...
Page is loading ...
Page is loading ...
Page is loading ...
Page is loading ...
Page is loading ...
Page is loading ...
Page is loading ...
Page is loading ...
Page is loading ...
Page is loading ...
Page is loading ...
Page is loading ...
Page is loading ...
Page is loading ...
Page is loading ...
Page is loading ...
Page is loading ...
Page is loading ...
Page is loading ...
Page is loading ...
Page is loading ...
Page is loading ...
Page is loading ...
Page is loading ...
Page is loading ...
Page is loading ...
Page is loading ...
Page is loading ...
Page is loading ...
Page is loading ...
Page is loading ...
Page is loading ...
Page is loading ...
Page is loading ...
Page is loading ...
Page is loading ...
Page is loading ...
Page is loading ...
Page is loading ...
Page is loading ...
Page is loading ...
Page is loading ...
Page is loading ...
Page is loading ...
Page is loading ...
Page is loading ...
Page is loading ...
Page is loading ...
Page is loading ...
Page is loading ...
Page is loading ...
Page is loading ...
Page is loading ...
Page is loading ...
Page is loading ...
Page is loading ...
Page is loading ...
Page is loading ...
Page is loading ...
Page is loading ...
Page is loading ...
Page is loading ...
Page is loading ...
Page is loading ...
Page is loading ...
Page is loading ...
Page is loading ...
Page is loading ...
Page is loading ...
Page is loading ...
Page is loading ...
Page is loading ...
Page is loading ...
Page is loading ...
Page is loading ...
Page is loading ...
Page is loading ...
Page is loading ...
Page is loading ...
Page is loading ...
Page is loading ...
Page is loading ...
Page is loading ...
Page is loading ...
Page is loading ...
Page is loading ...
Page is loading ...
Page is loading ...
Page is loading ...
Page is loading ...
Page is loading ...
Page is loading ...
Page is loading ...
Page is loading ...
Page is loading ...
Page is loading ...
Page is loading ...
Page is loading ...
Page is loading ...
Page is loading ...
Page is loading ...
Page is loading ...
Page is loading ...
Page is loading ...
Page is loading ...
Page is loading ...
Page is loading ...
Page is loading ...
Page is loading ...
Page is loading ...
Page is loading ...
Page is loading ...
Page is loading ...
Page is loading ...
Page is loading ...
Page is loading ...
Page is loading ...
Page is loading ...
Page is loading ...
Page is loading ...
Page is loading ...
Page is loading ...
Page is loading ...
Page is loading ...
Page is loading ...
Page is loading ...
Page is loading ...
Page is loading ...
Page is loading ...
Page is loading ...
Page is loading ...
Page is loading ...
Page is loading ...
Page is loading ...
Page is loading ...
Page is loading ...
Page is loading ...
Page is loading ...
Page is loading ...
Page is loading ...
Page is loading ...
Page is loading ...
Page is loading ...
Page is loading ...
Page is loading ...
Page is loading ...
Page is loading ...
Page is loading ...
Page is loading ...
Page is loading ...
Page is loading ...
Page is loading ...
Page is loading ...
Page is loading ...
Page is loading ...
Page is loading ...
Page is loading ...
Page is loading ...
Page is loading ...
Page is loading ...
Page is loading ...
Page is loading ...
Page is loading ...
Page is loading ...
Page is loading ...
Page is loading ...
Page is loading ...
Page is loading ...
Page is loading ...
Page is loading ...
Page is loading ...
Page is loading ...
Page is loading ...
Page is loading ...
Page is loading ...
Page is loading ...
Page is loading ...
Page is loading ...
Page is loading ...
Page is loading ...
Page is loading ...
Page is loading ...
Page is loading ...
Page is loading ...
Page is loading ...
Page is loading ...
Page is loading ...
Page is loading ...
Page is loading ...
Page is loading ...
Page is loading ...
Page is loading ...
Page is loading ...
-
 1
1
-
 2
2
-
 3
3
-
 4
4
-
 5
5
-
 6
6
-
 7
7
-
 8
8
-
 9
9
-
 10
10
-
 11
11
-
 12
12
-
 13
13
-
 14
14
-
 15
15
-
 16
16
-
 17
17
-
 18
18
-
 19
19
-
 20
20
-
 21
21
-
 22
22
-
 23
23
-
 24
24
-
 25
25
-
 26
26
-
 27
27
-
 28
28
-
 29
29
-
 30
30
-
 31
31
-
 32
32
-
 33
33
-
 34
34
-
 35
35
-
 36
36
-
 37
37
-
 38
38
-
 39
39
-
 40
40
-
 41
41
-
 42
42
-
 43
43
-
 44
44
-
 45
45
-
 46
46
-
 47
47
-
 48
48
-
 49
49
-
 50
50
-
 51
51
-
 52
52
-
 53
53
-
 54
54
-
 55
55
-
 56
56
-
 57
57
-
 58
58
-
 59
59
-
 60
60
-
 61
61
-
 62
62
-
 63
63
-
 64
64
-
 65
65
-
 66
66
-
 67
67
-
 68
68
-
 69
69
-
 70
70
-
 71
71
-
 72
72
-
 73
73
-
 74
74
-
 75
75
-
 76
76
-
 77
77
-
 78
78
-
 79
79
-
 80
80
-
 81
81
-
 82
82
-
 83
83
-
 84
84
-
 85
85
-
 86
86
-
 87
87
-
 88
88
-
 89
89
-
 90
90
-
 91
91
-
 92
92
-
 93
93
-
 94
94
-
 95
95
-
 96
96
-
 97
97
-
 98
98
-
 99
99
-
 100
100
-
 101
101
-
 102
102
-
 103
103
-
 104
104
-
 105
105
-
 106
106
-
 107
107
-
 108
108
-
 109
109
-
 110
110
-
 111
111
-
 112
112
-
 113
113
-
 114
114
-
 115
115
-
 116
116
-
 117
117
-
 118
118
-
 119
119
-
 120
120
-
 121
121
-
 122
122
-
 123
123
-
 124
124
-
 125
125
-
 126
126
-
 127
127
-
 128
128
-
 129
129
-
 130
130
-
 131
131
-
 132
132
-
 133
133
-
 134
134
-
 135
135
-
 136
136
-
 137
137
-
 138
138
-
 139
139
-
 140
140
-
 141
141
-
 142
142
-
 143
143
-
 144
144
-
 145
145
-
 146
146
-
 147
147
-
 148
148
-
 149
149
-
 150
150
-
 151
151
-
 152
152
-
 153
153
-
 154
154
-
 155
155
-
 156
156
-
 157
157
-
 158
158
-
 159
159
-
 160
160
-
 161
161
-
 162
162
-
 163
163
-
 164
164
-
 165
165
-
 166
166
-
 167
167
-
 168
168
-
 169
169
-
 170
170
-
 171
171
-
 172
172
-
 173
173
-
 174
174
-
 175
175
-
 176
176
-
 177
177
-
 178
178
-
 179
179
-
 180
180
-
 181
181
-
 182
182
-
 183
183
-
 184
184
-
 185
185
-
 186
186
-
 187
187
-
 188
188
-
 189
189
-
 190
190
-
 191
191
-
 192
192
-
 193
193
-
 194
194
-
 195
195
-
 196
196
-
 197
197
-
 198
198
-
 199
199
-
 200
200
-
 201
201
-
 202
202
-
 203
203
-
 204
204
-
 205
205
-
 206
206
-
 207
207
-
 208
208
-
 209
209
-
 210
210
-
 211
211
-
 212
212
-
 213
213
-
 214
214
-
 215
215
-
 216
216
-
 217
217
-
 218
218
-
 219
219
-
 220
220
-
 221
221
-
 222
222
-
 223
223
-
 224
224
-
 225
225
-
 226
226
-
 227
227
-
 228
228
-
 229
229
-
 230
230
-
 231
231
-
 232
232
-
 233
233
-
 234
234
-
 235
235
-
 236
236
-
 237
237
-
 238
238
-
 239
239
-
 240
240
-
 241
241
-
 242
242
-
 243
243
-
 244
244
-
 245
245
-
 246
246
-
 247
247
-
 248
248
-
 249
249
-
 250
250
-
 251
251
-
 252
252
-
 253
253
-
 254
254
-
 255
255
-
 256
256
-
 257
257
-
 258
258
-
 259
259
-
 260
260
-
 261
261
-
 262
262
-
 263
263
-
 264
264
-
 265
265
-
 266
266
-
 267
267
-
 268
268
-
 269
269
-
 270
270
-
 271
271
-
 272
272
-
 273
273
-
 274
274
-
 275
275
-
 276
276
-
 277
277
-
 278
278
-
 279
279
-
 280
280
-
 281
281
-
 282
282
-
 283
283
-
 284
284
-
 285
285
-
 286
286
-
 287
287
-
 288
288
-
 289
289
-
 290
290
-
 291
291
-
 292
292
-
 293
293
-
 294
294
-
 295
295
-
 296
296
-
 297
297
-
 298
298
-
 299
299
-
 300
300
-
 301
301
-
 302
302
-
 303
303
-
 304
304
-
 305
305
-
 306
306
-
 307
307
-
 308
308
-
 309
309
-
 310
310
-
 311
311
-
 312
312
-
 313
313
-
 314
314
-
 315
315
-
 316
316
-
 317
317
-
 318
318
-
 319
319
-
 320
320
-
 321
321
-
 322
322
-
 323
323
-
 324
324


Lexmark 310 series User manual
- Type
- User manual
Ask a question and I''ll find the answer in the document
Finding information in a document is now easier with AI
in other languages
- italiano: Lexmark 310 series Manuale utente
- français: Lexmark 310 series Manuel utilisateur
- español: Lexmark 310 series Manual de usuario
- Deutsch: Lexmark 310 series Benutzerhandbuch
- Nederlands: Lexmark 310 series Handleiding
Related papers
Other documents
-
Kodak Printer 5300 User manual
-
-
-
Kodak 5500 - EASYSHARE All-in-One Color Inkjet User manual
-
HP Photosmart C6300 All-in-One Printer series User manual
-
-
HP PHOTOSMART C5500 User manual
-
Epson C11C536011 User manual
-
-