Page is loading ...

INSTALLATION AND OPERATING GUIDE
SCALAR AIT 440/480

Scalar AIT 440/480 Libraries
Installation and
Operation

ii Scalar AIT 440/480
Copyright
Copyright 1998 by Advanced Digital Information Corporation (ADIC). All rights
reserved. This item and the information contained herein are the property of ADIC. No
part of this document may be reproduced, transmitted, transcribed, stored in a retrieval
system, or translated into any language or computer language in any form or by any
means, electronic, mechanical, magnetic, optical, chemical, manual, or otherwise,
without the express written permission of ADIC, 11431 Willows Road N.E., Redmond,
Washington 98052.
Disclaimer
ADIC makes no representation or warranties with respect to the contents of this
document and specifically disclaims any implied warranties of merchantability or fitness
for any particular purpose. Further, ADIC reserves the right to revise this publication
without obligation of ADIC to notify any person or organization of such revision or changes.
Trademark Notices
ADIC
™
, ADIC Europe
™
and Scalar
™
are trademarks of Advanced Digital
Information Corporation. Sony
®
is a registered trademark of Sony Corporation. AIT
™
,
AME
™
and MIC
™
are trademarks of Sony Corporation. All other product names are
trademarks or registered trademarks of their respective companies.
Advanced Digital Information Corporation
11431 Willows Road N.E.
Redmond, Washington 98052
62-0153-01

Installation and Operation iii
Revision History
Revisions to This Manual
This revision of
Scalar AIT 440/480 Library Installation and Operation
(B) contains the
following changes and enhancements:
• Added information about Scalar AIT 440/480 support for AIT-1 and AIT-2
tape drives.
Safety Agency Standards
The Scalar AIT 440/480 comply with the following domestic and international product
safety standards:
• UL Standard 1950, 3rd Edition, Information Technology Equipment
Including Electrical Business Equipment
• CSA Standard C22.2 No. 950-95, Safety of Information Technology
Equipment Including Electrical Business Equipment
• IEC 950/EN60950, Safety of Information Technology Equipment
including Electrical Business Equipment
Revision Date Description
A December 1998 Initial release
B June 1999 AIT-1, AIT-2 tape drives

iv Scalar AIT 440/480
Electro-magnetic Interference (EMI)
The Scalar AIT 440/480 meet the requirements for radiated and conducted emissions as
defined by the following standards:
• FCC Rules and Regulations, Part 15: Class A, Radio Frequency Devices—
Subpart B: Unintentional Radiators
• Industry Canada Notice, ICES-003, Class A, Digital Apparatus
• CISPR Publication 22, 1985, (EN 55022)
FCC Notice
This equipment has been tested and found to comply with the limits for a Class A digital
device, pursuant to part 15 of the FCC Rules. These limits are designed to provide
reasonable protection against harmful interference when the equipment is operated in a
commercial environment. This equipment generates, uses, and can radiate radio
frequency energy and, if not installed and used in accordance with this instruction
manual, may cause harmful interference to radio communications. Operation of this
equipment in a residential area is likely to cause harmful interference in which case the
user will be required to correct the interference at his own expense.
Shielded cables are required for this device to comply with FCC Rules.
Use shielded
cables when connecting this device to others.
According to FCC regulations, changes or modifications to this equipment that are not
expressly approved by ADIC could void the user’s authority to operate the equipment.
Industry Canadian Notice per ICES-003
English
This Class A digital apparatus meets all requirements of the Canadian
Interference-Causing Equipment Regulations.
French
Cet appareil numérique de la classe A respecte toutes les exigences du
Règlement sur le matériel brouilleur du Canada.
CISPR22 Compliance Notice
This equipment complies with the CISPR22B standard for EMI radiation.

Installation and Operation v
Product Warranty Caution
The Scalar AIT 440/480 Libraries are warranted to be free from defects in materials,
parts, and workmanship and will conform to the current product specification upon
delivery.
For the specific details of your warranty, refer to your sales contract or
contact the company from which the library was purchased.
The warranty for the library shall not apply to failures of any unit when:
• The library is repaired by anyone other than ADIC’s personnel or approved
agent.
• The library is physically abused or is used in a manner that is inconsistent
with the operating instructions or product specification defined by ADIC.
• The library fails because of accident, misuse, abuse, neglect, mishandling,
misapplication, alteration, faulty installation, modification, or service by
anyone other than the factory service center or its approved agent.
• The library is repaired by anyone, including an approved agent, in a manner
that is contrary to the maintenance or installation instructions supplied by
ADIC.
• ADIC's serial number tag is removed.
• The library is damaged because of improper packaging on return.
CAUTION
Returning the library in unauthorized packaging may damage
the unit and void the warranty.
If problems with the library occur, contact your maintenance
organization; do not void the product warranty by allowing
untrained or unauthorized personnel to attempt repairs.

vi Scalar AIT 440/480
Notes

Installation and Operation vii
Contents
Welcome. . . . . . . . . . . . . . . . . . . . . . . . . . . . . . . . . . . . . . . . . . . . . . . . . . . . . . . xi
About the Scalar AIT 440 and Scalar AIT 480 . . . . . . . . . . . . . . . . . . . . . . . xii
Front panel components . . . . . . . . . . . . . . . . . . . . . . . . . . . . . . . . . . . . . . . xiii
Internal components . . . . . . . . . . . . . . . . . . . . . . . . . . . . . . . . . . . . . . . . . . . xv
About this manual . . . . . . . . . . . . . . . . . . . . . . . . . . . . . . . . . . . . . . . . . . . . . xx
Contacting ADIC. . . . . . . . . . . . . . . . . . . . . . . . . . . . . . . . . . . . . . . . . . . . xxiii
1 Installing the Hardware . . . . . . . . . . . . . . . . . . . . . . . . . . . . . . . . . . . . . . 1
Preparing for installation . . . . . . . . . . . . . . . . . . . . . . . . . . . . . . . . . . . . . . . . . 1
Installing the library hardware . . . . . . . . . . . . . . . . . . . . . . . . . . . . . . . . . . . . 6
2 Configuring the Library. . . . . . . . . . . . . . . . . . . . . . . . . . . . . . . . . . . . . 31
Displaying the Configuration Menu . . . . . . . . . . . . . . . . . . . . . . . . . . . . . . . 33
Setting the SCSI IDs . . . . . . . . . . . . . . . . . . . . . . . . . . . . . . . . . . . . . . . . . . . 34
Setting the LCD security option . . . . . . . . . . . . . . . . . . . . . . . . . . . . . . . . . . 36
Setting other configuration options . . . . . . . . . . . . . . . . . . . . . . . . . . . . . . . . 40
3 Checking the Setup . . . . . . . . . . . . . . . . . . . . . . . . . . . . . . . . . . . . . . . . . 45
4 Operating the Library . . . . . . . . . . . . . . . . . . . . . . . . . . . . . . . . . . . . . . 47
Using the operator panel . . . . . . . . . . . . . . . . . . . . . . . . . . . . . . . . . . . . . . . . 47
Operating in different control modes . . . . . . . . . . . . . . . . . . . . . . . . . . . . . . 52
Selecting and replacing data cartridges . . . . . . . . . . . . . . . . . . . . . . . . . . . . . 54
Replacing data cartridge magazines . . . . . . . . . . . . . . . . . . . . . . . . . . . . . . . 61
Resetting the library . . . . . . . . . . . . . . . . . . . . . . . . . . . . . . . . . . . . . . . . . . . 64
5 Operating the Tape Drives . . . . . . . . . . . . . . . . . . . . . . . . . . . . . . . . . . . 67
Monitoring the tape drive LEDs . . . . . . . . . . . . . . . . . . . . . . . . . . . . . . . . . . 67
Cleaning the tape drives . . . . . . . . . . . . . . . . . . . . . . . . . . . . . . . . . . . . . . . . 69
Displaying information about tape drives . . . . . . . . . . . . . . . . . . . . . . . . . . . 72
Ejecting a cartridge manually . . . . . . . . . . . . . . . . . . . . . . . . . . . . . . . . . . . . 76

viii Scalar AIT 440/480
6 Maintaining the Library . . . . . . . . . . . . . . . . . . . . . . . . . . . . . . . . . . . . 79
Replacing tape drives or drive blanks. . . . . . . . . . . . . . . . . . . . . . . . . . . . . . . 80
Replacing the fuse . . . . . . . . . . . . . . . . . . . . . . . . . . . . . . . . . . . . . . . . . . . . . 85
Replacing the air filter . . . . . . . . . . . . . . . . . . . . . . . . . . . . . . . . . . . . . . . . . . 87
Cleaning the front window . . . . . . . . . . . . . . . . . . . . . . . . . . . . . . . . . . . . . . . 90
Using touch-up paint on the housing . . . . . . . . . . . . . . . . . . . . . . . . . . . . . . . 90
7 Packing and Shipping the Library . . . . . . . . . . . . . . . . . . . . . . . . . . . . 91
Returning the library for service. . . . . . . . . . . . . . . . . . . . . . . . . . . . . . . . . . . 91
Shipping the library . . . . . . . . . . . . . . . . . . . . . . . . . . . . . . . . . . . . . . . . . . . . 92
8 Using the Demo Menu . . . . . . . . . . . . . . . . . . . . . . . . . . . . . . . . . . . . . 105
Starting a demo. . . . . . . . . . . . . . . . . . . . . . . . . . . . . . . . . . . . . . . . . . . . . . . 105
Slot Demo. . . . . . . . . . . . . . . . . . . . . . . . . . . . . . . . . . . . . . . . . . . . . . . . . . . 106
Drive Demo . . . . . . . . . . . . . . . . . . . . . . . . . . . . . . . . . . . . . . . . . . . . . . . . . 109
9 Performing Diagnostics . . . . . . . . . . . . . . . . . . . . . . . . . . . . . . . . . . . . 113
Using the LCD Diagnostics Menu . . . . . . . . . . . . . . . . . . . . . . . . . . . . . . . . 113
Configuring the serial ports for diagnostics . . . . . . . . . . . . . . . . . . . . . . . . . 127
10 Using the Library Info Menu. . . . . . . . . . . . . . . . . . . . . . . . . . . . . . . . 131
Accessing the Library Info Menu. . . . . . . . . . . . . . . . . . . . . . . . . . . . . . . . . 131
Using the SCSI Menu. . . . . . . . . . . . . . . . . . . . . . . . . . . . . . . . . . . . . . . . . . 132
Viewing statistics . . . . . . . . . . . . . . . . . . . . . . . . . . . . . . . . . . . . . . . . . . . . . 140
Viewing system sensors . . . . . . . . . . . . . . . . . . . . . . . . . . . . . . . . . . . . . . . . 142
Viewing command history . . . . . . . . . . . . . . . . . . . . . . . . . . . . . . . . . . . . . . 144
Using the Inventory Menu . . . . . . . . . . . . . . . . . . . . . . . . . . . . . . . . . . . . . . 145
11 Troubleshooting . . . . . . . . . . . . . . . . . . . . . . . . . . . . . . . . . . . . . . . . . . 151
Problems with installation . . . . . . . . . . . . . . . . . . . . . . . . . . . . . . . . . . . . . . 151
Problems with tape drive operation . . . . . . . . . . . . . . . . . . . . . . . . . . . . . . . 153
Problems with library operation . . . . . . . . . . . . . . . . . . . . . . . . . . . . . . . . . . 154
If you cannot resolve the problem... . . . . . . . . . . . . . . . . . . . . . . . . . . . . . . . 154

Installation and Operation ix
A Specifications . . . . . . . . . . . . . . . . . . . . . . . . . . . . . . . . . . . . . . . . . . . . . 157
General specifications . . . . . . . . . . . . . . . . . . . . . . . . . . . . . . . . . . . . . . . . . 157
Physical characteristics . . . . . . . . . . . . . . . . . . . . . . . . . . . . . . . . . . . . . . . . 158
Operating environment . . . . . . . . . . . . . . . . . . . . . . . . . . . . . . . . . . . . . . . . 158
Power. . . . . . . . . . . . . . . . . . . . . . . . . . . . . . . . . . . . . . . . . . . . . . . . . . . . . . 158
SCSI cable specifications . . . . . . . . . . . . . . . . . . . . . . . . . . . . . . . . . . . . . . 159
SCSI terminator specifications . . . . . . . . . . . . . . . . . . . . . . . . . . . . . . . . . . 160
Power cord requirements. . . . . . . . . . . . . . . . . . . . . . . . . . . . . . . . . . . . . . . 160
B LCD Error Codes . . . . . . . . . . . . . . . . . . . . . . . . . . . . . . . . . . . . . . . . . 163
C Library Elements . . . . . . . . . . . . . . . . . . . . . . . . . . . . . . . . . . . . . . . . . 171
Index. . . . . . . . . . . . . . . . . . . . . . . . . . . . . . . . . . . . . . . . . . . . . . . . . . . . . . . . . 175

x Scalar AIT 440/480
Notes

Installation and Operation xi
W
elcome
Congratulations on selecting the Scalar AIT 440 or Scalar AIT 480
Library. Your new library provides automated data storage, archiving,
backup, and retrieval for mid-range and high-end workstations, servers,
and networks.

xii Scalar AIT 440/480
The library's robotic cartridge handling mechanism (CHM) responds to
commands from the host application to move AIT data cartridges
between tape drives and storage slots, while the tape drives read and
write data. You can insert and remove cartridges through the entry/exit
port without opening the library door.
About the Scalar AIT 440 and Scalar AIT 480
The following illustrations and descriptions summarize the important
library features. For library specifications, refer to .
The Scalar AIT 440 contains 40 data cartridge slots, while the Scalar
AIT 480 contains 80 data cartridge slots. Both libraries can include up
to four 3.5” form factor Sony
®
AIT
™
tape drives. The libraries can
operate as five SCSI devices on up to five SCSI buses. When the library
is equipped with AIT-1 drives, the library is a differential SCSI-2 device
and the drives are differential Fast/Wide SCSI-2 devices. The library can
be a differential SCSI-2 device and the drives are differential SCSI-2
Fast/Wide devices. When equipped with AIT-2 drives, the library can
be configured as a high voltage differential (HVD) Wide Ultra SCSI
device, or as a low voltage differential (LVD) Wide Ultra SCSI device.
When operating with four AIT-2 tape drives and assuming an average
data compression ratio of 2:1, the Scalar AIT 440 can store up to 4.0
terabytes of information on 40 Advanced-Metal Evaporative (AME
™
)
data cartridges (SDX2-50C), while the Scalar AIT 480 can store up to
8.0 terabytes of information on 80 AME cartridges.

Installation and Operation xiii
Employing the 3.5” form factor AIT-2 drive, the Scalar AIT 440 and
Scalar AIT 480 provide a maximum sustained data transfer rate of over
1440 MB per minute (assuming 2:1 data compression). The Wide Ultra
SCSI drive does not require periodic head cleaning as often as many
conventioanl tape drives. The drive constantly moinitors head output to
check for possible contamination. If present, the drive will invoke a
built-in Active Head Cleaner. Under extreme operating conditions, a
cleaning cartridge may be required and the drive indicates this by
displaying a Cleaning Request message on its front panel Status LED.
The Sony SDX1-25C, SDX1-35C, SDX2-36C, and SDX2-50C data
cartridges support the Advanced Intelligent Tape format. The cartridges
use a new recording format, Adaptive Lossless Data Compression
(ALDC), Memory In Cassette (MIC
™
) technology capabilities and use
Sony’s AME media, which incorporates dual cobalt magnetic layers, the
absence of binder material to prevent tape head contamination and a
super-durable “diamond-like carbon” protective coating for extreme
durability.

xiv Scalar AIT 440/480
Front panel components
Operator panel
The operator panel includes a four-line liquid crystal display (LCD) and
a keypad. Use the operator panel to access menu options used to
configure the library and monitor operations. If necessary, you can tilt
the LCD for easier viewing.
Entry/exit port
The entry/exit port allows you to insert or remove individual cartridges
from the library without opening the door.

Installation and Operation xv
Internal components
Drum assembly
The drum assembly holds the data cartridge magazines and rotates 180
degrees in either direction to position the magazines in front of the CHM.

xvi Scalar AIT 440/480
Data cartridge magazines
Data cartridge magazines are the removable carriers for the AIT data
cartridges. The magazines snap onto mounting plates on the library's
rotating drum assembly and allow easy removal and replacement of
cartridges. Each magazine has individual cartridge slots for 10
cartridges. The Scalar AIT 440 contains up to four data cartridge
magazines; the Scalar AIT 480 contains up to eight.
Fixed cartridge slot
The fixed cartridge slot, located directly above the tape drives, provides
a storage location for a single cartridge. Typically, this slot is used to
store an AIT cleaning cartridge.
Tape drives
The library accommodates up to four HVD, Fast/Wide SCSI-2, AIT-1
tape drives, or up to four HVD/LVD, Wide Ultra SCSI AIT-2 tape drives.

Installation and Operation xvii
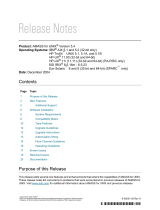
Drive carrier
When you purchase the library, each tape drive in the library is fitted
inside a drive carrier. The drive carrier allows you to slide the drive in
and out of the library if the tape drive needs repair or if you are adding
new tape drives.
Note:
You must purchase the tape drive pre-installed in the drive
carrier.
Drive blank (not shown)
Drive blanks are “empty” drive carriers with solid faceplates. If you plan
to operate the library with fewer than four tape drives, you must install
drive blanks in the empty drive positions. The drive blanks ensure correct
airflow through the library for cooling, compliance with EMI
regulations, and in some configurations, correct SCSI connection.
AIT drive carrier

xviii Scalar AIT 440/480
Cartridge handling mechanism (CHM)
The cartridge handling mechanism (CHM) moves cartridges between
cartridge slots, tape drives, and the entry/exit port.
Bar code scanner
The high-speed bar code scanner, mounted on the CHM, reads bar code
labels affixed to the cartridges to track individual cartridges. Cartridge
label information becomes part of the library's cartridge inventory stored
in nonvolatile RAM.
Entry/exit transport assembly
The entry/exit transport assembly moves the transport arm to and from
the entry/exit port to pick up cartridges.
Serial ports
Two serial ports (25-pin and 9-pin) at the back of the library allow you
to communicate with the tape drives and the library across a serial cable
connected to an external computer. By running a special diagnostic
program, you can perform diagnostics, upgrade firmware, and test CHM
motion.

Installation and Operation xix
SCSI connectors
The library has ten SCSI connectors, accessible through the cabling bay
on the back, and can be attached to up to five SCSI buses (all four tape
drives and the library can be on separate buses).
/