Page is loading ...

1
MasterFlush
®
7600 Series
Toilet
Macerator toilet
Instruction manual
EN
For multilingual manual, go to:
http://www.dometic.com

2
Dometic MasterFlush Toilet
1
4
5
A
B
C
D
E
F
G
H
J
K
L
I
3
2
A
A
B C
E
G
F
D
B
C
D
F
G
E
A B EDC

3
Notes on using the manual/ General safety
1 Notes on using the manual .................................................3
2 General safety instructions ..............................................3 - 4
3 Intended use ............................................................4
4 Specications ........................................................4 - 5
5 Components ............................................................6
6 Installation ...........................................................6 - 7
7 Operation............................................................7 - 8
8 Maintenance and winterizing.............................................8 - 9
9 Troubleshooting.........................................................10
10 Customer service........................................................10
Limited warranty ........................................................11
EN
Table of contents
1 Notes on using the manual
Caution!
Safety Instruction: Failure to observe this instruction can cause material damage and
impair the function of the device.
Note
Supplementary information for operating the device.
g.
1
A, p. 2 : This refers to an element in an illustration. In this example, item A in gure
1 on page 2.
2 General safety instructions
The manufacturer will not be held liable for claims for damage resulting from the following:
• Faulty installation or connection
• Damage to the unit from mechanical inuences, misuse or abuse
• Alterations to the unit without express written permission from the manufacturer
• Use for purposes other than those described in this manual
2.1 Warnings
The following statement must be read and understood before installing, servicing and/or
operating this product. Modication of this product may result in property damage.
Dometic recommends that a qualied RV technician or electrician install or service this product
with regard to all applicable codes and regulations. Equipment damage, personal injury or death
could result from improper installation. DOMETIC ACCEPTS NO RESPONSIBILITY OR LIABILITY
FOR DAMAGE TO EQUIPMENT, OR PERSONAL INJURY OR DEATH THAT MAY RESULT FROM
IMPROPER INSTALLATION, SERVICE OR OPERATION OF THIS PRODUCT.

4
Dometic MasterFlush Toilet Intended use / Specifications
Caution!
Overlling the holding tank can create serious damage to the sanitation system, such as
rupturing the holding tank and releasing tank contents into the motorhome. To prevent
this possibility, Dometic recommends using the “full” tank shut-down circuitry in the toi-
let’s electronic control module. The “full” signal from the holding tank can be generated
by an optional Dometic DTM01C tank monitor or DTM04 four-level tank monitor system.
3 Intended use
The MasterFlush 7640 toilet provides an electric-ush toilet that macerates waste and pumps it to a
holding tank or other efuent storage/disposal system. Operated by a ush pedal, the toilet allows
the user to add water to the bowl (before using or ushing) and to ush the toilet.
3.1 Benefits
Convenient electronic flush. Add water or ush by pressing on the ush pedal.
Choice of two water consumption settings. “Normal” ush uses 0.83 gal. (3.1 liters) per ush
and adds water to bowl after ush; “Dry Bowl” setting uses only 0.21 gal. (0.79 liters) per ush and
does not add water to the bowl.
Versatile installation. Powerful macerator pump allows toilet to be located up to 40 ft. (12.2 m)
away from holding tank or other discharge line destination.
Automatic “full tank” shut-down. When connected to a holding tank level indication system
(such as Dometic DTM01 system), the MasterFlush 7640 toilet will not ush when the holding tank
is full. This safety features prevents overlling the holding tank, which may cause damage to the
motorhome.
4 Specifications
4.1 Materials
Materials
Toilet bowl: vitreous ceramic
Toilet seat: enameled wood
Toilet base: polypropylene
Macerator pump body: glass-lled polypropylene
Water valve: polypropylene
Foot pedal: polypropylene
Vacuum breaker: ABS/polypropylene
Floor flange seal: nitrile rubber, foam

5
4.2 Minimum installation requirements
Electrical
Power draw 15 amps/12 V DC
Circuit breaker/fuse 20 amps/12 V DC
Wiring
Refer to ANSI/RVIA LV and NFPA 70/NEC Standards for recommended wire gauge (USA).
Refer to CEC I and II Standards for recommended wire gauge (Canada).
Water
Supply
Fitting 1/2 in. NPT
Flow rate
3.0-5.0 gpm / 11.4-18.9 lpm recommended*
2.0 gpm / 9.5 lpm minimum
Static pressure 30-100 PSI / 206.8-689.5 kPa
Discharge
(2 options)
Floor ange Floor ange – 3 in./76 mm ID, 1/4-7/16 in. (6-11 mm) thick
Remote
(not on ange directly
above waste tank)
Sanitation hose size – 1.5 in. / 38 mm or 1 in. / 25 mm ID
Horizontal hose run – 40 ft. / 12.2 m maximum**
* Water supply that exceeds 5.0 gpm / 18.9 lpm may require a ow restrictor at toilet inlet.
** Check for adequate discharge ow if installation nears this distance.
Refer to ANSI 1192 and Z240 RV Series standards, where applicable, for additional RV toilet installation guidelines.
Specications are subject to change without notice.
4.3 Toilet dimensions (g.
2
, page 2) All dimensions may vary ±3/8 inch (10 mm)
Ref.
Model 7640
A 20 in. / 508 mm
B 15 in. / 381 mm
C 19 in. / 483 mm
D 18.375 in. / 467 mm - seat height
E 33.875 in. / 860 mm - seat lid up
F 14.75 in. / 375 mm - back to front of base
G 10 in. / 254 mm - rough-in
4.4 Rough-in dimensions (g.
3
, page 2)
Ref. Dimensions/Description
A 10 in. / 254 mm
B 11 in. / 279 mm
C 11 in. / 279 mm
D Floor ange
Ref. Dimensions/Description
E Left wall
F Back wall
G Right wall
Specifications

6
Dometic MasterFlush Toilet Components / Installation
5 Components (g.
1
, page 2)
Ref. Description
A Toilet seat
B Toilet bowl
C Toilet base
D Flush pedal
E Water valve
F Macerator pump
G Floor ange seal
Ref. Description
H Electrical wires
I Vacuum breaker cover
J Vacuum breaker
K Pump/base cover
L Floor ange mounting hardware
kit
NS Remote mounting hardware kit
6 Installation
Note
Be sure foot pedal, when pressed, touches same at surface on which toilet is installed.
Note
Be sure to follow recommended installation requirements in section 4.2 of this manual.
NOT INTENDED FOR INSTALLATION IN A SHOWER.
6.1 Tools required
• pliers or adjustable wrench
• 7/16-in. / 11 mm wrench
• electrical connection tools
6.2 Installation on floor flange
1. To replace an older toilet, turn off water supply to toilet. Remove and drain water supply line.
Remove toilet hold-down bolts/screws. Remove toilet from oor. Remove and discard old
oor ange seal and hold-down bolts. Verify center of oor ange is at least the recommended
rough-in distance from back wall (g.
3
A, p. 2). See Rough-in dimensions. Make sure top
surface of oor ange is clean and free of any debris or sealant.
2. If installing a new oor ange, make certain that toilet mounting holes are at the correct
location (g.
3
D, p. 2). Floor ange must be secured to oor with a minimum of four screws
(8 is preferred). Insert two supplied T-bolts into slots in oor ange (g.
4
p. 2).
3. Verify that oor ange seal is installed on base of toilet (g.
5
A, p. 2). Carefully set toilet over
oor ange. Align holes in toilet base with T-bolts as toilet is lowered onto oor ange. Toilet
must be aligned so that outlet of base ts inside of oor ange outlet hole.
Note
Entire toilet base does not rest completely on oor yet. Floor seal must be compressed in
following steps.
Please refer to complete parts list (printed separately)
for more details.

7
Installation / Operation
4. Install oor mounting nuts and washers onto T-bolts. Carefully torque nuts to 30-40 inch-
pounds. DO NOT OVERTIGHTEN. Alternate between sides when tightening to prevent
distortion of base. When tight, base should be securely attached and at against oor.
Attach bolt covers onto nuts. (g.
5
B, p. 2)
6. Connect water supply line and torque connection to 30-40 inch-pounds.
DO NOT OVERTIGHTEN. (g.
5
C, p. 2)
7. Connect electrical power to toilet according to wiring diagram on
toilet’s parts list (printed separately). Turn on electrical power to
toilet.
8. Turn on water supply to toilet. Flush toilet several times and
check for leaks.
9. Attach pump/base cover (g.
5
E, p. 2) to base with screws on
sides of toilet base (g.
6
) and with locking tabs on sides and
back.
6.3 Remote installation
1. To install toilet separate from holding tank
(not on typical floor flange), position toilet
in location with same clearances as ange-
mounted toilet (g.
3
, p. 2). See Rough-in
dimensions.
2. Mark fastener hole locations through two
holes in base. Drill pilot holes for hex screws
in Remote Mounting Hardware Kit.
3. Remove black rubber elbow from check valve
(g.
5
D, p. 2) in back of toilet (g.
7
).
4. Route either 1.5 in. ID exible sanitation hose or 1.5 in. ID PVC or ABS pipe from waste tank to
check valve. Plumbing can be routed either above- or below-oor as required. Access holes
may need to be drilled through oor or wall depending on installation layout (g.
8
).
(Flexible sanitation hose can be connected directly to check valve with hose clamps.)
5. Route and connect appropriate wiring and water line according to instructions in section 6.2.
6. Fasten toilet to oor with hex-head screws on each side of base. Cover fasteners with plastic
caps. Then, follow steps 8 and 9 from section 6.2 to complete the toilet installation.
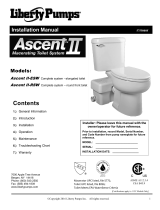
7 Operation
7.1 Add water to bowl
Flush – press pedal
completely down
Add water to bowl –
partially press pedal
To add water to the toilet, press the ush pedal
part way down. (To avoid possible overow,
water ow will stop automatically if pedal is
pressed too long.) More water is usually added
only when ushing solids.
7.2 Flush toilet
To ush, press pedal down completely, then
release it. This activates a powerful macerator
pump that siphons water and waste from the
toilet bowl, macerates and propels the efuent to the holding tank.
(“Operation” continued on next page)
6
7 8

8
Dometic MasterFlush Toilet Operation / Maintenance and winterizing
Note
Residual water trickle in ceramic bowls: Due to integrated rim of this toilet bowl, water
may continue to slowly trickle into toilet bowl for up to 20 minutes after ushing. If water
trickle continues after 30 minutes, replace water valve.
Caution – Do Not Flush Foreign Objects!
Flush only water, bodily wastes and rapid-dissolving toilet
tissue. Do not ush wet wipes, sanitary napkins, diapers,
paper cups, cotton swabs, food, hair or liquids such as
oils or solvents as clogging or damage to the toilet or toilet
system may occur.
Note
Make sure all guests understand toilet operation before use.
7.3 Changing “Flush” modes
MasterFlush 7640 toilets offer two ush settings to help manage water consumption:
Normal flush – Uses 0.83 gal. (3.1 liters) per ush. Adds water to bowl after every ush.
Dry Bowl flush – Uses 0.21 gal. (0.79 liters) per ush. Does not add water to bowl after ush.
To change from Normal to Dry Bowl ush setting, press ush pedal for about 10 seconds. Flush mode
has been changed to Dry Bowl setting. Change mode to Normal ush by following the same
procedure.
8 Maintenance and winterizing
8.1 Routine toilet cleaning
For routine cleaning, use Dometic
®
Toilet Bowl Cleaner. If this cleaner cannot be found in your
area, contact Dometic for your nearest dealer. If the cleaner is not available, use most any non-
abrasive bathroom and toilet bowl cleaner. Please follow label instructions.
Caution
To avoid damaging internal seals, do not clean toilet with abrasive cleaners, caustic
chemicals, or lubricants and cleaners that contain alcohols or petroleum distillates.
8.2 Routine maintenance
MONTHLY
1. Inspect toilet, plumbing, and plumbing connections, wires, and wire connections.
2. Open and close all plumbing valves.
3. Check in-line water lters, if any, for blockage.
YEARLY
Check water valve lter. Also check water valve lter if water ow into toilet becomes insufcient.
8.3 During extended periods of non-use
The macerator toilet and sanitation system should be protected if toilet will not be needed for an
extended period of time (more than two weeks, especially in hot weather).
1. Flush toilet in “Normal” mode and add 4 oz. (118 ml) of liquid biodegradable laundry detergent
(should NOT contain bleach or environmentally harmful substances).
(“Maintenance” continued on next page)

9
2. Flush toilet at least ve times.
3. Turn off water supply to toilet.
4. Flush the toilet without water. Repeat three times. (This procedure will minimize any remaining
water in the macerator pump.)
5. Turn off power to the toilet.
If system will be subjected to freezing temperatures, please follow above procedure, and then
winterize system as described below.
8.4 Winterizing
At the end of each camping season, or when the vehicle is stored for long periods of time during
which the MasterFlush macerator toilet may be exposed to freezing temperatures, the toilet system
should be winterized for storage by using potable water-safe antifreeze.
Caution
This toilet is not intended for use when exposed to temperatures below freezing.
Caution
Never use automotive-type antifreeze (ethylene glycol) in freshwater systems.
Note
Use nontoxic antifreeze (propylene glycol) designated for potable water systems.
(See vehicle owner’s manual.)
Non-toxic Antifreeze Winterization
1. Drain potable water tank and empty waste holding tank.
2. Add freshwater antifreeze to potable water tank according to mixture instructions from
antifreeze manufacturer.
3. Flush toilet several times until antifreeze mixture has owed completely through toilet,
macerator pump and holding tank.
4. Turn off power to toilet.
Each installation is different, so antifreeze mixture amounts may vary. User discretion is required to
assure adequate protection.
Note
Never leave vehicle unoccupied for extended periods of time with municipal water supply
or onboard water pump turned on when there is a possibility of freezing temperature.
Maintenance and winterizing

10
Dometic MasterFlush Toilet Troubleshooting / Customer Service
9 Troubleshooting
Problem Possible Cause Service Instruction
1. Flush cycle operates correctly
but water in the bowl empties
slowly or not at all.
a. Discharge piping is pinched or
kinked.
b. The macerator pump or
discharge piping is blocked.
a. Check discharge piping.
b. Clear blockage.
2. Macerator pump makes
unusually loud noise or
continually trips breaker.
a. Foreign material in pump
chamber.
a. Clear foreign material from pump
chamber.
3. Flush cycle is not activated after
pressing ush pedal.
a. Electrical power to toilet is
shut off or disrupted.
b. Flush pedal is malfunctioning.
c. Circuit board is malfunctioning.
d. Holding tank is full and signal
from tank has shut down
electrical power to toilet
(if tank level monitor system
is installed).
a. Check wiring and circuit
breakers (or fuses).
b. Replace switch in ush pedal.
c. Replace circuit board.
d. Empty holding tank.
4. Insufcient or no water enters
the toilet bowl.
a. Water supply line is pinched or
kinked.
b. Screen in water valve is blocked.
c. Water valve is malfunctioning.
a. Check water supply line.
b. Clear blockage at water valve.
c. Replace water valve.
10 Customer service
10.1 Toilet model identification
The toilet model identication label is located on the back of the
toilet bowl under the base cover. Please have this information
ready if contacting Dometic for customer service.
10.2 Contact information
There is a strong, worldwide network to assist in servicing and
maintaining your toilet system. For the Authorized Service Center
near you, please call from 8:00 a.m. to 5:00 p.m. (ET)
Monday through Friday.
You may also contact or have your local dealer contact the Parts
Distributor nearest you for quick response to your replacement parts
needs. They carry a complete inventory for the Dometic product line.
Telephone: 1 800-321-9886 U.S.A. and Canada
330-439-5550 International
Fax: 330-496-3097 U.S.A. and Canada
330-439-5567 International
Web site: http://www.Dometic.com

11
Limited Warranty
THE SELLER NAMED BELOW MAKES THE FOLLOWING WARRANTY WITH RESPECT TO
DOMETIC MASTERFLUSH MODEL 7640 ONLY
1. ONE-YEAR LIMITED WARRANTY
1A. This Limited Warranty will be in effect for one year from the date of purchase.
1B. This Limited Warranty is made only to the First Purchaser (hereinafter called the “Original Purchaser”)
who acquired the product for Original Purchaser’s personal, family, or household-type use. The Original
Purchaser should retain a copy of the sales receipt or invoice as evidence of the date of purchase because
proof of purchase is required to obtain warranty service.
1C. If this product is placed in commercial or business use, it will be warranted, to the Original Purchaser only, to
be free of defects in material and workmanship for a period of 90 days from the date of purchase.
1D. This warranty covers all parts of the Dometic toilet which is warranted to be free of defects in material and
workmanship under normal use. This warranty does not cover conditions unrelated to the material and
workmanship of the product. Such unrelated conditions include, but are not limited to, (a) faulty installation
and any damage resulting from such; (b) the need for normal maintenance and any damage resulting from
failure to provide such maintenance; (c) failure to follow Seller’s instructions for use of this product, includ-
ing failure which may result from not following winterization procedures; (d) any accident that results in
damage to this product; (e) scratching or staining of any ceramic or plastic component; and (f) acts of God,
or misuse of any part of this product and any alteration by anyone other than the Seller.
1E. For Original Purchaser (ONLY) to obtain the benets of this Warranty during the 1-year period (for personal
use) or 90-day period (for commercial use), the following shall apply:
(a) Original Purchaser shall contact the local dealer from whom the product
was purchased; or contact the Seller Customer Service Department at
1-800-321-9886 (8 a.m.-5 p.m. ET, USA) and provide the local dealer or
Seller Customer Service Department with sales receipt or invoice, product
model and serial number from product. The product model identication
label is located on the back of the toilet bowl under the pump/base cover
(see illustration).
(b) If product, while still under warranty, is returned to local dealer where
purchased, the local dealer will repair, replace or refund the product per this
Warranty and as authorized by the Seller. Seller will provide necessary
replacement parts or product free of charge to Original Purchaser,
including freight on such replacement parts or product, and Seller will pay
direct labor charges for such repair or replacement.
(c) Under no circumstances will Seller pay or be liable for any of Original Purchaser’s or dealer’s travel
charges or other expenses associated with bringing the product or recreation vehicle to the dealer for
repair, for providing dealer with access to the product or vehicle, or for downtime of the product or
vehicle.
(d) Original Purchaser may be required to return defective product or parts when requested by Seller;
in such event, Seller will pay related freight costs.
2. THE SELLER DOES NOT AUTHORIZE ANY PERSON OR COMPANY TO CREATE OR EXTEND ANY
WARRANTY OBLIGATIONS OR LIABILITY ON ITS BEHALF.
3. REPAIR OR REPLACEMENT OF, OR REFUND FOR, DEFECTIVE PRODUCT, AT SELLER’S OPTION,
SHALL BE THE ORIGINAL PURCHASER’S SOLE REMEDY UNDER THIS LIMITED WARRANTY.
IN NO EVENT SHALL SELLER BE LIABLE FOR PURCHASER’S INCIDENTAL OR CONSEQUENTIAL
DAMAGES. SOME STATES DO NOT ALLOW THE EXCLUSION OR LIMITATION OF INCIDENTAL OR
CONSEQUENTIAL DAMAGES, SO THE ABOVE LIMITATION OR EXCLUSION MAY NOT APPLY TO
YOU.
4. SELLER DISCLAIMS ALL OTHER WARRANTIES WITH RESPECT TO THE PRODUCT, WHETHER
EXPRESS OR IMPLIED, AND SPECIFICALLY DISCLAIMS THE IMPLIED WARRANTIES OF
MERCHANTABILITY AND FITNESS FOR A PARTICULAR PURPOSE. SOME STATES DO NOT ALLOW
LIMITATIONS ON IMPLIED WARRANTIES OR HOW LONG AN IMPLIED WARRANTY LASTS, SO THE
ABOVE LIMITATION MAY NOT APPLY TO YOU.
5. THIS WARRANTY GIVES YOU SPECIFIC LEGAL RIGHTS, AND YOU MAY ALSO HAVE OTHER
RIGHTS WHICH VARY FROM STATE TO STATE.
Location of product ID label

12
Dometic MasterFlush Toilet
REVISION A
Form No. 600347268 7/17
©2017 Dometic Corporation
Dometic Corporation, Sanitation Division
13128 State Rt. 226, P.O. Box 38
Big Prairie, OH 44611 USA
1-800-321-9886 • Fax: 330-496-3097
www.Dometic.com
/