Page is loading ...

• This fence was designed to meet the U.S. Consumer Product
Safety Commission’s guidelines for “Safety Barriers For Home
Pools”. Local municipalities enforce varying Safety Barrier
requirements, check with your local code enforcement office
to determine if this fence meets your local requirements.
• Contact your utility supplier to locate and mark underground lines.
• Sketch out the layout of your fence and calculate the number
of panels, posts and caps needed for your project. Use of full
panels is highly recommended.
• Careful planning and measuring of your fence project is essential,
as moving posts after the concrete sets is extremely difficult.
Most yards are relatively level and will allow for fairly simple
installation. If your yard is steeply pitched or is very uneven,
be sure to allow for the required mounting height of the adjacent
panel when setting your posts. You may need to “stair step”
the panels in these cases. See Figure 1.
• Dig post holes 10-12" in diameter and 36-42" deep (depending
on local ordinance and/or expected frost depth). Dig the hole
6" deeper than necessary and backfill with 6" of gravel to drain
water away from the bottom of the post.
• Keep the height of your fence panel in mind when digging post
holes and cutting posts to proper length. Always account for
clearance from the ground to the bottom of the panel as well as
additional post length for a post cap.
• Check measurements of fence panel to ensure proper post spacing.
• Use a string line to ensure posts follow a straight line.
INSTALLATION INSTRUCTIONS
6 ft. Pressure-Treated Fence Kit
with Black Aluminum Pickets
Planning
Digging Post Holes
Setting Posts
Tools Needed
• Post hole digger
• Drill/power screwdriver
• Level
• Miter or circular saw
with carbide tip blade
• Tape measure
• String line
• Ready-mix concrete
• Gravel
• Pencil
• Safety glasses
• Gloves
• Rubber mallet
Step Method.eps
Figure 1
Figure 2
• Install end and corner posts first. Tie a string between these
posts to establish a reference that you can use to make sure
other posts are properly aligned.
• It is good practice to use the bottom rail of the fence panel as a
spacer between posts to ensure accurate spacing is maintained.
• Brace the posts using 2x4s fastened to both the posts and stakes
in the ground. This will keep the posts straight while the concrete
sets. Check for plumb on two adjacent sides prior to pouring
concrete. See Figure 2.
• Fill the holes with ready-mix concrete following the package
instructions. Tamp the concrete to remove any air pockets.
Overfill the holes at the top and slope the concrete away from
the post to keep water from collecting around it. Recheck plumb
and alignment of all posts and allow the concrete to cure.
Cement
6" Gravel
10" - 12"

This brochure is for illustration purposes only. Use of this product must be in accordance with all local zoning and/or building codes. Consumer assumes all risks and liability associated with the use of this
product. For details on safe handling, go to UFPI.com/Safe Handling. Warrantor does not provide any warranty,either express or implied, and shall not be liable for any damages, including consequential damages.
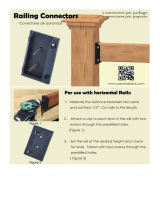
Cutting Down the Fence Panel
• Although it’s best to plan your fence line to utilize full fence panels,
it may be unavoidable to cut a fence panel to a custom width.
• For minor width adjustments, the top and bottom fence rails
should be cut down in equal amounts from each end.
• If major adjustments need to be made, cut the panel down to
your desired look, i.e. cutting all from one side or equal amounts
from each end. Ensure both the top and bottom rails are cut
identically so the predrilled holes line up.
• Insert the supplied blocks into the cutout flush with the ends.
High quality exterior wood glue or long woodscrews may be
used. If screws are used, predrill 2 holes long enough for
4-½"- 5" long screws.
Installing Fence Kit
• Install brackets according to the provided instructions.
• Lay the fence kit components on the ground or other flat surface.
• Insert aluminum pickets into the top rail, ensuring the pickets
are fully set into the predrilled holes.
• Insert the bottom rail onto the pickets, working from one end to
the other, positioning one picket at a time as you work your way
down the rail. See Figure 3.
( Note: It’s beneficial to have two people for this step,
or a ratcheting strap or rope can be used to hold the two
rails together as you position each picket.)
• Pick up the panel and slide the fence rails into the installed brackets.
( Note: Ensure the fence rails and pickets stay together
by using two people or tying the fence rails together.)
• Install all remaining screws into the brackets per the instructions.
• Install post caps as desired.
Figure 3
Top Rail
Bottom Rail
Work Your Way Down
50415 Herbert Street, P.O. Box 129 • Granger, Indiana 46530 • 574.277.7670 • www.ufpi.com
WeatherShield is a registered trademark of Osmose Wood Preserving Company of America. ©2013 Universal Forest Products, Inc. All rights reserved. 7576 2/14
/