Brother QL-710W User guide

Category
Print & Scan
Type
User guide

This manual is also suitable for

User's Guide
Be sure to read and understand this guide before using the machine.
We recommend that you keep this guide nearby for future reference.
Not all models are available in all countries.
www.brother.com
US ENG
ver.B
QL-710W/720NW
1
Contents ••••••••••••••••••••••••••••••••••••••••••••••••••••••••••••••••••••••••• 1
1 Using Interface Cable••••••••••••••••••••••••••••••••••••••••••••••••••••••••• 2
2 Uninstalling Software and Printer Driver •••••••••••••••••••••••••••••••••• 4
Uninstalling the software/User's Guide (Windows®) ••••••••••••••••••••••••••••• 4
Uninstalling the Printer Driver (Windows®)••••••••••••••••••••••••••••••••••••••••• 4
Uninstalling P-touch Editor (Macintosh)••••••••••••••••••••••••••••••••••••••••••••• 6
Uninstalling the Printer Driver (Macintosh) ••••••••••••••••••••••••••••••••••••••••• 6
3 Variety of the Labels •••••••••••••••••••••••••••••••••••••••••••••••••••••••••• 7
4 General Procedures••••••••••••••••••••••••••••••••••••••••••••••••••••••••••• 8
5 Status Lamp •••••••••••••••••••••••••••••••••••••••••••••••••••••••••••••••••••• 9
6 Mass Storage (QL-720NW only)•••••••••••••••••••••••••••••••••••••••••••• 10
7 iPrint&Label ••••••••••••••••••••••••••••••••••••••••••••••••••••••••••••••••••••• 12
8 QL Utility••••••••••••••••••••••••••••••••••••••••••••••••••••••••••••••••••••••••• 13
Overview •••••••••••••••••••••••••••••••••••••••••••••••••••••••••••••••••••••••••••••••••• 13
Using the QL Utility•••••••••••••••••••••••••••••••••••••••••••••••••••••••••••••••••••••• 13
9 Maintenance •••••••••••••••••••••••••••••••••••••••••••••••••••••••••••••••••••• 16
10 Troubleshooting•••••••••••••••••••••••••••••••••••••••••••••••••••••••••••••••• 17
11 Main Specifications•••••••••••••••••••••••••••••••••••••••••••••••••••••••••••• 20
Accessories (For USA Only) •••••••••••••••••••••••••••••••••••••••••••••••••••••••••• 22
Contents
2
RS-232C cable and Network cable are not standard accessories.
Prepare the appropriate cable for your interface.
USB cable
Use the enclosed interface cable.
RS-232C cable (QL-720NW)
The pin assignments for the serial cables (RS-232C cables) which can be used with this
machine are shown in the table below. You can purchase the cables at an electronics
store. Do not use an interface cable that is longer than 2 meters.
Brother QL side PC side
D-sub female, lock screw #4-40 (UNC). (D-Sub9P female)
Network cable (QL-720NW)
Use a straight-through Category5 (or greater) twisted-pair cable for 10BASE-T or
100BASE-TX Fast Ethernet Network.
The RS-232C serial connector part of this equipment is not Limited Power Source.
1 Using Interface Cable
Signal
Name
Pin
Number
Pin Assignments
Pin
Number
Signal
Name
DCD 1 1 DCD
RXD 2 2 RXD
TXD 3 3 TXD
DTR 4 4 DTR
GND 5 5 GND
DSR 6 6 DSR
RTS 7 7 RTS
CTS 8 8 CTS
RI 9 9 RI
3
Important
For USB interface, the included USB interface cable should be used to
ensure compliance with the limits for EMC (Electromagnetic
compatibility).
For serial and network interfaces, a shielded interface cable should be
used to ensure compliance with the limits for EMC.
Changes or modifications not expressly approved by Brother Industries,
Ltd. may affect the performance and print quality, and damage may not
be covered under the limited warranty.
Caution for LAN connection
Connect this product to a LAN connection that is not subjected to overvoltages.
Caution for RS-232C connection
The RS-232C serial connector part of this equipment is not Limited Power Source.
4
nstalling the Sof tware
This section describes how to uninstall the software and printer driver. In the following
steps, you will see XX-XXXX. Read "XX-XXXX" as your printer name.
1
For Windows
®
XP/Windows Server
®
2003
From [Control Panel], go to [Add or Remove Programs].
The [Add or Remove Programs] dialog appears.
For Windows Vista
®
/Windows
®
7/Windows Server
®
2008
From the [Control Panel], go to [Programs] and open [Programs and Features].
The [Uninstall or change a program] window appears.
2
For Windows
®
XP/Windows Server
®
2003
Choose the software/user's manual you want to remove, such as P-touch Editor
5.0, and click [Remove].
For Windows Vista
®
/Windows
®
7/Windows Server
®
2008
Choose the software/user's manual you want to remove, such as P-touch Editor
5.0, and click [Uninstall].
3
Click [OK]/[Yes].
The uninstall operation starts.
4
Close the [Add or Remove Programs] (Windows
®
XP/Windows
Server
®
2003)/[Programs and Features] (Windows Vista
®
/
Windows
®
7/Windows Server
®
2008) dialog.
Brother P-touch Editor/Brother P-touch Update Software/User's Guide has been
uninstalled.
1
Turn off the printer.
2 Uninstalling Software and
Printer Driver
Uninstalling the software/User's Guide (Windows
®
)
Uninstalling the Printer Driver (Windows
®
)
5
2
For Windows
®
XP
From [Control Panel], go to [Printers and Other Hardware], open [Printers and
Faxes] window.
For Windows Server
®
2003
From [Control Panel], open [Printers and Faxes] window.
For Windows Vista
®
From [Control Panel], go to [Hardware and Sound] and open [Printers].
For Windows
®
7
Click the , go to [Devices and Printers].
For Windows Server
®
2008
From [Control Panel], open [Printers].
For details, see Windows
®
Help.
3
For Windows
®
XP/Windows Server
®
2003
Choose "Brother XX-XXXX", and click [File] - [Delete].
For Windows Vista
®
/Windows
®
7/Windows Server
®
2008
Choose "Brother XX-XXXX", right click on the icon, and then click [Delete]
(Windows Vista
®
/Windows Server
®
2008)/[Remove device] (Windows
®
7).
4
For Windows
®
XP/Windows Server
®
2003
Go to [File] - [Server Properties].
For Windows Vista
®
In the [Printers] window, right click and go to [Run as administrator] - [Server
Properties...].
If the [Authorization confirmation] dialog appears, click [Continue]. If the [User
Account Control] dialog appears, enter the password and click [OK].
For Windows
®
7
Choose [Fax] or [Microsoft XPS Document Writer] in the [Devices and Printers]
window, and then click [Print server properties], which appears in the menu bar.
For Windows Server
®
2008
In the [Printers] window, click [Server properties], which appears in the menu bar.
5
For Windows
®
XP/Windows Server
®
2003/Windows Server
®
2008
Click the [Drivers] tab and choose "Brother XX-XXXX". Then, click [Remove].
For Windows Vista
®
Click the [Drivers] tab and choose "Brother XX-XXXX". Then, click [Remove...].
For Windows
®
7
Click the [Drivers] tab, and then click [Change Driver Settings].
(If a User Account Control message appears, type in the password, and then click
[OK]).
Choose "Brother XX-XXXX", and then click [Remove...].
6
6
For Windows
®
XP/Windows Server
®
2003
Go to step 7.
For Windows Vista
®
/Windows
®
7/Windows Server
®
2008
Choose [Remove driver and driver package], and then click [OK].
7
Close the [Print Server Properties] window.
The Printer Driver has been uninstalled.
1
On the drive where P-touch Editor is installed, double-click the
"Applications" folder - "P-touch Editor 5.0" folder - "Uninstall
P-touch" folder - "UninstallPtEditor.command".
The "Terminal" window appears, and the uninstall operation starts.
Administrator rights are required for the uninstall operation.
In case the [Terminal] window does not appear by double-clicking the
"UninstallPtEditor.command", right click (or press control key + click) the
"UninstallPtEditor.command". The context menu appears. Open the
[Terminal] window from the context menu.
2
Click to close the [Terminal] window.
3
Delete the "P-touch Editor 5.0" folder from the "Applications" folder.
Before you delete the "P-touch Editor 5.0" folder, please check if any
necessary files are saved in it.
P-touch Editor has been uninstalled.
1
Turn off the printer.
2
Click Apple menu - [System Preferences], and click [Print & Fax]
(Mac OS X 10.5.8 - 10.6)/[Print & Scan] (Mac OS X 10.7).
3
Choose "Brother XX-XXXX", and click .
4
Close the [Print & Fax]/[Print & Scan] window.
The Printer Driver has been uninstalled.
Uninstalling P-touch Editor (Macintosh)
Uninstalling the Printer Driver (Macintosh)
7
Here are the sample labels that you can create with Brother QL-710W/720NW.
There is a variety of labels to choose from. Go to Page 22 for more information.
Choose the type of label you want to create.
3 Variety of the Labels
8
This section describes the general procedure for creating labels.
Connect to the PC/Mac
Remove the labels from the label output slot when the labels are piled up. This
prevents a paper jam.
Use the machine without connecting to the PC (Windows
®
only)
1
Create the label data.
Enter text directly using P-touch Editor, or copy text from a Microsoft
®
Office
application.
Use P-touch Editor's variety of editing functions to format and decorate your label.
Enter text in P-touch Editor. • Copy text from Microsoft
®
Office.
(Microsoft
®
Word for Windows
®
shown in the example)
For details on how to create the labels, see the Help.
2
Print the label.
Print the label from the Brother QL printer.
For details on how to print the labels, see the Help.
1
Create the label data and transfer it to the printer. (See the P-touch
Transfer Manager chapter of the Software User's Guide.)
2
Use the P-touch Template command to print the transferred
template. (For details of the P-touch Template function, see the
Software User's Guide in the CD-ROM.)
4 General Procedures
9
Definition of Status Lamp
Status lamp on the Brother QL printer indicates the current operating
condition.
Lamp Condition
Not lit
Power is OFF.
Green lamp is lit
Power is ON.
Green lamp is flashing
Receiving data from the PC.
Transferring data.
Creating Printer Set-up Information data.
Orange lamp is lit
The roll cover is opened. Close the roll cover correctly.
Starting reset or CUT button pressed while resetting.
Orange lamp is flashing
Cooling (Wait for the temperature of the print head to cool off)
Reset in progress.
Red lamp is lit
The machine is booting.
Red lamp is flashing
Indicates one of the following errors.
Red lamp flashes in 1.0 second intervals:
End of DK Roll
Incorrect DK Roll installed
Feed error
No DK Roll
Transmission error
The roll cover is opened (While running)
Data image deployment error
Access point search/connection error
Red lamp flashes 0.9 seconds OFF, 0.3 seconds ON, 0.3
seconds OFF, and then 0.3 seconds ON:
Cutter error
Red lamp flashes in 0.3 second intervals:
•EEPROM error
5 Status Lamp
10
Description
The mass storage feature allows you to execute commands by sending data from a
computer or other device to the printer via USB. Files that have been copied to the
printer's mass storage area are processed when you press the Wi-Fi button.
This feature is useful in the following situations.
When you want to apply settings that are stored in a command file (".bin" format) or
templates that are stored in ".blf" format files that were distributed by the administrator
without using a customized tool
When you want to execute commands without installing the printer driver
When you want to use a device with an OS (including non-Windows operating systems)
that has a USB host feature to print and transmit data
Using the Mass Storage Feature
1
Confirm that the printer is turned off.
2
While holding down the Wi-Fi button, press and hold the power
button.
When the Status and Wi-Fi lamps start to flash in green, release the
Wi-Fi and power buttons.
After the lamps flash a few times, the Status lamp lights in green
automatically.
3
Connect the computer or device to the printer via USB. The printer's
mass storage area is displayed on the computer or device's screen.
If the mass storage area is not displayed automatically, refer to the operating
instructions for the computer or device's operating system for information about
displaying the mass storage area.
4
Drag and drop the file you want to copy to the mass storage area.
5
Press the Wi-Fi button. The command file is executed. While the file
is being executed, the Wi-Fi lamp lights in green.
6
After the file has been executed, the Wi-Fi lamp turns off.
7
To turn mass storage mode off, turn the printer off.
The printer will start up in its normal operating mode.
6 Mass Storage (QL-720NW only)
11
When the printer is turned off, mass storage mode is deactivated and any files in
the mass storage area are deleted.
This feature supports ".bin" and ".blf" files. Do not use other file formats with this
feature.
Do not create folders in the mass storage area. If a folder is created, files in the
folder will not be executed.
The capacity of the mass storage area is 2.45 MB. Use of files larger than 2 MB
cannot be guaranteed.
If multiple files are copied to the mass storage area, they are executed in the order
they were copied. If multiple files are copied in one operation, the order that the files
will be executed in cannot be guaranteed.
Wi-Fi, wired network interface and RS-232C features are not available while the
printer is running in mass storage mode.
12
The Brother™ iPrint&Label application allows you to print directly to your Brother QL
label printer from your Apple iPhone, iPad, and iPod touch or Android™ smartphone.
The Brother™ iPrint&Label application can be downloaded free-of-charge from App
Store or the Google Play. Simply search for "Brother iPrint&Label" in App Store or the
Google Play.
The Brother™ iPrint&Label application supports the following functions:
Printing labels with text you input
Printing labels with text you input using templates
Printing pre-designed labels from the Label Collection
Printing labels with photos saved on your Apple iPhone, iPad, and iPod touch or
Android™ smartphone
The specifications of this product are subject to change without notice.
7 iPrint&Label
13
The QL Utility is a computer program that allows you to change the printer's default
settings.
Normally when using a computer program to print a document, print settings are
specified in the printer driver's dialog box and then the data is sent to the printer. This
utility can be used to adjust settings that are more advanced than the printer driver's
settings.
Use the QL Utility to configure the printer only when the printer is idle. The printer may
malfunction if you attempt to configure it while it is handling a job.
Before Using the QL Utility
Connect the printer to an AC power outlet.
Make sure that the printer driver has been installed and is functional.
Connect the printer to a computer via USB or RS-232C (QL-720NW only).
Starting the QL Utility (Windows
®
)
1
Connect the printer to be configured to the computer.
2
Click [Start] - [All Programs] - [Brother] - [Label & Mobile Printer] -
[Printer Setting Tool]. The [Printer Setting Tool] screen is displayed.
3
Select the printer connected in step 1.
4
Click the [Utility] button.
The main window is displayed.
See
Î How to Use the QL Utility.
8 QL Utility
Overview
Using the QL Utility
14
Starting the QL Utility (Macintosh)
How to Use the QL Utility
Power on when plugged in
Determines whether or not the printer turns on
automatically when the power cord is connected.
Available settings: [OFF], [ON]
Auto power-off time setting
Determines the amount of time that passes before
the printer turns off automatically.
Available settings: [0], [10], [20], [30], [40], [50], [60]
This setting is disabled when connecting with
wired network/wireless network.
Network Settings on Power On
Determines the conditions for connecting via Wi-Fi
and wired network (QL-720NW only) when the
printer is turned on.
Available settings: (QL-710W) [On by Default], [Off
by Default], [Keep Current State]
(QL-720NW) [Wireless LAN by Default], [Wired
LAN by Default], [Keep Current State]
Save Command Settings
Saves the content of the selected (checked) items as a command-format ".bin" file.
1
Connect the printer to be configured to the Mac.
2
Click [Macintosh HD] - [Applications] - [Brother] - [Utilities] - [Brother
QL-7xx Utility].
The main window is displayed.
See Î How to Use the QL Utility.
1
In the main window of the QL Utility, select the check boxes of the
parameters with settings that can be changed.
2
Select the desired settings from the pull-down menus or enter the
desired values.
3
Click [Apply] to save the settings in the printer.
The settings are saved when you quit the QL Utility, and the settings are applied
the next time the QL Utility is started.
Note, however, that if the printer is already connected when the QL Utility is
started, the printer's settings are applied.
For Windows
®
15
Printer Information Output Settings
Determines which information is printed when
printing the printer's settings.
Available settings: (QL-710W) [All], [Usage Log],
[Printer Settings]
(QL-720NW) [All], [Usage Log], [Printer Settings],
[Printer Transfer Data]
Command Mode (QL-720NW only)
Sets the printer's command format.
Available settings: [Raster], [ESC/P], [P-touch
Template]
Baud Rate (QL-720NW only) (Windows
®
only)
(RS-232C connection only)
Sets the Baud Rate.
Available settings: [9600], [57600], [115200]
For Windows
®
16
Referenc e
Maintenance of the machine can be performed as required. However, some
environments require that maintenance be performed more frequently (e.g. in dusty
conditions).
Print head maintenance
The DK Roll (thermal recording paper type) used with the machine is
designed to clean the print head automatically. When the DK Roll
passes the print head during printing and label feeding, the print head
is cleaned.
Label outlet maintenance
If a label causes the machine to jam
due to glue attached to the label
outlet, remove the power cord and
clean the label outlet with a cloth
dipped into ethanol or isopropyl
alcohol.
9 Maintenance
Label outlet
17
Referenc e
If the problems occur while using this machine, the following may help you to solve the
problems.
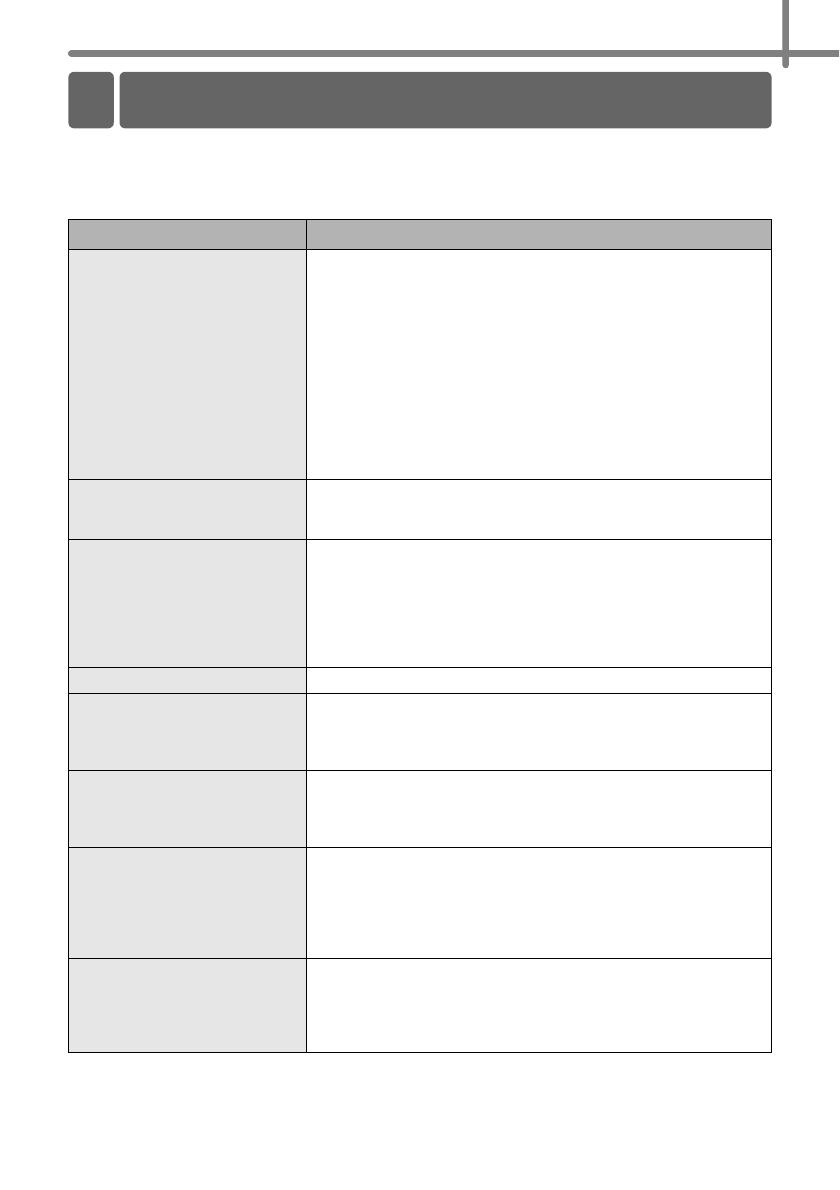
Potential types of problems
Problem Solution
The Brother QL printer does not
print, or a printing error is
received.
Is the cable loose?
Check that the cable is connected securely.
Is the DK Roll installed correctly?
If not, remove the DK Roll and reinstall it.
Is there enough roll remaining?
Check that there is enough roll remaining.
Is the DK Roll compartment cover open?
Check that the DK Roll compartment cover is closed.
Has a print error or transmission error occurred?
Turn off the Brother QL printer and then turn it on again. If there
is still a problem, contact your Brother dealer.
If the printer is connected via a USB hub, try connecting it
directly to the PC. If not, try connecting it to another USB port.
The Status LED lamp is not lit.
Is the power cord inserted correctly?
Check that the power cord is inserted. If it is inserted correctly,
try plugging it into another electrical outlet.
A data transmission error
appears on the PC/Mac.
Is the correct port chosen? (Windows
®
only)
Check that the correct port is chosen from the "Print to the
following port" list in the Printer Properties dialog box.
Is the Brother QL printer in cooling mode (the Status lamp is
flashing in orange)?
Wait until the Status lamp stops flashing and then try printing
again.
Labels are jammed in the cutter. Contact Brother Customer Service at 1-877-BROTHER.
The label is not ejected properly
after printing.
Check that the ejection path of the label is not blocked.
Check that the DK Roll is set properly by removing the DK Roll
and reinstalling it.
Ensure that the DK Roll cover is closed properly.
After replacing the Roll while the
Add-In feature was activated,
the layout style was not
updated. (Windows
®
only)
Close the P-touch Editor to exit the Add-In, and then reactivate
the Add-In.
The P-touch Add-In icon is not
displayed on Microsoft
®
Word.
(Windows
®
only)
Is Microsoft
®
Word started up from Microsoft
®
Outlook
®
?
Is Microsoft
®
Word chosen as the default editor for Microsoft
®
Outlook
®
?
Due to program limitations, the Microsoft
®
Word Add-In does
not work with the above settings. Quit Microsoft
®
Outlook
®
, and
restart Microsoft
®
Word.
Cutter error
If the cutter error occurs, keep the DK roll compartment cover
closed and press the ON/OFF button. The cutter moves back to
the normal position and turns the machine OFF automatically.
After the machine is OFF, inspect the label outlet and remove
the paper jam.
10
Troubleshooting
18
The printed bar code cannot be
read.
Set the label vertical to the print head as shown below.
Some types of scanner are not able to read the bar code. Try
using another scanner.
We recommend printing the Bar code with Print Quality options
set to "Give priority to print quality".
Windows
®
XP:
To change the Print Quality options, open the printer properties
by going to [Control Panel] - [Printers and Other Hardware] -
[Printers and Faxes], right-clicking the printer whose settings are
to be changed, then selecting [Properties]. Then, in the [General]
tab, click [Printing Preferences...].
Windows Vista
®
:
To change the Print Quality options, open the printer properties
by going to [Control Panel] - [Hardware and Sound] - [Printers],
right-clicking the printer whose settings are to be changed, then
selecting [Properties]. Then, in the [General] tab, click [Printing
Preferences...].
Windows
®
7:
To change the Print Quality options, open the printer properties
by going to - [Devices and Printers], right-clicking the printer
whose settings are to be changed, and selecting [Printer
properties]. Then, in the [General] tab, click [Preferences...].
Mac OS X 10.5.8 - 10.7:
To change the Print Quality options, use the [Basic] tab in the
printer properties.
I want to reset the printer/delete
the data transferred from the
PC/Mac.
Press and hold the Cut button while holding down the ON/OFF
button when the machine is turned off. When the Wi-Fi lamp
starts flashing and the Status lamp lights orange, press the Cut
button six times while continuing to hold down the ON/OFF
button. The machine will then reset. All data transferred from the
PC/Mac will be deleted and the machine will be reset to factory
settings.
I want to cancel the current
printing job.
Make sure that the printer is ON, and press ON/OFF button.
Problem Solution
Print head
Recommended
print direction
Label exit slot
19
When printing via the USB
cable, the printer repeatedly
pauses and then continues
printing.
Is the printer set for sequential printing?
If so, set print mode to buffered printing.
Windows
®
XP:
Open printer properties from [Control Panel] - [Printers and
Faxes] and click [Printing Preferences...] button in the [Other]
tab.
Choose the option [After one page of data is received].
Windows Vista
®
/Windows
®
7:
Open [Devices and Printers] from [Control Panel]. Then right-
click your QL printer and click [Printing Preferences]. Choose
the option [After one page of data is received] in the [Other] tab.
Mac OS X 10.5.8 - 10.7:
Open the [Basic] tab in the printer properties.
Choose the option "After one page of data is received".
An alternative solution is to disconnect the LAN cable until USB
printing is completed.
Cannot print from wired
network.
Check that the wired network cable is connected.
Is the wireless LED lit?
If the LED is lit or flashing, press the Wi-Fi button to turn it off.
Cannot install the printer driver
for wired network.
Check that the wired network cable is connected.
Is the wireless LED lit?
If the LED is lit or flashing, press the Wi-Fi button to turn it off.
Cannot print from wireless
network.
Is the wireless LED lit?
If the LED is not lit, press the Wi-Fi button to light it.
Cannot install the printer driver
for wireless network.
Is the wireless LED lit?
If the LED is not lit, press the Wi-Fi button to light it.
Problem Solution
For Windows
®
  • Page 1 1
  • Page 2 2
  • Page 3 3
  • Page 4 4
  • Page 5 5
  • Page 6 6
  • Page 7 7
  • Page 8 8
  • Page 9 9
  • Page 10 10
  • Page 11 11
  • Page 12 12
  • Page 13 13
  • Page 14 14
  • Page 15 15
  • Page 16 16
  • Page 17 17
  • Page 18 18
  • Page 19 19
  • Page 20 20
  • Page 21 21
  • Page 22 22
  • Page 23 23

Brother QL-710W User guide

Category
Print & Scan
Type
User guide
This manual is also suitable for

Ask a question and I''ll find the answer in the document

Finding information in a document is now easier with AI