
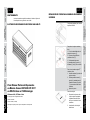
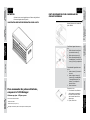
Operating Instructions & Parts Manual EN
LIGHT
DUTY TOOL
CABINET
Models 48RJ69, 48RJ70, 48RJ71, 48RJ72

GettinG Started Safety /
SpecificationS
aSSembly /
inStallation operation troubleShootinG maintenance /
repair
PLEASE READ AND SAVE
THESE INSTRUCTIONS.
READ CAREFULLY
BEFORE ATTEMPTING
TO ASSEMBLE, INSTALL,
OPERATE OR MAINTAIN THE
PRODUCT DESCRIBED.
PROTECT YOURSELF AND
OTHERS BY OBSERVING ALL
SAFETY INFORMATION. FAILURE
TO COMPLY WITH INSTRUCTIONS
COULD RESULT IN PERSONAL
INJURY AND/OR PROPERTY DAMAGE!
RETAIN INSTRUCTIONS FOR FUTURE
REFERENCE.
PLEASE REFER TO BACK COVER
FOR INFORMATION REGARDING
DAYTON’S WARRANTY AND OTHER
IMPORTANT INFORMATION.
Model #: ___________________
Serial #: ___________________
Purch. Date: _______________
Form xxxxx / Printed in xxxxx
xxxxx/ Version xx/ xx/ xxxx
© 2015 W.W. Grainger, Inc.
All Rights Reserved
•See General Safety Instructions on page 2, and Cautions and Warnings
as shown.
1
UNPACKING
Steps:
1. When unpacking, please ensure the unit is upright.
2. Do not use any sharp objects to open the packaging.
3. After unpacking unit, inspect carefully for any damage that may
have occurred during transit.
4. Check for loose, missing, or damaged parts.
5. Any shipping damage claim must be filed with the carrier.

GENERAL SAFETY INFORMATION
GettinG Started
GettinG Started
Safety /
SpecificationS
Safety /
SpecificationS
aSSembly /
inStallation
aSSembly /
inStallation
operation
operation
troubleShootinG
troubleShootinG
maintenance /
repair
maintenance /
repair
23
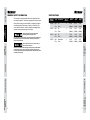
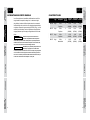
SPECIFICATIONS
The Westward top and intermediate chests have a durable red finish
and strong load capacity. The cabinet is equipped with full extension ball
bearing slides, ensuring smooth functionality of all drawers, and plastic
side carrying handles. Each drawer can hold up to 55 lbs(25kg). The
chest is ideal for mechanics, craftsmen, repairmen and garage owners
interested in storing and organizing tools and parts.
Ensure the drawers are closed and locked
completely before moving the chest.
Do not alter the product in any manner. Do not
step or climb on the chest.
Keep the product on level surfaces. The product may become unstable and
tip if stored or moved on an unlevel surface, which may cause personal
injury or product damage.
Please open the lid first when opening the drawers, and be careful with the
lid stops which may hurt you. Do not open more than one drawer at the
same time. The chest may become unstable and tip. Please ensure the chest
is locked prior to moving.
Grainger
Items No.
Type Description No. of
Drawers
Width Depth Height
48RJ69 Light
Duty
Top
Chest
4 25.98”
(660MM)
12.09”
(307MM)
13.90”
(353MM)
48RJ70 Light
Duty
Top
Chest
6 25.98”
(660MM)
12.09 ”
(307MM)
13.90”
(353MM)
48RJ71 Light
Duty
Top
Chest
7 25.98”
(660MM)
12.09”
(307MM)
16.02”
(407MM)
48RJ72 Light
Duty
Intermediate
Chest
3 26.26”
(667MM)
12.60”
(320MM)
9.65”
(245MM)

GettinG Started
GettinG Started
Safety /
SpecificationS
Safety /
SpecificationS
aSSembly /
inStallation
aSSembly /
inStallation
operation
operation
troubleShootinG
troubleShootinG
maintenance /
repair
maintenance /
repair
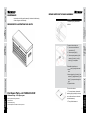
Maintenance
For Repair Parts, call 1-800-323-0620
24 hours a day – 365 days a year
Please provide following information:
-Model number
-Serial number (if any)
-Part description and number as shown in parts list
4
Lubricate the lock with graphite annually. Lubricate the ball bearing
slides with grease twice annually.
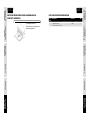
REPAIR PARTS ILLUSTRATION FOR 48RJ70
REPAIR PARTS FOR TOP HOOK ASSEMBLY
Description
Lock and key set, parts number:
42XN06.
To remove lock and key set:
1. Use a cross screwdriver to
remove bolts (7).
2. Remove spring clip (3).
3. Remove spring washer (6), flat
washer (5), hook (4), lock (2),
and key (1) in sequence.
To remove the drawer:
1. To remove drawers, release the
retaining clip by pushing the lever up
on one side and down on the other
side simultaneously .
2. Then pull the drawer out.
To reinstall lock and key set:
1. Insert lock (2) through the round
hole.
2. Insert spring clip (3), hook (4), flat
washer (5), spring washer (6), and
bolts (7) in sequence through the
lock.
3. Tighten the bolts.
5

GettinG Started
Safety /
SpecificationS
aSSembly /
inStallation
operationtroubleShootinG
maintenance /
repair
GettinG Started Safety /
SpecificationS
aSSembly /
inStallation operation troubleShootinG maintenance /
repair
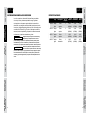
repair parts list
67
Ref.
No.
Description Part No. Qty.
142XN06 1
2
Lock and key set (1 Lock & 2 Keys)
10”×35MM Ball Bearing Slides
(For 48RJ69, 48RJ70, 48RJ71, 48RJ72)
41GW99 1
REPAIR PARTS FOR TOP HOOK ASSEMBLY
Description
To reinstall drawers:
Place drawer on slide channels and
push in completely.

WESTWARD ONE-YEAR LIMITED WARRANTY
WESTWARD ONE-YEAR LIMITED WARRANTY.
All Westward product models covered in this manual
covered by this Limited Warranty are warranted by W.W. Grainger, Inc. (“Grainger”) to the original user
against defects in workmanship or materials under normal use for one year after date of purchase. If the
Product is part of a set, only the portion that is defective is subject to this warranty. Any Product or part
which is determined to be defective in material or workmanship and returned to an authorized service
location, as Grainger or Grainger’s designee designates, shipping costs prepaid, will be, as the exclusive
remedy, repaired or replaced with a new or reconditioned product or part of equal utility or a full refund
given, at Grainger’s or Grainger’s designee’s option, at no charge. For limited warranty claim procedures,
see “Warranty Service” below.
COVERED PRODUCTS.
This Limited Warranty covers the product model(s) identified in this manual.
This Limited Warranty does not cover normal wear and tear of Products or portions of them, or products or
portions of them which are consumable in normal use. This warranty is void if there is evidence of misuse,
mis-repair, mis-installation, abuse or alteration.
WARRANTY DISCLAIMERS AND LIMITATIONS OF LIABILITY RELATING TO ALL CUSTOMERS
FOR ALL PRODUCTS
LIMITATION OF LIABILITY.
TO THE EXTENT ALLOWABLE UNDER APPLICABLE LAW, GRAINGER’S
LIABILITY FOR CONSEQUENTIAL AND INCIDENTAL DAMAGES IS EXPRESSLY DISCLAIMED. GRAINGER’S
LIABILITY IN ALL EVENTS IS LIMITED TO AND SHALL NOT EXCEED THE PURCHASE PRICE PAID.
WARRANTY DISCLAIMER.
A DILIGENT EFFORT HAS BEEN MADE TO PROVIDE PRODUCT INFORMATION
AND ILLUSTRATE THE PRODUCTS IN THIS LITERATURE ACCURATELY; HOWEVER, SUCH INFORMATION
AND ILLUSTRATIONS ARE FOR THE SOLE PURPOSE OF IDENTIFICATION, AND DO NOT EXPRESS OR
IMPLY A WARRANTY THAT THE PRODUCTS ARE MERCHANTABLE, OR FIT FOR A PARTICULAR PURPOSE,
OR THAT THE PRODUCTS WILL NECESSARILY CONFORM TO THE ILLUSTRATIONS OR DESCRIPTIONS.
EXCEPT AS PROVIDED BELOW, NO WARRANTY OR AFFIRMATION OF FACT, EXPRESSED OR IMPLIED,
OTHER THAN AS STATED IN THE “LIMITED WARRANTY” ABOVE IS MADE OR AUTHORIZED BY GRAINGER.
PRODUCT SUITABILITY.
MANY JURISDICTIONS HAVE CODES AND REGULATIONS GOVERNING SALES,
CONSTRUCTION, INSTALLATION, AND/OR USE OF PRODUCTS FOR CERTAIN PURPOSES, WHICH MAY VARY
FROM THOSE IN NEIGHBORING AREAS. WHILE ATTEMPTS ARE MADE TO ASSURE THAT PRODUCTS COMPLY
WITH SUCH CODES, GRAINGER CANNOT GUARANTEE COMPLIANCE, AND CANNOT BE RESPONSIBLE FOR
HOW THE PRODUCT IS INSTALLED OR USED. BEFORE PURCHASE AND USE OF A PRODUCT, REVIEW THE
SAFETY/SPECIFICATIONS, AND ALL APPLICABLE NATIONAL AND LOCAL CODES AND REGULATIONS,
AND BE SURE THAT THE PRODUCT, INSTALLATION, AND USE WILL COMPLY WITH THEM.
CONSUMERS ONLY.
CERTAIN ASPECTS OF DISCLAIMERS ARE NOT APPLICABLE TO CONSUMER
PRODUCTS SOLD TO CONSUMERS; (A) SOME JURISDICTIONS DO NOT ALLOW THE EXCLUSION OR
LIMITATION OF INCIDENTAL OR CONSEQUENTIAL DAMAGES, SO THE ABOVE LIMITATION OR EXCLUSION
MAY NOT APPLY TO YOU; (B) ALSO, SOME JURISDICTIONS DO NOT ALLOW A LIMITATION ON HOW LONG
AN IMPLIED WARRANTY LASTS, SO THE ABOVE LIMITATION MAY NOT APPLY TO YOU; AND (C) BY LAW,
DURING THE PERIOD OF THIS LIMITED WARRANTY, ANY IMPLIED WARRANTIES OF MERCHANTABILITY
OR FITNESS FOR A PARTICULAR PURPOSE APPLICABLE TO CONSUMER PRODUCTS PURCHASED BY
CONSUMERS, MAY NOT BE EXCLUDED OR OTHERWISE DISCLAIMED.
THIS LIMITED WARRANTY GIVES YOU SPECIFIC LEGAL RIGHTS, AND YOU MAY ALSO HAVE OTHER
RIGHTS WHICH VARY FROM STATE TO STATE.
THIS LIMITED WARRANTY ONLY APPLIES TO PRODUCTS PURCHASED BY UNITED STATES PURCHASERS
FOR DELIVERY IN THE UNITED STATES.
WARRANTY SERVICE
To obtain warranty service if you purchased the covered product directly from Grainger, (i) write or call or
visit the local Grainger branch from which the product was purchased or another Grainger branch near you
(see www.grainger.com for a listing of Grainger branches); or (ii) contact Grainger by going to www.grainger.
com and clicking on the “Contact Us” link at the top of the page, then clicking on the “Email us” link; or
(iii) call Customer Care (toll free) at 1-888-361-8649. To obtain warranty service if you purchased the covered
product from another distributor or retailer, (i) go to www.grainger.com for Warranty Service; (ii) write or
call or visit a Grainger branch near you; or (iii) call Customer Care (toll free) at 1-888-361-8649. In any case,
you will need to provide, to the extent available, the purchase date, the original invoice number, the stock
number, a description of the defect and anything else specified in this Westward One-Year Limited Warranty.
You may be required to send the product in for inspection at your cost. You can follow up on the progress
of inspections and corrections in the same ways. Title and risk of loss pass to buyer on delivery to common
carrier, so if product was damaged in transit to you, file claim with carrier, not the retailer or Grainger.
For warranty information for purchasers and/or delivery outside the United States, please contact:
Canada: www.westwardtools.ca
Mexico:
Grainger.com.mx
Location not listed, contact:
+1-888-361-8649 (or 1-800-GRAINGER)
®
DM_US 45931887-4.019350.0029

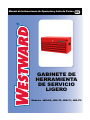
Manual de Instrucciones de Operación y Lista de Partes ES
GABINETE DE
HERRAMIENTA
DE SERVICIO
LIGERO
Modelos 48RJ69, 48RJ70, 48RJ71, 48RJ72

POR FAVOR, LEA Y GUARDE
ESTAS INSTRUCCIONES. LEALAS
CUIDADOSAMENTE ANTES DE
TRATAR DE MONTAR, INSTALAR,
OPERAR O DAR MANTENIMIENTO
AL PRODUCTO AQUI DESCRITO.
PROTEJASE USTED MISMO Y
A LOS DEMAS OBSERVANDO
TODA LA INFORMACION DE
SEGURIDAD. ¡EL NO CUMPLIR
CON LAS INSTRUCCIONES
PUEDE OCASIONAR DAÑOS,
TANTO PERSONALES COMO
A LA PROPIEDAD! GUARDE
ESTAS INSTRUCCIONES PARA
REFERENCIA EN EL FUTURO.
CONSULTE LA CUBIERTA
POSTERIOR PARA VER
LA INFORMACION DE
GARANTIA DE DAYTON Y OTRA
INFORMACION IMPORTANTE.
Núm. de Modelo: ____________
Núm. de Serie: _____________
Fecha de Compra: __________
Formulario 5SXXXX / Impreso en XXXX
XXXXX Versión XX XX/XXXX
© 2013 Dayton Electric Manufacturing Co.
Reservados todos los derechos
PARA COMENZAR SEGURIDAD /
ESPECIFICACIONES
MONTAJE /
INSTALACION OPERACION IDENTIFICACION
DE PROBLEMAS
MANTENIMIENTO /
REPARACION
DESEMBALAJE
1
• Vea las Instrucciones Generales de Seguridad en la página 2 y
Precauciones y Advertencias como se muestra.
Pasos:
1. Al desembalar, asegúrese de que la unidad está en posición vertical.
2. No utilice ningún objeto afilado para abrir el envase.
3. Después de desempacar la unidad, inspeccione cuidadosamente
por cualquier daño que pueda haber ocurrido durante el transporte.
4. Compruebe si hay piezas sueltas, faltantes o dañados.
5. Cualquier reclamación daños durante el transporte debe ser
presentada ante el transportista.

PARA COMENZAR SEGURIDAD /
ESPECIFICACIONES
MONTAJE /
INSTALACION OPERACION IDENTIFICACION
DE PROBLEMAS
MANTENIMIENTO /
REPARACION
INFORMACIÓN GENERAL DE SEGURIDAD
PARA COMENZAR
SEGURIDAD /
ESPECIFICACIONES
MONTAJE /
INSTALACION
OPERACION
IDENTIFICACION
DE PROBLEMAS
MANTENIMIENTO /
REPARACION
2
ADVERTENCIA
PRECAUCION
Los cofres superiores e intermedios Westward tienen un acabado
de color rojo fuerte y duradera capacidad de carga. El gabinete
está equipado con toboganes completa bolitas de la extensión de
rodamientos, que aseguran una funcionalidad sin problemas de todos
los cajones y manijas laterales de plástico que lleva. Cada cajón puede
contener hasta 55 libras (25 kg). El pecho es ideal para la mecánica,
artesano, hombre de reparación y propietarios de talleres interesados
en almacenar y organizar las herramientas y piezas.
Asegúrese de que los cajones están cerradas y
bloqueadas por completo antes de mover el
No altere el producto de cualquier manera. No se
pare ni se suba en el pecho. Por favor, abra la tapa
pecho. Mantenga el producto en superficies planas. El producto puede
desestabilizarse y volcar si se almacena y se trasladó en una superficie
desnivelada, lo que puede causar lesiones personales o daños al producto.
primero al abrir los cajones, y tenga cuidado con la tapa deja que le puede
hacer daño. No abra más de un cajón a la vez. El pecho se puede volver
inestable y la punta. Asegúrese de que el pecho está bloqueado antes de
mover.
3
ESPECIFICACIONES
Tipo Descripción No. de
Cajones
Anchura Profundidad Altura
48RJ69 trabajo
ligero
Pecho
superior
4 25.98”
(660MM)
12.09”
(307MM)
13.90”
(353MM)
48RJ70 Trabajo
ligero
Pecho
superior
6 25.98”
(660MM)
12.09 ”
(307MM)
13.90”
(353MM)
48RJ71 Trabajo
ligero
Pecho
superior
7 25.98”
(660MM)
12.09”
(307MM)
16.02”
(407M)
48RJ72 Trabajo
ligero
Pecho
Intermendio
3 26.26”
(667MM)
12.60”
(320MM)
9.65”
(245MM)

PARA COMENZAR SEGURIDAD /
ESPECIFICACIONES
MONTAJE /
INSTALACION OPERACIÓN SOLUCIÓN DE
PROBLEMAS
MANTENIMIENTO /
REPARACION
PARA COMENZAR
SEGURIDAD /
ESPECIFICACIONES
MONTAJE /
INSTALACION
OPERACION
IDENTIFICACION
DE PROBLEMAS
MANTENIMIENTO /
REPARACION
4
MANTENIMIENTO
Lubricar la cerradura con grafito anualmente. Lubricar el cojinete de
bolas diapositivas con grasa dos veces al año.
ILUSTRACIÓN DE REPARACIÓN DE PIEZAS PARA 48RJ70
Para Obtener Partes de Reparación
en México llame al 001-800-527-2331
en EE.UU. llame al 1-800-Grainger
24 horas al día, 365 días al año
Por favor proporcione la siguiente información:
-Número de modelo
-Número de serie (si lo tiene)
-Descripción de la parte y número que le corresponde en la lista de partes
REPARACIÓN DE PIEZAS PARA ASAMBLEA DEL GANCHO
SUPERIOR
Descripción
Conjunto de cerradura y llave, número
de piezas: 42XN06.
Para quitar el conjunto cerradura y
llave:
1. El uso de destornillador de cruz
para quitar los pernos (7).
2. Remove spring clipRetire la
presilla de resorte (3).
3. Retire arandela de resorte
(6), arandela plana (5), gancho (4),
cerradura (2), llave (1) en secuencia.
Para retirar el cajón
1. Para retirar los cajones, suelte
el clip de sujeción empujando
la palanca hacia arriba en un
lado y en el otro lado de forma
simultánea.
2. A continuación, tire del cajón
hacia afuera.
Para volver a instalar conjunto de
cerradura y llave:
1. Insertar cerradura (2) a través del
agujero redondo.
2. Insertar presilla de resorte (3),
gancho (4), arandela plana (5),
arandela de resorte (6), pernos
(7) en secuencia a través de la
cerradura.
3. Apretar los pernos.
5

PARA COMENZAR SEGURIDAD /
ESPECIFICACIONES
MONTAJE /
INSTALACION OPERACIÓN SOLUCIÓN DE
PROBLEMAS
MANTENIMIENTO /
REPARACION
PARA COMENZAR
SEGURIDAD /
ESPECIFICACIONES
MONTAJE /
INSTALACION
OPERACION
IDENTIFICACION
DE PROBLEMAS
MANTENIMIENTO /
REPARACION
6
REPARACIÓN DE PIEZAS PARA ASAMBLEA DEL
GANCHO SUPERIOR
7
LISTA DE PIEZAS DE REPARACIÓN
Descripción
Para volver a instalar los cajones:
Colocar el cajón en los canales
de deslizamiento y empuje por
completo.
No.
de Ref.
Descripción Pieza No. Cant.
1Conjunto de cerradura y llave (1 cerradura & 2 llaves) 42XN06 1
210”×35MM Diapositivas cojinete de bolas
(Para 48RJ69, 48RJ70, 48RJ71, 48RJ72)
41GW99 1

GARANTIA LIMITADA DE WESTWARD POR UN AÑO
GARANTIA LIMITADA DE WESTWARD POR UN AÑO. W.W. Grainger, Inc. (“Grainger”) le garantiza al usuario
original que todos los modelos de los productos Westward® tratados en este manual cubiertos por esta garantía
limitada están libres de defectos en la mano de obra o el material, cuando se les somete a uso normal, por un
año a partir de la fecha de compra. Si el producto es parte de un juego, sólo la parte defectuosa está sujeta a
esta garantía. Cualquier producto o parte que se halle defectuoso, ya sea en el material o en la mano de obra, y
sea devuelto (con los costos de envío pagados por adelantado) a un centro de servicio autorizado designado por
Grainger o por una entidad designada por Grainger, será reparado o reemplazado (no existe otra posibilidad) por
un producto o parte nuevo o reacondicionado de igual uso o se le reembolsará el costo total, según lo determine
Grainger o una entidad designada por Grainger, libre de costo. Para obtener información sobre los procedimientos
de reclamo cubiertos en la garantía limitada, vea la sección “Servicio de Garantía” que aparece más adelante.
PRODUCTOS CUBIERTOS. Esta garantía limitada cubre el modelo(s) de producto(s) identificados en este
manual. Esta garantía limitada no cubre desgaste y ruptura normal de los productos o parte de los mismos,
o productos o partes de los mismos que se pueden utilizar durante uso normal. Se anulará esta garantía
si se detecta evidencia de mal uso, reparación defectuosa, instalación defectuosa, abuso o modificación.
EXCLUSION DE RESPONSABILIDAD DE LA GARANTIA Y LIMITES DE RESPONSABILIDAD
RELACIONADOS A TODOS LOS CLIENTES PARA TODOS LOS PRODUCTOS
LIMITES DE RESPONSABILIDAD.
EN LA MEDIDA EN QUE LAS LEYES APLICABLES LO PERMITAN, LA
RESPONSABILIDAD DE GRAINGER POR LOS DAÑOS EMERGENTES O INCIDENTALES ESTA EXPRESAMENTE
EXCLUIDA. LA RESPONSABILIDAD DE GRAINGER EXPRESAMENTE ESTA LIMITADA Y NO PUEDE EXCEDER EL
PRECIO DE COMPRA PAGADO POR EL ARTICULO.
EXCLUSION DE RESPONSABILIDAD DE LA GARANTIA.
SE HA HECHO UN ESFUERZO DILIGENTE
PARA PROPORCIONAR INFORMACION E ILUSTRACIONES APROPIADAS SOBRE LOS PRODUCTOS EN ESTE
MANUAL; SIN EMBARGO, ESTA INFORMACION Y LAS ILUSTRACIONES TIENEN COMO UNICO PROPOSITO LA
IDENTIFICACION DEL PRODUCTO Y NO EXPRESAN NI IMPLICAN GARANTIA DE QUE LOS PRODUCTOS SEAN
VENDIBLES O ADECUADOS PARA UN PROPOSITO EN PARTICULAR NI QUE SE AJUSTAN NECESARIAMENTE
A LAS ILUSTRACIONES O DESCRIPCIONES. CON EXCEPCION DE LO QUE SE ESTABLECE A CONTINUACION,
GRAINGER NO HACE NI AUTORIZA NINGUNA GARANTIA O AFIRMACION DE HECHO, EXPRESA O IMPLICITA,
QUE NO SEA ESTIPULADA EN LA “GARANTIA LIMITADA” ANTERIOR.
ADAPTACION DEL PRODUCTO.
MUCHAS JURISDICCIONES TIENEN CODIGOS O REGULACIONES SOBRE LA
VENTA, EL DISEÑO, LA INSTALACION Y/O EL USO DE PRODUCTOS PARA CIERTAS APLICACIONES; DICHAS
LEYES PUEDEN VARIAR DE UN AREA A OTRA. SI BIEN SE TRATA DE QUE LOS PRODUCTOS CUMPLAN
CON DICHOS CODIGOS, GRAINGER NO PUEDE GARANTIZAR SU CONFORMIDAD Y NO SE PUEDE HACER
RESPONSABLE POR LA FORMA EN QUE SE INSTALE O USE SU PRODUCTO. ANTES DE COMPRAR Y USAR
EL PRODUCTO, REVISE LA INFORMACION DE SEGURIDAD/ESPECIFICACIONES, Y TODOS LOS CODIGOS Y
REGULACIONES NACIONALES Y LOCALES APLICABLES, Y ASEGURESE QUE EL PRODUCTO, LA INSTALACION
Y EL USO LOS CUMPLAN.
CONSUMIDOR SOLAMENTE.
CIERTOS ASPECTOS DE LIMITE DE RESPONSABILIDAD NO SE APLICAN A
PRODUCTOS AL CONSUMIDOR; ES DECIR (A) ALGUNAS JURISDICCIONES NO PERMITEN LA EXCLUSION NI
LIMITACION DE DAÑOS INCIDENTALES O CONSECUENTES, DE MODO QUE LAS LIMITACIONES O
EXCLUSIONESANTERIORES QUIZAS NO APLIQUEN EN SU CASO; (B) ASIMISMO, ALGUNAS JURISDICCIONES
NO PERMITEN LIMITAR EL PLAZO DE UNA GARANTIA IMPLICITA, POR LO TANTO, LA LIMITACION ANTERIOR
QUIZAS NO APLIQUE EN SU CASO; Y (C) POR LEY, MIENTRAS LA GARANTIA LIMITADA ESTE VIGENTE NO
PODRAN
EXCLUIRSE NI LIMITARSE EN MODO ALGUNO NINGUNA GARANTIA IMPLICITA DE COMERCIALIZACION O
DE IDONEIDAD PARA UN PROPOSITO EN PARTICULAR APLICABLES A LOS PRODUCTOS AL CONSUMIDOR
ADQUIRIDOS POR ESTE.
ESTA GARANTIA LIMITADA LE OTORGA DERECHOS LEGALES ESPECIFICOS Y TAMBIEN PUEDE USTED TENER
OTROS DERECHOS QUE VARIEN DE ESTADO A ESTADO.
ESTA GARANTIA LIMITADA APLICA UNICAMENTE A LOS PRODUCTOS COMPRADOS POR COMPRADORES EN
LOS ESTADOS UNIDOS PARA ENTREGA EN LOS ESTADOS UNIDOS.
SERVICIO DE GARANTIA
Para obtener un servicio de garantía si compró un producto cubierto directamente de Grainger, (i) escriba,
llame o visite la sucursal local de Grainger donde compró el producto u otra sucursal de Grainger cerca de
usted (visite www.grainger.com para obtener una lista de las sucursales); o (ii) comuníquese con Grainger
visitando www.grainger.com y haga clic en el enlace “Contact Us” en la parte superior de la página, luego
haga clic en enlace “Email us”; o (iii) llame a Servicio al Cliente (libre de cargo) al 1-888-361-8649. Para obtener
servicio de garantía si compró el producto cubierto a través de otro distribuidor o minorista, (i), visite www.
grainger.com para el Servicio de Garantía; (ii) escriba, llame o visite la sucursal de Grainger cerca de usted;
o (iii) llame a Servicio al Cliente (libre de cargo) al 1-888-361-8649. En cualquiera de los casos, necesitará
proporcionar, cuando esté disponible, la fecha de compra, el número de factura original, el número de pieza,
una descripción del defecto, y cualquier otra información que especifique esta Garantía limitada de Westward
por un año. Se le podría solicitar que envíe el producto a su propio coste para que lo inspeccionen. Puede hacer
un seguimiento de los avances de las inspecciones y medidas correctivas de la misma forma. El título y el riesgo
de pérdida pasa del comprador en el momento de la entrega a la compañía de transporte, por lo que si el
producto sufre daños durante el transporte, presente un reclamo a la compañía transportista, no al minorista
ni a Grainger. Para información sobre la garantía para compradores y/o entregas fuera de los Estados Unidos,
comuníquese con:
Canadá: www.westwardtools.ca
México:
Grainger.com.mx
Si la ubicación no aparece en la lista, llame al:
+1-888-361-8649 (o1-800GRAINGER)
DM_US 45931887-4.019350.0029

Manuel d’utilisation et de pièces détachées FR
CABINET À
OUTILS
LÉGERS
Modèles 48RJ69, 48RJ70, 48RJ71, 48RJ72

LIRE ET CONSERVER CES
INSTRUCTIONS. IL FAUT LES
LIRE ATTENTIVEMENT AVANT DE
COMMENCER À ASSEMBLER,
INSTALLER, FAIRE FONCTIONNER
OU ENTRETENIR L’APPAREIL
DÉCRIT.
POUR SE PROTÉGER ET PROTÉGER
AUTRUI, OBSERVER TOUTES LES
INFORMATIONS SUR LA SÉCURITÉ.
NÉGLIGER D’APPLIQUER CES
INSTRUCTIONS PEUT CAUSER
DES BLESSURES ET/OU DES
DOMMAGES MATÉRIELS!
CONSERVER CES INSTRUCTIONS
POUR CONSULTATION ULTÉRIEURE.
SE REPORTER AU DOS DE LA
PRÉSENTE BROCHURE POUR LES
INFORMATIONS CONCERNANT LA
GARANTIE DAYTON ET D’AUTRES
INFORMATIONS IMPORTANTES.
N° de modèle: ______________
N° de série: ________________
Date d’achat: _______________
Brochure 5SXXXX / Imprimée en XXXX
XXXXX Version XX XX/XXXX
© 2013 Dayton Electric Manufacturing Co.
Tous droits réservés
DÉMARRAGE
DE L’APPAREIL
SÉCURITÉ /
CARACTÉRISTIQUES
ASSEMBLAGE /
INSTALLATION OPERATION DÉPANNAGE ENTRETIEN /
RÉPARATION
DÉBALLAGE
1
• Voir les instructions de sécurité générale à la page 2, et les Attentions et
les Avertissement comme indiqués.
1. Lors du déballage, assurez-vous que l’appareil est en position
verticale s’il vous plaît.
2. N’utilisez pas aucuns objets pointus pour ouvrir l’emballage.
3. Après le déballage de l’appareil, inspectez soigneusement pour tout
le dommage qui aurait pu se produire pendant le transport.
4. Vérifiez les pièces détachées, manquants ou endommagés.
5. Toute la reclamation des dommages du transport doit être déposée
auprès du transporteur.
Etape:

DÉMARRAGE
DE L’APPAREIL
SÉCURITÉ /
CARACTÉRISTIQUES
ASSEMBLAGE /
INSTALLATION UTILISATION DÉPANNAGE ENTRETIEN /
RÉPARATION
INFORMATION DE SECURITE GENERALE
DÉMARRAGE
DE L’APPAREIL
SÉCURITÉ /
CARACTÉRISTIQUES
ASSEMBLAGE /
INSTALLATION
UTILISATIONDÉPANNAGE
ENTRETIEN /
RÉPARATION
2
Les coffres supérieurs et intermédiaires de Westward ont une finition
rouge durable et la capacité de charge forte. Le cabinet est équipé
des glissières à roulement à billes de pleine extension, en assurant la
fonctionnalité lisse de tous les tiroirs et les poignées portantes latérales
en plastique. Chaque tiroir peut contenir jusqu’à 55 lbs (25kg). Le coffer
est idéal pour la mécanique, l’artisan, le réparateur et les propriétaires
de garage intéressés par le stockage et l’organisation des outils et des
pièces.
Assurez-vous que les tiroirs sont fermés et
verrouillés complètement avant de déplacer le
Ne modifiez pas le produit de quelque manière. Ne
marchez pas ou grimpez sur le coffer. Ouvrez
coffre. Gardez le produit sur des surfaces planes. Le produit peut devenir
instable et basculer en cas de stocker et de déplacer sur une surface rude,
qui peut causer des blessures ou des dommages matériels.
le couvercle première lors d’ouvrir les tiroirs s’il vous plaît, et soyez prudent
avec les arrêts du couvercle qui peut vous blesser. N’ouvrez pas plus d’un
tiroir à la fois. Le coffer peut devenir instable et basculer. Assurez-vous que
le coffer est verrouillé avant de se déplacer s’il vous plaît.
ATTENTION
AVERTISSEMENT
3
CARACTERISTIQUES
Type Description N° de
Tiroirs
Largeur Profondeur Hauteur
48RJ69 Léger Coffre
Supérieur
4 25.98”
(660MM)
12.09”
(307MM)
13.90”
(353MM)
48RJ70 Léger Coffre
Supérieur
6 25.98”
(660MM)
12.09 ”
(307MM)
13.90”
(353MM)
48RJ71 Léger Coffre
Supérieur
7 25.98”
(660MM)
12.09”
(307MM)
16.02”
(407MM)
48RJ72 Léger Coffre
Intermédiaire
3 26.26”
(667MM)
12.60”
(320MM)
9.65”
(245MM)

DÉMARRAGE
DE L’APPAREIL
DÉMARRAGE
DE L’APPAREIL
SÉCURITÉ /
CARACTÉRISTIQUES
SÉCURITÉ /
CARACTÉRISTIQUES
ASSEMBLAGE /
INSTALLATION
ASSEMBLAGE /
INSTALLATION
UTILISATION
UTILISATION
DÉPANNAGE
DÉPANNAGE
ENTRETIEN /
RÉPARATION
ENTRETIEN /
RÉPARATION
45
Graissez le verrou avec le graphite par an. Graissez les glissières à
billes avec la graisse deux fois par an.
ILLUSTRATION DES PARTS DE REPARATION POUR 48RJ70
PARTS DE RÉPARATION POUR L’ASSEMBLAGE DU
CROCHET SUPÉRIEUR
ENTRETIEN
Description
Appareil de verrou et clé, numéro de
parts: 42XN06.
Pour Retirer l’appareil de verrou et
clé:
1. Utilisez le tournevis cruciforme
pour retirer les boulons (7).
2. Retirez la pince à ressort (3).
3. Retirez la rondelle élastique (6),
la rondelle plate 5, le crochet 4, le
verrou (2), la clé(1) en séquence.
Pour retirer le tiroir:
1. Pour retirer les tiroirs, libérez le
clip de retenue en poussant le
levier vers le haut d’un côté et
vers le bas de l’autre côté en
même temps.
2. Et puis, tirez le tiroir.
Pour réinstaller l’appareil de verrou
et clé:
1. Insérez le verrou (2) à travers le
trou rond.
2. Insérez la pince à ressort (3),
le crochet (4), la rondelle plate
5, la rondelle élastique 6, les
boulons (7) en séquence à
travers le verrou.
3. Serrez les boulons.
5
Pour commander des pièces détachées,
composer le 1-800-Grainger
24 heures par jour – 365 jours par an
Fournir les informations suivantes :
- Numéro de modèle
- Numéro de série (s’il y en a un)
- Description et numéro de pièce comme indiqué sur la liste des pièces

DÉMARRAGE
DE L’APPAREIL
DÉMARRAGE
DE L’APPAREIL
SÉCURITÉ /
CARACTÉRISTIQUES
SÉCURITÉ /
CARACTÉRISTIQUES
ASSEMBLAGE /
INSTALLATION
ASSEMBLAGE /
INSTALLATION
UTILISATION
UTILISATION
DÉPANNAGE
DÉPANNAGE
ENTRETIEN /
RÉPARATION
ENTRETIEN /
RÉPARATION
LISTE DES PARTS DE REPARATION
N°de
Réf
Description N°de Part Qté.
1Appareil de verrou et clé (1 Verrou & 2 clés) 42XN06 1
210”×35MM Glissières à Billes
(Pour 48RJ69, 48RJ70, 48RJ71, 48RJ72)
41GW99 1
PARTS DE RÉPARATION POUR L’ASSEMBLAGE DU
CROCHET SUPÉRIEUR
6 7
Description
Pour réinstaller les tiroirs:
Placez les tiroirs sur les glissières et
poussez complètement.

-
 1
1
-
 2
2
-
 3
3
-
 4
4
-
 5
5
-
 6
6
-
 7
7
-
 8
8
-
 9
9
-
 10
10
-
 11
11
-
 12
12
-
 13
13
-
 14
14
-
 15
15
-
 16
16
-
 17
17
-
 18
18


Westward 48RJ72 Operating Instructions & Parts Manual
- Type
- Operating Instructions & Parts Manual
- This manual is also suitable for
Ask a question and I''ll find the answer in the document
Finding information in a document is now easier with AI
in other languages
- français: Westward 48RJ72
- español: Westward 48RJ72
Related papers
-
 Westward 1VER1 Operating Instructions & Parts Manual
-
 Westward 53RH50 Operating Instructions & Parts Manual
-
 Westward 5M463A Operating Instructions & Parts Manual
-
 Westward 1AVP7 Operating Instructions & Parts Manual
-
 Westward 3JR69A Operating instructions
-
 Westward 3JR69 Operating instructions
-
 Westward 4YD76B Operating instructions


Other documents
-
Daytona 61HV95 User manual
-
 Dayton 3VE56A Operating instructions
-
 Speedaire 15D802 Operating Instructions Manual
-
 Musica 52WRM User manual
-
 Dayton 1P579F User manual
-
 LumaPro 53DK21 Operating Instructions Manual
-
Air King 3C614D User manual
-
-
-
 Dayton 2ZRP8 User manual


