Page is loading ...

Westward Operating Instructions and Parts Manual Model 3JR69A
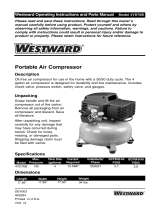
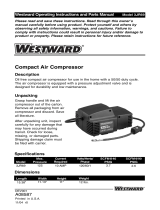
Compact Air Compressor
Please read and save these instructions. Read through this owner’s
manual carefully before using product. Protect yourself and others by
observing all safety information, warnings, and cautions. Failure to
comply with instructions could result in personal injury and/or damage to
product or property. Please retain instructions for future reference.
Description
Oil free compact air compressor for use in the home with a 50/50 duty cycle.
The air compressor is equipped with a pressure adjustment valve and is
designed for durability and low maintenance.
Unpacking
Grasp handle and lift the air
compressor out of the carton.
Remove all packaging from air
compressor and discard. Save
all literature.
After unpacking unit, inspect
carefully for any damage that
may have occurred during
transit. Check for loose,
missing, or damaged parts.
Shipping damage claim must
be filed with carrier.
DEV001
A16320
Printed in U.S.A.
01/06 r0
Specifications
Length
15.38"
Width
11.13"
Height
11"
Weight
12 lbs.
Dimensions
Model
3JR69A
Max.
Pressure
125
SCFM@40
PSIG
3.7
SCFM@90
PSIG
2.6
Current
Required
10 AMP
Volts/Hertz/
Phase
120/60/1

2- ENG
Westward Operating Instructions and Parts Manual Model 3JR69A
Compact Air Compressor
3- ENG
Westward Operating Instructions and Parts Manual Model 3JR69A
Compact Air Compressor
Safety Guidelines -
Definitions
Indicates a
potentially
hazardous situation which, if not
avoided, may result in minor or
moderate injury.
Indicates a
potentially
hazardous situation which, if not
avoided, could result in death or
serious injury.
Indicates an
imminently
hazardous situation which, if not
avoided, will result in death or
serious injury.
NOTE: Indicates special instructions,
which are important but not related to
hazards.
IMPORTANT: Indicates factors
concerned with assembly, installation,
operation, or maintenance, which
could result in damage to the machine
or equipment if ignored.
This manual contains information
that is important for you to know
and understand. This information
relates to protecting YOUR SAFETY
and PREVENTING EQUIPMENT
PROBLEMS. To help you recognize
this information, we use the symbols
below. Please read the manual and
pay attention to these sections.
Important Safety Instructions
Some dust
created by power
sanding, sawing, grinding, drilling,
and other construction activities
contains chemicals known (to
the State of California) to cause
cancer, birth defects or other
reproductive harm. Some example
of these chemicals are:
• lead from lead-based paints
• crystalline silica from bricks
and cement and other masonry
products
• arsenic and chromium from
chemically-treated lumber
Your risk from these exposures
varies, depending on how often
you do this type of work. To reduce
your exposure to these chemicals
when using such tools:
• work in a well ventilated area
• work with approved safety
equipment
• al ways wear MSHA/NIOSH
approved, properly fit ting face
mask or res pi ra tor.
When using air tools, basic safety
precautions should always be
followed to reduce the risk of
personal injury.
Save these instructions
Improper operation or maintenance of this product could result in serious injury and prop-
erty damage. Read and understand all warnings and operation instructions before using
this equipment.
WARNING: Risk of explosion or fire
How To Prevent It
What Could Happen
It is normal for electrical contacts within
the motor and pressure switch to spark.
If electrical sparks from compressor come
into contact with flammable vapors, they
may ignite, causing fire or explosion.
Restricting any of the compressor
ventilation openings will cause serious
overheating and could cause fire.
Unattended operation of this product
could result in personal injury or
property damage. To reduce the risk
of fire, do not allow the compressor to
operate unattended.
Always operate the compressor in a well
ventilated area free of combustible mate-
rials, gasoline, or solvent vapors.
If spraying flammable materials, locate
compressor at least 20 feet away from
spray area. An additional length of hose
may be required.
Store flammable materials in a secure
location away from compressor.
Never place objects against or on top of
compressor. Operate compressor in an
open area at least 12 inches away from
any wall or obstruction that would restrict
the flow of fresh air to the ventilation
openings.
Operate compressor in a clean, dry well
ventilated area. Do not operate unit
indoors or in any confined area.
Always remain in attendance with the
product when it is operating.
Always disconnect electrical power by
moving pressure switch lever to the off
position and drain tank daily or after
each use.
HAZARD

4- ENG
Westward Operating Instructions and Parts Manual Model 3JR69A
Compact Air Compressor
5- ENG
Westward Operating Instructions and Parts Manual Model 3JR69A
Compact Air Compressor
WARNING: Risk of Bursting
Air Tank: The following conditions could lead to a weakening of the tank, and result
in a violent tank explosion and could cause property damage or serious injury.
How To Prevent It
What Could Happen
HAZARD
Drain tank daily or after each use. If tank
develops a leak, replace it immediately
with a new tank or replace the entire
compressor.
Failure to properly drain condensed
water from tank, causing rust and
thinning of the steel tank.
Modifications or attempted repairs to
the tank.
Unauthorized modifications to the
unloader valve, safety valve, or any
other components which control tank
pressure.
Never drill into, weld, or make any
modifications to the tank or its
attachments.
Excessive vibration can weaken the
air tank and cause rupture or
explosion
The tank is designed to withstand specific
operating pressures. Never make
adjustments or parts substitutions to
alter the factory set operating
pressures.
For essential control of air pressure, you
must install a pressure regulator and
pressure gauge to the air outlet (if not
equipped) of your compressor. Follow the
equipment manufacturers recommendation
and never exceed the maximum allowable
pressure rating of attachments. Never use
compressor to inflate small low
pressure objects such as children’s
toys, footballs, basketballs, etc.
ATTACHMENTS & ACCESSORIES:
Exceeding the pressure rating of air
tools, spray guns, air operated
accessories, tires, and other inflatables can
cause them to explode or fly apart, and
could result in serious injury.
WARNING: Risk from Flying Objects
The compressed air stream can cause
soft tissue damage to exposed skin and
can propel dirt, chips, loose particles,
and small objects at high speed,
resulting in property damage or personal
injury.
Always wear ANSI Z87.1 approved
safety glasses with side shields when
using the compressor.
Never point any nozzle or sprayer
toward any part of the body or at other
people or animals.
Always turn the compressor off and
bleed pressure from the air hose and tank
before attempting maintenance, attaching
tools or accessories.
How To Prevent It
What Could Happen
HAZARD
WARNING: Risk of Electrical Shock
Your air compressor is powered by
electricity. Like any other electrically pow-
ered device, If it is not used properly it
may cause electric shock.
Repairs attempted by unqualified
personnel can result in serious injury
or death by electrocution.
Electrical Grounding: Failure to provide
adequate grounding to this product
could result in serious injury or death
from electrocution.
See grounding instructions.
Never operate the compressor outdoors
when it is raining or in wet conditions.
Never operate compressor with
protective covers removed or damaged.
Any electrical wiring or repairs required
on this product should be performed by
authorized service center personnel in
accordance with national and local
electrical codes.
Make certain that the electrical circuit
to which the compressor is connected
provides proper electrical grounding,
correct voltage and adequate fuse pro-
tection.
How To Prevent It
What Could Happen
HAZARD

6- ENG
Westward Operating Instructions and Parts Manual Model 3JR69A
Compact Air Compressor
7- ENG
Westward Operating Instructions and Parts Manual Model 3JR69A
Compact Air Compressor
WARNING: Risk to Breathing
Sprayed materials such as paint, paint
solvents, paint remover, insecticides,
weed killers, may contain harmful
vapors and poisons.
Work in an area with good cross
ventilation. Read and follow the safety
instructions provided on the label or
safety data sheets for the materials
you are spraying. Use a NIOSH/MSHA
approved respirator designed for use
with your specific application.
How To Prevent It
What Could Happen
The compressed air directly from your
compressor is not safe for breathing.
The air stream may contain carbon
monoxide, toxic vapors, or solid
particles from the tank. Breathing these
contaminants can cause serious injury
or death.
Air obtained directly from the compressor
should never be used to supply air for
human consumption. In order to use air
produced by this compressor for
breathing, suitable filters and in-line
safety equipment must be properly
installed. In-line filters and safety
equipment used in conjunction with the
compressor must be capable of treating
air to all applicable local and federal
codes prior to human consumption.
WARNING: Risk of Burns
Touching exposed metal such as the
compressor head or outlet tubes, can
result in serious burns.
Never touch any exposed metal parts
on compressor during or immediately
after operation. Compressor will remain
hot for several minutes after operation.
Do not reach around protective shrouds
or attempt maintenance until unit has
been allowed to cool.
How To Prevent It
What Could Happen
WARNING: Risk from Moving Parts
Never operate the compressor with
guards or covers which are damaged or
removed.
Moving parts such as the pulley,
flywheel, and belt can cause serious
injury if they come into contact with you
or your clothing.
WARNING: Risk of Falling
A portable compressor can fall from
a table, workbench, or roof causing
damage to the compressor and could
result in serious injury or death to the
operator.
Always operate compressor in a stable
secure position to prevent accidental
movement of the unit. Never operate
compressor on a roof or other elevated
position. Use additional air hose to
reach high locations.
Any repairs required on this product
should be performed by authorized
service center personnel.
Attempting to operate compressor with
damaged or missing parts or
attempting to repair compressor with
protective shrouds removed can expose
you to moving parts and can result in
serious injury.
How To Prevent It
What Could Happen
How To Prevent ItWhat Could Happen
HAZARD
HAZARD
HAZARD
HAZARD

8- ENG
Westward Operating Instructions and Parts Manual Model 3JR69A
Compact Air Compressor
9- ENG
Westward Operating Instructions and Parts Manual Model 3JR69A
Compact Air Compressor
Review and understand all instructions
and warnings in this manual.
Be come fa mil iar with the op er a tion and
con trols of the air compressor.
Keep operating area clear of all persons,
pets, and obstacles.
Keep chil dren away from the air
compressor at all times.
Do not operate the product when fatigued
or under the influence of alcohol or
drugs. Stay alert at all times.
Never defeat the safety fea tures of this
prod uct.
Equip area of operation with a fire
extinguisher.
Do not op er ate machine with missing,
broken, or un au tho rized parts.
WARNING: Risk of Unsafe Operation
Unsafe op er a tion of your air compressor
could lead to se ri ous in ju ry or death to
you or others.
SAVE THESE INSTRUCTIONS
How To Prevent It
What Could Happen
HAZARD
Assembly
ASSEMBLE ACCESSORIES
1. Assemble adapter (2) to hose (1).
NOTE: Make sure the end of the
adapter without the sealant (3) is
assembled to the hose.
2. Assemble the quick connect body
(4) to the adapter.
3. Apply sealant tape (5) to the
quick connect plugs (6).
4. Assemble the quick connect
plugs to the tire chuck (8) and
blow gun (7). The tire chuck may
now be used, if using the blow
gun and blow gun accessories
proceed to step 5.
Risk of unsafe
operation. If an
accessory is not being used with
the blow gun, the safety nozzle (10)
MUST be assembled.
5. Assemble the safety nozzle (10),
tapered inflator (11), rubber blow
gun tip (9), or blow gun adapter
(12) to blow gun. NOTE: To use
the inflating needle (13) the blow
gun adapter has to be assembled
to blow gun.
1
2
4
5
6
6
3
8
7
9
10
11
12
13

10- ENG
Westward Operating Instructions and Parts Manual Model 3JR69A
Compact Air Compressor
11- ENG
Westward Operating Instructions and Parts Manual Model 3JR69A
Compact Air Compressor
VOLTAGE AND CIRCUIT
PROTECTION
Refer to the specification chart for the
voltage and minimum branch circuit
requirements.
Certain air compressors can be
operated on a 15 amp circuit if the
following conditions are met.
1. Voltage supply through branch
circuit is 15 amps.
2. Circuit is not used to supply any
other electrical needs (lights,
appliances, etc.).
3. Extension cords comply with
specifications.
4. Circuit is equipped with a 15 amp
circuit breaker or 15 amp time
delay fuse. NOTE: If compressor
is connected to a circuit protected
by fuses, use only time delay
fuses. Time delay fuses should
be marked "D" in Canada and "T"
in the US.
EXTENSION CORDS
Use extra air hose instead of an
extension cord to avoid voltage drop
and power loss to the motor, and to
prevent overheating.
If an extension cord must be used, be
sure it is:
• a 3-wire extension cord that has
a 3-blade grounding plug, and a
3-slot receptacle that will accept
the plug on the product
• in good condition
• no longer than 50 feet
• 14 gauge (AWG) or larger. (Wire
size increases as gauge number
decreases. 12 AWG and 10
AWG may also be used. DO
NOT USE 16 OR 18 AWG.)
If any of the above conditions
cannot be met, or if operation of
the compressor repeatedly causes
interruption of the power, it may be
necessary to operate it from a 20 amp
circuit. It is not necessary to change
the cord set.
Operation
KNOW YOUR AIR COMPRESSOR
READ THIS OWNER’S MANUAL
AND SAFETY RULES BEFORE
OPERATING YOUR UNIT. Compare
the illustrations with your unit to
familiarize yourself with the location
of various controls and adjustments.
Save this manual for future reference.
On/Off Switch
DESCRIPTION OF OPERATION
Pressure Adjustable Valve: The
pressure valve controls the amount
of pressure going from the air
compressor to the accessory. The
pressure adjustable valve can be
used to set approximate pressure
between 10 and 125 PSI (125 PSI is
the highest pressure this compressor
will deliver).
Pressure
Adjustment
Valve
Tire
Chuck
2. Make sure the outlet being used
has the same configuration as
the grounded plug. DO NOT USE
AN ADAPTER. See illustration.
3. Inspect the plug and cord before
each use. Do not use if there are
signs of damage.
4. If these grounding instructions
are not completely understood,
or if in doubt as to whether the
compressor is properly grounded,
have the installation checked by
a qualified electrician.
IMPROPER
GROUNDING CAN
RESULT IN ELECTRICAL SHOCK.
Do not modify the plug provided. If
it does not fit the available outlet,
a correct outlet should be installed
by a qualified electrician.
Repairs to the cord set or plug
MUST be made by a qualified
electrician.
GROUNDING INSTRUCTIONS
RISK OF
ELECTRICAL
SHOCK. In the event of a short
circuit, grounding reduces the risk
of shock by providing an escape
wire for the electric current. This
air compressor must be properly
grounded.
The portable air compressor is
equipped with a cord having a
grounding wire with an appropriate
grounding plug (see following
illustrations). The plug must be used
with an outlet that has been installed
and grounded in accordance with all
local codes and ordinances.
1. The cord set and plug with this
unit contains a grounding pin.
This plug MUST be used with a
grounded outlet.
IMPORTANT: The outlet being used
must be installed and grounded in
accordance with all local codes and
ordinances.
Grounding Pin
Grounded
Outlets
Plug
Installation
LOCATION OF THE AIR
COMPRESSOR
Locate the air compressor in a clean,
dry and well ventilated area. The air
compressor pump and shroud are
designed to allow for proper cooling.
The ventilation openings on the
compressor are necessary to maintain
proper operating temperature. Do not
place rags or other containers on or
near these openings.
Blow Gun and
Accessories

12- ENG
Westward Operating Instructions and Parts Manual Model 3JR69A
Compact Air Compressor
13- ENG
Westward Operating Instructions and Parts Manual Model 3JR69A
Compact Air Compressor
On/Off Switch (located on opposite
side of air compressor): Used to
turn air compressor on and off.
Female Tire Chuck: Attaches to the
hose end to be used to inflate tires.
Note: To ensure correct tire pressure
use a tire pressure gauge.
Blow Gun: Ideal for blowing, clean-
ing, and inflating. Depress lever on to
release the air.
Safety Nozzle: Prevents pressure
build-up.
Blow Gun Adapter: Attached to blow
gun or female hose end to allow the
tapered Inflator or inflating needle to
be used.
Inflating needle: Used to inflate sport
balls.
Tapered Inflator: Used to inflate toy
inflatables/air mattresses.
Rubber Tip Nozzle: Used to inflate
toy inflatables/air mattresses.
HOW TO STOP
1. Set the On/Off switch to "OFF".
On/Off
Switch
TO USE TIRE CHUCK
1. Attach tire chuck to hose.
2. See the "How to Start" paragraph
to start air compressor.
3. Place the female tire chuck onto
the tire valve stem of the tire to
be inflated.
BEFORE STARTING
1. Place On/Off switch to "OFF".
2. Place the adjustable pressure
valve to 10 PSI.
3. Attach hose and accessories.
Too much air
pressure causes a
hazardous risk of bursting. Check
the manufacturer’s maximum
pressure rating for air tools and
accessories. Carefully follow the
"How to Start" instructions.
HOW TO START
1. Place On/Off switch to "OFF".
2. Plug the power cord into the
grounded outlet.
3. Place On/Off switch to "ON" to
start compressor.
4. Check the manufacturer's
maximum pressure rating for the
air tool, accessory, or vehicle tire
being used. The air compressor
outlet pressure must never
exceed the maximum pressure
rating.
5. Slowly increase the pressure
setting of the adjustable pressure
valve. You should be able
to hear and feel air pressure
being relieved by the adjustable
pressure valve. If pressure is
not being relieved, turn the air
compressor off immediately. The
pressure valve must be replaced.
Compressed air
from the outfit may
contain water condensation. Do
not spray unfiltered air at an item
that could be damaged. Some
air operated tools or devices
may require filtered air. Read
the instructions for the air tool or
device.
Service and Adjustments
AIR HOSE REPLACEMENT
The air hose attached to your
compressor has an integral pressure
adjusting valve at the working end
of the hose. Should service or
replacement be required, make sure
that the pressure adjusting valve is
present in the air hose line.
DO NOT replace
the hose with
standard hose that is not equipped
with the pressure adjusting valve.
Do not allow hose
to become kinked
or pinched at any time. This is
important to avoid damage to
your compressor and to maintain
pressure adjusting valve control.
Storage
1. Set the On/Off switch to "OFF"
and unplug the cord.
2. Relieve all pressure from the air
compressor head and air hose by
turning the adjustable pressure
valve to 10 PSI.
3. Protect the electrical cord and air
hose from damage by winding
them loosely around the air
compressor.
4. Store the air compressor in a
clean and dry location.
4. Slowly increase the pressure
setting of the adjustable pressure
valve to the tire manufacturer’s
recommended PSI. Note: To
ensure correct tire pressure use a
tire pressure gauge.
TO USE BLOW GUN
1. Attach the blow gun, with
desired accessory, to hose.
See Assembly for Accessory
Assembly.
If an accessory
is not being used
with the blow gun, the safety
nozzle MUST be assembled.
2. See the "How to Start” paragraph
to start air compressor.
3. Depress lever on blow gun to
release the air.
Safety Nozzle

14- ENG
Westward Operating Instructions and Parts Manual Model 3JR69A
Compact Air Compressor
15- ENG
Westward Operating Instructions and Parts Manual Model 3JR69A
Compact Air Compressor
Symptom (s) Possible Causes (s) Corrective Actions (s)
Voltage sources, moving parts, or compressed air sources
are exposed when repairing the compressor. Personal
injury can occur. Unplug the compressor before attempting any repairs.
1. Hose fitting loose. 1. Tighten fitting.
Air Leaks
1. Prolonged excessive
use of air.
1. Decrease the amount
of air usage. Your
compressor is not
large enough for the
air requirement.
Compressor is not
delivering enough air.
Motor will not run.
1. Fuse blown, circuit
breaker tripped.
1a. Check fuse box
for blown fuse and
replace as necessary.
Reset circuit breaker.
Do not use a fuse or
circuit breaker with
higher rating than
that specified for your
particular branch
circuit.
b. Check for proper
fuse. You should be
using a
"Time Delay" fuse.
c. Check for low voltage
problem.
d. Check the extension
cord.
e. Disconnect the other
electrical appliances
from circuit or operate
the compressor on its
own branch circuit.
2. Hole in hose.
3. Air leaks.
2. Replace the hose.
3. Tighten fittings.
Troubleshooting Chart
Symptom (s) Possible Causes (s) Corrective Actions (s)
3. Loose electrical
connections.
3. Check wiring
connection inside
terminal box area.
4. Faulty motor.
High discharge
pressure. Cannot be
adjusted lower.
1. Adjustable pressure
valve not functioning.
1.
Risk of bursting.
DO NOT operate
the compressor if
this problem exists.
Adjustable pressure
valve must be
replaced.
2. Extension cord is
wrong length or
gauge.
2. Check the extension
cord.
4. Contact a trained
service technician.
Motor will not run
(continued)

16- ENG
Westward Operating Instructions and Parts Manual Model 3JR69A
Compact Air Compressor
17- ENG
Westward Operating Instructions and Parts Manual Model 3JR69A
Compact Air Compressor
9
3
21
5
6
8
15
20
18
1
2
39
22
16
10
23
4
7
Tor qu e
49-55 in.-lbs.
Tor qu e
30-45 in.-lbs.
9-13
9-12
9-8
9-9
9-10
9-11
For Repair Parts, call 1-800-323-0620
24 hours a day - 365 days a year
Please provide the following:
- Model Number
- Serial Number (if any)
- Part description and number as shown on parts list
Address parts correspondence to:
Grainger Parts
P.O. Box 3074
1657 Shermer Road
Northbrook, IL 60065-3074 U.S.A.
** REPLACEMENT BRUSHES FOR MOTOR
Motor number and vendor is stamped on motor stack.
Both must be identified before ordering replacement brush.
Motor Vendor Brush Set
M0-9088 Northland Z-D20041
D23494 GS Electric (Ametek) Z-D23825
D27219 GS Electric (Ametek) Z-D23825
D27098 GS Electric (Ametek)) Z-D23825
D27098 ECM (Gold Tuning) Z-D27196
1 ★ Shroud, Left ————— 1
2 ★ Shroud, Right ————— 1
3 Cylinder Head CAC-1196 1
4 ✧ Tube Seal CAC-1212 1
5 ✧ Gasket Head Z-D24819 1
6 Valve Plate Assembly Z-A08548 1
7 Outlet Tube A12368 1
8 ✧ Gasket ————— 1
9 Sub Pump Assembly Z-A04615 1
9-8 ■ Connecting Rod Assembly -------- 1
9-9 ■ Pre-Formed Compression Ring -------- 1
9-10 ■ Connecting Rod Cap -------- 1
9-11 ■ Screw #10-24 D21127 1
9-12 ● Screw 3/8-16 UNC SSF-3147 1
9-13 ■ Cylinder Sleeve -------- 1
10 Clamp CAC-1206-1 1
15 ● Screw #8-32 x .375/.344 SUDL-9-1 1
16 Timing Belt AC-0815 1
18 ● Screw #10-14 x .750 Plastite D29132 5
20 Pump Isolator D25731 5
21 ● Screw #10-24 x .875 SSF-995 4
22 Switch (On/Off) SSS-16 1
23 Pressure Valve Assembly CAC-4076 1
39 Housing Isolator CAC-1211 4
▼ Adapter D26889 1
▼ Power Cord D23786 1
▼ ** Brush ————— 1
▼ Quick Connect Plug D20597 2
▼ Quick Connect Body AC90 2
▼ Accessory Kit A03370 1
Kits Available
★ Left/Right Shroud Kit A06438
■ Connecting Rod Kit KK-4964
● Fastener Kit KK-4929
✧ Gasket Kit D30139
Operator's Manual A10166
▼ not shown
Repair Parts List
Key No Description Part Number Qty.

18- ENG
Westward Operating Instructions and Parts Manual Model 3JR69A
Compact Air Compressor
LIMITED WARRANTY
WESTWARD ONE-YEAR LIMITED WAR RAN TY. Westward Air Compressors, Models
cov ered in this man u al, are warranted by Westward to the orig i nal user against defects
in work man ship or ma te ri als un der normal use for one year after date of pur chase. Any
part which is determined to be de fec tive in material or work man ship and re turned to an
authorized service lo ca tion, as Westward designates, shipping costs pre paid, will be, as
the ex clu sive remedy, re paired or re placed at Westward’s option. For limited warranty
claim procedures, see PROMPT DIS PO SI TION be low. This lim it ed warranty gives
purchasers specific legal rights, which vary from ju ris dic tion to ju ris dic tion.
LIMITATION OF LIABILITY. To the extent allowable under applicable law, Westward’s
li a bil i ty for consequential and in ci den tal dam ag es is expressly disclaimed. Westward’s
liability in all events is limited to and shall not exceed the purchase price paid.
WARRANTY DISCLAIMER. Westward has made a diligent effort to provide product in for-
ma tion and illustrate the products in this lit er a ture accurately; however, such in for ma tion
and illustrations are for the sole purpose of identification, and do not ex press or imply a
warranty that the prod ucts are MERCHANTABLE, or FIT FOR A PARTICULAR PURPOSE,
or that the prod ucts will nec es sar i ly conform to the illustrations or descriptions. Except
as provided below, no warranty or affirmation of fact, expressed or implied, other than as
stated in the "LIMITED WARRANTY" above is made or authorized by Westward.
PRODUCT SUITABILITY. Many ju ris dic tions have codes and regulations governing sales,
construction, installation, and/or use of products for certain purposes, which may vary from
those in neighboring areas. While Westward attempts to assure that its prod ucts comply
with such codes, it cannot guarantee compliance, and cannot be responsible for how the
product is installed or used. Before purchase and use of a product, review the product
applications, and all applicable national and local codes and reg u la tions, and be sure that
the product, installation, and use will comply with them.
Certain aspects of disclaimers are not applicable to consumer products; e.g., (a) some
jurisdictions do not allow the ex clu sion or lim i ta tion of incidental or consequential
damages, so the above limitation or exclusion may not apply to you; (b) also, some ju ris-
dic tions do not allow a limitation on how long an implied warranty lasts, consequently the
above lim i ta tion may not apply to you; and (c) by law, during the period of the Limited
Warranty, any implied warranties of implied merchantability or fitness for a par tic u lar
purpose applicable to consumer products purchased by consumers, may not be excluded
or otherwise disclaimed.
PROMPT DISPOSITION. Westward will make a good faith effort for prompt correction or
other adjustment with respect to any prod uct, which proves to be defective within limited
warranty. For any product believed to be defective within limited war ran ty, first write or call
dealer from whom the product was purchased. Dealer will give additional directions. If
unable to solve sat is fac to ri ly, write to Westward at address below, giving dealer’s name,
address, date, and number of dealer’s in voice, and de scrib ing the nature of the defect.
Title and risk of loss pass to buyer on delivery to common carrier. If prod uct was damaged
in transit to you, file claim with carrier.
Manufactured for Grainger International Inc.,
100 Grainger Parkway, Lake Forest, Illinois 60045 U.S.A.
Westward - Manual de Instrucciones Operativas y Piezas
Modelo 3JR69A
Compresor compacto de aire
Sírvase leer y conservar estas instrucciones. Lea completa y atentamente este
manual del propietario antes de utilizar este producto. Protéjase y a los demás
observando toda la información relacionada con la seguridad, advertencias y
precauciones. La desatención al cumplimiento de todas las instrucciones podrá
ocasionar lesiones personales y/o daños al producto o a la propiedad. Sírvase
retener las instrucciones para referencias futuras.
Descripción
Compresor de aire, sin aceite, para uso doméstico con un ciclo de servicio
50/50. El compresor de aire viene equipado con una válvula reguladora de
presión, y está diseñada para su durabilidad y bajo mantenimiento.
Desembalaje
Tome de su asa y levante el
compresor de aire fuera de su
caja. Extraiga todo el embalaje
del compresor y descártelo.
Conserve su literatura.
Una vez desembalada la unidad,
inspecciónela cuidadosamente
por cualquier daño que pudiese
haber ocurrido durante su
transporte. Verifique la existencia
de faltantes o piezas dañadas.
Los reclamos por daños en el
transporte deben hacerse al
transportista.
DEV001
A16320
Impreso en EE.UU.
01/06 r0
Especificaciones
Largo
15.38"
Ancho
11.13"
Alto
11"
Peso
12 lbs.
Dimensiones
Modelo
3JR69A
Presión
máxima
125
p
3
/min a
40 lb/pug
2
3.7
p
3
/min a
90 lb/pug
2
2.6
Corriente
requerida
10 AMP
Voltios / Hz.
/ Fases
120/60/1

Westward Operating Instructions and Parts Manual Modèle 3JR69A
Compresseur d'air compact
/