Trendnet RB-TV-IP262PI User manual

Category
Security cameras
Type
User manual
Table of Contents
TRENDnet Users Guide
© Copyright 2012 TRENDnet. All Rights Reserved.
i
Contents
Product Overview ................................................................................ 2
Package Contents
..........................................................................................................
2
Features
.........................................................................................................................
2
Product Hardware
Features...........................................................................................
3
Application Diagram
......................................................................................................
4
Installation........................................................................................... 5
Hardware
Installation
................................................................................................
5
Camera Installation
...................................................................................................
6
Starting Camera Finder........................................................................ 9
Con
f
i
g
u
r
ation
..................................................................................... 11
Viewing Camera Basic
Function
...................................................................................
11
Configuring the Camera
Setting...................................................................................
12
Smart Wizard
...............................................................................................................
13
Basic
.............................................................................................................................
14
Network .......................................................................................................................
16
Video &
Audio
..............................................................................................................
19
Event
Server.................................................................................................................
22
Motion Detect
.............................................................................................................
25
Event
Config
.................................................................................................................
26
Tools
............................................................................................................................
28
SD Card
........................................................................................................................
28
Device
Info
...................................................................................................................
30
How to setup/access the camera behind a Router .............................. 31
Technical Specifications...................................................................... 34
Troubleshooting .................................................................................36
TV-IP262PI
TRENDnet Users Guide
© Copyright 2012 TRENDnet. All Rights Reserved.
2
Product Overview
TV-IP262PI
Features
The Megapixel PoE Dome Internet Camera with IR (model TV-IP262PI) is an indoor,
enterprise class surveillance camera capable of transmitting H.264 video at up to 1280 x
1024 resolution. View and manage the tamper resistant dome IP camera from any
computer with an internet connection.
Manually pan the camera side-to-side350 degrees and tilt it up-and-down 70 degrees to
fix its final viewing position. No need to install this camera near a power source, power
and data are received through a single Ethernet cable using Power over Ethernet (PoE)
technology. View this camera on your mobile device with TRENDnets free mobile App*.
Manage up to 32 TRENDnet cameras with the included complimentary camera
management software**. Define up to three motion detection windows with
email alert,
image snapshot, and continuous recording triggers. Scheduled recording sessions and
define video storage location with Samba client support. Multiple video streaming
support for H.264, MPEG-4, and MJPEG compression types. Other features include two-
way audio support (mic and speaker sold separately), date/time text overlay, mask
overlay to conceal sensitive areas, and image flip capabilities for upside down
installations. Integrated cabling allows for easy wall/ceiling mounting and the off-white
IP camera housing blends into most environments.
Package Contents
TV-IP262PI
Multi-Language Quick Installation Guide
CD-ROM (Utility &User’s Guide)
Network cable (1.5m / 5ft)
Power adapter (12V DC, 1.5A)
Camera mounting kit
If any package contents are missing or damaged, please contact the retail store, online
retailer, or reseller/distributor that the item was purchased.
* TRENDnets Mobile APP supports iPhone®, iPad®, iPod® Touch and
Android. Search for SecurView Mobile from iTunes® or Google Play™.
For future updates, please check www.trendnet.com/App
for details.
** Monitoring multiple cameras may required a high performance CPU
TV-IP262PI
TRENDnet Users Guide
© Copyright 2012 TRENDnet. All Rights Reserved.
3
Product Hardware Features
Rear Panel View
Power Connector: Connect the provided power adapter to supply power to the
camera for non-PoE installation.
SD Card Slot: Insert a memory card for expansion of storage.
Ethernet/PoE Connector: Connect the provided network cable (RJ-45 type) to
Ethernet/PoE port for wire or PoE connection.
* The connector supports Power over Ethernet standard, enabling the camera to
be powered by the Ethernet.
Mic In: Connect an external microphone .
Line Out: Connects an external active speaker.
Reset: Press and hold the reset button for five seconds to reset the camera to
factory default settings.
Front Panel View
TV-IP262PI
TRENDnet Users Guide
© Copyright 2012 TRENDnet. All Rights Reserved.
4
Inside C
o
m
pon
e
nt
LED
indicators
- Power: Indicate the camera is powered on with the steady amber
light.
- Link: Indicate the camera’s network connectivity with the flashing
green light.
Application Diagram
TV-IP262PI
TRENDnet Users Guide
© Copyright 2012 TRENDnet. All Rights Reserved.
5
Installation
Hardware Installation
The camera can be mounted to the ceiling surface directly by following the steps below:
1. Remove the Dome cover by unscrewing the four screws.
2. Use the included drill template to drill three mounting holes on the desire location
and hammer the plastic anchors into the holes.
3. Secured the camera to the location with three screws.
4. Before put the Dome cover back, adjust the lens assembly by the following steps:
Tilt the camera lens to a proper position by losing the screws (
) and then
swinging the adjustable base (
).
Rotate the camera lens by turning the base pedestal (
) in either clockwise or
counter clockwise direction.
Adjust the lens focus by turning the lens ring slowly (
) in either clockwise or
counter clockwise direction.
NOTE: You can review the image quality from the Web browser when you complete the
installation. If the image quality is poor, you have to disassemble the Dome cover to
adjust the lens focus until the desired image appears clearly.
5. Put the Dome cover back and secure with four screws.
TV-IP262PI
TRENDnet Users Guide
© Copyright 2012 TRENDnet. All Rights Reserved.
6
Camera Installation
1. Insert the Installation CD-ROM into your computer’s CD-ROM drive to initiate
the Auto-Run program.
2. lick the Install Camera.
3. Write down the MAC ID of the camera
4. Connect one end of the power adapter into the Power Connector, then click on
Next. Please click Next if you are using the PoE injector or switch.
TV-IP262PI
TRENDnet Users Guide
© Copyright 2012 TRENDnet. All Rights Reserved.
7
5. Connect a network cable to the camera’s network port and then to your router.
If you are using PoE, please ensure the cable is connected to a PoE switch or
PoE injector.
6. Wait while camera is searching.
7. The founded cameras will show on the screen. The camera already selected by
default if you have only one camera installed. If you have more than
one
camera in the same Network, you will need to identify the camera by the MAC
ID.
8. You MUST change the default password of the camera. Enter the default password:
admin, Enter your new password: must be between 8 and 32 characters. (Alphanumeric:
a-z, A-Z,0-9)
TV-IP262PI
TRENDnet Users Guide
© Copyright 2012 TRENDnet. All Rights Reserved.
8
9. Type in the new and confirm the new password by entering the password
twice.
10. Click TV-IP262P to access to the camera web page.
11. You can also click Finish to exit the program or click Home return to the main
screen.
TV-IP262PI
TRENDnet Users Guide
© Copyright 2012 TRENDnet. All Rights Reserved.
9
Starting Camera Finder
The camera comes with a conveniently utility, IPSetup, which is included in the
Installation CD-ROM, allowing you to search the camera on your network easily.
1. Insert the Installation CD-ROM into your computer’s CD-ROM drive to initiate
the Auto-Run program.
2. Click the Camera Finder (IPSetup) from the Auto-Run menu screen. Then the
IPSetup Wizard will appear. Click Install to install the utility.
3. When the Completing the IPSetup Setup Wizard appears, click Finish.
TV-IP262PI
TRENDnet Users Guide
© Copyright 2012 TRENDnet. All Rights Reserved.
10
4. After installing the IPSetup utility, the application is automatically installed to
your computer, and creates a folder in Start\Program\TRENDnet\IPSetup.
5. Click
Start
>
Programs
>
TRENDnet
>
IPSetup
,
and then click IPSetup.
6. The IPSetup window will appear. It will search for the camera within the same
network.
Camera Display Area
- Access Camera: Open Web browser to view camera .
- Camera Display Area: By default, the IP setting on the Camera is set to DHCP.
If you have DHCP server, the camera will automatic get the IP address from
DHCP server. If you do not have DHCP server on your network, it will show the
default IP as 192.168.10.30. Double click the IP address; it will link to Camera’s
Web Configuration page.
Change IP: Click this button to bring up the following window. It allows you to
change the IP Address. You can select either Static IP or click DHCP. Then,
enter the Administrator ID & Password. By default the ID/Password is: admin.
When complete, click Change.
Search: Click this button to search the connected camera in the same network
Exit: Click this button to exit the program.
TV-IP262PI
TRENDnet Users Guide
© Copyright 2012 TRENDnet. All Rights Reserved.
11
Configuration
Viewing Camera Basic Function
Open the Web browser on your computer (example showed in the User’s Guide is based
on the Internet Explorer). Type the default IP address (192.168.10.30) or the IP address
found by IPSetup in the Address bar, and then press [Enter].
When the login window appears, enter the default User name (admin) and Password
(admin) and press OK to access to the main screen of the camera’s Web Configuration.
NOTE: If you are initially access to the camera, you will be ask to install a new plug-in
for the camera. Permission request depends on the Internet security settings of
your computer. Click Yes to proceed.
After you login into the Web Configuration of the camera, the main page will appear as
below:
The Main screen of the Web Configuration provides you with many useful information
and functions, including:
TV-IP262PI
TRENDnet Users Guide
© Copyright 2012 TRENDnet. All Rights Reserved.
12
Live View/Setup Switch:
Click the button to configure the camera.
Click the button to return to the Main screen to view the live
view image.
Compression Buttons: Select to transmit and record the video using H.264, MPEG4, or
MJPEG compression.
Manual Record allows you manually record and save a video clip*.
Snapshot allows you to capture and save a still image*.
Browse allows you to assign the destination folder to store the video clips and
still images*.
Talk allows you to speak out through the camera. Please note only one user is
allowed to use this function at a time.
Listen allows you to receive the on-site sound and voice from the camera.
Multicast allows you to change the camera’s transmission type on multicast
Live View: The Live View Image window displays the real-time image of the connected
camera.
The current compression mode of image is displayed above the Live View
Image window.
Click the Zoom In buttons ( for SXGA ) or ( for
VGA/QVGA/QQVGA/720p) above the Live View Image window to zoom in the
live view image by 1x, 2x, 3x, 1/2, 1/4, or full screen
Camera Information: Displays the camera’s location and the current date & time. The
information can be modified in the Web Configuration.
* If you are using Microsoft 7/Vista platform, you may not be able to find the recorded
files by Snapshot or Manual Record. You will need to disable the protected mode of
Security in the IE browser before recording a video file or taking a snapshot.
Please follow the below steps:
1. Open IE Browser
2. Select ToolsInternet Options
3. Select Security
4. Uncheck the Enable Protected Mode then press OK
Configuring the Camera Setting
To configure the camera, click on the Main screen of Web
Configuration. The Web Configuration will start from the Basic page.
TV-IP262PI
TRENDnet Users Guide
© Copyright 2012 TRENDnet. All Rights Reserved.
13
The Web Configuration contains the settings that are required for the camera in the left
menu bar, including Smart Wizard, Basic, Network, Video/Audio, Event Server, Motion
detect, Event Config, Tools, SD Card, and Information.
Smart Wizard
The camera’s Smart Wizard lets you configure your camera easily and quickly. The
wizard will guide you through the necessary settings with detailed instructions on each
step.
To start the wizard, click Smart Wizard in the left menu bar.
Camera Setting
By default, the camera name is set as model number. Change the name if
necessary. Enter the location and administrator password twice.
IP Setting
Select the IP setting according to your network: DHCP, Static IP, or PPPoE.
Email Settings
Enter the required information to be able to send email with image.
For example, myserver.com. If you are using a free mail service (e.g. Google
Gmail®, Yahoo®, Hotmail®), please enter the SMTP server address and the
corresponding information from the service provider.
TV-IP262PI
TRENDnet Users Guide
© Copyright 2012 TRENDnet. All Rights Reserved.
14
Confirm Settings
The last step shows the configuration of your camera. When you confirm the
settings, click Apply to finish the wizard and reboot the camera. Otherwise,
click Prev to go back to the previous step(s) and change the settings; or click
Cancel to end the wizard and discard the changes.
Basic
The Basic menu contains three sub-menus that provide the system settings for the
camera, such as the Camera Name, Location, Date & Time, and User management.
Basic >> System
TV-IP262PI
TRENDnet Users Guide
© Copyright 2012 TRENDnet. All Rights Reserved.
15
Basic: This item allows you to assign the camera name and location
information.
Camera Name: Enter a descriptive name for the camera, which is
helpful to identify the camera easily while multiple cameras are connected
within the network.
Location: Enter a descriptive name for the location where is monitored by
the camera.
Language Default: Select the displayed language as default.
Indication LED: This item allows you to set the LED illumination as desired.
There are two options: Normal and OFF.
IR LED : This item allows you to set the IR LED Auto or OFF
Basic >> Date & Time
Date & Time: Enter the correct date and time for the system.
TimeZone: Select the proper time zone for the region from the pull-down
menu.
Automatically adjust clock for daylight saving time changes: select this
option for daylight saving
Synchronize with PC: Select this option and the date & time settings of the
camera will be synchronized with the connected computer.
Synchronize with NTP Server: Select this option and the time will be
synchronized with the NTP Server. You need to enter the IP address of the
server and select the update interval in the following two boxes.
Manual: Select this option to set the Date and Time
manually.
Basic >> User
Administrator: To prevent unauthorized access to the camera’s Web Configuration,
you are strongly recommend to change the default administrator password. Type the
administrator password twice to set and confirm the password.
General User
User Name: Enter the user’s name you want to add to use the camera.
Password: Enter the password for the new user. When you are finished, click
Add/Modify to add the new user to the camera. To modify the users information,
select the one you want to modify from UserList and click Add/Modify.
UserList: Display the existing users of the camera. To delete a user, select the one
you want to delete and click Delete.
Guest
User Name: Enter the guests name you want to add to use the camera.
Password: Enter the password for the new guest.
UserList: Display the existing guests of the camera. To delete a user, select the
one you want to delete and click Delete.
TV-IP262PI
TRENDnet Users Guide
© Copyright 2012 TRENDnet. All Rights Reserved.
16
NOTE: The “General User” is allowed to access the camera and control the Function
buttons on the Main screen of the Web Configuration.; the Guest” can only view the
live view image from the Main screen while accessing the camera. Only the
Administrator” is allowed to configure the camera through the Web Configuration.
Direct Video Stream Authentication:
To steam the video directly without going through the configuration page, you can
access it via Internet.
Enable: User needs to enter user name and password to stream the camera.
Disable: User can stream the camera without entering the user name and
password.
Examples of the direct link to video:
H.264 Mode
http://camera_ip_address:port
number/h264view.htm
MPEG4 Mode
http://camera_ip_address:port
number/mpgview.htm
MJPEG Mode
http://camera_ip_address:port
number/jpgview.htm
NOTE This feature is enabled by default, and for security reason, it is recommended to
have the feature enabled at all time.
Network
The Network menu contains two sub-menus that provide the networking settings for
the camera, such as the IP Setting, DDNS Setting, and IP Filter.
TV-IP262PI
TRENDnet Users Guide
© Copyright 2012 TRENDnet. All Rights Reserved.
17
IP
Enter the IP address of the camera. The
default setting is 192.168.10.30.
Subnet Mask
Enter the Subnet Mask of the camera. The
default setting is 255.255.255.0.
Default
Enter the Default Gateway of the camera. The
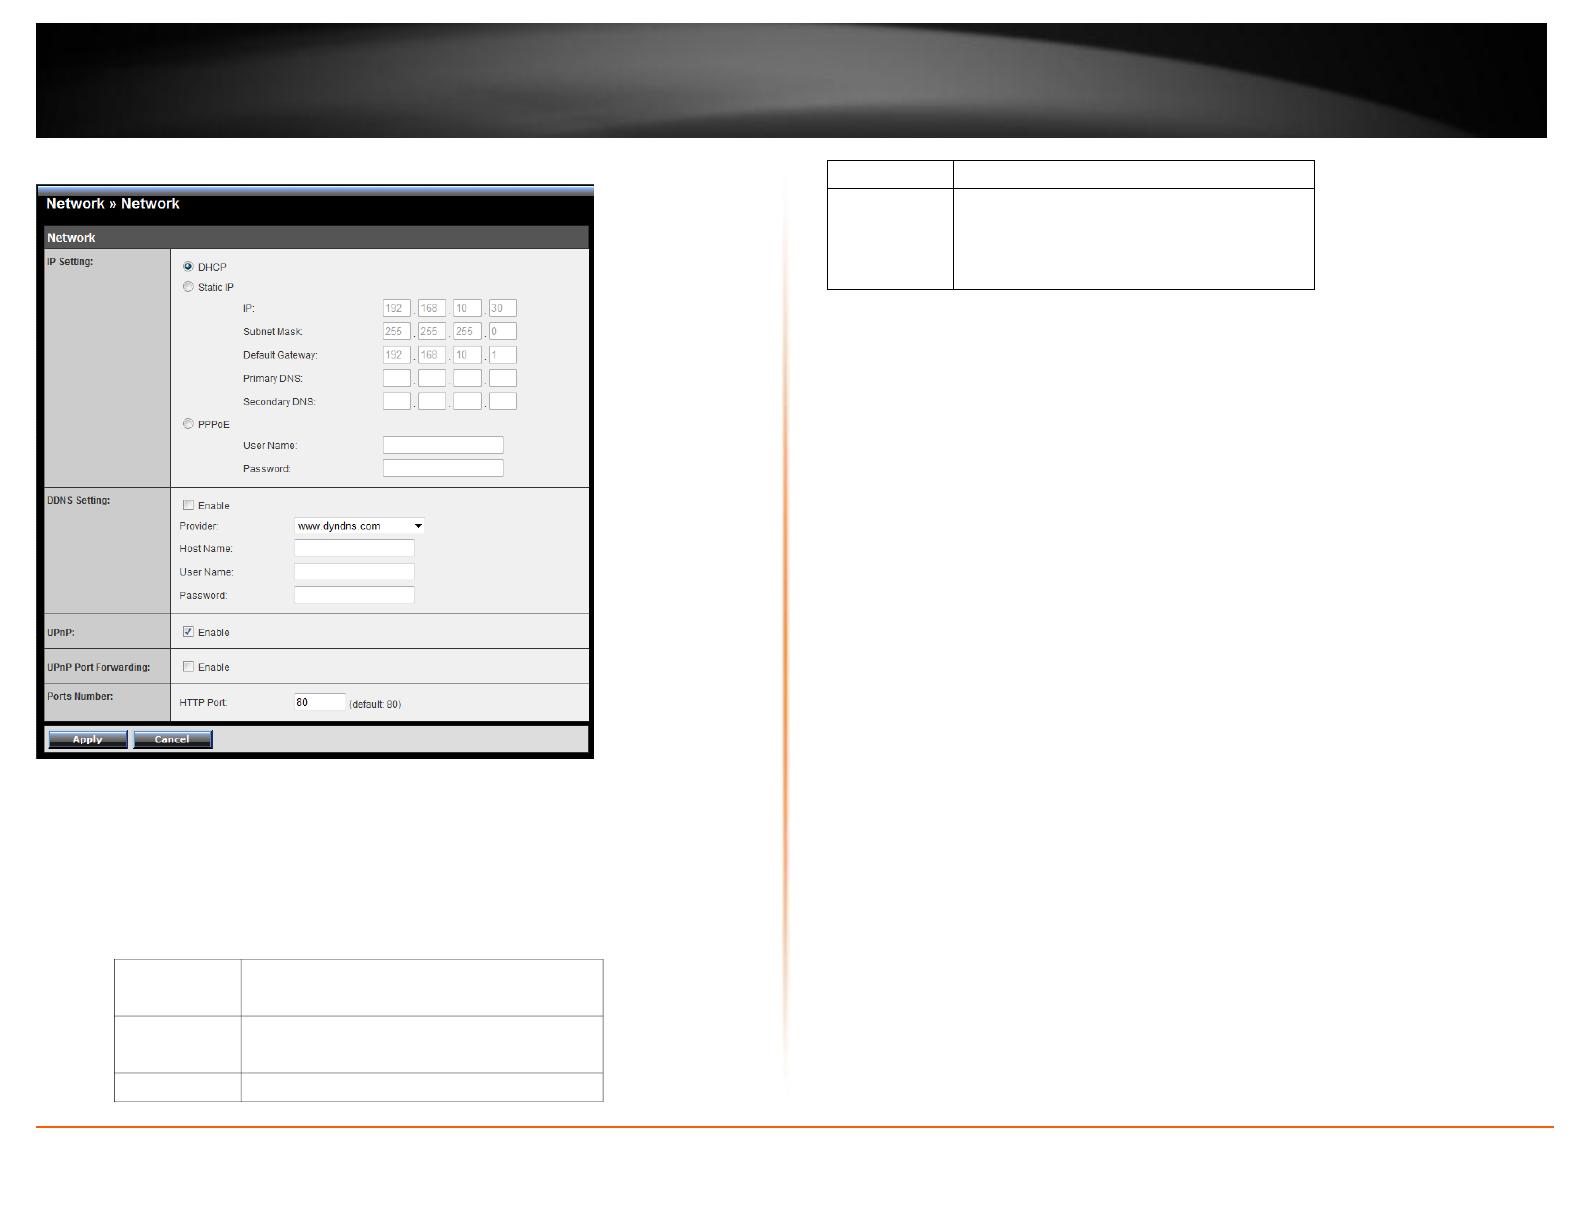
Network >> Network
IP Setting: This item allows you to select the IP address mode and set up the related
configuration.
DHCP: Select this option when your network uses the DHCP server. When the
camera starts up, it will be assigned an IP address from the DHCP server
automatically. This is the default IP setting on the camera.
Static IP: Select this option to assign the IP address for the camera directly. You
can use IP Setup to obtain the related setting values.
Gateway
default setting is 192.168.10.1.
Primary/
Secondary
DNS
DNS (Domain Name System) translates
domain names into IP addresses. Enter the
Primary DNS and Secondary DNS that are
provided by ISP.
PPPoE: Select this option when you use a direct connection via the ADSL
modem. You should have a PPPoE account from your Internet service
provider. Enter the User Name and Password. The camera will get an IP
address from the ISP as starting up.
NOTE: Once the camera get an IP address from the ISP as starting up, it automatically sends
a notification email to you. Therefore, when you select PPPoE as your connecting type, you
have to set up the email or DDNS configuration in advance.
DDNS Setting: With the Dynamic DNS feature, you can assign a fixed host and
domain name to a dynamic Internet IP address. To set up the DDNS:
1. Select the Enable option to enable this feature.
2. Select the Provider from the pull-down list.
3. Enter the required information in the Host Name, User Name, and Password
boxes.
NOTE: You have to sign up for DDNS service with the service provider before configuring this
feature.
UPnP: The camera supports UPnP (Universal Plug and Play), which is a set of
computer network protocols that enable the device-to-device interoperability. In
addition, it supports port auto mapping function so that you can access the
camera if it is behind an NAT router or firewall.
Select the Enable option to enable this
feature.
UPnP Port Forwarding: select this option to have the port forward to router.
Ports Number
HTTP Port: The default HTTP port is 80.
RTSP Port: Configure the transmission of streaming data within the network.
The default RTSP (Real Time Streaming Protocol) port is 554.
NOTE: If the camera is behind an NAT router of firewall, the suggested to be used is from
1024 to 65535.
TV-IP262PI
TRENDnet Users Guide
© Copyright 2012 TRENDnet. All Rights Reserved.
18
Disable
RTSP link does not require authentication. No
username/password required.
sic
RTSP link prompts for authentication.
Username/password are transmitted in plain text.
Digest
RTSP link prompts for authentication.
Username/password are encrypted during data
transmission.
Group IP
Assign a category of IP addresses to receive the information
from the camera.
H.264 Port
Assign a multicast port for H.264 in the text box.
The default port is 1234.
MPEG4 Port
Assign a multicast port for MPEG4 in the text box.
The default port is 1236.
Audio Port
Assign a multicast port for audio in the text box.
The default port is 1238.
TTL
Set the TTL value from 1 to 255, which is used to modify
the time to live field in the IP header.
Network >>
Advanced
HTTPS
Enable: Select this option to enable HTTPS, which is a secure protocol to
provide authenticated and encrypted communication within your network.
HTTPS Port: Assign a HTTPS port in the text box. The default HTTPS port is
443
.
Bonjour: The devices with Bonjour will automatically broadcast their own
services and listen for services being offered for the use of others. If your
browser with Bonjour, you can find the camera on your local network without
knowing its IP address.
The Apple Safari is already with Bonjour. You can download the complete
Bonjour for Internet Explorer browser from Apple's web site by visiting
http://www.apple.com/bonjour/.
RTSP
RTSP Streaming: The camera supports three levels of RTSP access. The
default RTSP Port is 554.
TRENDnet recommends using RSTP Digest authentication method. Disable
and Basic methods pose security risks. Please verify if your RTSP client
supports RSTP authentication method selected.
Multicast settings: Configure the following settings so that you can deliver
information from your camera to a set of receivers.
QoS
Live Video DSCP: Assign the DSCP (DiffServ Code Point) of the stream video
from the camera.
Live Audio DSCP: Assign the DSCP (DiffServ Code Point) of the stream audio
from the camera.
TV-IP262PI
TRENDnet Users Guide
© Copyright 2012 TRENDnet. All Rights Reserved.
19
Network >> IP Filter finished, click Add to save the range setting. You can repeat the action to
assign multiple ranges for the camera.
For example, when you enter 192.168.0.50 in Start IP Address and
192.168.0.80 in End IP Address, the user whose IP address located within
192.168.0.50 ~ 192.168.0.80 will not be allowed to access the camera.
IPv6: Enter the IP Address that is not allowed to access the camera.
The IP Filter setting allows the administrator of the camera to limit the users within a
certain range of IP addresses to access the camera.
To disable this feature, select the Disable option; otherwise, select the Accept
option
to assign the range of IP addresses that are allowed to access the camera, or select
the Deny option to assign the range of IP addresses that are blocked to access the
camera.
Disable: Select this option to disable the IP Filter function of the camera.
Accept
IPv4: Assign a range of IP addresses that are allowed to access the camera by
entering the Start IP address and End IP address options. When you are
finished, click Add to save the range setting. You can repeat the action to
assign multiple ranges for the camera.
For example, when you enter 192.168.0.50 in Start IP Address and
192.168.0.80 in End IP Address, the user whose IP address located within
192.168.0.50 ~ 192.168.0.80 will be allowed to access the camera.
IPv6: Enter the IP Address that is allowed to access the camera.
Deny
IPv4: Assign a range of IP addresses that are blocked to access the camera by
entering the Start IP address and End IP address options. When you are
Video & Audio
The Video & Audio menu contains four sub-menus that provide the video and audio
settings for the camera.
  • Page 1 1
  • Page 2 2
  • Page 3 3
  • Page 4 4
  • Page 5 5
  • Page 6 6
  • Page 7 7
  • Page 8 8
  • Page 9 9
  • Page 10 10
  • Page 11 11
  • Page 12 12
  • Page 13 13
  • Page 14 14
  • Page 15 15
  • Page 16 16
  • Page 17 17
  • Page 18 18
  • Page 19 19
  • Page 20 20
  • Page 21 21
  • Page 22 22
  • Page 23 23
  • Page 24 24
  • Page 25 25
  • Page 26 26
  • Page 27 27
  • Page 28 28
  • Page 29 29
  • Page 30 30
  • Page 31 31
  • Page 32 32
  • Page 33 33
  • Page 34 34
  • Page 35 35
  • Page 36 36
  • Page 37 37
  • Page 38 38
  • Page 39 39
  • Page 40 40
  • Page 41 41

Trendnet RB-TV-IP262PI User manual

Category
Security cameras
Type
User manual

Ask a question and I''ll find the answer in the document

Finding information in a document is now easier with AI